Special effects production case
Case overview
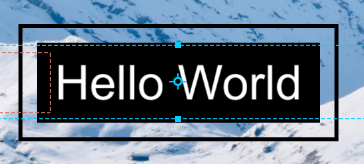
We will make a caption with a border and stretchable elements at the same time, so that you can achieve some complex caption effects. First, let’s take a look at the following examples of effects


Creative ideas
1. The whole effect has an overall border of the text, which is used to specify the maximum width and height of the text that can be written
2. The black background and lines will be stretched according to the actual input text, so as to be always included around the real text
3. Animation effects will be added to the beginning and end of this effect text
4. We have provided the corresponding production materials in the tutorial folder
Production flow
Step 1: Start the software
| Flow Description |
|
| A |
First start the software and enter the caption production module |
| B |
First replace a background image for better viewing
|

Step 2: Set the attributes of the text itself
| Flow Description |
|
| A |
Set the attributes of the subtitle itself, the specific parameters are as follows
|
第三步:设定文字本身的入出动画
Here we must first emphasize a concept. For a production tool, the caption is a track with a fixed length, but in the actual use of the caption, the user can drag the length of the caption by himself, so we have introduced the [in stop out] The concept enters the caption, as shown in the figure below

In the tool, we switched the animation of the text track into three parts: in animation, out animation and stop position
1. In the design, the designer can still set a complete animation of a text from appearing to disappearing
2. You can set the stop position of the text by dragging the red slider
3. Before the stop position, it will be used as an in-animation interval, and after the stop position is an out-of-animation interval
4. When the user uses a caption, regardless of the length of the drag, it will first show all the text effects in animation interval, and then the stretched part will remain in the stopped position, and finally the out animation interval effect will be performed at the end
| 流程说明 |
|
| A |
First drag the red slider to set the position of the caption to stop at 600ms |
| B |
Set the key frame of the [opacity] value of the caption track, the specific parameters are as follows: key time="0" Value=0 key time="360" Value=0 key time="440" Value=1 key time="600" Value=1 key time="760" Value=1 key time="840" Value=0 key time="1200"Value=0 |
Step 4: Set the black background
Since the black background contains in animation, stop and out animation, it is realized by three tracks respectively
| In animation flow description |
|
| A |
Import a black image from the material library and place it under the text track |
| B |
Set the image as a stretched element, change [Normal] to [Stretched element] on the track, and set the track attribute to [Normal] |
| C |
Click [Settings] to pop up the four sides of the stretched element, first click the middle of the Sudoku, as the four sides have a stretching relationship with the text box, and set the offset values of the four sides to "-32, 32, -20, 20"
|
| D |
Cancel the transformation data of the synchronized caption track, and then click Apply |
| E |
Set the start time of the track to 0 and the length to 600ms |
| F |
Set the zoom key frame value of the track as follows key time="0" value="0.00,0.00" key time="40" value="0.46,0.46" key time="80" value="0.65,0.65" key time="120" value="0.76,0.76" key time="160" value="0.83,0.83" key time="200" value="0.89,0.89" key time="240" value="0.92,0.92" key time="280" value="0.95,0.95" key time="320" value="0.97,0.97" key time="360" value="0.98,0.98" key time="400" value="0.992,0.992" key time="440" value="0.997,0.997" <key time="480" value="1,1"
|


| Stop style flow description |
|
| A |
Continue to drag the black image onto the track |
| B |
Set the track properties to [stop style] |
| C |
Set the track to [stretch element] |
| D |
Click [Settings] to pop up the four sides of the stretched element, first click the middle of the sudoku, as the four sides have a stretching relationship with the text box, and set the offset values of the four sides to "-32, 32, -20, 20"
|

| Out animation flow description |
|
| A |
Import a black image from the material library and place it under the text track |
| B |
The track attribute is [Out animation], the starting position of the track at this time is from the stop to the end of the caption |
| C |
Set the image as a stretched element, change [Normal] to [Stretched Element] on the track, and click [Set] to pop up the four sides of the stretched element. First, click the middle of the sudoku, as the four sides and the text box are pulled together Extend the relationship, and set the offset values of the four sides to "-32, 32, -20, 20" |
| D |
Cancel the transformation data of the synchronized caption track, and then click Apply |
| E |
Set the start time of the track to 0 and the length to 600ms |
| F |
Set the zoom keyframe value of the track as follows key time="720" value="1,1" key time="760" value="0.997,0.997" key time="800" value="0.992,0.992" key time="840" value="0.98,0.98" key time="880" value="0.97,0.97" key time="920" value="0.95,0.95" key time="960" value="0.92,0.92" key time="1000" value="0.89,0.89" key time="1040" value="0.83,0.83" key time="1080" value="0.76,0.76" key time="1120" value="0.65,0.65" key time="1160" value="0.46,0.46" key time="1200" value="0.00,0.00"
|

At this point we have completed the animation of the image and the black background image, and the effect can be seen when playing
Step 5: Set the black frame around
We still use this black solid color image to make the black frame around, and there are still three parts of the concept of in animation, stop style and out animation.
| In animation flow description |
|
| A |
Among them, the in animation has an overall scaling of the frame, so we introduce the concept of group, first create a group |
| B |
Then drag in four black pictures and set the track properties of the pictures to [Normal] |
| C |
Set all four pictures as group 1 |
| D |
Set all four tracks as stretch elements, and set the parameter values of each stretch element separately as follows A. Black picture 1, click [left middle] and set the offset to "-60, -54, 48, -48" B. Black picture 2, click [right middle] and set the offset to "54, 60, 48, -48" C. Black picture 3, click [bottom center] and set the offset to "-54, 54, -42, -48" D. Black picture 4, click [Top Center] and set the offset to "-54, 54, 48, 42" So we see a black frame composed of four pictures
|
| E |
Set the zoom keyframe on the group key time="0" value="1.25,1.25" key time="40" value="1.247,1.247" key time="80" value="1.235,1.235" key time="120" value="1.21,1.21" key time="160" value="1.18,1.18" key time="200" value="1.14,1.14" key time="240" value="1.104,1.104" key time="280" value="1.075,1.075" key time="320" value="1.053,1.053" key time="360" value="1.036,1.036" key time="400" value="1.023,1.023" key time="440" value="1.014,1.014" key time="480" value="1.008,1.008" key time="520" value="1.003,1.003" key time="560" value="1.001,1.001" key time="600" value="1.00,1.00"
|
| F |
Set the opacity keyframe on the group key time="0" value="0" key time="40" value="0.20" key time="80" value="0.40" key time="120" value="0.60" key time="160" value="0.80" key time="200" value="1" When the following parameters are set, we can see that the in animation of the frame is completed
|

| Stop style flow description |
|
| A |
The overall stop style is consistent with the logic of the black bottom plate just now. The specific operations are as follows |
| B |
First drag 4 black pictures into the track |
| C |
Set these four picture track properties to stop style |
| D |
Set four tracks as [stretch elements] |
| E |
Set the stretch value of the four pictures separately
A. Black picture 1, click [left middle] and set the offset to "-60, -54, 48, -48" B. Black picture 2, click [right middle] and set the offset to "54, 60, 48, -48" C. Black picture 3, click [bottom center] and set the offset to "-54, 54, -42, -48" D. Black picture 4, click [Top Center] and set the offset to "-54, 54, 48, 42" Then the stop style is set
|

| Out animation flow description |
|
| A |
The out animation is used to set the disappearing method of the frame. Since the position is to consider each current effect, the related group concept is no longer introduced. The specific flow is as follows |
| B |
First drag 4 black pictures into the track |
| C |
Set these four picture track properties as out animation |
| D |
Set four tracks as [stretch elements] |
| E |
Set the stretch value of the four pictures separately
|
| F |
Separate the zoom and opacity key frames of each picture. Since the parameter values of the four sides are the same, you can set a copy |
| G |
Set zoom keyframe key time="0" value="1" key time="40" value="1.001" key time="80" value="1.003" key time="120" value="1.008" key time="160" value="1.014" key time="200" value="1.023" key time="240" value="1.036" key time="280" value="1.053" key time="320" value="1.075" key time="360" value="1.104" key time="400" value="1.14" key time="440" value="1.18" key time="480" value="1.21" key time="520" value="1.235" key time="560" value="1.247" key time="600" value="1.25" |
| H |
Set opacity keyframe key time="0" value="1" key time="440" value="0.80" key time="480" value="0.60" key time="520" value="0.40" key time="560" value="0.20" key time="600" value="0"
After setting the out animation, the whole effect is complete, you can click play to view the effect |
Step 6: Export the material package
Click the Generate Special Effect button in the upper right corner to generate special effects, please note the following
1. Export ID number settings
2. Set the Chinese and English name of the caption package
3. If the material package is upgraded under the same ID, please update the version number
4. Click Export to complete
