文章目录
本次结课大作业5个题目,最后一道题为选做题。老师给的原项目非常复杂,得仔细研究,在这之前还得了解C++的语法,特别是标准库的一些功能,函数等,可参考我写的一点内容(C++模板、命名空间):
模板.
命名空间.
另外,好好阅读文档“final_project作业题2020.docx”,还有课件PPT“计算机图形学8-2020-第二学期”,有对本项目的简单介绍。
配置环境我也有博客介绍:环境配置.
提示信息
a.函数1、2、4、5
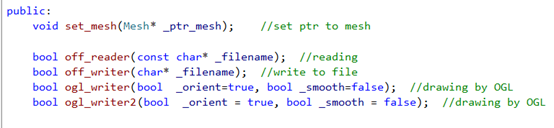
其中1. 2. 4. 5的函数声明在 mesh/extension/ExKernelT.h(截图如下)
函数实现请在mesh/extension/ExkernelT.cpp中完成 (务必)

b.函数3
b. 其中3的函数声明在read_write/read_write.h
函数实现请在read_write/read_write.cpp中完成 (务必)
c.注意代码复用
请把整个代码看明白,里面实现了各种基本操作,例如求三角网格中每个三角形的重心、求每个三角面片的法向等等。
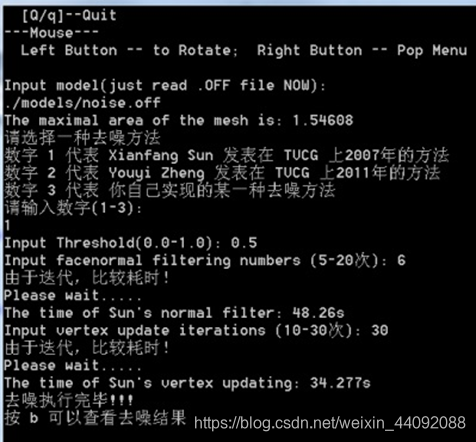
d.程序运行截图
如下:
e.操作界面
鼠标点击右键,会出现一个操作界面,里面有一些灯光和其他绘制效果。

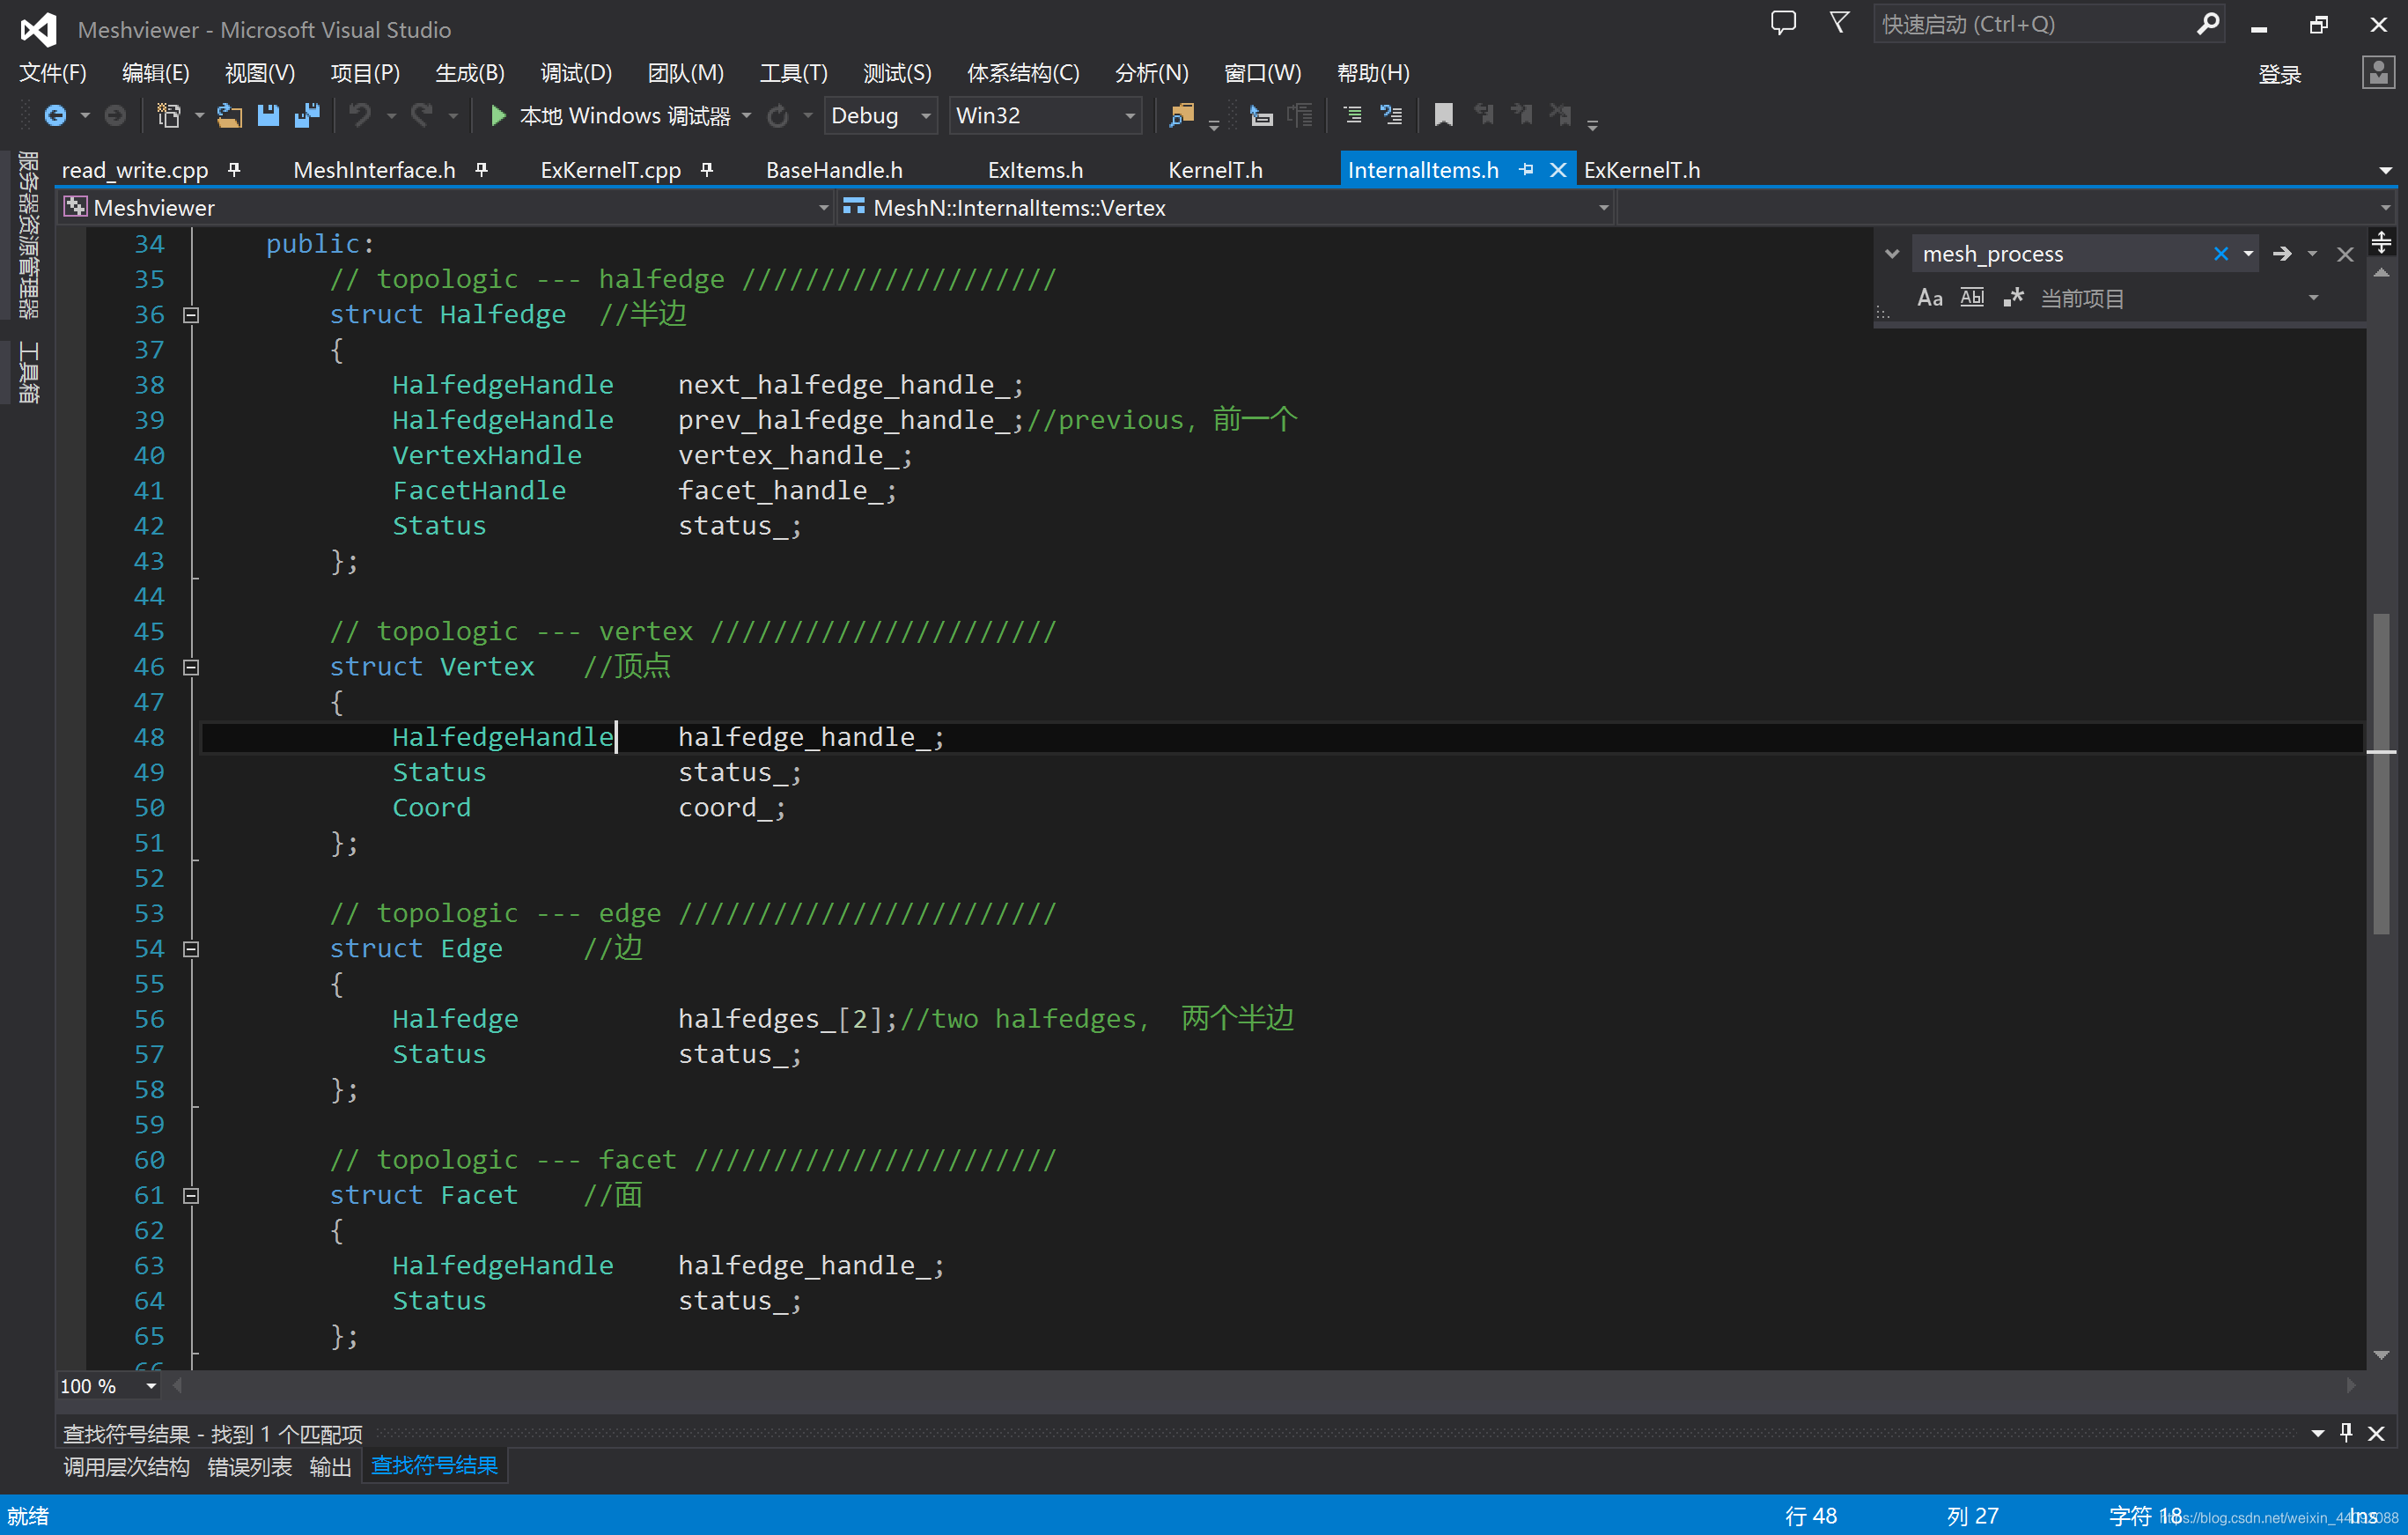
半边数据结构
定义如下:
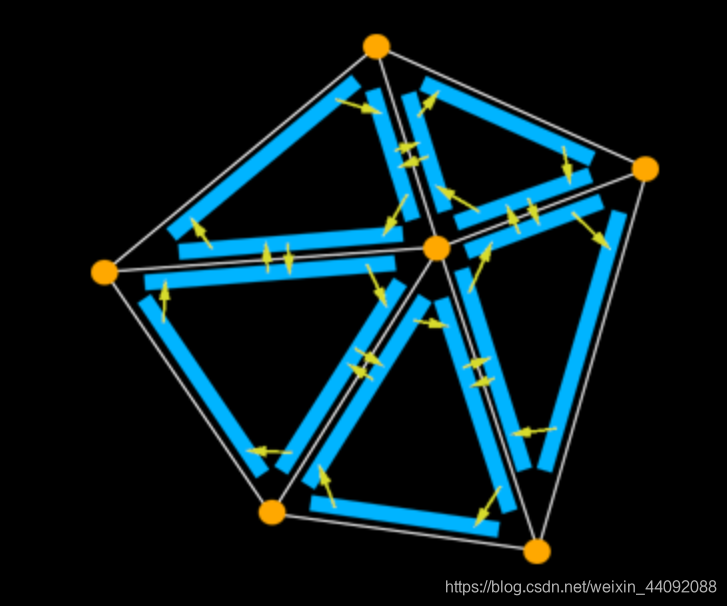
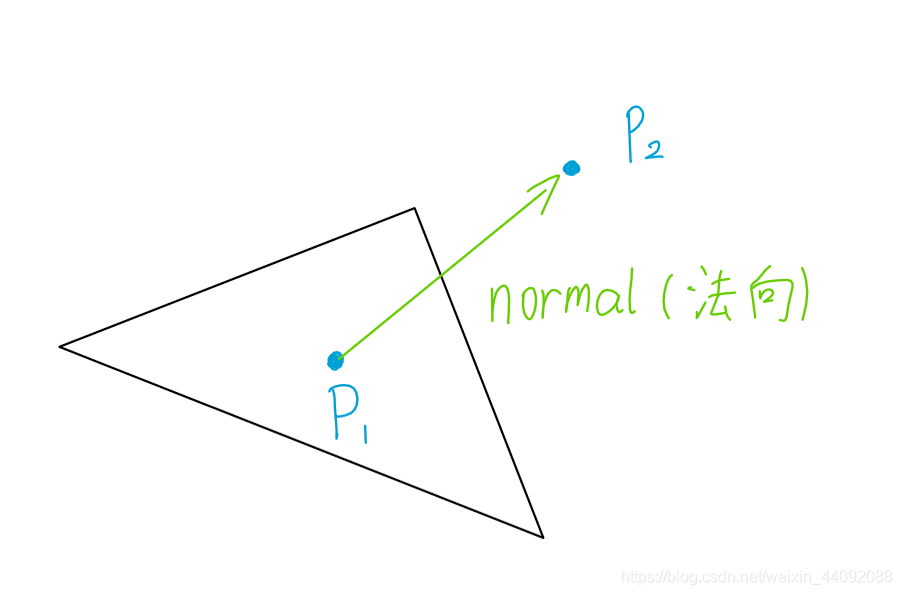
简单来说,半边有方向,一条边由两个半边组成,一个面片唯一对应三个半边,如下图:
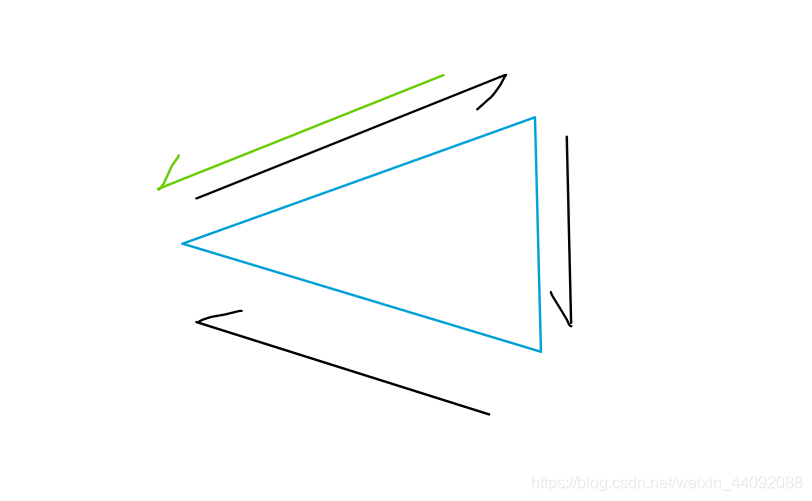
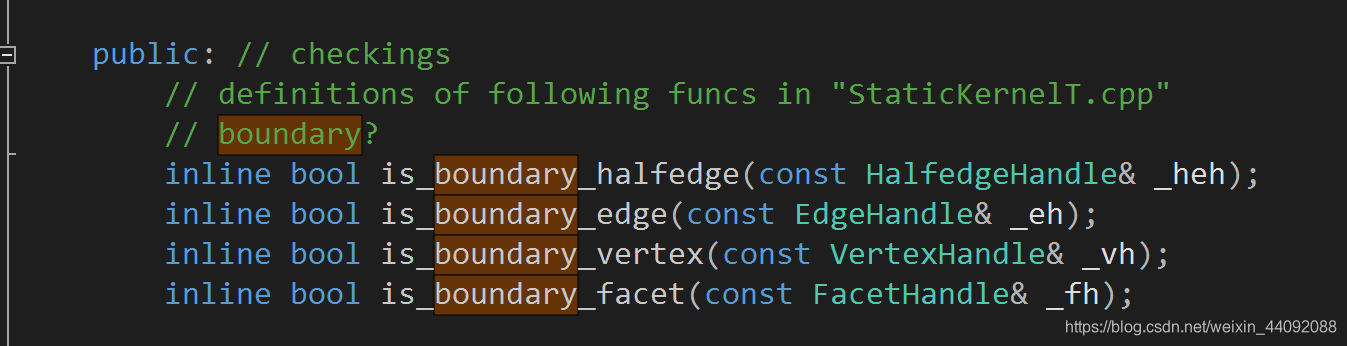
黑色的三个半边仅属于蓝色的面片,而绿色的半边不属于。如果一条半边不属于任何面片,那么该半边称作边界半边,并配有相关函数(KernelT.h):
半边之间可以相互转换,半边①可以使用函数prev_halfedge_handle(),得到半边③;还可以使用函数next_halfedge_handle(),得到半边②;或者使用函数opposite_halfedge_handle()得到半边④;(如下图)
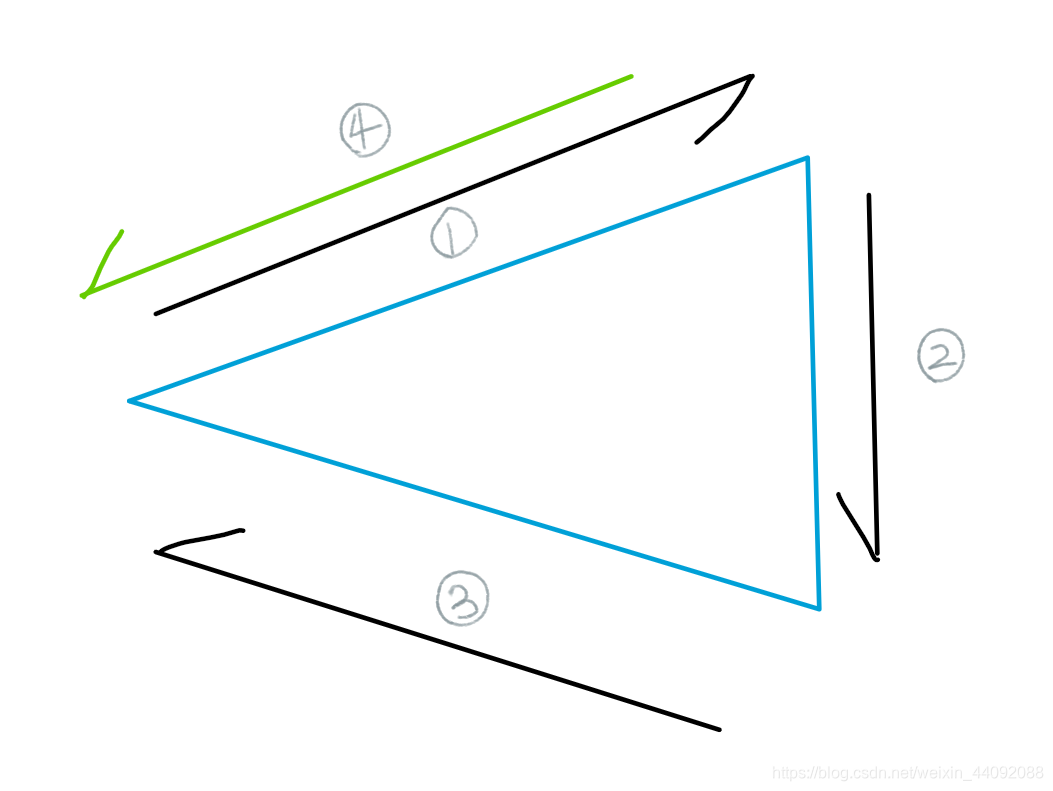
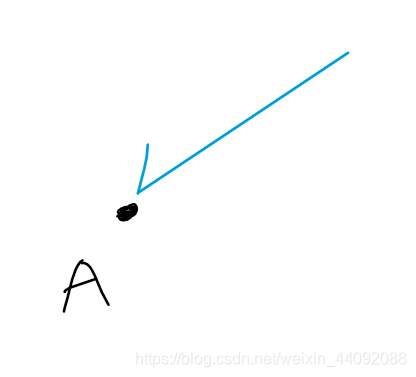
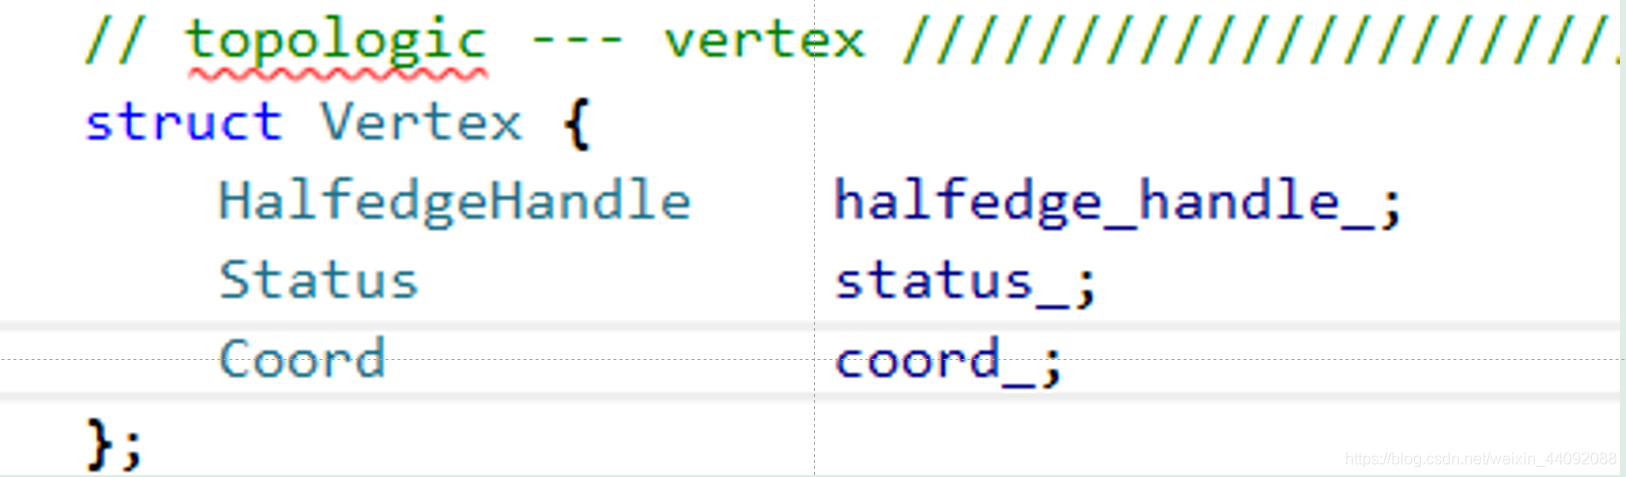
顶点可以通过函数halfedge_handle_,得到一条半边,该半边指向该顶点。
其余的就不一一介绍了。
VS小技巧
查找
本项目过于复杂,经常找不到函数位置,所以“查找”功能使用的比较多,快捷键为==“Ctrl + F”==,并且我常常使用“在项目中查找”,因为常常会出现在意想不到的文件中。

查看定义
注意代码复用,例如老师已经完成了边长计算函数:
(鼠标拖动选择函数,点击右键,转到“查看定义”;)
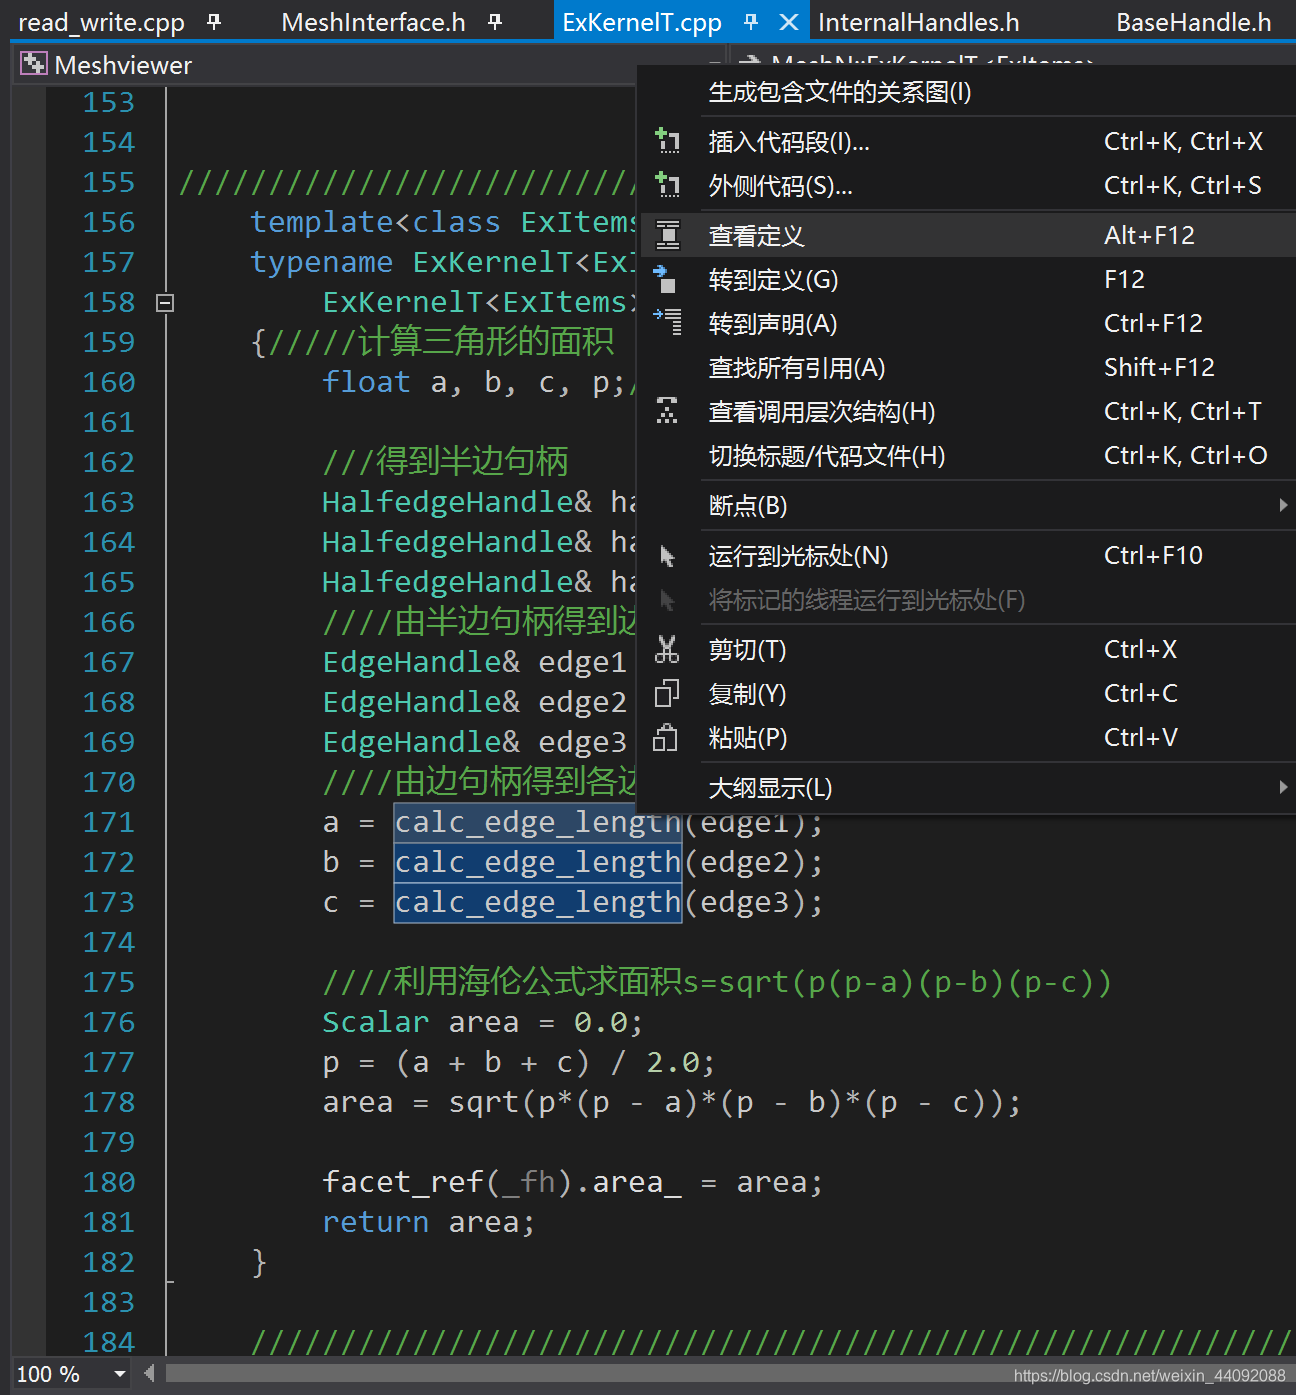
(得到如下小窗口提示:)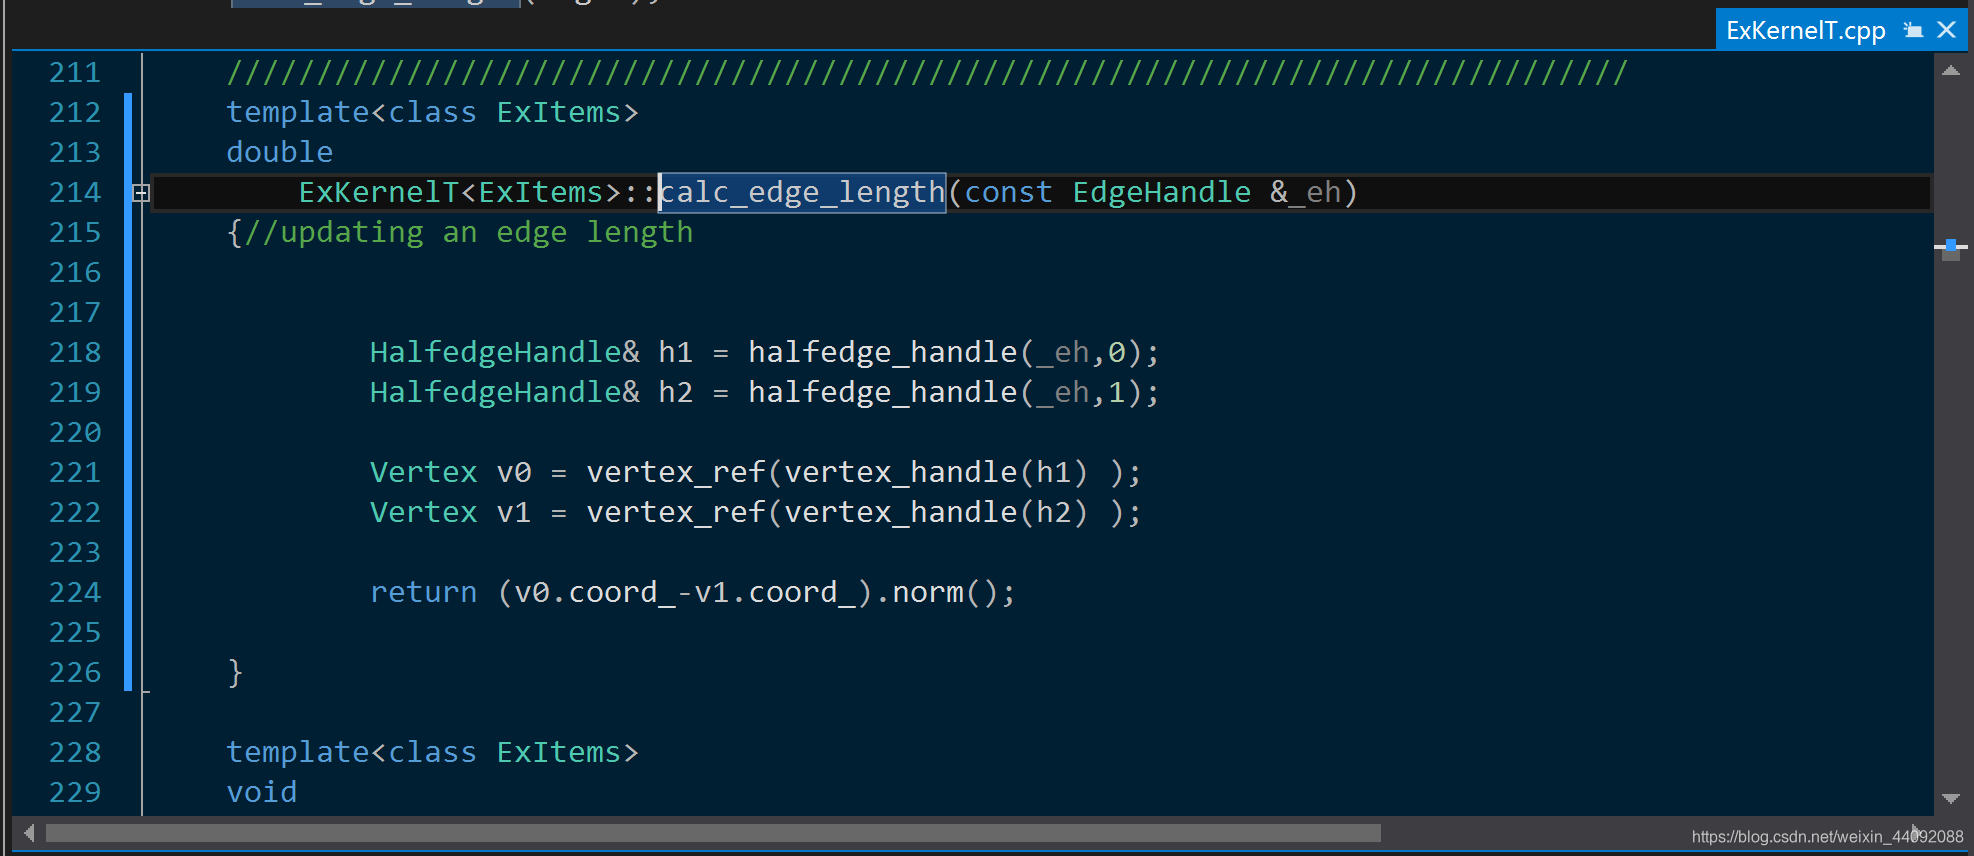
重点关注函数名,输入参数以及返回参数类型。老师写的函数名比较规范,见名知意,用来计算边的长度,需要输入 EdgeHandle 类型的参数,返回的长度是浮点数类型的。以后还有很多的函数、变量等通过“查看定义”的方式弄清楚其含义。
(有可能“查看定义”会找不到什么实质性东西,建议用第一种“查找”来解决)
查找所有引用
鼠标拖动选择函数,点击右键,转到“查找所有引用”:
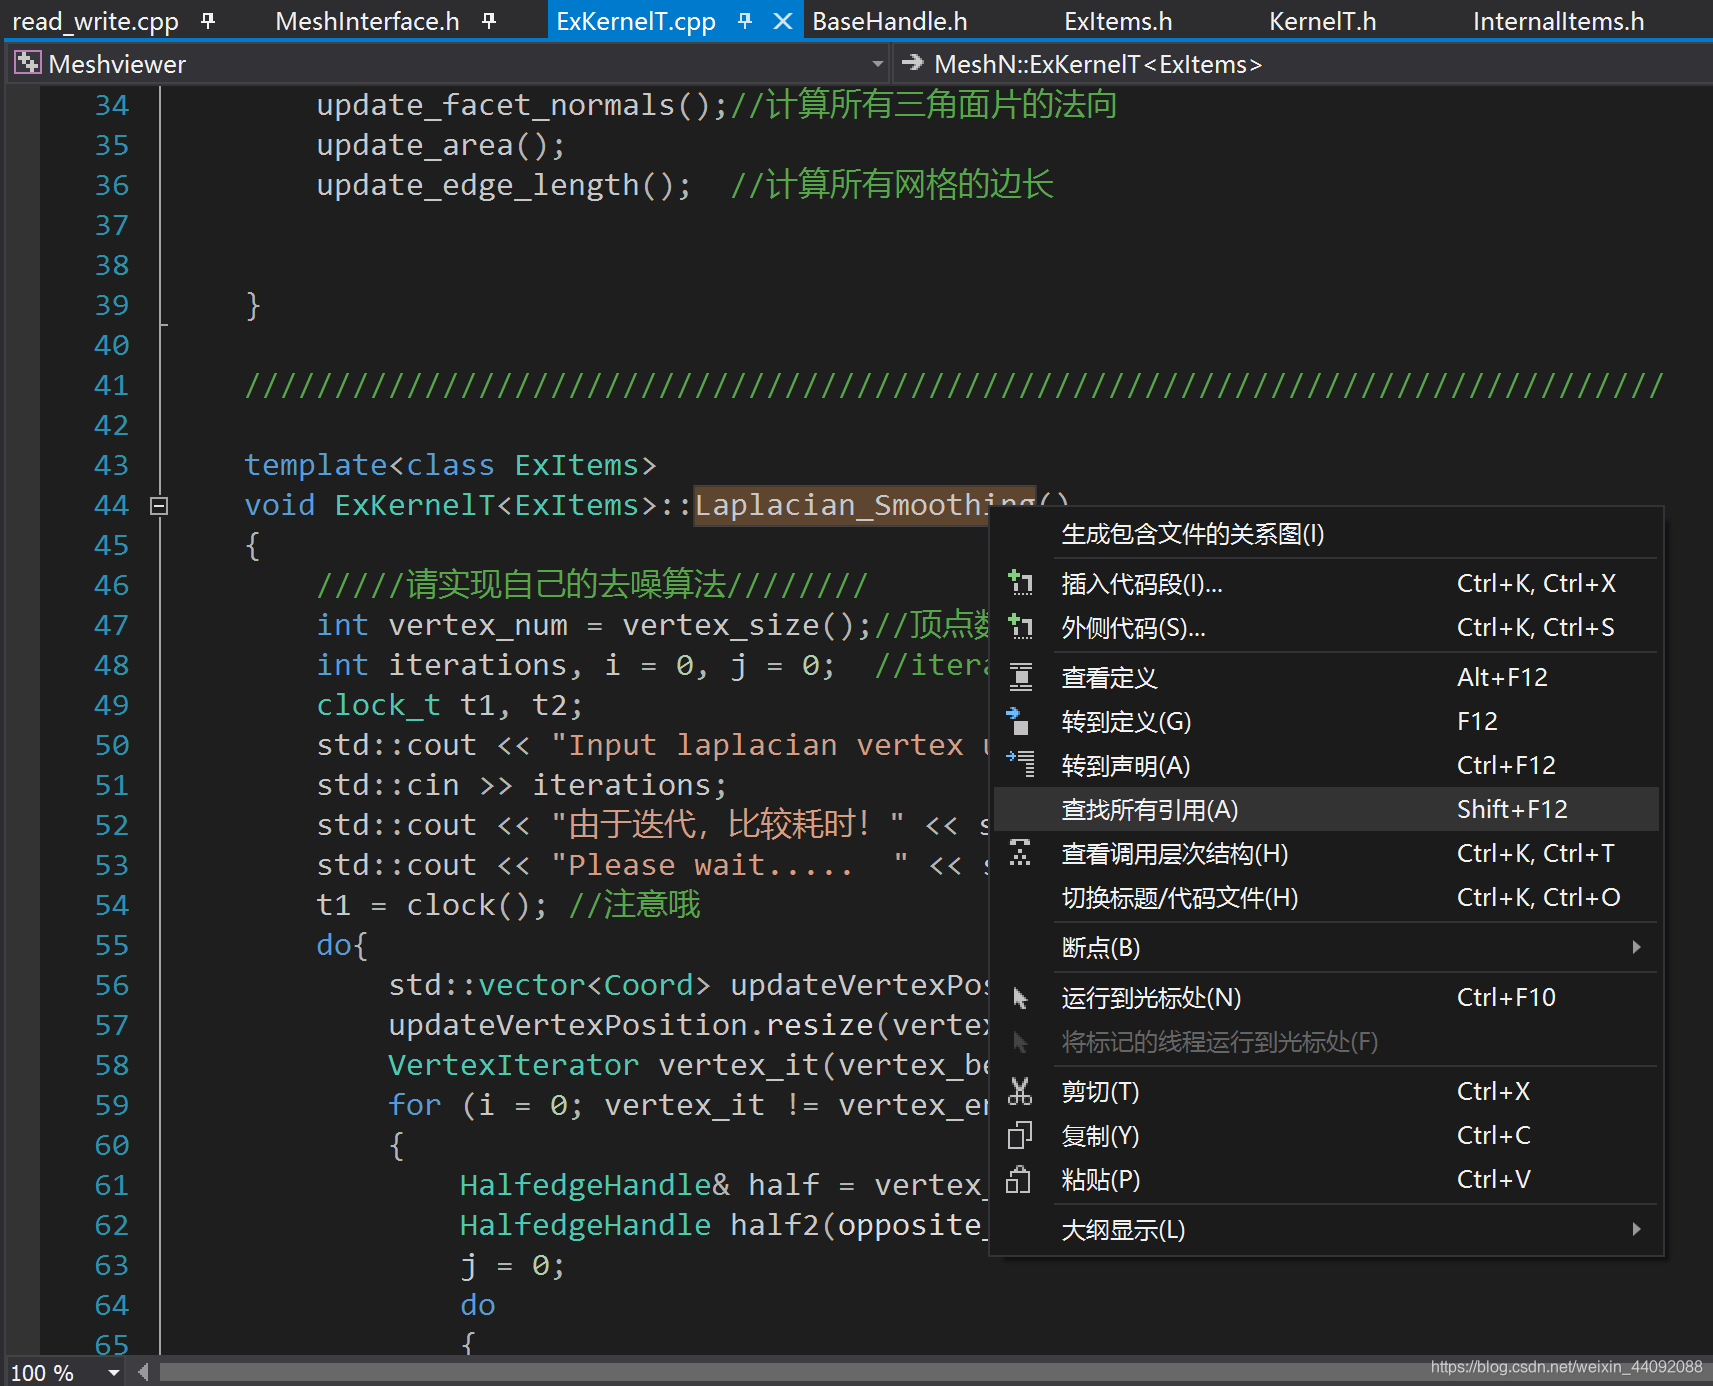
在下方弹出提示信息:
找到项目调用它的地方。
1. 计算三角网格中每个三角形的面积 (10分)
题目说明
此函数已经被声明为:
Scalar calc_facet_area(const FacetHandle& _fh); //给定一个三角面片,计算它的面积
Tips: 可以根据程序输出结果判定是否计算正确,例如,输入模型cow.off,它的所有三角形面片中,面积最大的三角形面片的面积为:The maximal area of the mesh is: 0.0494426
算法思想
想办法计算出三角形三边长,再利用海伦公式。
变量类型转化过程:
FacetHandle -> HalfedgeHandle -> EdgeHandle -> double ;
面片 -> 半边句柄 -> 边句柄 -> 边长
调用了老师已经写好的 calc_edge_length函数。
代码示例
	template<class ExItems>
	typename ExKernelT<ExItems>::Scalar
		ExKernelT<ExItems>::calc_facet_area(const FacetHandle& _fh)
	{
		/计算三角形的面积
		float a, b, c, p;//a, b, c 为三角形三边长

		///得到半边句柄
		HalfedgeHandle& half1 = halfedge_handle(_fh);			//这样使用变量的引用效率高
		HalfedgeHandle& half2 = next_halfedge_handle(half1);
		HalfedgeHandle& half3 = next_halfedge_handle(half2);
		由半边句柄得到边句柄
		EdgeHandle& edge1 = edge_handle(half1);
		EdgeHandle& edge2 = edge_handle(half2);
		EdgeHandle& edge3 = edge_handle(half3);
		由边句柄得到各边长
		a = calc_edge_length(edge1);
		b = calc_edge_length(edge2);
		c = calc_edge_length(edge3);

		利用海伦公式求面积s=sqrt(p(p-a)(p-b)(p-c))
		Scalar area = 0.0;
		p = (a + b + c) / 2.0;
		area = sqrt(p*(p - a)*(p - b)*(p - c));

		facet_ref(_fh).area_ = area;
		return area;
	}
代码末尾的 facet_ref()函数,输入 FacetHandle 类型的参数,返回 Facet (面片) 类型。会发现有许许多多名字里带 Handle的东西,这玩意就像 iterator(迭代器),也可以理解为指针。

(KernelT.h)
有 handlle , 有 iterator,虽然我傻傻分不清。。。
facet_ref(_fh).area_ = area;这一行代码的意思是:将计算好的面积赋值给该面片对象的area_属性;

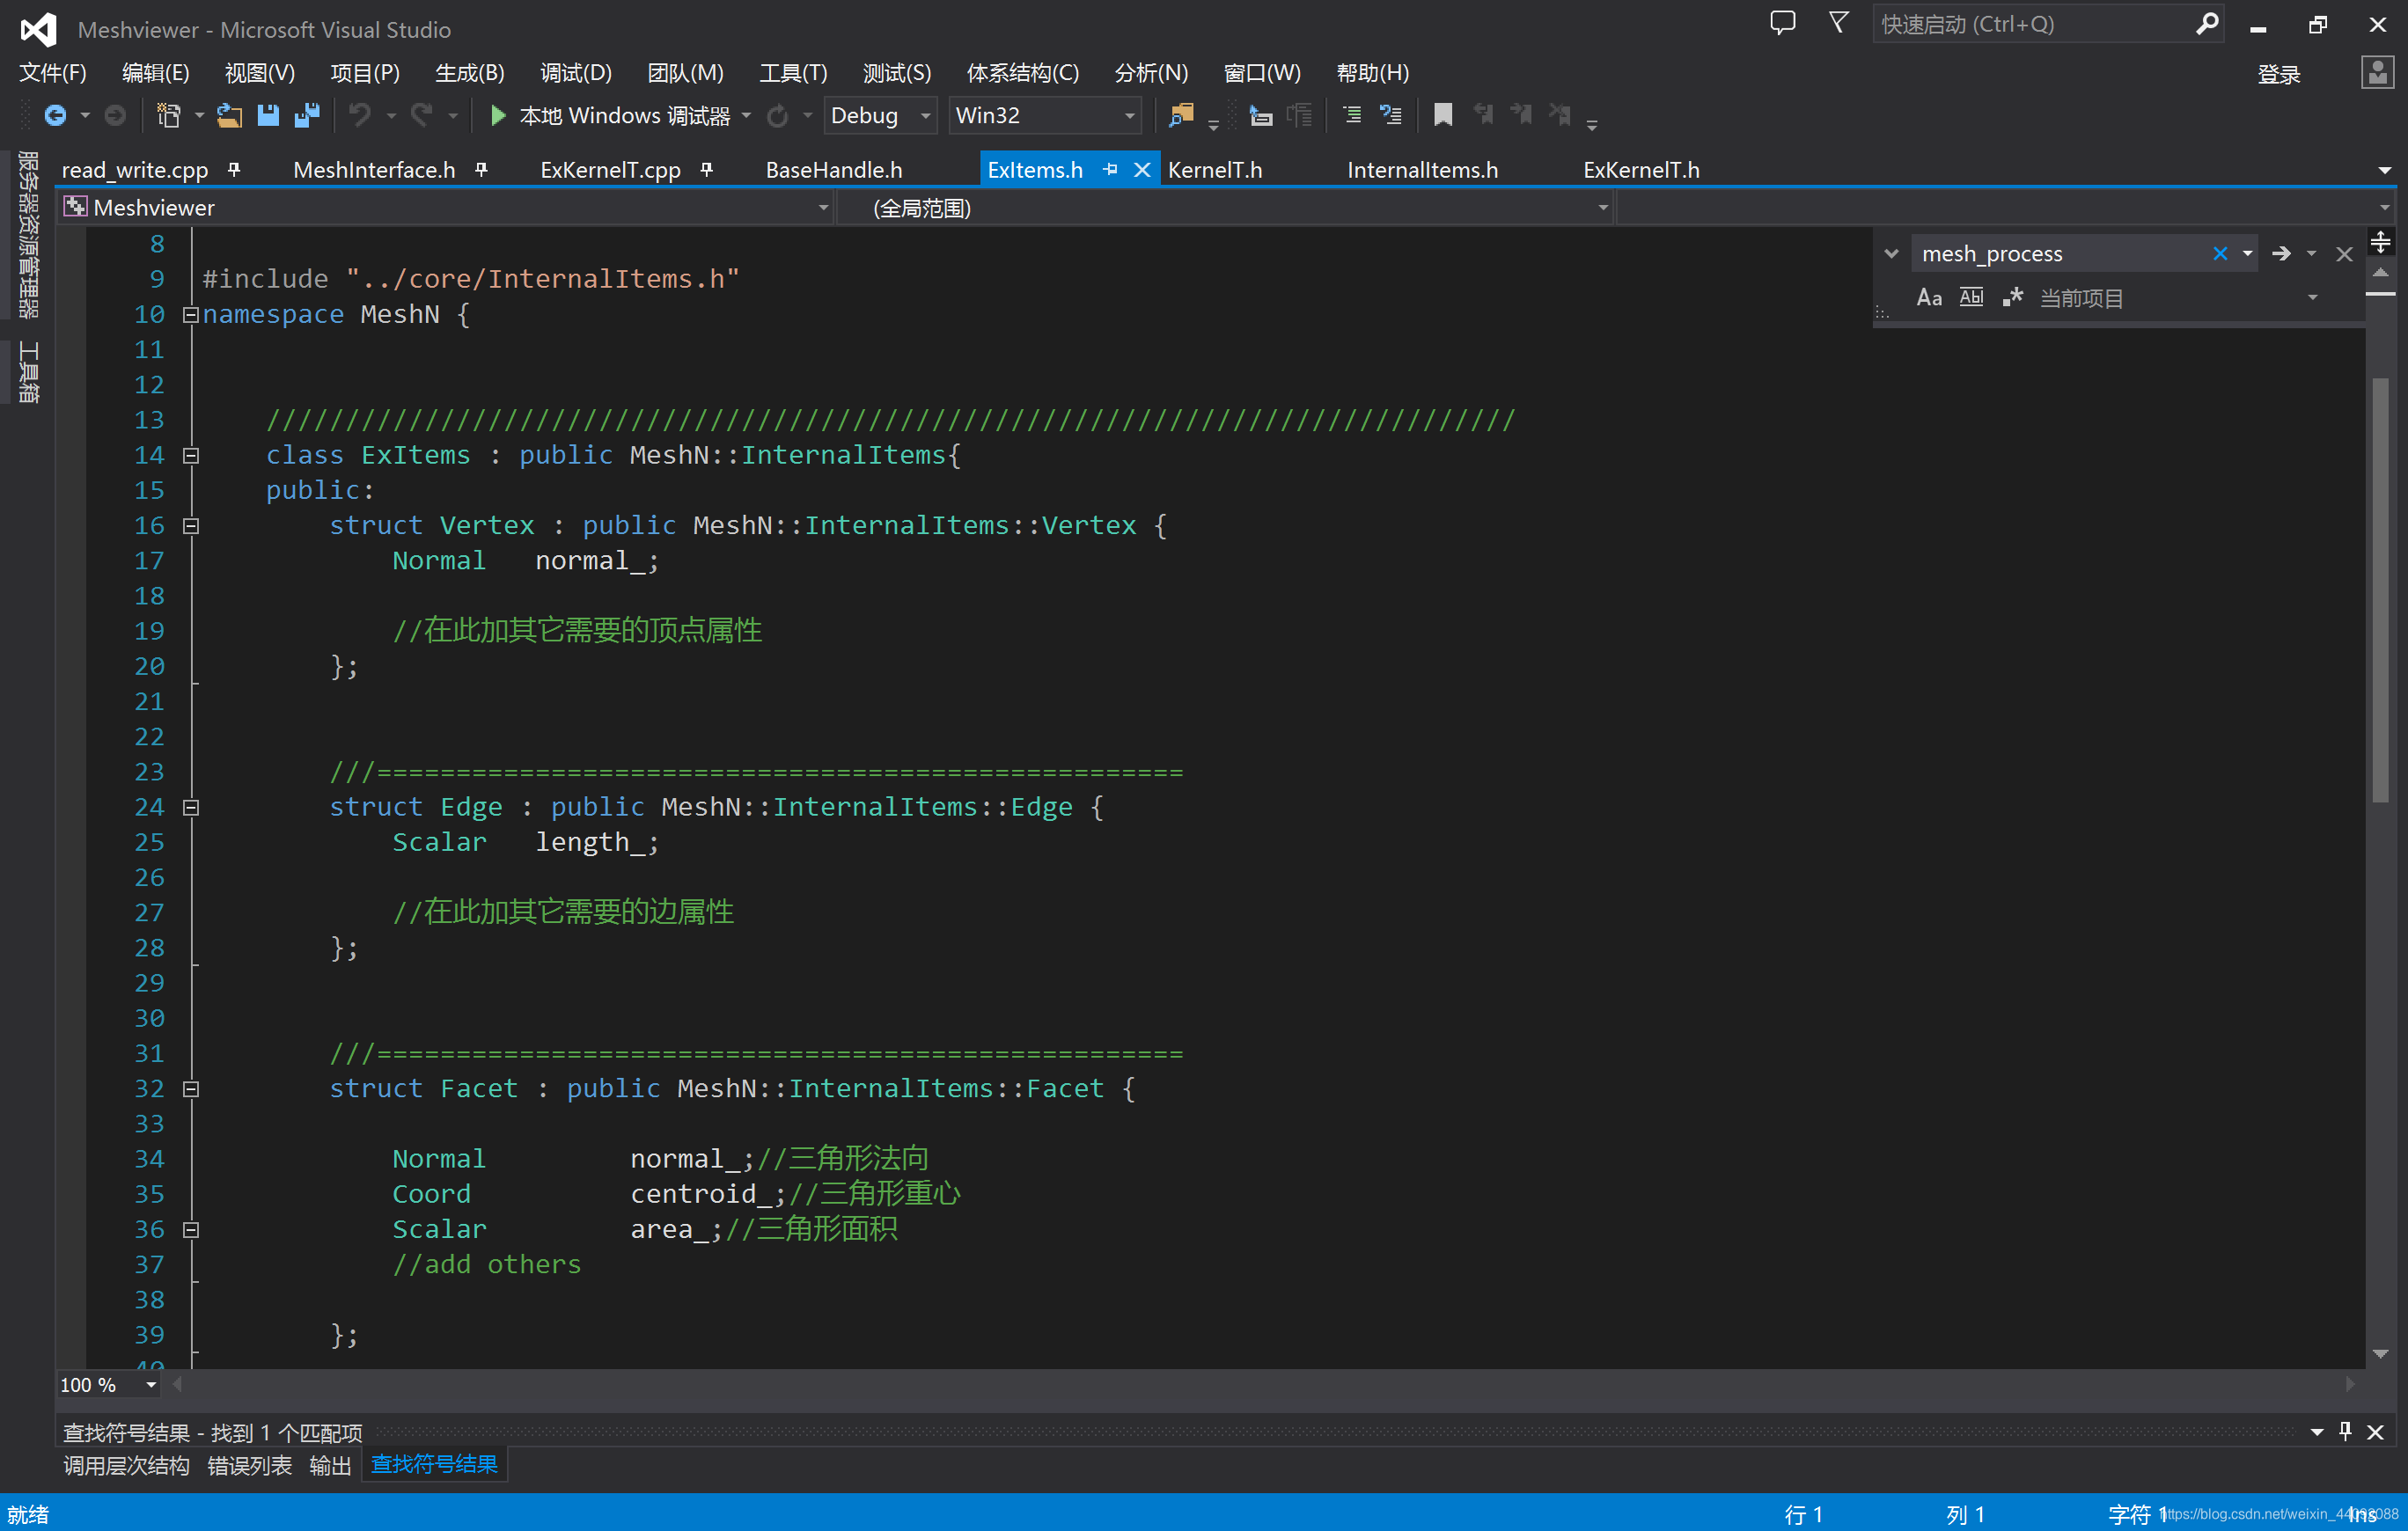
area_定义如下:
注意,不要被函数名前面那一大堆奇奇怪怪的东西吓住了,那些带尖括号的 “<…>” 是模板,相当于我现在要把模板里面设置成什么参数;那些带2个冒号的“::”,是和命名空间有关,就相当于我现在要调用哪片区域里的那些东西。所以函数名就只有短短一小句:calc_facet_area
(不瞒你说,好多小傻瓜第一次看到这块,压根就不知道函数名到底是啥,(~ ̄▽ ̄)~ )
再把那又臭又长的东西拖出来:
template<class ExItems>
typename ExKernelT<ExItems>::Scalar
ExKernelT<ExItems>::calc_facet_area(constFacetHandle& _fh)
返回类型:Scalar
函数名:calc_facet_area
输入类型:FacetHandle
2. 计算三角网格中每个顶点(vertex)的法向 (20分)
题目说明
此函数已经被声明为:
inline Normal calc_normal(const VertexHandle& _vh);///计算顶点的法向值
Tips: 注意法向要归一化。
算法思想
把当前顶点周围面片的法向加起来,求平均,就是当前顶点的法向。
有条件了可以来个加权平均,例如以面片面积为权重(我没有实现。。)
调用函数calc_normal(另一个同名函数)
计算面片法向量,输入面片迭代器FacetHandle,返回法向量Normal
	template <class ExItems>
	typename ExKernelT<ExItems>::Normal
		ExKernelT<ExItems>::calc_normal(const FacetHandle& _fh) {
			assert( _fh.is_valid() );
			assert( _fh.idx() < facet_size() );

			const HalfedgeHandle&   hh = halfedge_handle(_fh);
			const HalfedgeHandle& p_hh = prev_halfedge_handle(hh);
			const HalfedgeHandle& n_hh = next_halfedge_handle(hh);

			const Coord& cd0 = coord( vertex_handle( hh) );
			const Coord& cd1 = coord( vertex_handle(p_hh) );
			const Coord& cd2 = coord( vertex_handle(n_hh) );

			//return ((cd1-cd0)%(cd2-cd1)).normalize();
			return ((cd2-cd1)%(cd1-cd0)).normalize();//两个向量叉乘并且单位化 be careful
	}
代码示例
template <class ExItems>
	typename ExKernelT<ExItems>::Normal
		ExKernelT<ExItems>::calc_normal(const VertexHandle& _vh) {更新一个顶点的法向
			assert( _vh.is_valid());
			assert( _vh.idx() < vertex_size() );

			Normal          norm(1,1,1);///用norm存储求得的法向值

//在此实现
			//最简单最不负责的一种做法啦
			HalfedgeHandle half1, half2, half3;
			FacetHandle face;

			half1 = halfedge_handle(_vh);
			face = facet_handle(half1);

			norm = norm + calc_normal(face);
			half2 = next_halfedge_handle(half1); //1.
			half2 = opposite_halfedge_handle(half2); //1.//
			while (half2 != half1)
			{
				face = facet_handle(half2);
				norm = norm + calc_normal(face);//把每个面的法向加起来
				half2 = next_halfedge_handle(half2);
				half2 = opposite_halfedge_handle(half2); //1.//
			}
3. 用OpenGL把三角网格中每个三角形面片的法向画出来(在每个三角面片的重心处画) (20分)
题目说明
此函数已经被声明为:bool ogl_writer2(bool _orient = true, bool _smooth = false);
Tips: 可以参照函数bool ogl_writer(bool _orient = true, bool _smooth = false)的来实现,这时只需要在每个三角形面片中画出法向即可(法向用Line表示,也可以在绘制出的直线上加上箭头(代表方向)。按键盘上”m”可以查看画出面片法向后的结果。)
算法思想
遍历每一块三角面片,画出重心,画出由重心加上法向量到达的点,使用glBegin(GL_LINES);,自动连成线,法向量显示完成;
注意,这里只是单纯画出来了法向量,记得加上ogl_writer()把本体也画出来,要不然你就会得到一堆针漂浮在半空中。另外,画出的法向量长度可以自行调整,要看着舒服,可通过除以一个整数来解决。
调用函数:calc_centroid()
输入面片迭代器类型FacetHandle,输出Coord(坐标)类型;
	template<class ExItems>
	typename ExKernelT<ExItems>::Coord
		ExKernelT<ExItems>::calc_centroid(const FacetHandle& _fh)//求重心
	{

		HalfedgeHandle& hh = halfedge_handle(_fh);
		HalfedgeHandle& n_hh = next_halfedge_handle(hh);
		HalfedgeHandle& pre_hh = prev_halfedge_handle(hh);

		VertexHandle& vh = vertex_handle(hh);
		VertexHandle& n_vh = vertex_handle(n_hh);
		VertexHandle& pre_vh = vertex_handle(pre_hh);

		return Coord(coord(vh) + coord(n_vh) + coord(pre_vh)) / 3.0;
	}
代码示例
	template <class Mesh>
	bool ReaderWriterT<Mesh>::ogl_writer2(bool _orient, bool _smooth)//画出法向量
	{
		//在里面把三角面片法向画出
		HalfedgeHandle       half;
		Mesh::FacetIterator  face_it(mesh_->facet_begin());//初始面片,既然是 "iterator" 那我就把它当作一个指针呗
		bool orient;
		FacetHandle face;
		float blue[] = { 0, 0, 1.0, 0.8 };

		reader.ogl_writer(0, 1);   //这里加了一个,就把原本的画出来啦

		glShadeModel(GL_SMOOTH);
		orient = true;
		mesh_->update_normals();

		for (; face_it != mesh_->facet_end(); face_it++)//遍历所有的面
		{
			if ((*face_it).status_.is_deleted())	//跳过已经被删除的
			{
				continue;
			}
			half = face_it->halfedge_handle_;	//当前半边
			face = mesh_->facet_handle(half); //所在面片
			const VertexHandle& vertex0 = mesh_->vertex_handle(half);//当前半边顶点

			glMaterialfv(GL_FRONT, GL_AMBIENT, blue);
			glBegin(GL_LINES);	//画直线
			do {
				const VertexHandle& vertex = mesh_->vertex_handle(half);//当前顶点
				half = mesh_->next_halfedge_handle(half);			//下一个半边
				//先画重心,再画法向
				glVertex3fv(mesh_->calc_centroid(face));//重心
				glVertex3fv(mesh_->calc_centroid(face) + mesh_->normal(face) / 2.0); //重心+法向 -> 上端点 (你给我短一点)

			} while (half != face_it->halfedge_handle_);//把当前面片的半边都遍历完
			glEnd();
			glFlush();
		}

		return true;
	}
这里我们走一个捷径,在函数ogl_writer2()上方,老师已经实现了它的兄弟函数ogl_writer(),它是用来画出.off文件存储的3D物体的。先研究研究,再模仿就好了,(我不会告诉你我就只改动了两三行。。。)
	//把这个函数看懂就可以啦,就可以写下边的了
	template <class Mesh>
	bool ReaderWriterT<Mesh>::ogl_writer(bool _orient, bool _smooth) //画出原图形
	{
		HalfedgeHandle       half;
		Mesh::FacetIterator  face_it(mesh_->facet_begin());
		float green[] = { 0, 1.0, 0.0, 0.8 };

		//glShadeModel(GL_FLAT);
		glShadeModel(GL_SMOOTH);
		int orient = true;//orient 朝向
		// (_orient) ? 1 : -1;
		mesh_->update_normals();

		for (; face_it != mesh_->facet_end(); face_it++)
		{
			if ((*face_it).status_.is_deleted())
			{
				continue;
			}
			half = face_it->halfedge_handle_;
			FacetHandle face = mesh_->facet_handle(half);
			const VertexHandle& vertex0 = mesh_->vertex_handle(half);
			glMaterialfv(GL_FRONT, GL_AMBIENT, green);
			glBegin(GL_TRIANGLES);
			do {
				const VertexHandle& vertex = mesh_->vertex_handle(half);

				glNormal3fv(mesh_->normal(face)*orient);
				glVertex3fv(mesh_->coord(vertex));
				half = mesh_->next_halfedge_handle(half);
			} while (half != face_it->halfedge_handle_);
			glEnd();
		}

		return true;
	}
ogl_writer() 算法思想
遍历每一块面片,画出三角面片的每一个点,使用glBegin(GL_TRIANGLES);,自动连接成三角形;
4. 实现一种三角网格去噪算法(30分)
题目说明
(例如Laplacian smoothing (全局或者局部Laplacian Smoothing),全局双边滤波 (bilateral mesh denoising “Shachar Fleishman, Iddo Drori, Daniel Cohen-Or: Bilateral mesh denoising. ACM Trans. Graph. 22(3): 950-953 (2003)” 或者 bilateral normal filtering for mesh denoising “Youyi Zheng, Hongbo Fu, Oscar Kin-Chung Au, Chiew-Lan Tai: Bilateral Normal Filtering for Mesh Denoising. IEEE Trans. Vis. Comput. Graph. 17(10): 1521-1530 (2011)”),引导双边滤波(guided mesh normal filtering, “Wangyu Zhang, Bailin Deng, Juyong Zhang, Sofien Bouaziz, Ligang Liu: Guided Mesh Normal Filtering. Comput. Graph. Forum 34(7): 23-34 (2015)”), L0方法” Lei He, Scott Schaefer: Mesh denoising via L0 minimization. ACM Trans. Graph. 32(4): 64:1-64:8 (2013)”等等)
此函数声明为:
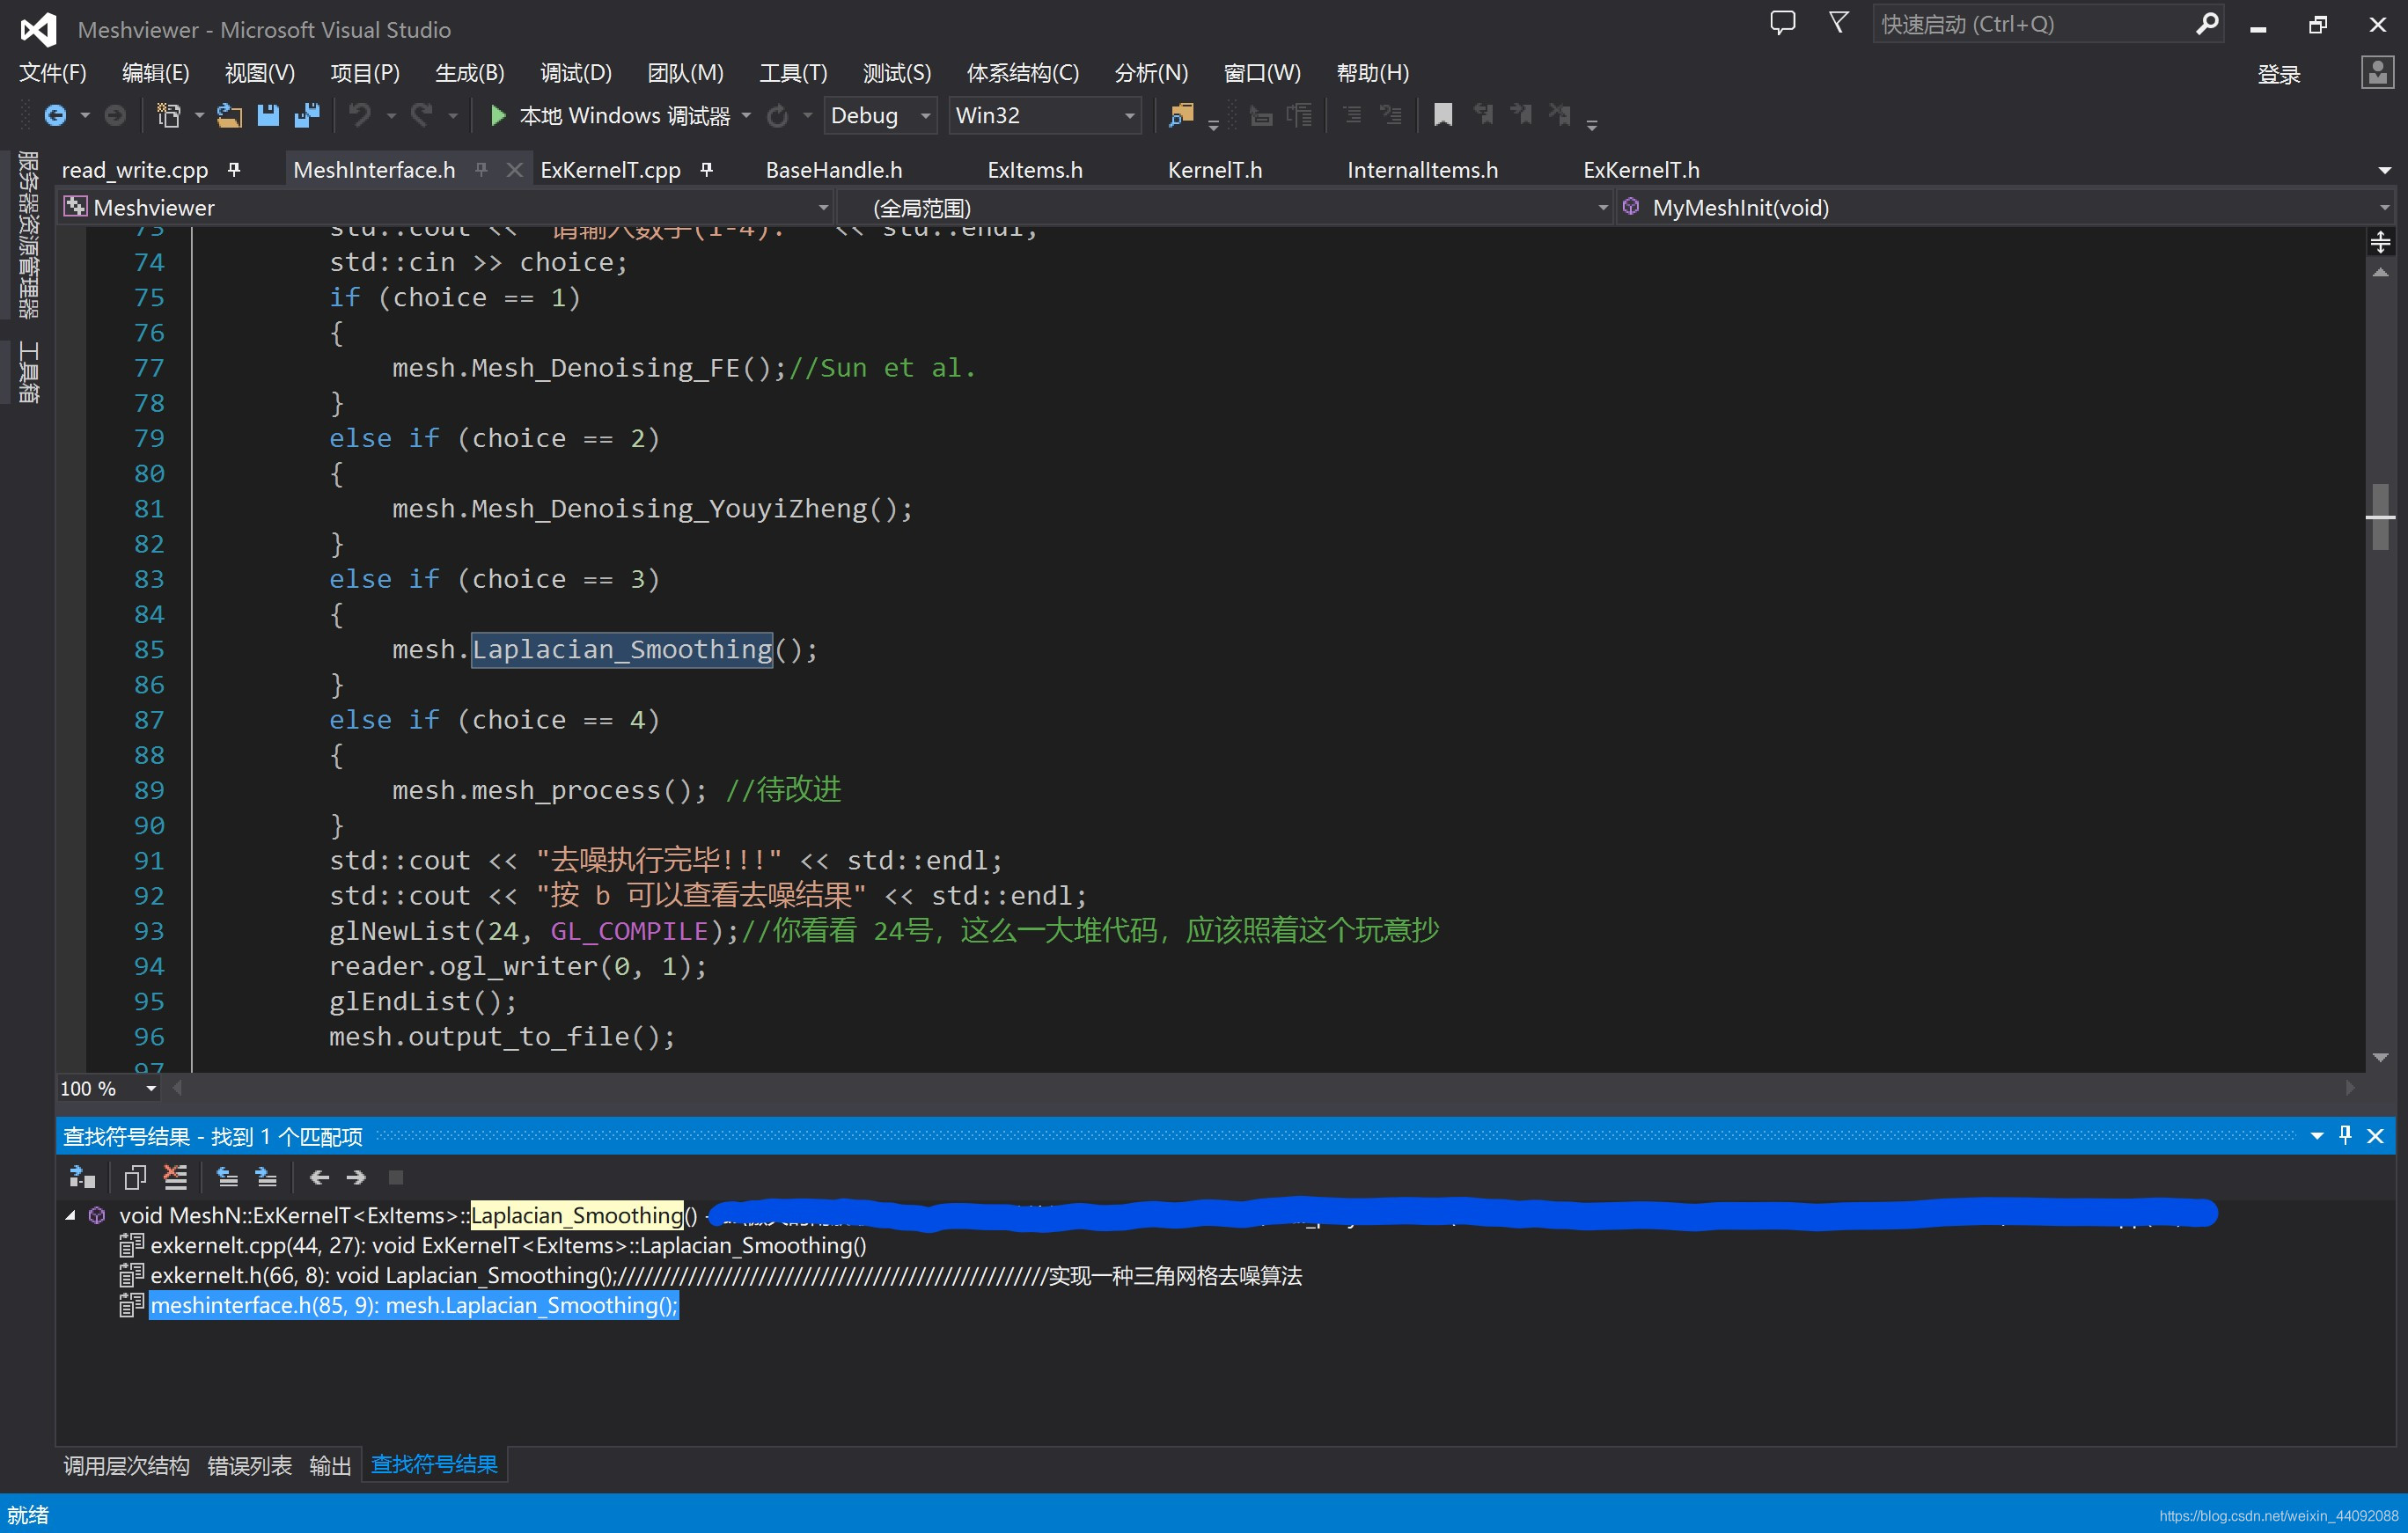
void Laplacian_Smoothing();//实现一种三角网格去噪算法
Tips: 可以参照已经实现的两个去噪算法;按键盘上”b”可以查看去噪结果。
算法思想
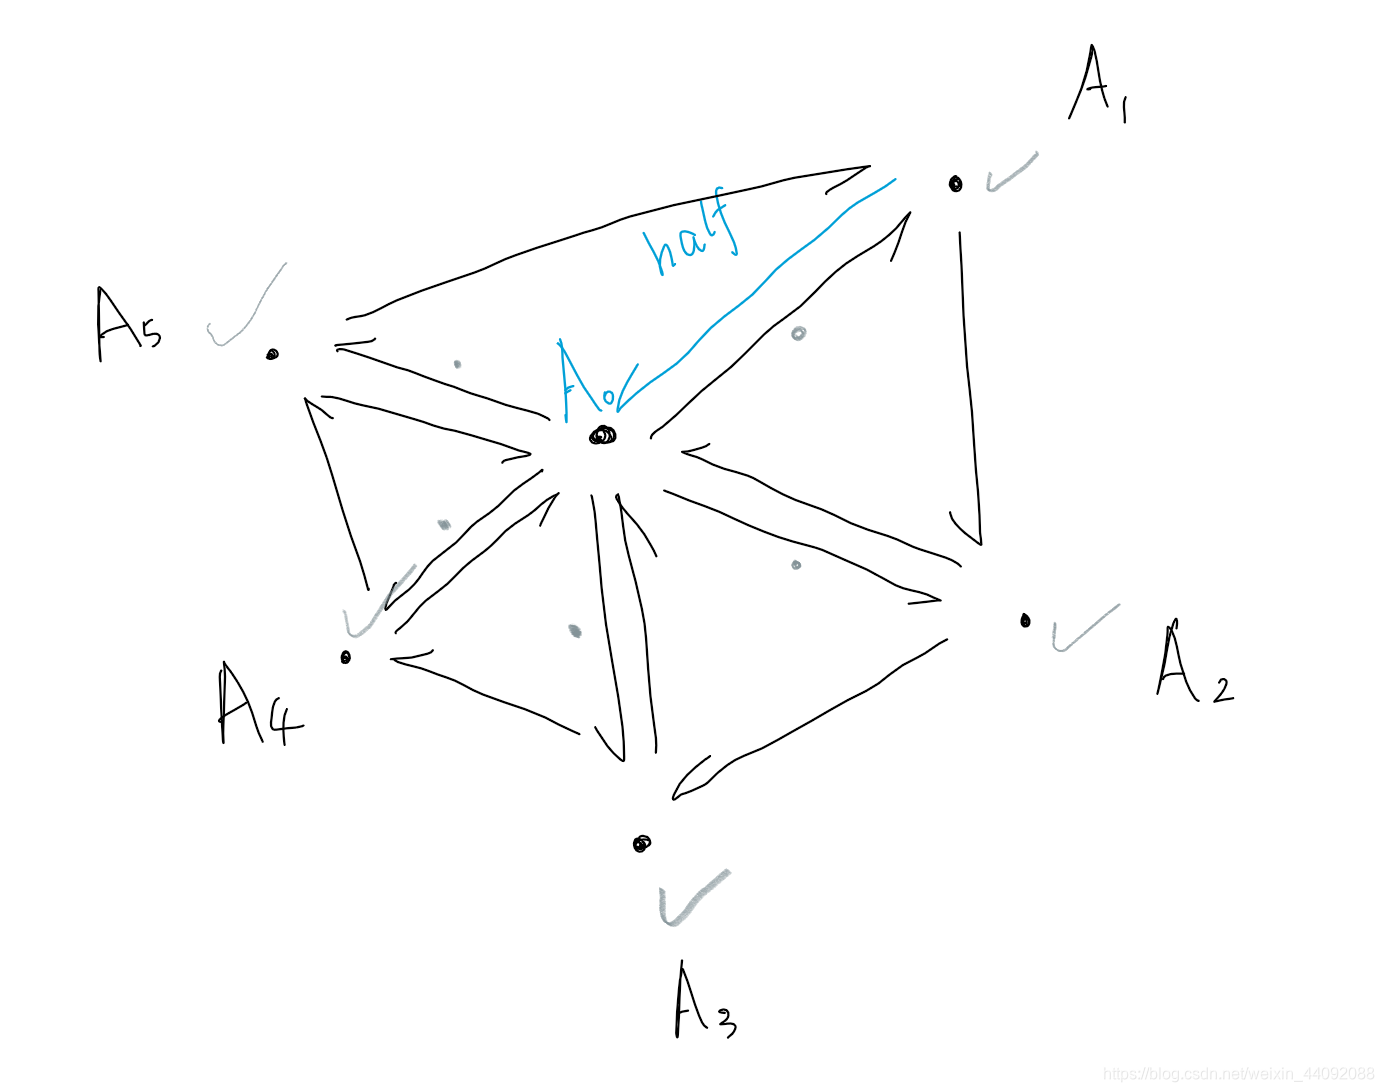
拉普拉斯变换,对于当前顶点来说,把它周围所有顶点的坐标加起来,求平均,再赋值给当前顶点,达到平滑去噪的效果。
了解了解这里遍历当前顶点周围所有顶点的过程:
代码示例
template<class ExItems>
void ExKernelT<ExItems>::Laplacian_Smoothing()
{
/请实现自己的去噪算法
int vertex_num = vertex_size();//顶点数量
int iterations, i = 0, j = 0; //iterations : 迭代次数
clock_t t1, t2;
std::cout << "Input laplacian vertex update iterations(5-30次): ";
std::cin >> iterations;
std::cout << "由于迭代,比较耗时!" << std::endl;
std::cout << "Please wait..... " << std::endl;
t1 = clock(); //注意哦
do{
std::vector<Coord> updateVertexPosition; //向量,存储... ...
updateVertexPosition.resize(vertex_num); //调整大小
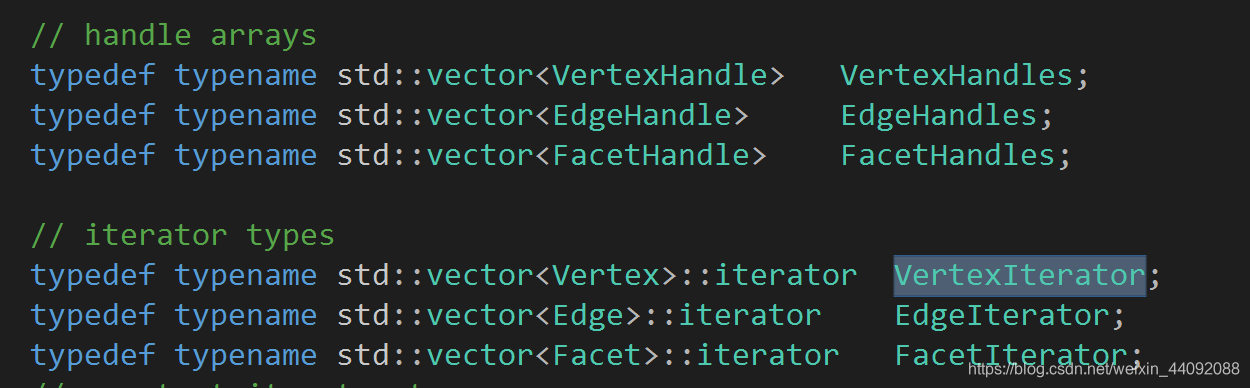
VertexIterator vertex_it(vertex_begin());
for (i = 0; vertex_it != vertex_end(); vertex_it++)
{
HalfedgeHandle& half = vertex_it->halfedge_handle_; //顶点处半边
HalfedgeHandle half2(opposite_halfedge_handle(half));//对面的半边
j = 0;
do
{
updateVertexPosition[i] += coord(vertex_handle(half2)); //获取顶点坐标
j++;
half2 = opposite_halfedge_handle(prev_halfedge_handle(half2));
} while (opposite_halfedge_handle(half2) != half);
updateVertexPosition[i] /= j;//顶点坐标取平均
i++;
}
i = 0;
for ( vertex_it = vertex_begin(); vertex_it != vertex_end(); vertex_it++)
{
vertex_it->coord_ = updateVertexPosition[i]; //用刚求得的平均值代替原来的,可避免毛刺产生
i++;
}
} while (iterations--);
t2 = clock();
std::cout << "The time of laplacian vertex updating: " << (t2 - t1) * 1.0 / CLOCKS_PER_SEC << "s" << std::endl;
}
实现之前可以先看看老师已经完成的其它2种去噪方式。
Mesh_Denoising_FE()
Mesh_Denoising_YouyiZheng()
5. (可选/可做可不做)实现一种基于三角网格的操作(例如,特征点/边提取,给三角网格添加随机高斯噪声,求三角网格每个顶点的高斯曲率,三角网格简化,三角网格四边形化等等) (20分)
题目说明
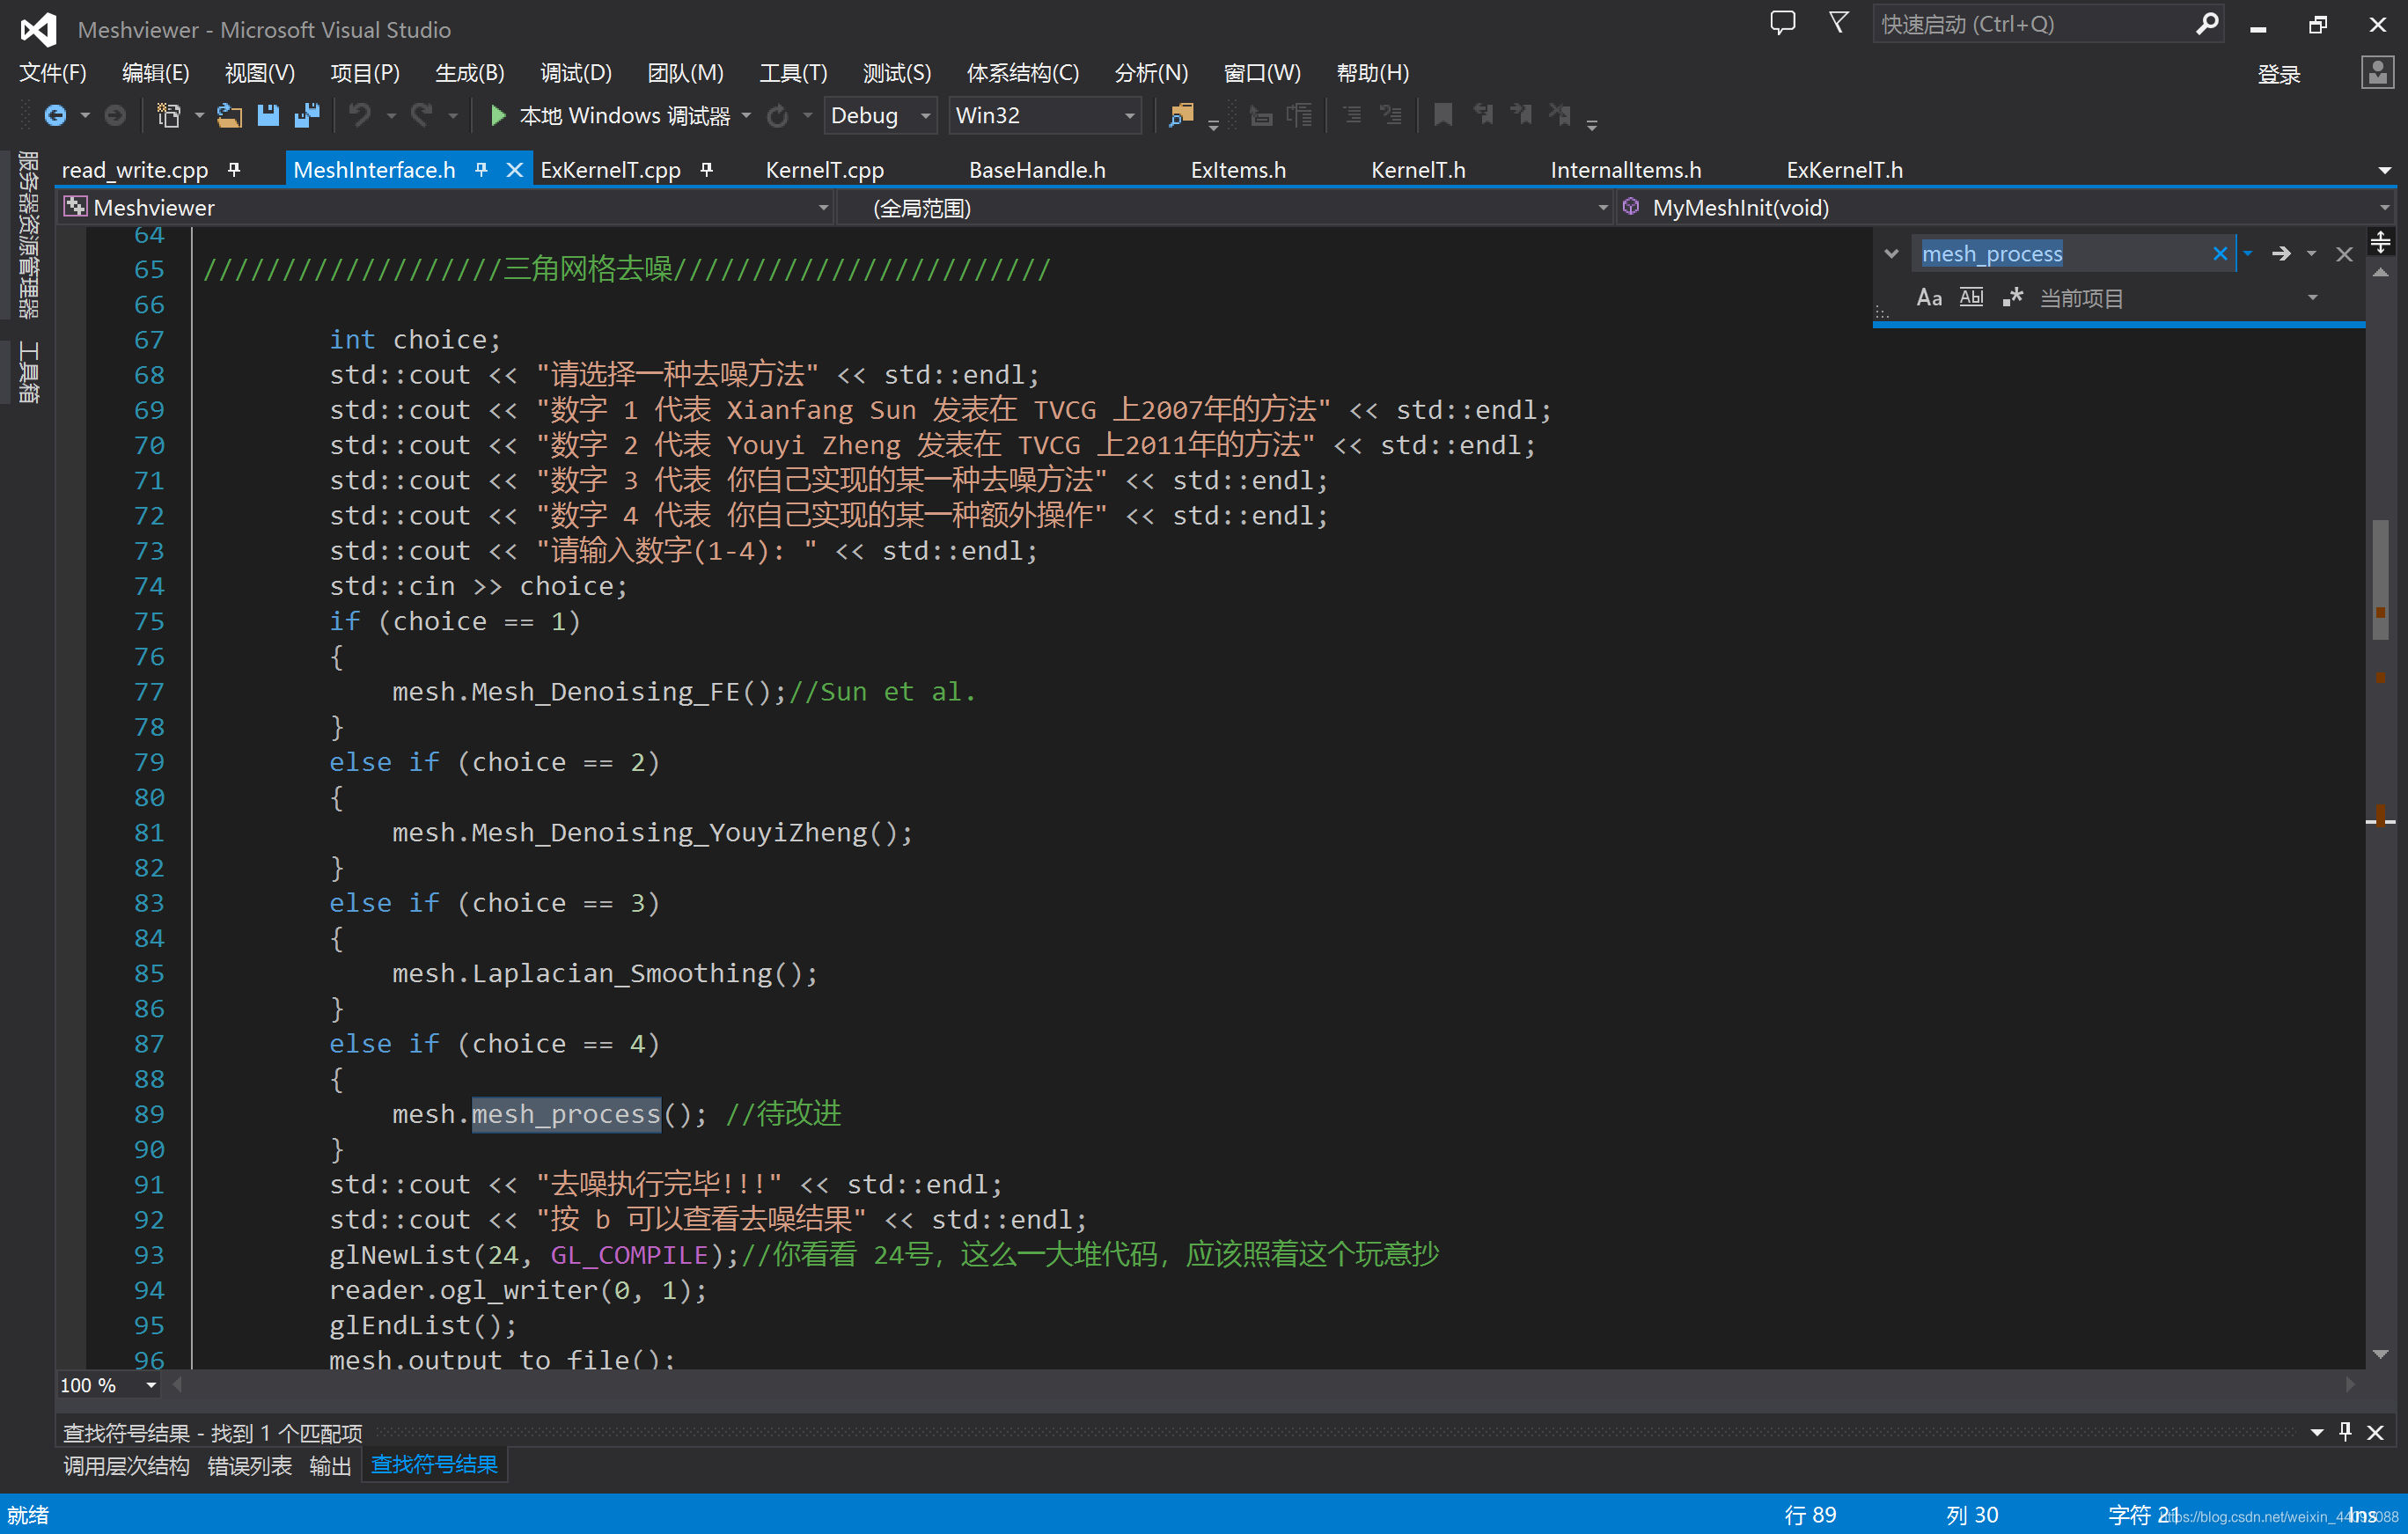
此函数声明为: void mesh_process();
算法思想
我反着来一遍拉普拉斯变换,把周围顶点和当前顶点坐标的差距放大,还是这张熟悉的图:
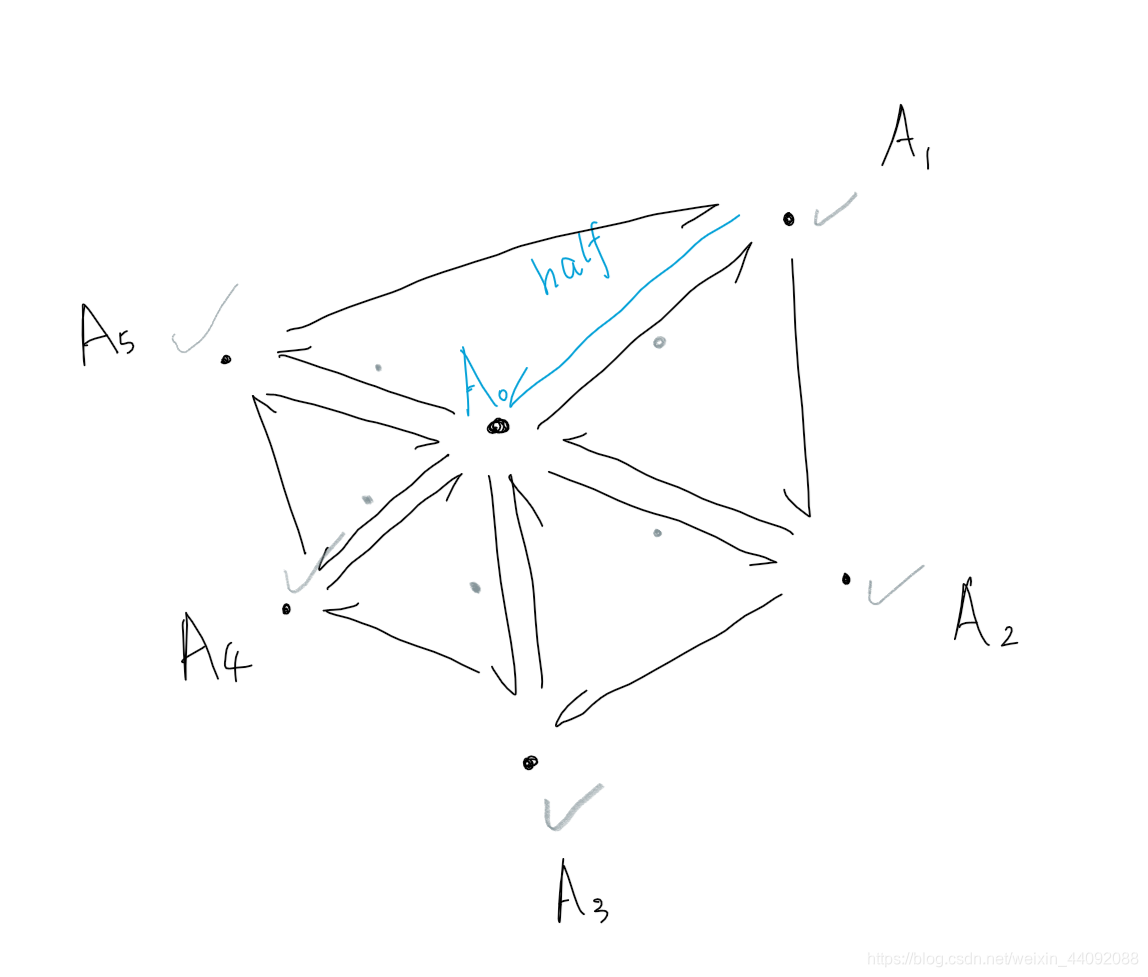
绿颜色的“5”,替换成周围的顶点数“j”,就具有普遍性。
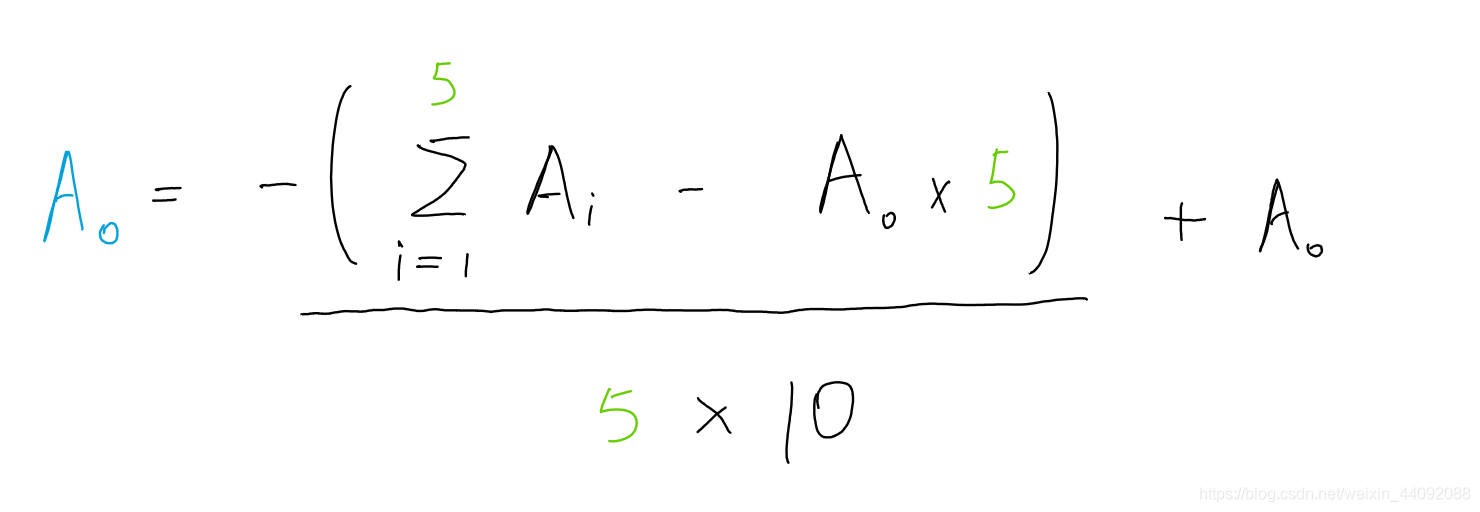
这里除以10的原因是,减小一点噪声,让画面显得更清晰。
代码示例
	template<class ExItems>
	void ExKernelT<ExItems>::mesh_process()
	{
		//放大噪声
		int vertex_num = vertex_size();
		int iterations, i, j;
		clock_t t1, t2;
		std::cout << "Input sharpening vertex update iterations(1-30次): ";
		std::cin >> iterations;
		i = 0;
		std::cout << "由于迭代,比较耗时!" << std::endl;
		std::cout << "Please wait.....  " << std::endl;
		t1 = clock();
		do{
			std::vector<Coord> updateVertexPosition;
			updateVertexPosition.resize(vertex_num);
			VertexIterator vertex_it(vertex_begin());
			for (i = 0; vertex_it != vertex_end(); vertex_it++)
			{
				HalfedgeHandle& half = vertex_it->halfedge_handle_;
				HalfedgeHandle half2(opposite_halfedge_handle(half));
				j = 0;
				do{
					updateVertexPosition[i] +=coord(vertex_handle(half2));//coordinates 坐标
					j++;
					half2 = prev_halfedge_handle(half2);
					half2 = opposite_halfedge_handle(half2);
				} while (opposite_halfedge_handle(half2) != half);
				updateVertexPosition[i] -= coord(vertex_handle(half)) * j;
				updateVertexPosition[i] /= j;
				updateVertexPosition[i] *= -1;
				i++;
			}
			i = 0;
			for ( vertex_it = vertex_begin(); vertex_it != vertex_end(); vertex_it++)
			{
				vertex_it->coord_ += updateVertexPosition[i] * 0.1;
				//小一点,小一点
				i++;
			}
		} while (iterations--);
		t2 = clock();
		std::cout << "The time of sharpening vertex updating: " << (t2 - t1) * 1.0 / CLOCKS_PER_SEC << "s" << std::endl;
	}
项目中没有调用该函数,请自行调用:
在这里设置为 choice == 4就好
如有不足,恳请指正。