首先看一下都有哪些绑定数据的注解:
1.@RequestParam,绑定单个请求数据,可以是URL中的数据,表单提交的数据或上传的文件;
2.@PathVariable,绑定URL模板变量值;
3.@CookieValue,绑定Cookie数据;
4.@RequestHeader,绑定请求头数据;
5.@ModelAttribute,绑定数据到Model;
6.@SessionAttributes,绑定数据到Session;
7.@RequestBody,用来处理Content-Type不是application/x-www-form-urlencoded编码的内容,例如application/json, application/xml等;
8.@RequestPart,绑定“multipart/data”数据,并可以根据数据类型进项对象转换;
在实际应用中我们通常需要获取的是model对象,别担心,我们不需要把数据绑定到一个个变量然后在对model赋值,只需要把model加入相应的action参数(这里不需要指定绑定数据的注解)Spring MVC会自动进行数据转换并绑定到model对象上,一切就是这么简单。测试如下:
添加一个AccountModel类作为测试的model:
package com.ray.models;

/**
 * @author Ray
 * @date 2018/4/18 0018
 */
public class AccountModel {

    private String username;
    private String password;

    public String getUsername() {
        return username;
    }

    public void setUsername(String username) {
        this.username = username;
    }

    public String getPassword() {
        return password;
    }

    public void setPassword(String password) {
        this.password = password;
    }
}
在DataBindController里面添加2个modelAutoBind的action分别对应get和post请求:
/**
 * @author Ray
 * @date 2018/4/18 0018
 * 2个modelAutoBind的action分别对应get和post请求
 */
@Controller
public class DataBindController {

    @RequestMapping(value = "/modelautobind", method = RequestMethod.GET)
    public String modelAutoBind(HttpServletRequest request,Model model){
        model.addAttribute("accountmodel", new AccountModel());
        return "modelautobind";
    }

    @RequestMapping(value = "/modelautobind", method = RequestMethod.POST)
    public String modelAutoBind(HttpServletRequest request, Model model, AccountModel accountModel){
        model.addAttribute("accountmodel",accountModel);
        return "modelautobindresult";
    }
}
在views文件夹中添加modelautobind.jsp和modelautobindresult.jsp 2个视图用于提交数据和展示提交的数据:
modelautobind.jsp:
<%@ page language="java" contentType="text/html; charset=UTF-8"
         pageEncoding="UTF-8" %>
<%@ taglib prefix="form" uri="http://www.springframework.org/tags/form" %>
<%
    String path = request.getContextPath();
    String basePath = request.getScheme() + "://" + request.getServerName() + ":" + request.getServerPort() + path + "/";
%>
<!DOCTYPE HTML PUBLIC "-//W3C//DTD HTML 4.01 Transitional//EN">
<html>
<head>
    <base href="<%=basePath%>">
    <title>标题</title>
    <meta http-equiv="pragma" content="no-cache">
    <meta http-equiv="cache-control" content="no-cache">
    <meta http-equiv="expires" content="0">
    <meta http-equiv="keywords" content="keyword1,keyword2,keyword3">
    <meta http-equiv="description" content="This is my page">
</head>
<body>
    <form:form modelAttribute="accountmodel" method="post">
        用户名:<form:input path="username"/><br>
        密码:<form:password path="password"/><br>
        <input type="submit" value="Submit">
    </form:form>
</body>
</html>
modelautobindresult.jsp :
<%@ page language="java" contentType="text/html; charset=UTF-8"
         pageEncoding="UTF-8" %>
<%
    String path = request.getContextPath();
    String basePath = request.getScheme() + "://" + request.getServerName() + ":" + request.getServerPort() + path + "/";
%>
<!DOCTYPE HTML PUBLIC "-//W3C//DTD HTML 4.01 Transitional//EN">
<html>
<head>
    <base href="<%=basePath%>">
    <title>标题</title>
    <meta http-equiv="pragma" content="no-cache">
    <meta http-equiv="cache-control" content="no-cache">
    <meta http-equiv="expires" content="0">
    <meta http-equiv="keywords" content="keyword1,keyword2,keyword3">
    <meta http-equiv="description" content="This is my page">
</head>
<body>
    用户名:${accountmodel.username}<br>
    密码:${accountmodel.password}
</body>
</html>
运行测试:
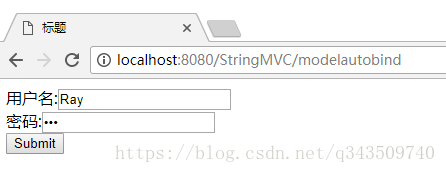
用户名 输入Ray 密码 输入123,提交:
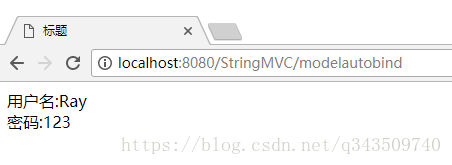
可以看到结果显示正确,说明自动绑定成功。
注:
1.关于@RequestParam的参数,这是一个@RequestParam的完整写法@RequestParam(value="username", required=true, defaultValue="AAA")。
value表示要绑定请求中参数的名字;
required表示请求中是否必须有这个参数,默认为true这是如果请求中没有要绑定的参数则返回404;
defaultValue表示如果请求中指定的参数值为空时的默认值;
要绑定的参数如果是值类型必须要有值否则抛异常,如果是引用类型则默认为null(Boolean除外,默认为false);
2.在刚才添加的2个action中可以看到返回类型和以前的不一样了由ModelAndView变成了String,这是由于Spring MVC 提供Model、ModelMap、Map让我们可以直接添加渲染视图需要的模型数据,在返回时直接指定对应视图名称就可以了。同时Map是继承于ModelMap的,而Model和ModelMap是继承于ExtendedModelMap的。
3.在刚才添加的视图modelautobind.jsp中可以看到<form:form、<form:input 等标签,这是Spring MVC提供的表单标签,借助于这些标签我们可以很方便的把模型数据绑定到表单上面(当然你也可以选择继续使用原生的HTML表单标签),要使用Spring MVC只要在视图中添加引用 <%@ taglib prefix="form" uri="http://www.springframework.org/tags/form" %>即可,关于Spring MVC表单标签的具体内容会在以后的文章中作介绍。