下面我们来看一下其它几个数据绑定注解的使用方法。
1.@CookieValue 用来绑定Cookie中的数据。下面我们用获取Cookie中的sessionId做测试:
在DataBindController添加cookiebind action,代码如下:
/**
     * @CookieValue 用来绑定Cookie中的数据
     */
    @RequestMapping(value="/cookiebind", method = {RequestMethod.GET})
    public String cookieBind(HttpServletRequest request, Model model, @CookieValue(value="JSESSIONID", defaultValue="") String jsessionId){

        model.addAttribute("jsessionId", jsessionId);
        return "cookiebindresult";
    }
在views文件夹中添加一个cookiebindresult.jsp视图,代码如下:
<%@ page language="java" contentType="text/html; charset=UTF-8"
         pageEncoding="UTF-8" %>
<%
    String path = request.getContextPath();
    String basePath = request.getScheme() + "://" + request.getServerName() + ":" + request.getServerPort() + path + "/";
%>
<!DOCTYPE HTML PUBLIC "-//W3C//DTD HTML 4.01 Transitional//EN">
<html>
<head>
    <base href="<%=basePath%>">
    <title>标题</title>
    <meta http-equiv="pragma" content="no-cache">
    <meta http-equiv="cache-control" content="no-cache">
    <meta http-equiv="expires" content="0">
    <meta http-equiv="keywords" content="keyword1,keyword2,keyword3">
    <meta http-equiv="description" content="This is my page">
</head>
<body>
${jsessionId}
</body>
</html>
运行测试:
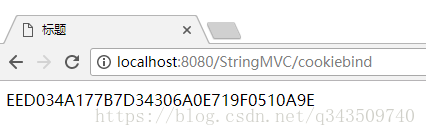

可以看到已经获取到了sessionId。
注:@CookieValue 与@RequestParam 一样也有3个参数,其含义与的@RequestParam 参数含义相同。
2.@RequestHeader 用来绑定请求头中的数据,我们用@RequestHeader获取User-Agent 来做演示:
在DataBindController添加requestheaderbind action,代码如下:
/**
     * @RequestHeader 用来绑定请求头中的数据
     */
    @RequestMapping(value = "/requestheaderbind", method = RequestMethod.GET)
    public String requestHeaderBind(HttpServletRequest request, Model model, @RequestHeader(value = "User-Agent", defaultValue = "") String userAgent){
        model.addAttribute("userAgent", userAgent);
        return "requestheaderbindresult";
    }
在views文件夹中添加一个requestheaderbindresult.jsp视图,代码如下:
<%@ page language="java" contentType="text/html; charset=UTF-8"
         pageEncoding="UTF-8" %>
<%
    String path = request.getContextPath();
    String basePath = request.getScheme() + "://" + request.getServerName() + ":" + request.getServerPort() + path + "/";
%>
<!DOCTYPE HTML PUBLIC "-//W3C//DTD HTML 4.01 Transitional//EN">
<html>
<head>
    <base href="<%=basePath%>">
    <title>标题</title>
    <meta http-equiv="pragma" content="no-cache">
    <meta http-equiv="cache-control" content="no-cache">
    <meta http-equiv="expires" content="0">
    <meta http-equiv="keywords" content="keyword1,keyword2,keyword3">
    <meta http-equiv="description" content="This is my page">
</head>
<body>
    ${userAgent}
</body>
</html>
运行测试:

可以看到已经获取到了User-Agent 。
注:@RequestHeader 与@RequestParam 一样也有3个参数,其含义与的@RequestParam 参数含义相同。
3.@ModelAttribute 绑定数据到模型中。在系列(4)的modelAutoBind action中我们将表单提交的数据添加到Model中的代码如下:
//    @RequestMapping(value = "/modelautobind", method = RequestMethod.POST)
//    public String modelAutoBind(HttpServletRequest request, Model model, AccountModel accountModel){
//        model.addAttribute("accountmodel",accountModel);
//        return "modelautobindresult";
//    }
而借助于@ModelAttribute 我们可以更简单的讲数据添加到Model中,把上面的代码修改为:
/**
     * @ModelAttribute 绑定数据到模型中
     */
    @RequestMapping(value = "/modelautobind", method = RequestMethod.POST)
    public String modelAutoBind(HttpServletRequest request, @ModelAttribute("accountmodel") AccountModel accountModel){
        return "modelautobindresult";
    }
运行测试:
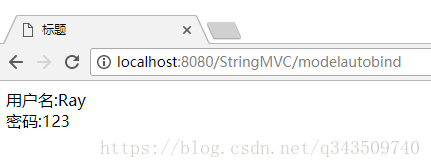
可以看到依然成功的绑定了提交的数据。
4.Model中的数据作用域是Request级别的,也就是说在一个Request请求中是获取不到其它Request请求的Model的数据的。但我们可以用@SessionAttributes 把数据存储到session中,来保持多次请求间数据,这样就可以来实现比如分步骤提交表单等需求。下面我们来看如何分2步把数据绑定到AccountModel中:
在DataBindController类上添加:
@SessionAttributes(value = "sessionaccountmodel")
在DataBindController添加usernamebind和passwordbind,代码如下:
/**
* @SessionAttributes 把数据存储到session中,来保持多次请求间数据
*/
@ModelAttribute("sessionaccountmodel")
public AccountModel initAccountModel(){
return new AccountModel();
}
@RequestMapping(value = "/usernamebind", method = RequestMethod.GET)
public String userNameBind(Model model, AccountModel accountModel){
model.addAttribute("sessionaccountmodel", new AccountModel());
return "usernamebind";
}
@RequestMapping(value = "/usernamebind", method = RequestMethod.POST)
public String usernameBindPost(@ModelAttribute("sessionaccountmodel") AccountModel accountModel){
//重定向到密码绑定测试
return "redirect:passwordbind";
}
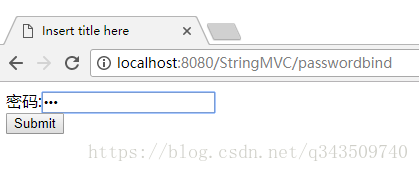
@RequestMapping(value = "/passwordbind", method = RequestMethod.GET)
public String passwordBind(@ModelAttribute("sessionaccountmodel") AccountModel accountModel){
return "passwordbind";
}
@RequestMapping(value = "/passwordbind", method = RequestMethod.POST)
public String passwordBindPost(@ModelAttribute("sessionaccountmodel") AccountModel accountModel, SessionStatus status){
//销毁@SessionAttributes存储的对象
status.setComplete();
//显示绑定结果
return "sessionmodelbingresult";
}
由于我们在controller上指定了@SessionAttributes,所以在@ModelAttribute(“xxx”)注解的参数会直接在@SessionAttributes中查找名为”xxx”的对象,如果没有找到则调用@ModelAttribute(“xxx”)注解的方法返回对象并存入@SessionAttributes(如果没有找到且没有@ModelAttribute(“xxx”)注解的方法就会抛出HttpSessionRequiredException)。当执行到最后一步就可以调用SessionStatus .setComplete()方法把@SessionAttributes中保存对象销毁了(不会清除HttpSession中的数据)。
在views文件夹中添加usernamebind.jsp、passwordbind.jsp和sessionmodelbindresult.jsp视图内容分别如下:
<%@ page language="java" contentType="text/html; charset=UTF-8"
         pageEncoding="UTF-8" %>
<%@ taglib prefix="form" uri="http://www.springframework.org/tags/form" %>
<%
    String path = request.getContextPath();
    String basePath = request.getScheme() + "://" + request.getServerName() + ":" + request.getServerPort() + path + "/";
%>
<!DOCTYPE HTML PUBLIC "-//W3C//DTD HTML 4.01 Transitional//EN">
<html>
<head>
    <base href="<%=basePath%>">
    <title>Insert title here</title>
    <meta http-equiv="pragma" content="no-cache">
    <meta http-equiv="cache-control" content="no-cache">
    <meta http-equiv="expires" content="0">
    <meta http-equiv="keywords" content="keyword1,keyword2,keyword3">
    <meta http-equiv="description" content="This is my page">
</head>
<body>
    <form:form modelAttribute="sessionaccountmodel" method="post">
        用户名:<form:input path="username"/><br>
        <input type="submit" value="Submit">
    </form:form>
</body>
</html>
<%@ page language="java" contentType="text/html; charset=UTF-8"
         pageEncoding="UTF-8" %>
<%@ taglib prefix="form" uri="http://www.springframework.org/tags/form"%>
<%
    String path = request.getContextPath();
    String basePath = request.getScheme() + "://" + request.getServerName() + ":" + request.getServerPort() + path + "/";
%>
<!DOCTYPE HTML PUBLIC "-//W3C//DTD HTML 4.01 Transitional//EN">
<html>
<head>
    <base href="<%=basePath%>">
    <title>Insert title here</title>
    <meta http-equiv="pragma" content="no-cache">
    <meta http-equiv="cache-control" content="no-cache">
    <meta http-equiv="expires" content="0">
    <meta http-equiv="keywords" content="keyword1,keyword2,keyword3">
    <meta http-equiv="description" content="This is my page">
</head>
<body>
    <form:form modelAttribute="sessionaccountmodel" method="post">
        密码:<form:password path="password"/><br>
        <input type="submit" value="Submit">
    </form:form>
</body>
</html>
<%@ page language="java" contentType="text/html; charset=UTF-8"
         pageEncoding="UTF-8" %>
<%
    String path = request.getContextPath();
    String basePath = request.getScheme() + "://" + request.getServerName() + ":" + request.getServerPort() + path + "/";
%>
<!DOCTYPE HTML PUBLIC "-//W3C//DTD HTML 4.01 Transitional//EN">
<html>
<head>
    <base href="<%=basePath%>">
    <title>Insert title here</title>
    <meta http-equiv="pragma" content="no-cache">
    <meta http-equiv="cache-control" content="no-cache">
    <meta http-equiv="expires" content="0">
    <meta http-equiv="keywords" content="keyword1,keyword2,keyword3">
    <meta http-equiv="description" content="This is my page">
</head>
<body>
    用户名:${sessionaccountmodel.username}<br>
    密码:${sessionaccountmodel.password}
</body>
</html>
运行测试:

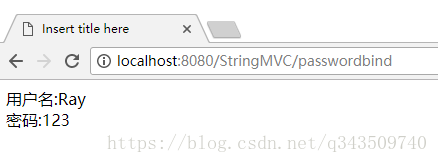
可以看到我们已经成功的分2步把数据绑定到AccountModel中了。
注:
@SessionAttributes有value和types两个参数其中value指明要对象的名称,types指定要绑定对象的类型,如@SessionAttributes(value = "sessionaccountmodel", types=AccountModel.class)两者是and关系,需要同时满足。也可以同时指定多个value和types 如:@SessionAttributes(value = {"aa", "aa"} , types={XXX.class, YYY.class}) 。