疫情防控平台搭建
项目展示
先把git贴上吧 喜欢的可以拉下来研究研究 https://gitee.com/shang_dynasty/yiqing.git
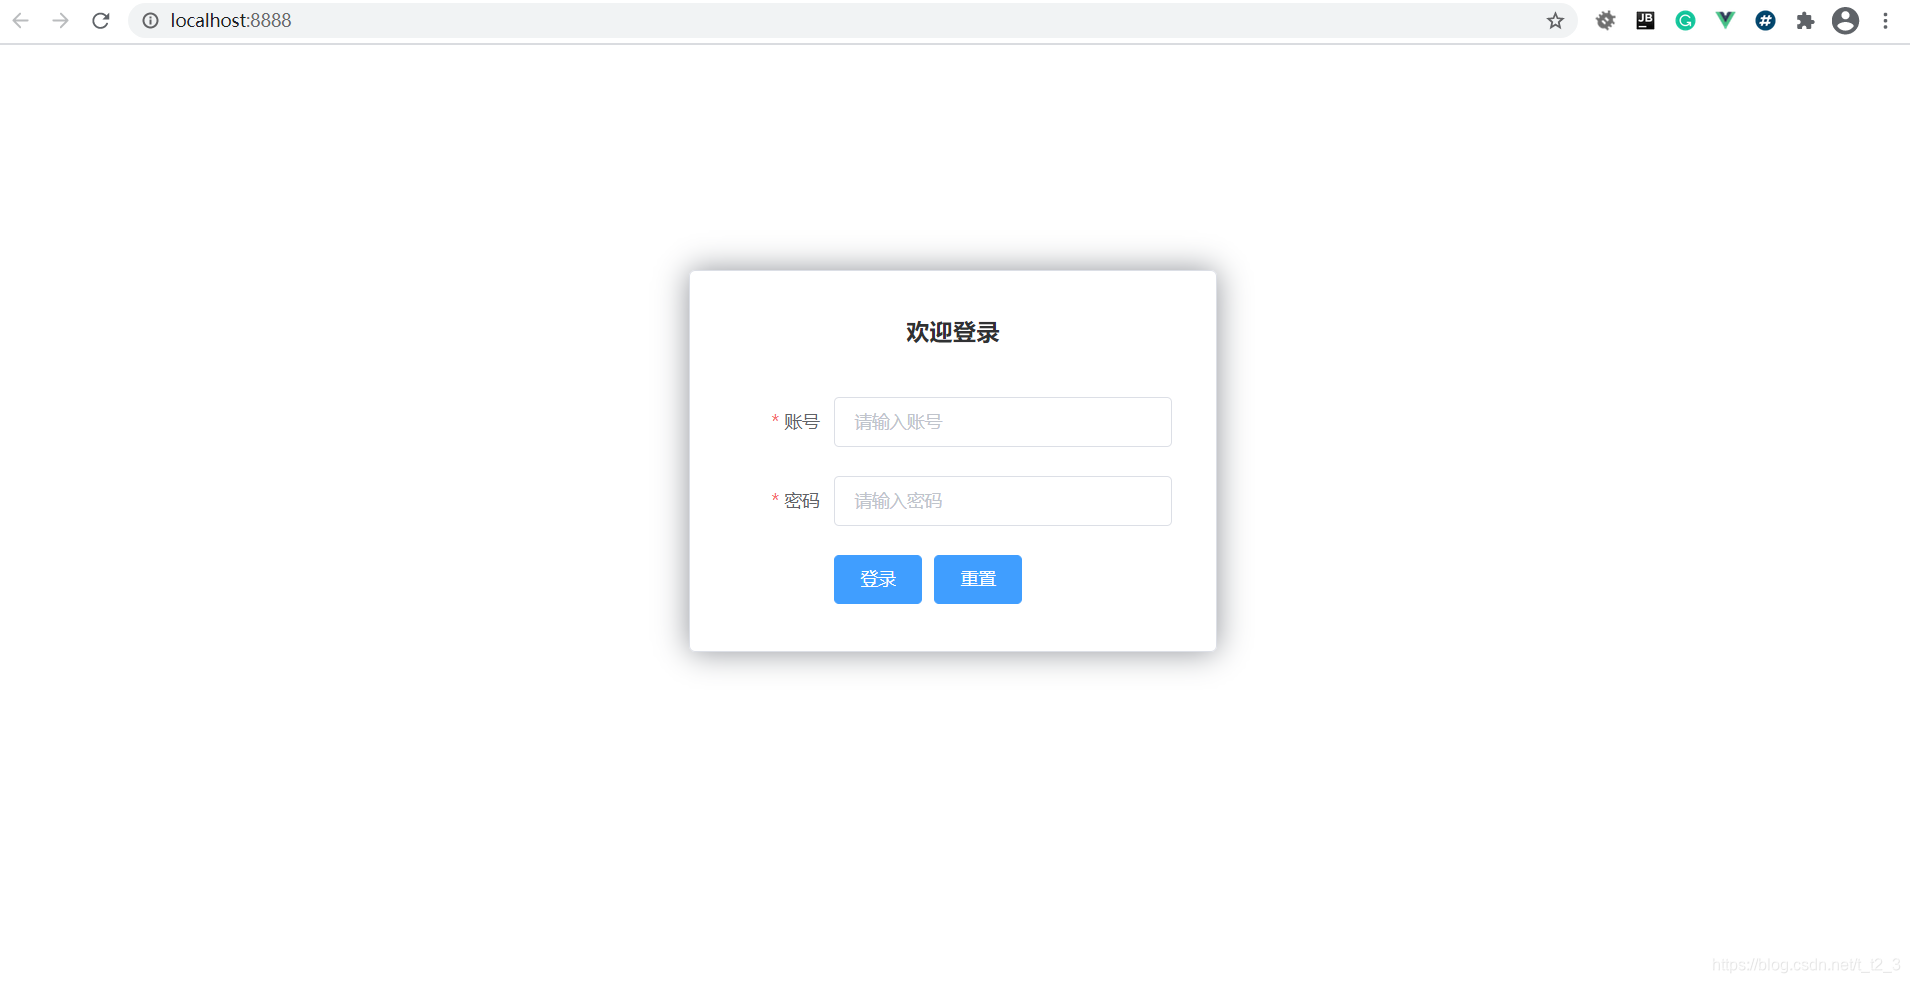
一个登录框 没什么好说的

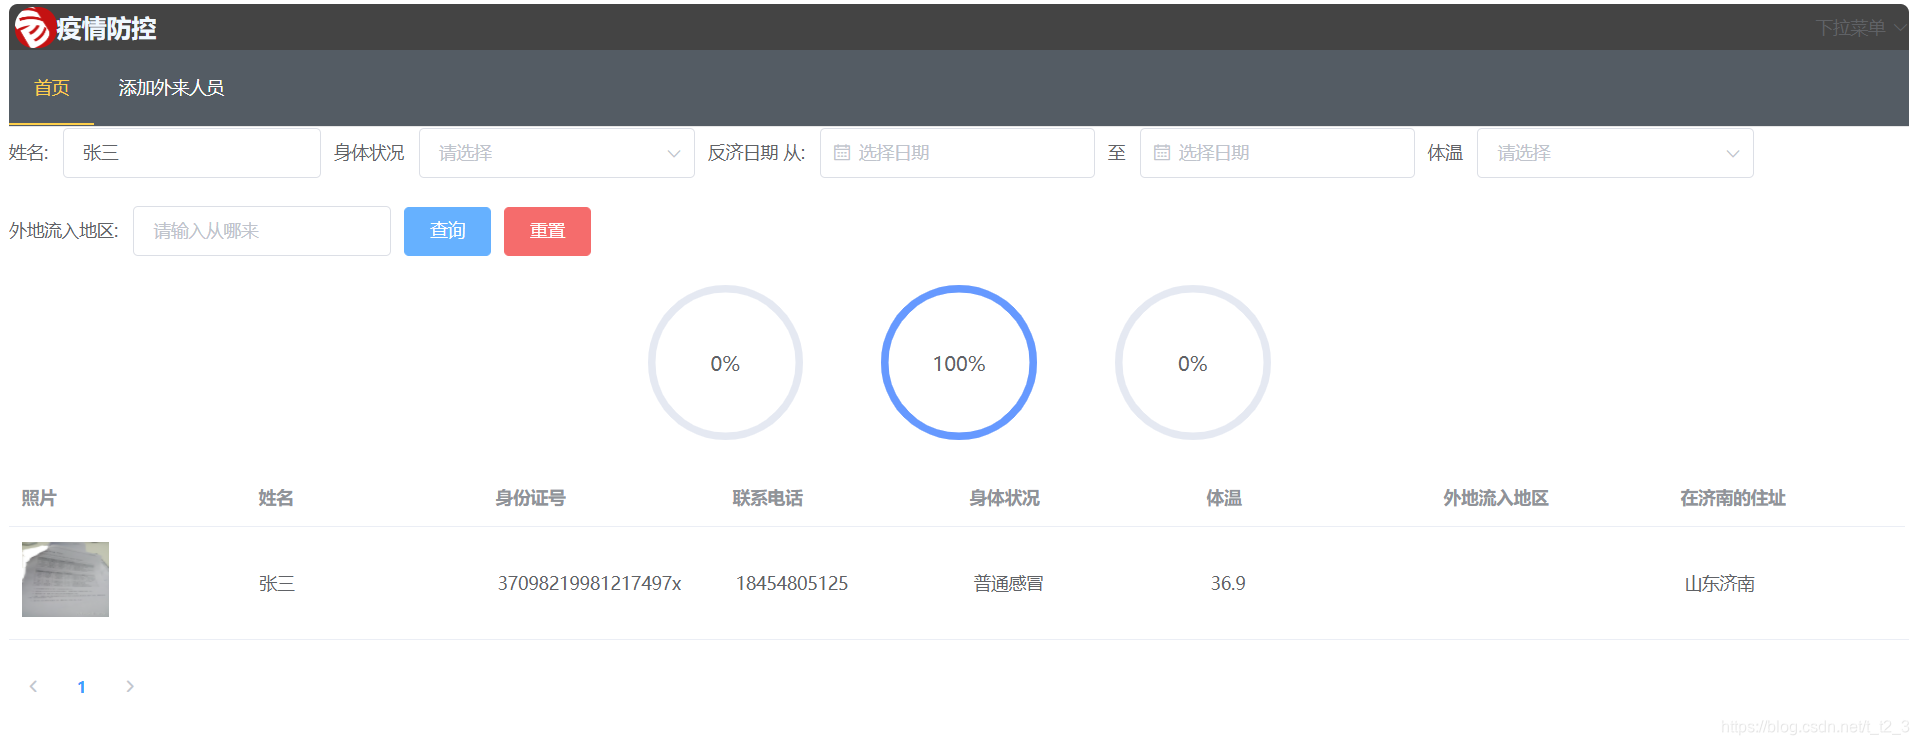
分页 体温处于“低热”及以上区间,且身体状况为“普通感冒”,则该行数据背景色渲染为黄色;若体温处于“低热”及以上区间,且身体状况为“呼吸困难腹泻”,则该行数据背景色渲染为红色 进度条显示百分比 上面可以查询 比如:
(当然了这些都是我往数据库里添的测试数据 方便测试效果哦 当然也可以用mock 项目比较小 没搞…)
一个带有数据校验的表单
最后带一个登出 清除token 和username.
脚手架
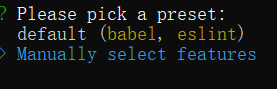
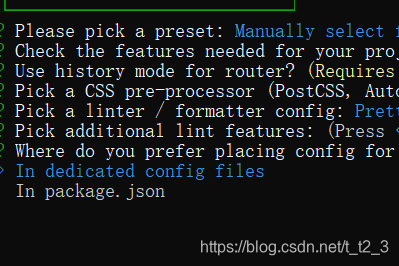
脚手架安装我就不多说了网上有很多 我们直接create 打开工程目录地址栏输入cmd
vue create 项目名称

选第二个回车
需要空格选择Route Vuex Css 回车
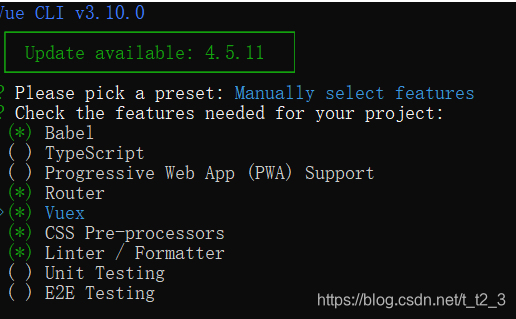
直接回车

第一个
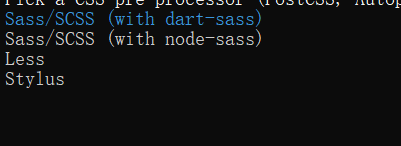
第四个
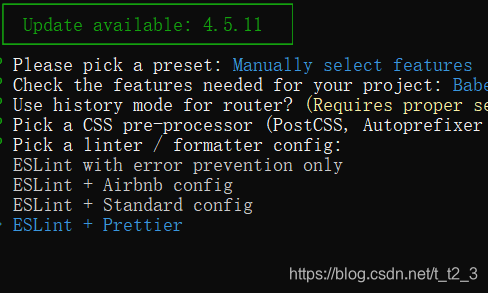
第一个
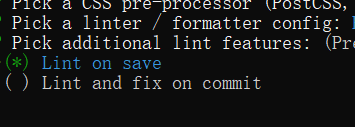
第一个回车 直接开始创建了等一会吧
布局
Vscode打开刚才创建的工程
在集成终端打开
下载elementui
npm i element-ui -S
ok一切都完了 先把该导的包导了
先main.js
import Vue from "vue";
import App from "./App.vue";
import router from "./router";
import store from "./store";
import elementUI from 'element-ui'
import 'element-ui/lib/theme-chalk/index.css'
Vue.use(elementUI)
Vue.config.productionTip = false;
import './promission'
new Vue({


  router,
  store,
  render: h => h(App)
}).$mount("#app");
ok关了就行了 之后不会再打开了
接着App.vue 用了点路由动画的效果,不过也可以不用 随便
不用路由动画就直接
<template>
	<router-view></router-view>
</template>
<script>
export default {


}
</script>
<style scoped>
</style>
下面是
加了路由动画的代码
<template>

    <transition name="fade" mode="out-in">
<router-view ></router-view></transition>
</template>

<script>
export default {


}
</script>

<style scoped>
.fade-enter {


opacity:0;
}
.fade-leave{


opacity:1;
}
.fade-enter-active{


transition:opacity .5s;
}
.fade-leave-active{


opacity:0;
transition:opacity .5s;
}
</style>
router.js
import Vue from "vue";
import Router from "vue-router";
Vue.use(Router);
import Login from "./views/Login.vue"
import Index from "./views/Index.vue"
import Maneage from "./views/Maneage.vue"
export default new Router({


    mode:'history',
    routes:[
        {


            path:'/login',
            component:Login,
        },{


            path:'/index',
            component:Index,
        },{


            path:'/',
           component:Login,
        },{


            path:'/maneage',
            component:Maneage,
        }
    ]
})
当然了 刚开始这些路由组件都还没有 这些是我们只一个工程需要的全部组件 可以先建立出来
别问为啥不用alias 别问 问就是有坑 坑还很大 所以主页跳转这一块索性就直接引入两个相同的组件
目前的项目目录大概是这样
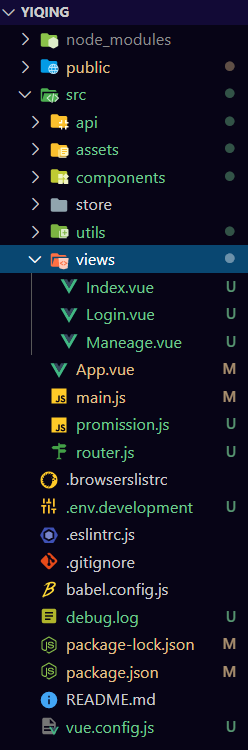
这里面的router.js 是自己建立的 脚手架自己带的那一种不习惯用 我删了 你们习惯怎么写都可以
api是dao层也是自己建立 utils里放request 这是request的代码 当然了后端api接口得先弄好这里先不讲后端以后再说
import axios from 'axios'
const request = axios.create({


    baseURL:'http://42.192.3.100:9527',
    timeout:5000,
})
export default request
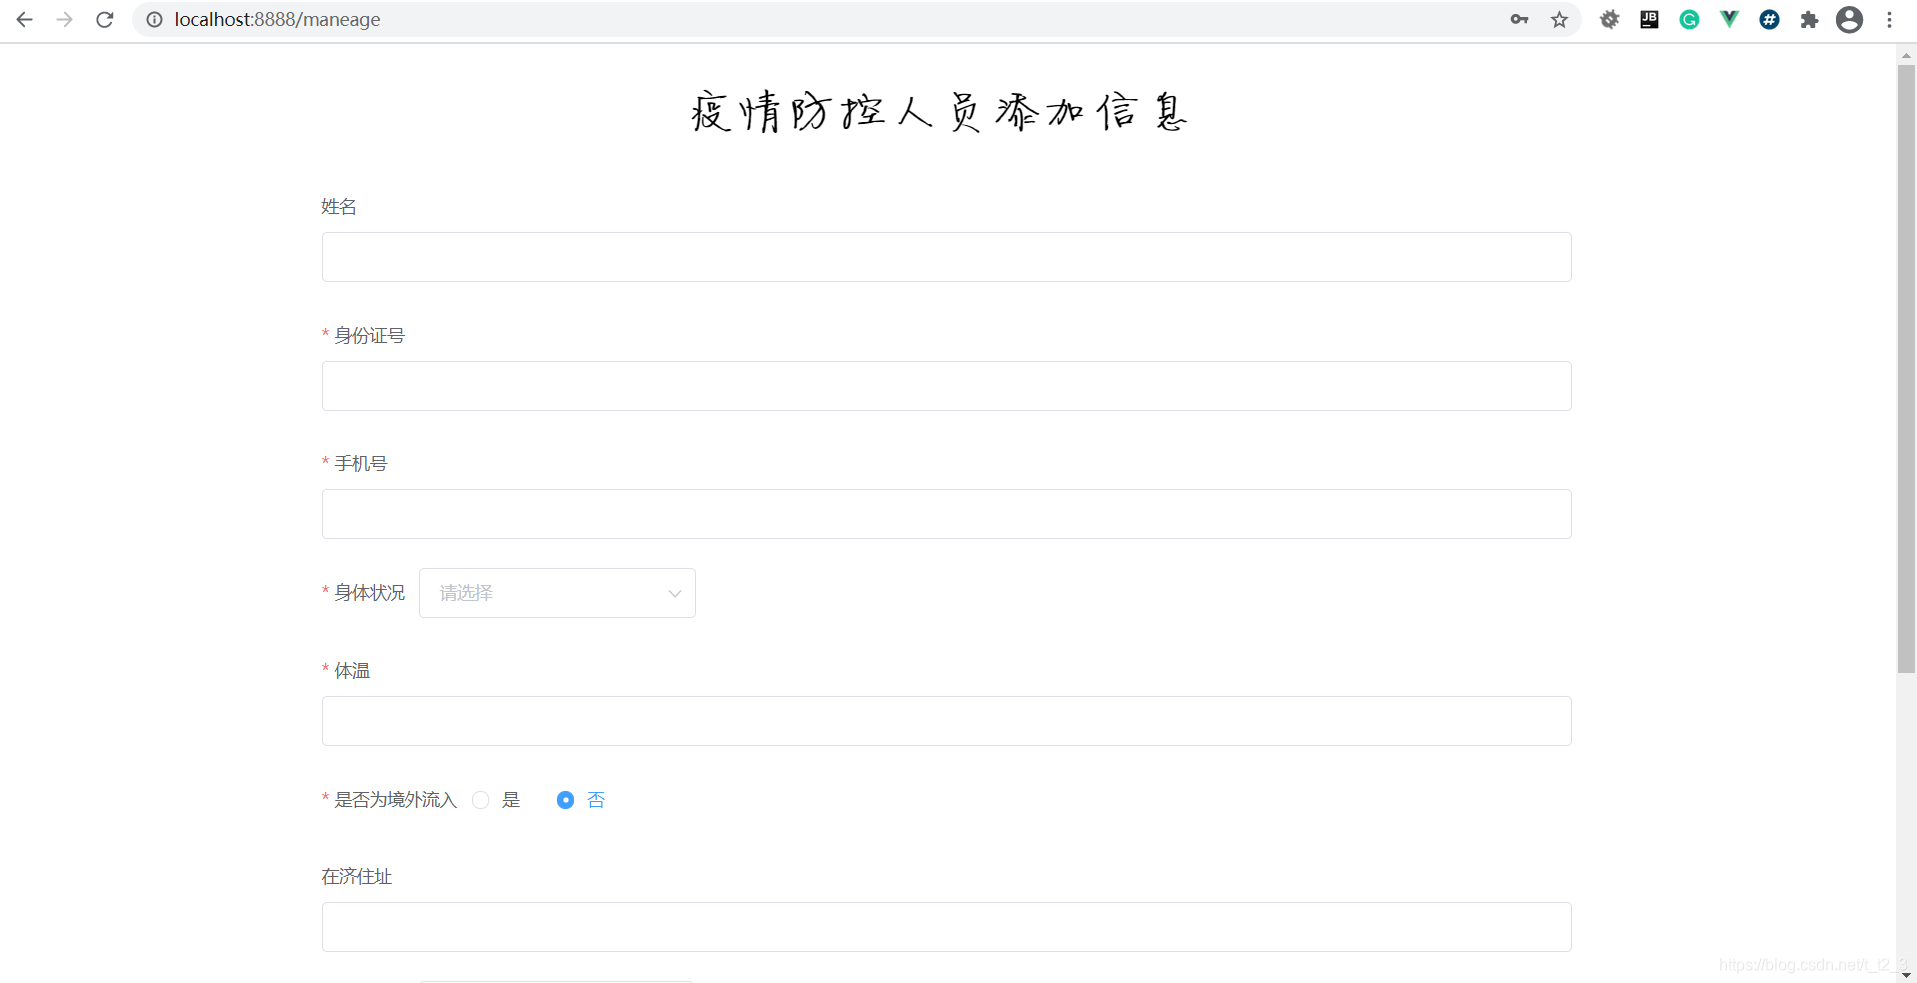
添加信息
布局
我是挺烦美工的活的布局这一块 你们去饿了么ui组件那里去喜欢哪个拉哪个就好 这里我就不再多说直接上代码 我就用了一个表单

进入views Maneage.vue
开始写组件 首先是template里面
<template>
<div >
<h2 style="margin-left:36%;font-family:'方正静蕾简体';font-size:40px">疫情防控人员添加信息</h2>
<div id="container">
<el-form
ref="etoak"
:model="ruleForm"
label-width="80p"
:rules="rule"
:label-position="poistion"
>
<el-form-item label="姓名" prop="name">
<el-input v-model="ruleForm.name"></el-input>
</el-form-item>
<!-- 身份证号 校验 -->
<el-form-item label="身份证号" prop="idNum">
<el-input v-model="ruleForm.idNum"></el-input>
</el-form-item>
<!-- 需要校验 -->
<el-form-item label="手机号" prop="phone">
<el-input v-model="ruleForm.phone"></el-input>
</el-form-item>
<el-form-item label="身体状况" required>
<el-select v-model="ruleForm.value" placeholder="请选择">
<el-option
v-for="item in options"
:key="item.value"
:label="item.label"
:value="item.value"
>
</el-option>
</el-select>
</el-form-item>
<el-form-item label="体温" prop="temperature">
<el-input v-model="ruleForm.temperature"></el-input>
</el-form-item>
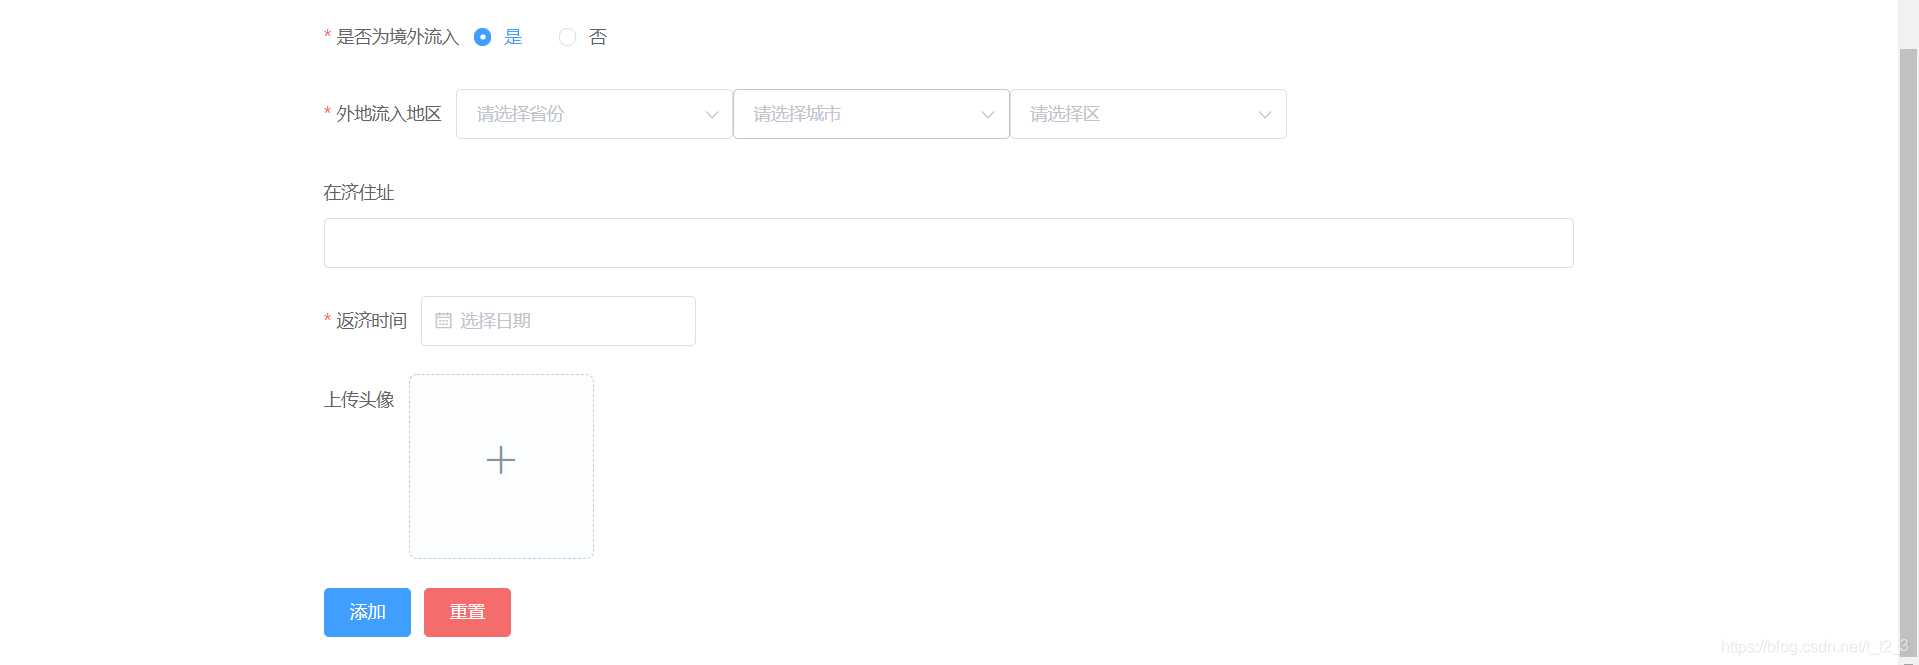
<el-form-item label="是否为境外流入" required="">
<el-radio v-model="ruleForm.radio" label="1">是</el-radio>
<el-radio v-model="ruleForm.radio" label="0">否</el-radio>
</el-form-item>
<el-form-item
label="外地流入地区"
v-if="ruleForm.radio === '1'"
required
>
<!-- 级联 选择器-->
<el-select
v-model="provice"
placeholder="请选择省份"
@change="searchCity(provice)"
ref="proviceName"
>
<el-option
v-for="provice in provices"
:key="provice.id"
:label="provice.name"
:value="provice.id"
>
</el-option>
</el-select>
<el-select
v-model="city"
placeholder="请选择城市"
@change="searchArea(city)"
>
<el-option
v-for="city in cities"
:key="city.id"
:label="city.name"
:value="city.id"
>
</el-option>
</el-select>
<el-select v-model="area" placeholder="请选择区" @change="load(area)">
<el-option
v-for="area in areas"
:key="area.id"
:label="area.name"
:value="area.id"
>
</el-option>
</el-select>
</el-form-item>
<el-form-item label="在济住址" prop="address">
<el-input v-model="ruleForm.address"></el-input>
</el-form-item>
<el-form-item label="返济时间" prop="time" required>
<el-date-picker
v-model="ruleForm.time"
type="date"
placeholder="选择日期"
>
</el-date-picker>
</el-form-item>
<el-form-item label="上传头像" prop="paths">
<el-upload
list-type="picture-card"
class="avatar-uploader"
action="http://42.192.3.100:9527/sysFile/fileUpload"
:before-upload="beforeUpload"
:on-success="success"
:on-remove="del"
:limit="1"
:show-file-list="true"
:on-exceed="message"
:on-preview="show"
ref="up"
>
<i class="el-icon-plus"></i>
</el-upload>
<el-dialog :visible.sync="dialogVisible">
<img width="100%" :src="imageUrl" alt="" />
</el-dialog>
</el-form-item>
<el-form-item>
<el-button type="primary" @click="onSubmit('etoak')">添加</el-button>
<el-button type="danger" @click="resetForm('etoak')">重置</el-button>
</el-form-item>
</el-form>
</div>
</div>
</template>
有一些上传需要的钩子函数下面再说先这么摆上 可以先npm run serve一下看看静态效果
还有表单绑定的对象先弄好 我这里用的ruleForm 写在 data(){return{这里面}}
ruleForm: {


        address: "" /* 具体地址 */,
        name: "",
        idNum: "",/*身份证号*/
        value: "" /* 身体状况 下拉框 */,
        temperature: "",/*体温*/
        radio: "0",/*是否外来 默认是false*/
        time: "",/*回来的时间 这里需要字符串 后面再说怎么date转str*/
        path: "",/*头像路径*/
        proviceName: "",/*省*/
        cityName: "",/*城市*/
        areaName: "",/*区*/
      }
信息校验
防止用户挺迷输入一些乱七八糟的东西 先给他掰过来

 rule: {


        idNum: [
          {


            required: true,
            message: "请填写有效身份证号",
            validator: checkIdNum,
            trigger: "blur",
          },
        ],
        phone: [
          {


            required: true,
            message: "请填写有效手机号",
            validator: checkPhone,
            trigger: "blur",
          },
        ],
        /* 保留一位小数 */
        temperature: [
          {


            required: true,
            message: "请填写正确的体温",
            validator: checkTempreature,
            trigger: "blur",
          },
        ],
        address: [
          {


            max: 20,
            message: "最多20个字符",
            trigger: "blur",
          },
        ],
      }
注意下面的代码写在data(){ }里面 而不是return{}
let checkIdNum = (rule, value, callback) => {


      if (!value) {


        callback(new Error("请填写身份证号"));
      } else if (!(this.isIdNum(value) && value.length == 18)) {


        //引入methods中封装的检查手机格式的方法
        callback(new Error("请输入有效格式身份证号!"));
      } else {


        callback();
      }
    };
    let checkPhone = (rule, value, callback) => {


      if (!value) {


        callback(new Error("请输入有效手机号!"));
      } else if (!(this.isNumber(value) && value.length == 11)) {


        //引入methods中封装的检查手机格式的方法
        callback(new Error("请输入有效格式手机号码!"));
      } else {


        callback();
      }
    };
    let checkTempreature = (rule, value, callback) => {


      if (!value) {


        callback(new Error("请输入有效体温!"));
      } else if (!this.isTempreature(value)||value<36.4) {


        //引入methods中封装的检查手机格式的方法
        callback(new Error("请输入有效有效体温!"));
      } else {


        callback();
      }
    }
开始method:{}
 /* 身份证号码检测 */
    isIdNum(value) {


      if (
        !/^[1-9]\d{5}(18|19|20)\d{2}((0[1-9])|(1[0-2]))(([0-2][1-9])|10|20|30|31)\d{3}[0-9Xx]$/.test(
          value
        )
      ) {


        return false;
      } else {


        return true;
      }
    },
    /* 手机号检测 */
    isNumber(phone) {


      if (!/^1(3|4|5|6|7|8)\d{9}$/.test(phone)) {


        return false;
      } else {


        return true;
      }
    },
    isTempreature(value) {


      if (!/^\d+(\.\d{0,1})?$/.test(value)) {


        return false;
      } else {


        return true;
      }
    }
别问正则是啥 怎么写 我也不会 百度一堆 能搜到的自己动脑子就是吃饱了撑的 还有就是这个时候不要想太多后台怎么处理数据 根本不关你的事 你就负责发请求过去就行了 别问 问就是被坑坑过 还有一辈子也别用js写后端 嗯 一辈子…
ok上传头像那里的钩子函数
首先得先解释一下都是干啥的
action="http://42.192.3.100:9527/sysFile/fileUpload"
            :before-upload="beforeUpload"
            :on-success="success"
            :on-remove="del"
            :limit="1"
            :show-file-list="true"
            :on-exceed="message"
            :on-preview="show"
这是从el-upload标签里面粘贴过来的
action 这没啥好说的就是你图片要上传到哪里 (你后台的地址)
before-upload: 这是判断一下你上传过来的文件是不是你要求的格式 咱别弄过来个txt文档当头像
 beforeUpload(file) {


      const isJPG = file.type === "image/jpeg";
      const isLt2M = file.size / 1024 / 1024 < 2;

      if (!isJPG) {


        this.$message.error("上传头像图片只能是 JPG 格式!");
      }
      if (!isLt2M) {


        this.$message.error("上传头像图片大小不能超过 2MB!");
      }
      return isJPG && isLt2M;
    }
别信什么支持全格式 那纯放屁 一般软件你传个图都是给你压缩成它需要的格式 这里就用jpg就ok…当然了我也没弄格式转换的插件,需要的话可以自己搜搜下一个弄过来 这里就是死规定 我只要jpg 其他格式一律不要
on-success:
主要拿返回的存储地址 因为现在都是异步的时代了 头像这种东西一般填进去就发过去了 最后提交表单我们还需要发一个图片的路径 也就是它返回来的path(看你后台怎么写)
 success(response, file, fileList) {


      this.ruleForm.path = response.data.path;
    }
:on-remove 很明显是删除了 图片不想要了 想换一个 这时所触发的函数
 del(file, fileList) {


      //console.log(file, fileList);
      this.ruleForm.path = "";/*清除ruleForm的path*/
    }
:limit 最多只能上传几个图片
:on-exceed 超过最大要求数咋办 提示信息 骂他两句
message(file, fileList) {


      this.$message({


        message: "一张图就可以",
        type: "error",
      });
    }
on-preview 点一下高清看大图 开启封印的dialog
show(file) {


      this.imageUrl = file.url;
      this.dialogVisible = true;
    }
show-file-list:
开启show-file-list=true的情况下before-upload方法return false终止上传的时候,上传列表中会出现被终止上传的文件item(且无法remove)
再就是到了省市区了
首先我们得再created()中动手一进去就得拿全部省的数组 没选择之前 城市和区都是空的 先不向后台发请求 用不着
首先再data(){return{里面我们需要这些东西}}
 provice: "",/*省id*/
     city: "",/*城市id*/
     area: "",/*区域id*/
     proviceName: "",/*省名字*/
     cityName: "",/*城市名字*/
     areaName: "",/*区域名*/
     areas: [],/*对应城市下的全部区域*/
     cities: [],/*对应省下的全部城市*/
     provices: [],/*全部省*/
先对钩子函数下手 加载完毕给我们全部省份给privices[]渲染给页面 当然传的这个0是和后台商量好的 我零0给我全部省份 传其他的id给我对应的省份 比如 search(1) 回来的就是北京市下面对应的区了
created() {


   search(0).then((response) => {


     if (response.data.flag) {


       console.log(response.data);
       this.provices = response.data.data;
     }
   });
 }
dao层怎么写的呢 简单的很 就仨字 拿数 发
import request from "../utils/request"

export function search(pid){


   return request({


       url:'/district/select',
       method:'get',
       params:{


           pid,
       }
   })
}
费脑子的来了 @change绑定的函数 就是我一选择省份 拿着省份id接着发给后台请求拿到对应省份的城市 再渲染列表 区同理
load(id) {


     const areaItem = this.areas.find((item) => {


       return item.id === id;
     });
     this.ruleForm.areaName = areaItem.name;
     //console.log(this.proviceName,this.cityName,this.areaName)
   },
searchArea(id) {


     this.areas = null;
     this.area = null;
     this.cityName = "";
     search(id).then((response) => {


       this.areas = response.data.data;
     });
     const cityItem = this.cities.find((item) => {


       return item.id === id;
     });
     this.ruleForm.cityName = cityItem.name;
   },
searchCity(id) {


     this.cities = null;//很坑人必须清空 不然会出现 河北省济南市 这种东西...
     this.areas = null;
     this.city = null;
     this.area=null;
     this.proviceName = "";
     search(id).then((response) => {


       console.log(response.data);
       this.cities = response.data.data;
       console.log(this.cities);
     });
     const proviceItem = this.provices.find((item) => {


       return item.id === id;
     });
     this.ruleForm.proviceName = proviceItem.name;
   }
还有一个 小点 回来的时间是个date类型 我们得转成str 百度一堆我复制过来的直接 他还是用的ES5的写法(low) 不过嘛能用就行 封装成一个方法掉就行了
   getDate(date){


      var year = date.getFullYear();
 var month =(date.getMonth() + 1).toString();
 var day = (date.getDate()).toString();
 if (month.length == 1) {


     month = "0" + month;
 }
 if (day.length == 1) {


     day = "0" + day;
 }
 var dateTime = year + "-" + month + "-" + day;
 return dateTime;
   }
ok都办完了到
提交表单 dao层俩函数 当然了也可以一个 省市区不需要就传空呗 也没啥 我这里分开了 问就是强迫症的缘故…
import request from "@/utils/request"
export function ADDALL(name,idNumber,phone,physicalCondition,bodyTemperature,isNonlocal,province,city,area,date,address,avatar){


   return request({


       url:'/antiepidemic/add',
       method:'post',
       data:{


           name,
           idNumber,
           phone,
           physicalCondition,
           bodyTemperature,
           isNonlocal,
           province,
           city,
           area,
           date,
           address,
           avatar
       }
   })
};
export function ADD(name,idNumber,phone,physicalCondition,bodyTemperature,isNonlocal,date,address,avatar){


   return request({


       url:'/antiepidemic/add',
       method:'post',
       data:{


           name,
           idNumber,
           phone,
           physicalCondition,
           bodyTemperature,
           isNonlocal,
           date,
           address,
           avatar

       }
   })
}
看看方法 看起来很多 其实就是dao层俩函数的事儿 就俩字 把表单里面填的东西 也就是刚开始创建的哪个对象的所有键对应的值 发给后台 奥 刚进去还得看看它有没有犯病没传头像 没传的话直接轰走 让他传
 onSubmit(FormName) {


     const strtime =this.getDate(this.ruleForm.time)
     if (!this.ruleForm.path) {


       this.$message({


         message: "请上传头像",
         type: "error",
       });
       return;
     }
     this.$refs[FormName].validate((valid) => {


       if (valid) {


         if (this.ruleForm.radio === "0") {


           ADD(
             this.ruleForm.name,
             this.ruleForm.idNum,
             this.ruleForm.phone,
             this.ruleForm.value,
             this.ruleForm.temperature,
             this.ruleForm.radio,
             strtime,
             this.ruleForm.address,
             this.ruleForm.path
           ).then((response) => {


             console.log(response.data)
             if (response.data.flag) {


               this.$message({


                 message: "添加成功",
                 type: "success",
               });
               this.$router.push("/index");
             }
           });
         } else {


           ADDALL(
             this.ruleForm.name,
             this.ruleForm.idNum,
             this.ruleForm.phone,
             this.ruleForm.value,
             this.ruleForm.temperature,
             this.ruleForm.radio,
             this.ruleForm.proviceName,
             this.ruleForm.cityName,
             this.ruleForm.areaName,
             strtime,
             this.ruleForm.address,
             this.ruleForm.path
           ).then((response) => {


             if (response.data.flag) {


               this.$message({


                 message: "添加成功",
                 type: "success",
               });
               this.$router.push("/index");
             }
           });
         }
       } else {


         alert("有表单项未填");
       }
     });
   }
查询页也就这么多东西了…没啥东西全部代码我贴一下好了
<template>
  <div >
    <h2 style="margin-left:36%;font-family:'方正静蕾简体';font-size:40px">疫情防控人员添加信息</h2>
    <div id="container">
      <el-form
        ref="etoak"
        :model="ruleForm"
        label-width="80p"
        :rules="rule"
        :label-position="poistion"
      >
        <el-form-item label="姓名" prop="name">
          <el-input v-model="ruleForm.name"></el-input>
        </el-form-item>
        <!-- 身份证号 校验 -->
        <el-form-item label="身份证号" prop="idNum">
          <el-input v-model="ruleForm.idNum"></el-input>
        </el-form-item>
        <!-- 需要校验 -->
        <el-form-item label="手机号" prop="phone">
          <el-input v-model="ruleForm.phone"></el-input>
        </el-form-item>
        <el-form-item label="身体状况" required>
          <el-select v-model="ruleForm.value" placeholder="请选择">
            <el-option
              v-for="item in options"
              :key="item.value"
              :label="item.label"
              :value="item.value"
            >
            </el-option>
          </el-select>
        </el-form-item>
        <el-form-item label="体温" prop="temperature">
          <el-input v-model="ruleForm.temperature"></el-input>
        </el-form-item>
        <el-form-item label="是否为境外流入" required="">
          <el-radio v-model="ruleForm.radio" label="1">是</el-radio>
          <el-radio v-model="ruleForm.radio" label="0">否</el-radio>
        </el-form-item>
        <el-form-item
          label="外地流入地区"
          v-if="ruleForm.radio === '1'"
          required
        >
          <!-- 级联 选择器-->
          <el-select
            v-model="provice"
            placeholder="请选择省份"
            @change="searchCity(provice)"
            ref="proviceName"
          >
            <el-option
              v-for="provice in provices"
              :key="provice.id"
              :label="provice.name"
              :value="provice.id"
            >
            </el-option>
          </el-select>
          <el-select
            v-model="city"
            placeholder="请选择城市"
            @change="searchArea(city)"
          >
            <el-option
              v-for="city in cities"
              :key="city.id"
              :label="city.name"
              :value="city.id"
            >
            </el-option>
          </el-select>
          <el-select v-model="area" placeholder="请选择区" @change="load(area)">
            <el-option
              v-for="area in areas"
              :key="area.id"
              :label="area.name"
              :value="area.id"
            >
            </el-option>
          </el-select>
        </el-form-item>
        <el-form-item label="在济住址" prop="address">
          <el-input v-model="ruleForm.address"></el-input>
        </el-form-item>
        <el-form-item label="返济时间" prop="time" required>
          <el-date-picker
            v-model="ruleForm.time"
            type="date"
            placeholder="选择日期"
          >
          </el-date-picker>
        </el-form-item>
        <el-form-item label="上传头像" prop="paths">
          <el-upload
            list-type="picture-card"
            class="avatar-uploader"
            action="http://42.192.3.100:9527/sysFile/fileUpload"
            :before-upload="beforeUpload"
            :on-success="success"
            :on-remove="del"
            :limit="1"
            :show-file-list="true"
            :on-exceed="message"
            :on-preview="show"

          >
            <i class="el-icon-plus"></i>
          </el-upload>
          <el-dialog :visible.sync="dialogVisible">
            <img width="100%" :src="imageUrl" alt="" />
          </el-dialog>
        </el-form-item>
        <el-form-item>
          <el-button type="primary" @click="onSubmit('etoak')">添加</el-button>
          <el-button type="danger" @click="resetForm('etoak')">重置</el-button>
        </el-form-item>
      </el-form>
    </div>
  </div>
</template>

<script>
import AppHeader from "@/components/AppHeader.vue";
import {

     search } from "../api/cascCade";
import {

     ADD, ADDALL } from "../api/add";

export default {


  components: {


    AppHeader,
  },
  data() {


    let checkIdNum = (rule, value, callback) => {


      if (!value) {


        callback(new Error("请填写身份证号"));
      } else if (!(this.isIdNum(value) && value.length == 18)) {


        //引入methods中封装的检查手机格式的方法
        callback(new Error("请输入有效格式身份证号!"));
      } else {


        callback();
      }
    };
    let checkPhone = (rule, value, callback) => {


      if (!value) {


        callback(new Error("请输入有效手机号!"));
      } else if (!(this.isNumber(value) && value.length == 11)) {


        //引入methods中封装的检查手机格式的方法
        callback(new Error("请输入有效格式手机号码!"));
      } else {


        callback();
      }
    };
    let checkTempreature = (rule, value, callback) => {


      if (!value) {


        callback(new Error("请输入有效体温!"));
      } else if (!this.isTempreature(value)||value<36.4) {


        //引入methods中封装的检查手机格式的方法
        callback(new Error("请输入有效有效体温!"));
      } else {


        callback();
      }
    };
    return {


       poistion:'left',
      provice: "",
      city: "",
      area: "",
      proviceName: "",
      cityName: "",
      areaName: "",
      areas: [],
      cities: [],
      provices: [],
      imageUrl: "",
      dialogVisible: false,
      ruleForm: {


        address: "" /* 具体地址 */,
        name: "",
        idNum: "",
        value: "" /* 身体状况 下拉框 */,
        temperature: "",
        radio: "0",
        time: "",
        path: "",
        proviceName: "",
        cityName: "",
        areaName: "",
      },
      rule: {


        idNum: [
          {


            required: true,
            message: "请填写有效身份证号",
            validator: checkIdNum,
            trigger: "blur",
          },
        ],
        phone: [
          {


            required: true,
            message: "请填写有效手机号",
            validator: checkPhone,
            trigger: "blur",
          },
        ],
        /* 保留一位小数 */
        temperature: [
          {


            required: true,
            message: "请填写正确的体温",
            validator: checkTempreature,
            trigger: "blur",
          },
        ],
        address: [
          {


            max: 20,
            message: "最多20个字符",
            trigger: "blur",
          },
        ],
      },
      options: [
        {


          value: "正常",
          label: "正常",
        },
        {


          value: "普通感冒",
          label: "普通感冒",
        },
        {


          value: "呼吸困难腹泻",
          label: "呼吸困难腹泻",
        },
      ],
    };
  },
  methods: {


    onSubmit(FormName) {


      const strtime =this.getDate(this.ruleForm.time)
      if (!this.ruleForm.path) {


        this.$message({


          message: "请上传头像",
          type: "error",
        });
        return;
      }
      this.$refs[FormName].validate((valid) => {


        if (valid) {


          if (this.ruleForm.radio === "0") {


            ADD(
              this.ruleForm.name,
              this.ruleForm.idNum,
              this.ruleForm.phone,
              this.ruleForm.value,
              this.ruleForm.temperature,
              this.ruleForm.radio,
              strtime,
              this.ruleForm.address,
              this.ruleForm.path
            ).then((response) => {


              console.log(response.data)
              if (response.data.flag) {


                this.$message({


                  message: "添加成功",
                  type: "success",
                });
                this.$router.push("/index");
              }
            });
          } else {


            ADDALL(
              this.ruleForm.name,
              this.ruleForm.idNum,
              this.ruleForm.phone,
              this.ruleForm.value,
              this.ruleForm.temperature,
              this.ruleForm.radio,
              this.ruleForm.proviceName,
              this.ruleForm.cityName,
              this.ruleForm.areaName,
              strtime,
              this.ruleForm.address,
              this.ruleForm.path
            ).then((response) => {


              if (response.data.flag) {


                this.$message({


                  message: "添加成功",
                  type: "success",
                });
                this.$router.push("/index");
              }
            });
          }
        } else {


          alert("有表单项未填");
        }
      });
    },
    getDate(date){


       var year = date.getFullYear();
  var month =(date.getMonth() + 1).toString();
  var day = (date.getDate()).toString();
  if (month.length == 1) {


      month = "0" + month;
  }
  if (day.length == 1) {


      day = "0" + day;
  }
  var dateTime = year + "-" + month + "-" + day;
  return dateTime;
    },
    /* 身份证号码检测 */
    isIdNum(value) {


      if (
        !/^[1-9]\d{5}(18|19|20)\d{2}((0[1-9])|(1[0-2]))(([0-2][1-9])|10|20|30|31)\d{3}[0-9Xx]$/.test(
          value
        )
      ) {


        return false;
      } else {


        return true;
      }
    },
    /* 手机号检测 */
    isNumber(phone) {


      if (!/^1(3|4|5|6|7|8)\d{9}$/.test(phone)) {


        return false;
      } else {


        return true;
      }
    },
    isTempreature(value) {


      if (!/^\d+(\.\d{0,1})?$/.test(value)) {


        return false;
      } else {


        return true;
      }
    },
    resetForm(FormName) {


      this.$refs[FormName].resetFields();
    },
    load(id) {


      const areaItem = this.areas.find((item) => {


        return item.id === id;
      });
      this.ruleForm.areaName = areaItem.name;
      //console.log(this.proviceName,this.cityName,this.areaName)
    },
    searchArea(id) {


      this.areas = null;
      this.area = null;
      this.cityName = "";
      search(id).then((response) => {


        this.areas = response.data.data;
      });
      const cityItem = this.cities.find((item) => {


        return item.id === id;
      });
      this.ruleForm.cityName = cityItem.name;
    },
    searchCity(id) {


      this.cities = null;
      this.areas = null;
      this.city = null;
      this.area=null;
      this.proviceName = "";
      search(id).then((response) => {


        console.log(response.data);
        this.cities = response.data.data;
        console.log(this.cities);
      });
      const proviceItem = this.provices.find((item) => {


        return item.id === id;
      });
      this.ruleForm.proviceName = proviceItem.name;
    },
    /* 上传头像 */
    beforeUpload(file) {


      const isJPG = file.type === "image/jpeg";
      const isLt2M = file.size / 1024 / 1024 < 2;

      if (!isJPG) {


        this.$message.error("上传头像图片只能是 JPG 格式!");
      }
      if (!isLt2M) {


        this.$message.error("上传头像图片大小不能超过 2MB!");
      }
      return isJPG && isLt2M;
    },
    success(response, file, fileList) {


      this.ruleForm.path = response.data.path;

    },
    del(file, fileList) {


      //console.log(file, fileList);
      this.ruleForm.path = "";
    },
    message(file, fileList) {


      this.$message({


        message: "一张图就可以",
        type: "error",
      });
    },
    show(file) {


      this.imageUrl = file.url;
      this.dialogVisible = true;
    },
  },
  created() {


    search(0).then((response) => {


      if (response.data.flag) {


        console.log(response.data);
        this.provices = response.data.data;
      }
    });
  },
};
</script>

<style scoped>
    div#container{


        margin: 0 auto;
        width: 1000px;
        height: 1000px;
    }
</style>
添加信息的这个页面就完活了 活动活动 当心猝死 下一篇讲查询和分页 就是各种查反正 我也不知道为啥需求这么烦 反正有需求就得办…