前言
Haproxy用于负载均衡,分层去评估服务的性能,例如mysql有四层。
Haproxy如果只有一台则很容易单点异常的问题,如果进行了多台服务器部署入口就又变成了三个所以引入keepalived集群统一入口。
keepalived相当于一个虚拟的路由器,通过一个ip地址例如192.168.1.2接收请求,然后在服务中分配给Haproxy子节点去处理,Haproxy又去访问指定的服务,这样可以做到高可用。
1 安装keepalived
介绍
Keppalived由一个master虚拟路由器和多个backup虚拟路由器组成,每个节点之间的配置相互公开,初始情况下配置文件中必须且只能将一台keppalived指定为master,每台keepalived的优先级由配置文件配置,发生故障在抢占模式下谁的优先级更高谁作为master,非抢占模式下如果指定了谁是master正常工作下他一直是master即使重启也会重新夺取master权限。
keepalived路由的功能主要是对haproxy进行高可用,如果keepalived发现Haproxy服务停止则重新启动。
yum安装
yum install -y keepalived
修改配置文件
vim /etc/keepalived/keepalived.conf
!!!!!!!!!!!!!!主节点为MASTER,子节点为BACKUP!!!!!!!!!!!!!!
!!!!!!!!!!!!!!主节点为MASTER,子节点为BACKUP!!!!!!!!!!!!!!
!!!!!!!!!!!!!!主节点为MASTER,子节点为BACKUP!!!!!!!!!!!!!!
!!!!!!!!!!!!!!主节点为MASTER,子节点为BACKUP!!!!!!!!!!!!!!
! Configuration File for keepalived
global_defs {


    smtp_connect_timeout 30
    router_id pxc_db1 #备份节点改为pxc_db2
}

#检测haproxy是否正常服务脚本,若haproxy挂机,则自动启动
vrrp_script chk_haproxy {


    script "/etc/keepalived/check_haproxy.sh"
    interval 2
    weight 20
}
# VIP1
vrrp_instance VI_1 {


state MASTER                         #MASTER\ BACKUP
    interface ens33                       #配置当前为当前所使用的网卡
    virtual_router_id 240                 #配置id为1-255,在同一个局域网内不能重复,同一个集群使用同一个id
    priority 100                          #备份节点上将100改为90
    nopreempt                             #当前节点启动不抢占已经工作的节点
    advert_int 1                          #设定 MASTER 与 BACKUP 负载均衡之间同步检查的时间间隔,单位为秒,两个节点设>置必须一样
    authentication {

                          #设置验证类型和密码,节点必须一致
        auth_type PASS
        auth_pass 1111
    }
virtual_ipaddress {


      #(配置虚拟IP,成为对外服务IP)
        192.168.1.196
      #(如果有多个VIP,继续换行填写.)
    }

    track_script {


        chk_haproxy
    }
    notify_master "/etc/keepalived/notify.sh master"
}
邮件功能
https://blog.csdn.net/zhaohan___/article/details/106287396
启动
如果防火墙是firewall请关闭
systemctl stop firewalld.service
启动kepplived
systemctl start keepalived
验证
输入此命令在所有的虚拟机上可以看到当前ip漂移到哪个虚拟机
ip a
service keepalived status
查看服务信息
HAporxy
yum安装
yum -y install haproxy
修改配置文件
开放1080状态显示接口和mysql访问端口
firewall-cmd --zone=public --add-port=1080/tcp --permanent
firewall-cmd --zone=public --add-port=13306/tcp --permanent
firewall-cmd --reload
firewall-cmd --list-port
修改配置文件
vim /etc/haproxy/haproxy.cfg
#---------------------------------------------------------------------
# Example configuration for a possible web application.  See the
# full configuration options online.
#
#   http://haproxy.1wt.eu/download/1.4/doc/configuration.txt
#
#---------------------------------------------------------------------

#---------------------------------------------------------------------
# Global settings
#---------------------------------------------------------------------
global
    # to have these messages end up in /var/log/haproxy.log you will
    # need to:
    #
    # 1) configure syslog to accept network log events.  This is done
    #    by adding the '-r' option to the SYSLOGD_OPTIONS in
    #    /etc/sysconfig/syslog
    #
    # 2) configure local2 events to go to the /var/log/haproxy.log
    #   file. A line like the following can be added to
    #   /etc/sysconfig/syslog
    #
    #    local2.*                       /var/log/haproxy.log
    #
    log         127.0.0.1 local2

#    chroot      /var/lib/haproxy        #改变当前工作目录
    pidfile     /var/run/haproxy.pid    #当前进程id文件
    maxconn     4000                    #最大连接数
    user        haproxy                 #所属用户
    group       haproxy                 #所属组
    daemon                              #以守护进程方式运行haproxy
    stats socket /var/lib/haproxy/stats #基于本地的文件传输
    # turn on stats unix socket
    stats socket /var/lib/haproxy/stats

#---------------------------------------------------------------------
# common defaults that all the 'listen' and 'backend' sections will
# use if not designated in their block
#---------------------------------------------------------------------
defaults

    mode        http
    #默认的模式mode {

     tcp|http|health },tcp是4层,http是7层,health只会返回OK
    log         global
    #应用全局的日志配置
    option      httplog
    # 启用日志记录HTTP请求,默认haproxy日志记录是不记录HTTP请求日志
    option      dontlognull
    # 启用该项,日志中将不会记录空连接。所谓空连接就是在上游的负载均衡器或者监控系统为了探测该服务是否存活可用时,需要定期的连接或者获取某一固定的组件或页面,或者探测扫描端口是否在监听或开放等动作被称为空连接;官方文档中标注,如果该服务上游没有其他的负载均衡器的话,建议不要使用该参数,因为互联网上的恶意扫描或其他动作就不会被记录下来
    option      http-server-close
    #每次请求完毕后主动关闭http通道
    option      forwardfor       except 127.0.0.0/8
    #如果服务器上的应用程序想记录发起请求的客户端的IP地址,需要在HAProxy上配置此选项, 这样 HAProxy会把客户端的IP信息发送给服务器,在HTTP请求中添加"X-Forwarded-For"字段。启用X-Forwarded-For,在requests头部插入客户端IP发送给后端的server,使后端server获取到客户端的真实IP。
#    option        redispatch
    #当使用了cookie时,haproxy将会将其请求的后端服务器的serverID插入到cookie中,以保证会话的SESSION持久性;而此时,如果后端的服务器宕掉了, 但是客户端的cookie是不会刷新的,如果设置此参数,将会将客户的请求强制定向到另外一个后端server上,以保证服务的正常。
    retries       3
    # 定义连接后端服务器的失败重连次数,连接失败次数超过此值后将会将对应后端服务器标记为不可用
    timeout http-request    10s     #http请求超时时间
    timeout queue           1m      #一个请求在队列里的超时时间
    timeout connect         10s     #连接超时
    timeout client          1m      #客户端超时
    timeout server          1m      #服务器端超时
    timeout http-keep-alive 10s     #设置http-keep-alive的超时时间
    timeout check           10s     #检测超时
    maxconn                 3000

#---------------------------------------------------------------------
# main frontend which proxys to the backends
#---------------------------------------------------------------------

#后端mysql配置,访问虚机地址+端口号可以访问后端的mysql,例如:当前ip:13306可以访问199/198/197的mysql数据库
listen mysql
    bind 0.0.0.0:13306#监听哪个端口
    mode tcp#协议
    balance roundrobin
    server node199 192.168.1.199:3306
    server node198 192.168.1.198:3306
    server node197 192.168.1.197:3306
#haproxy监听端口(可去掉),访问虚机地址+端口号+/stats可以看到,例如:192.168.1.199:1080/stats
listen stats
        bind 0.0.0.0:1080
        mode http
        option httplog
        maxconn 10
        stats refresh 30s
        stats uri /stats
        stats realm XingCloud\ Haproxy
        stats auth admin:admin #用这个账号登录,可以自己设置
        stats auth Frank:Frank
        stats hide-version
        stats admin if TRUE
创建日志输出
cd /var/log
mkdir haproxy
cd haproxy
touch haproxy.log
chmod a+w haproxy.log
开启rsyslog的haproxy的日志记录功能
#查询日志功能是否安装
rpm -qa |grep rsyslog
rsyslog-5.8.10-8.el6.x86_64
#查找配置文件在哪里
rpm -ql rsyslog |grep conf$
#编辑配置文件
vim /etc/rsyslog.conf
$ModLoad imudp
$UDPServerRun 514
将这两行前的#去掉。
在local7.* /var/log/boot.log之后添加如下内容
# Save haproxy log
local2.* /var/log/haproxy/haproxy.log
# rsyslog configuration file

# For more information see /usr/share/doc/rsyslog-*/rsyslog_conf.html
# If you experience problems, see http://www.rsyslog.com/doc/troubleshoot.html

#### MODULES ####

# The imjournal module bellow is now used as a message source instead of imuxsock.
$ModLoad imuxsock # provides support for local system logging (e.g. via logger command)
$ModLoad imjournal # provides access to the systemd journal
#$ModLoad imklog # reads kernel messages (the same are read from journald)
#$ModLoad immark  # provides --MARK-- message capability

# Provides UDP syslog reception
#$ModLoad imudp
#$UDPServerRun 514

# Provides TCP syslog reception
$ModLoad imtcp
$InputTCPServerRun 514


#### GLOBAL DIRECTIVES ####

# Where to place auxiliary files
$WorkDirectory /var/lib/rsyslog

# Use default timestamp format
$ActionFileDefaultTemplate RSYSLOG_TraditionalFileFormat

# File syncing capability is disabled by default. This feature is usually not required,
# not useful and an extreme performance hit
#$ActionFileEnableSync on

# Include all config files in /etc/rsyslog.d/
$IncludeConfig /etc/rsyslog.d/*.conf

# Turn off message reception via local log socket;
# local messages are retrieved through imjournal now.
$OmitLocalLogging on

# File to store the position in the journal
$IMJournalStateFile imjournal.state


#### RULES ####

# Log all kernel messages to the console.
# Logging much else clutters up the screen.
#kern.*                                                 /dev/console

# Log anything (except mail) of level info or higher.
# Don't log private authentication messages!
*.info;mail.none;authpriv.none;cron.none                /var/log/messages

# The authpriv file has restricted access.
authpriv.*                                              /var/log/secure

# Log all the mail messages in one place.
mail.*                                                  -/var/log/maillog


# Log cron stuff
cron.*                                                  /var/log/cron

# Everybody gets emergency messages
*.emerg                                                 :omusrmsg:*

# Save news errors of level crit and higher in a special file.
uucp,news.crit                                          /var/log/spooler

# Save boot messages also to boot.log
local7.*                                                /var/log/boot.log
local2.*                                                /var/log/haproxy/haproxy.log

# ### begin forwarding rule ###
# The statement between the begin ... end define a SINGLE forwarding
# rule. They belong together, do NOT split them. If you create multiple
# forwarding rules, duplicate the whole block!
# Remote Logging (we use TCP for reliable delivery)
#
# An on-disk queue is created for this action. If the remote host is
# down, messages are spooled to disk and sent when it is up again.
#$ActionQueueFileName fwdRule1 # unique name prefix for spool files
#$ActionQueueMaxDiskSpace 1g   # 1gb space limit (use as much as possible)
#$ActionQueueSaveOnShutdown on # save messages to disk on shutdown
#$ActionQueueType LinkedList   # run asynchronously
#$ActionResumeRetryCount -1    # infinite retries if host is down
# remote host is: name/ip:port, e.g. 192.168.0.1:514, port optional
#*.* @@remote-host:514
# ### end of the forwarding rule ###
vim /etc/sysconfig/rsyslog #修改rsylog文件
SYSLOGD_OPTIONS="" 改为 SYSLOGD_OPTIONS="-r -m 2 -c 2"
!!!!!!!!!!!!!!!关机重新启动!!!!!!!!!!!!!!!!
!!!!!!!!!!!!!!!关机重新启动!!!!!!!!!!!!!!!!
!!!!!!!!!!!!!!!关机重新启动!!!!!!!!!!!!!!!!
!!!!!!!!!!!!!!!关机重新启动!!!!!!!!!!!!!!!!
#开启mysql服务
systemctl start mysql
#开启日志
systemctl start rsyslog
#开启代理
systemctl start haproxy
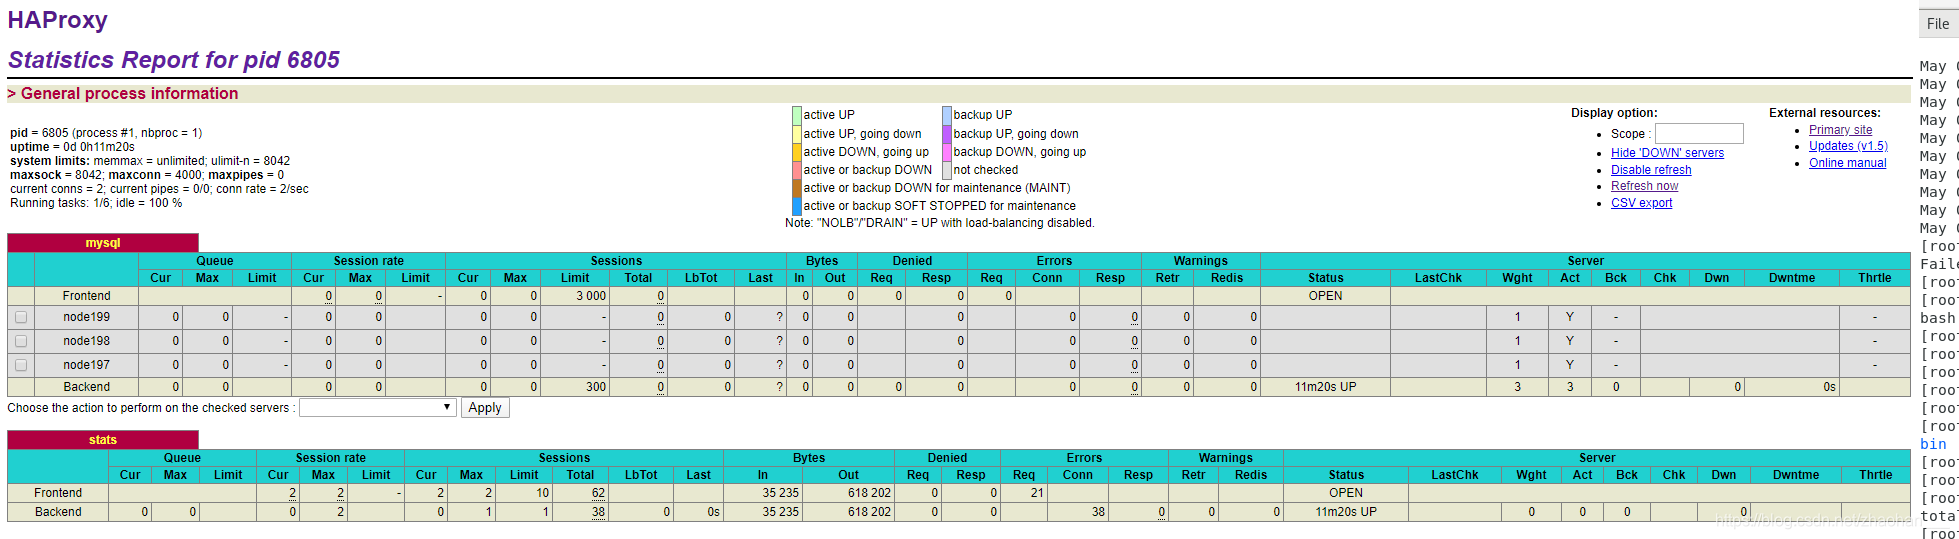
验证
http://proxy ip:1080/stats
查看
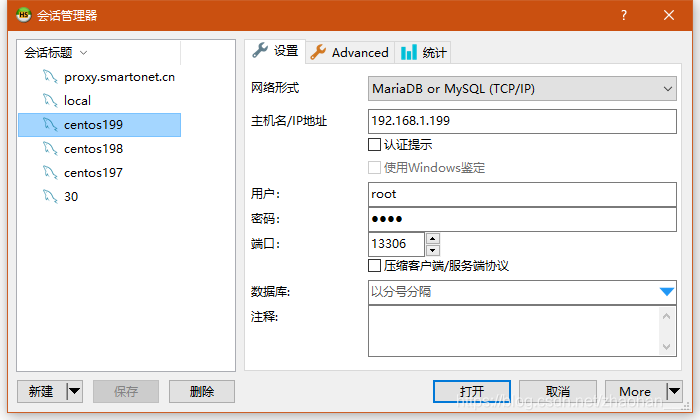
用mysql客户端软件访问该端口
经常出现的问题
mysql需要修复
mysql_upgrade -u root -p --force
复制配置文件排版错乱
:set paste
进入 paste 模式后,按 i 键进入插入模式,然后再粘帖,文本格式不会错乱了。但粘帖后还需要按 进入普通模式并执行如下命令结束 paste 模式:
:set nopaste
整体的启动流程
#启动keepalived
systemctl start keepalived
#开启mysql服务
systemctl start mysql
#开启日志
systemctl start rsyslog
#开启代理
systemctl start haproxy