背景
前几天发了关于jsp的一篇博客,别人给与认可,决定重新写下这一篇关于Spring的文章(其实之前写了一些的但是写的有些糙,觉得对不起别人的鼓励,决定产出重新写下)
什么是Spring
对于什么是Spring可能很多用力一段时间的同学都不是很清楚吧,大概只知道spring 整合完SpringMvc Mybatis(或者Hibernate)如何使用,知道@AutoWire,@controller,@Service等一些注解之类的吧。那么Spring的到底是什么呢?
百度百科说,Spring是一个轻量级控制反转(IoC)和面向切面(AOP)的容器框架!
所以 ,Spring是容器的框架,主要包括IOC和AOP两个方面
IOC是什么
好的,知道了Spring是什么以后,下面说下IOC。上面说到Spring是一种基于容器的思想的框架,那么容器是什么,记一下,容器现在可以粗略的理解为工厂模式,对,就是设计模式种的工厂模式。
Spring IOC 就是Spring使用容器的思想(工厂模式)对Bean进行管理这么一种方式。IOC又叫控制反转,那么什么叫控制反转呢?就是将Bean的创建建工Spring容器就型管理,就是使用工厂模式常见对象,这样说是不是就明白了。好下面通过代码继续分析。
我们传统的开发过程种,创建对象是要new 的,使用一个new 一个,而且耦合度高,不容易维护。像我们传统的mvc 模式种userService层想调用userDao层方法是只能new 对象,如下
public class UserDao {


    public void test(){


        System.out.println("print userDao-----");
    }
}
public class UserService {


    public void test(){


        UserDao userDao=new UserDao();
        userDao.test();
    }
}
那么IOC是怎么创建对象的呢?
一.新建一个类
public class User {


    public void test(){


        System.out.println("userTest---");
    }

}
二.建一个spring的配置文件,
<?xml version="1.0" encoding="UTF-8"?>
<beans xmlns="http://www.springframework.org/schema/beans"
       xmlns:xsi="http://www.w3.org/2001/XMLSchema-instance"
       xsi:schemaLocation="http://www.springframework.org/schema/beans
       http://www.springframework.org/schema/beans/spring-beans.xsd">

    <bean id="user" class="com.atguigu.User"></bean>

</beans>
三步,创建对象实例
public void testSpring()
    {


        ApplicationContext context=new ClassPathXmlApplicationContext("bean.xml");
        User user= context.getBean("user",User.class);
        user.test();
    }
Spring IOC通过这种方式,实现了对代码的解耦,和对像的创建。那么为什么通过这种方式就使得对象得以创建了呢,其实IOC内部使用了这三种技术。
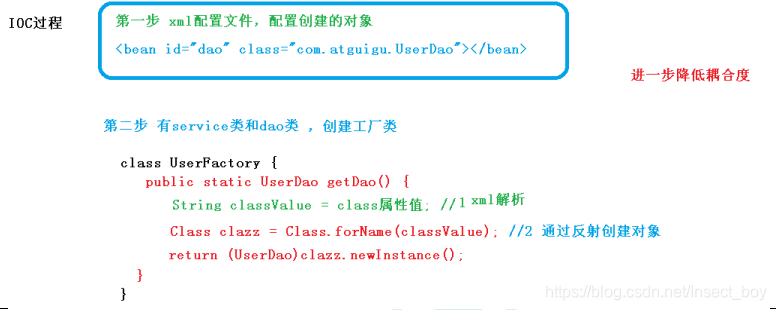
IOC=xml解析+工厂模式+反射 ,或者说IOC容器的实质就是一个工厂类。通过工厂管理对象对象实例。
我们一点点的分析:
这是工厂模式:
public class PhoneFactory {


    public Phone getPhone(String phoneType) {


        if(phoneType.equalsIgnoreCase("MiPhone")){


            return new MiPhone();
        }
        else if(phoneType.equalsIgnoreCase("iPhone")) {


            return new IPhone();
        }
        return null;
    }
}
public class Demo {


    public static void main(String[] arg) {


        PhoneFactory factory = new PhoneFactory();
        Phone miPhone = factory.getPhone("HUAWEI");

    }
}
我们看这两行代码有没有觉得很像,对没错我们代码里得ApplicationContext 本质就是一个工厂类。
User user= context.getBean("user",User.class);
Phone miPhone = factory.getPhone("HUAWEI");
再看下面这行代码,通过解析对应得xml,得到对应得工厂类ApplicationContext,这个就是一个解析xml,ApplicationContext获取对应参数内容得过程。
ApplicationContext context=new ClassPathXmlApplicationContext("bean.xml");
解析完xml 创建了对象工厂以后,就需要创建对象,既然不能new 应该怎么办呢,对,就是反射,解析完xml以后 ,获取bean标签中的class属性的值,然后反射生成对象,以上就是ioc创建对象的过程了。
<bean id="user" class="com.atguigu.User"></bean>
光创建完对象肯定不能算结束,还要给对象注入属性啊,这就是DI了(依赖注入)。
依赖注入没有什么难以理解的,就是对象创建完成以后,给对象的属性赋值,有以下几种方式
1)set方法注入:利用对象的set方法注入,没有set方法注入不进去
<bean id="book" class="com.spring5.Book">
 <property name="bname" value="java"></property>
 <property name="bauthor" value="redis"></property>
</bean>
2)有参构造进行注入:利用对象的有参构造函数注入属性。
<bean id="book2" class="com.spring5.Book">
 <constructor-arg name="bname" value="java"></constructor-arg>
 <constructor-arg name="bauthor" value="redis"></constructor-arg>
</bean>
3)p标签注入:xml标签开头要是有p标签的标识,还要有set方法

<bean id="book3" class="com.spring5.Book" p:bname="九阳神功"
p:bauthor="无名氏">
</bean>
注入特殊字符null
<bean id="book" class="com.atguigu.Book">
        <property name="bname">
            <null/>
        </property>
        <property name="bauthor" value="hah"></property>
    </bean>
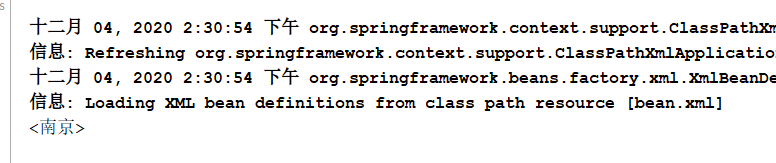
注入一些特殊字符比如需要转移的,不被识别的字符< >
 <bean id="book" class="com.atguigu.Book">
        <property name="bname">
            <value><![CDATA[<南京>]]></value>
        </property>
    </bean>
接下来是注入对象
1)引入内部Bean,直接在property标签中包含一个Bean
public class Student {


    private String sname;
    private Teacher teacher;

    public String getSname() {


        return sname;
    }

    public void setSname(String sname) {


        this.sname = sname;
    }

    public Teacher getTeacher() {


        return teacher;
    }

    public void setTeacher(Teacher teacher) {


        this.teacher = teacher;
    }
}

public class Teacher {


    private int age;
    private String  name;

    public int getAge() {


        return age;
    }

    public void setAge(int age) {


        this.age = age;
    }

    public String getName() {


        return name;
    }

    public void setName(String name) {


        this.name = name;
    }

    @Override
    public String toString() {


        return "Teacher{" +
                "age=" + age +
                ", name='" + name + '\'' +
                '}';
    }
}

<bean id="stu" class="com.atguigu.Student">
        <property name="teacher">
            <bean id="teacher" class="com.atguigu.Teacher">
                <property name="name" value="王老师"></property>
                <property name="age" value="20"></property>
            </bean>
        </property>
        <property name="sname" value="张三"></property>
    </bean>
2)引入外部Bean,引入一个已经存在的Bean,使用ref
<bean id="stu" class="com.atguigu.Student">
        <property name="teacher" ref="teacher"></property>
        <property name="sname" value="张三"></property>
    </bean>
    <bean id="teacher" class="com.atguigu.Teacher">
        <property name="name" value="张老师"></property>
        <property name="age" value="20"></property>
    </bean>
级联赋值
级联赋值就是注入对象的时候顺便把对象的值也注入进入
上面介绍的引入外部bean就是级联赋值的一种
第一种:
<bean id="stu" class="com.atguigu.Student">
        <property name="teacher">
            <bean id="teacher" class="com.atguigu.Teacher">
                <property name="name" value="王老师"></property>
                <property name="age" value="20"></property>
            </bean>
        </property>
        <property name="sname" value="张三"></property>
    </bean>
第二种:这种方法要求Student方法必须有getTeacher方法 ,而且输出结果teacher.name="理想",
<bean id="stu" class="com.atguigu.Student">
        <property name="teacher" ref="teacher"></property>
        <property name="sname" value="张三"></property>
        <property name="teacher.name" value="理想"></property>
    </bean>
    <bean id="teacher" class="com.atguigu.Teacher">
        <property name="name" value="张老师"></property>
        <property name="age" value="20"></property>
    </bean>
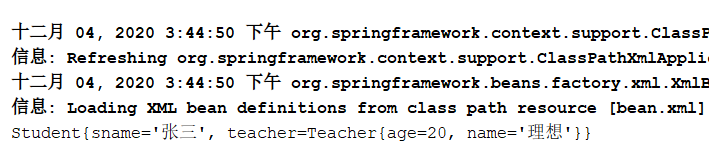
总结级联赋值,就是 引用外部类(使用ref的形式),使用teacher.name形式的赋值可以覆盖掉之前类的属性值,但是要有对应的get方法。
注入 集合
普通 值和对象注入完以后,接下来就是注入数组和集合属性
1)集合 的内容是普通值
public class User {


   private String [] names;
   private List<String>list;
   private Set<String> set;
   private Map<String,String> map;

    public String[] getNames() {

     return names; }

    public void setNames(String[] names) {

     this.names = names; }

    public List<String> getList() {

     return list; }

    public void setList(List<String> list) {

     this.list = list; }

    public Set<String> getSet() {

     return set; }

    public void setSet(Set<String> set) {

     this.set = set; }

    public Map<String, String> getMap() {

     return map; }

    public void setMap(Map<String, String> map) {

     this.map = map; }

    @Override
    public String toString() {


        return "User{" +
                "names=" + Arrays.toString(names) +
                ", list=" + list +
                ", set=" + set +
                ", map=" + map +
                '}';
    }
}

<bean id="stu" class="com.atguigu.User">
        <property name="names">
            <array>
                <value>李安琪</value>
                <value>王安娜</value>
                <value>孙琴</value>
            </array>
        </property>
        <property name="list">
            <list>
                <value>list1</value>
                <value>list2</value>
                <value>list3</value>
            </list>
        </property>
        <property name="set">
            <set>
                <value>set1</value>
                <value>set2</value>
                <value>set3</value>
            </set>
        </property>
        <property name="map">
            <map>
                <entry  key="key1" value="value1"></entry>
                <entry key="key2" value="value2"></entry>
                <entry key="key3" value="value3"></entry>
            </map>
        </property>
    </bean>
2)注入对象集合
public class User {


   private Book [] names;
   private List<Book>list;
   private Set<Book> set;
   private Map<String,Book> map;

    public Book[] getNames() {

     return names; }

    public void setNames(Book[] names) {

     this.names = names; }

    public List<Book> getList() {

     return list; }

    public void setList(List<Book> list) {

     this.list = list; }

    public Set<Book> getSet() {

     return set; }

    public void setSet(Set<Book> set) {

     this.set = set; }

    public Map<String, Book> getMap() {

     return map; }

    public void setMap(Map<String, Book> map) {

     this.map = map; }

    @Override
    public String toString() {


        return "User{" +
                "names=" + Arrays.toString(names) +
                ", list=" + list.toString() +
                ", set=" + set +
                ", map=" + map +
                '}';
    }
}


 <bean id="stu" class="com.atguigu.User">
        <property name="names">
            <array>
                <ref bean="book1"></ref>
                <ref bean="book2"></ref>
            </array>
        </property>
        <property name="list">
            <list>
            <ref bean="book1" ></ref>
            <ref bean="book2" ></ref>
            </list>
        </property>
        <property name="set">
            <set>
                <ref bean="book2"></ref>
                <ref bean="book1"></ref>
            </set>
        </property>
        <property name="map">
            <map>
                <entry key="key1" value-ref="book1"></entry>
                <entry key="key2" value-ref="book2"></entry>
            </map>
        </property>
    </bean>


    <bean id="book1" class="com.atguigu.Book">
        <property name="bname" value="三哥"></property>
    </bean>
    <bean id="book2" class="com.atguigu.Book">
        <property name="bauthor" value="唐浩"></property>
    </bean>