bert模型简介、transformers中bert模型源码阅读、分类任务实战和难点总结:https://blog.csdn.net/HUSTHY/article/details/105882989
目录
写在最前面,这篇博客篇幅有点长,原因是贴的代码和图有点多,感兴趣的可以坚持读下去!
一、bert模型简介
2018年bert模型被谷歌提出,它在NLP的11项任务中取得了state of the art 的结果。bert模型是由很多层transformer结构堆叠而成,这里简单看看一下transformer的结构,上一张经典的图片,如下:
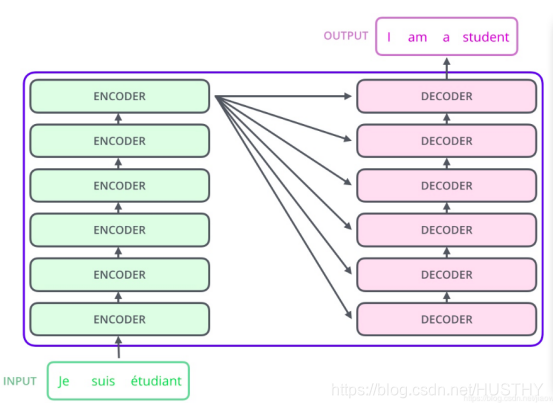
可以看到transformer是由encoder和decoder模块构成,而bert模型则是利用了transformer的encoder模块。最轻量的bert买模型是由12层transformer,12头注意力,768维的hidden state,在论文中的结构简图如下:
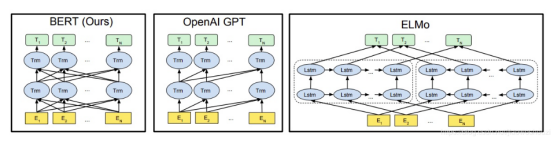
这样的双向transformer的结构,在NLP的大部分任务中取得了很好的效果,具备较强的泛化能力。由于使用了海量的语料进行了训练,bert模型可以使用pretrain——fine-tune这种方式来进行各类NLP任务。
bert与训练的流程:
这个过程包括两个任务,一个是Masked Language Model(遮掩语言模型),另外一个是Next Sentence Prediction(下一句预测)。
Masked Language Model(遮掩语言模型)可以理解为是做完型填空,把语料中15%的词遮掩掉,来学习词和词之间的一些规律;
Next Sentence Prediction就是学习语料中上下文中2个句子之间的关系规律。
通过这2个阶段任务的学习,bert就会把文本的语法和语义信息学习到。bert模型中的self-attention机制可以使用文本其他的词来增强目标词的语义表示,这也是bert模型吊打其他模型的一个关键原因。
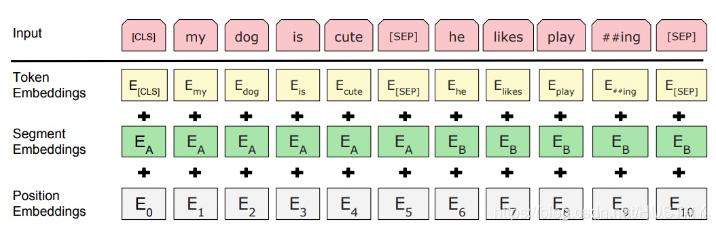
bert模型的输入
bert模型的输入可以是一个句子或者句子对,代码层面来说,就是输入了句子或者句子对对应的3个向量。它们分别是token embedding,segment embedding和position embedding,具体的含义:
token embedding:句子的词向量
segment embedding:是那个句子的0和1
position embedding:位置向量,指明每个字在句中的位置。
关于position embedding这里有两种求法,一种是有相应的三角函数公式得出的,这种是绝对向量;还有一种是学习得到的,这种是相对向量。具体形式如下:
二、huggingface的bert源码浅析
关于bert模型的使用,我主要是使用huggingface的transformer库来调用bert和使用——一般是直接用来bert来获取词向量。这里就bert的使用和huggingface中的源码进行一些解读。
bert提取文本词向量
首先看一段简单的代码,使用huggingface的transformers(其实就是实现的bert)来提取句——我爱武汉!我爱中国!——的向量。代码如下:
-
from transformers
import BertModel,BertTokenizer,BertConfig
-
import torch
-
-
config = BertConfig.from_pretrained(
'pretrain_model/chinese-bert-wwm')
#第一步加载模型配置文件
-
bertmodel = BertModel.from_pretrained(
'pretrain_model/chinese-bert-wwm',config=config)
#第二步初始化模型,并加载权重
-
# print('***************************bertmodel***************************')
-
tokenizer = BertTokenizer.from_pretrained(
'pretrain_model/chinese-bert-wwm')
#第三步加载tokenizer
-
-
text1 =
'我爱武汉!我爱中国!'
-
tokeniz_text1 = tokenizer.tokenize(text1)
-
# print(tokeniz_text1)
-
# print('tokeniz_text1:',len(tokeniz_text1))
-
indexed_tokens_1 = tokenizer.convert_tokens_to_ids(tokeniz_text1)
-
print(
'len(indexed_tokens_1):',len(indexed_tokens_1))
-
print(indexed_tokens_1)
-
-
-
-
input_ids_1 = indexed_tokens_1
-
# print(indexed_tokens_1)
-
# print('indexed_tokens_1:',len(indexed_tokens_1))
-
segments_ids_1 = [
0]*len(input_ids_1)
#其实这个输入可以不用的,因为是单句的原因
-
input_masks_1 = [
1]*len(input_ids_1)
#其实这个输入可以不用的,因为是单句的原因
-
-
input_ids_1_tensor = torch.tensor([input_ids_1])
-
vector1,pooler1 = bertmodel(input_ids_1_tensor)
#应该是输入3个向量的,但是单句情况下,它自会自己做判断,然后自动生成对应的segments_ids和input_masks向量
-
#这里的输出最后一层的last_hidden_state和最后一层首个token的hidden-state
-
-
-
text2 =
'[CLS]我爱武汉!我爱中国![SEP]'
-
tokeniz_text2 = tokenizer.tokenize(text2)
-
indexed_tokens_2 = tokenizer.convert_tokens_to_ids(tokeniz_text2)
-
-
input_ids_2 = indexed_tokens_2
-
segments_ids_2 = [
0]*len(input_ids_2)
#其实这个输入可以不用的,因为是单句的原因
-
input_masks_2 = [
1]*len(input_ids_2)
#其实这个输入可以不用的,因为是单句的原因
-
-
input_ids_2_tensor = torch.tensor([input_ids_2])
-
vector2,pooler2 = bertmodel(input_ids_2_tensor)
-
print(
'pooler2:',pooler2)
-
print(
'vector2[:,0:1,:]:',vector2[:,
0:
1,:])
-
-
-
-
text1_encode = tokenizer.encode(text1,add_special_tokens=
True)
-
print(
'len(text1_encode):',len(text1_encode))
-
print(
'text1_encode:',text1_encode)
-
#这里的text1_encode和indexed_tokens_2是一模一样的,encode()函数会自动为文本添加特殊字符[UNK][CLS][SEP][MASK]等
以上代码是基于pytorch来实现的,同时应用到了transoformers库!可以看到bert模型的使用非常简单!
第一步,初始化bert模型和加载权重。这个步骤中,首先加载配置文件、然后加载bert模型和载入权重。
第二步,对输入文本做词表映射,形成初始词向量。
第三步,输入喂入bert模型中得到输入文本的结果向量。
文中是bert模型的输入我这里只给出了一个那就是input_ids,另外的2个没有给出。这里的原因就是这里是单个句子,模型内部可以对另外2个输入做自动添加的处理——并不是没有,这点要注意到。
这里有个疑问因为bert的输入文本得添加一个[cls]特殊字符,我认为最后的输出lsat_hidden_state中的lsat_hidden_state[:,0:1,:]应该和pooler结果是一样的,可是这里是不一样的,有点理解的偏差,不知道为什么。
BertModel代码阅读
通过上文中的代码,大致可以知道怎么调用一些API来创建bert模型和应用它。那么huggingface中是怎么实现BertModel的这个也是比较重要的,这里我们就好好阅读以下其中关于BertModel实现的代码。看一张transformers项目文件结构图:
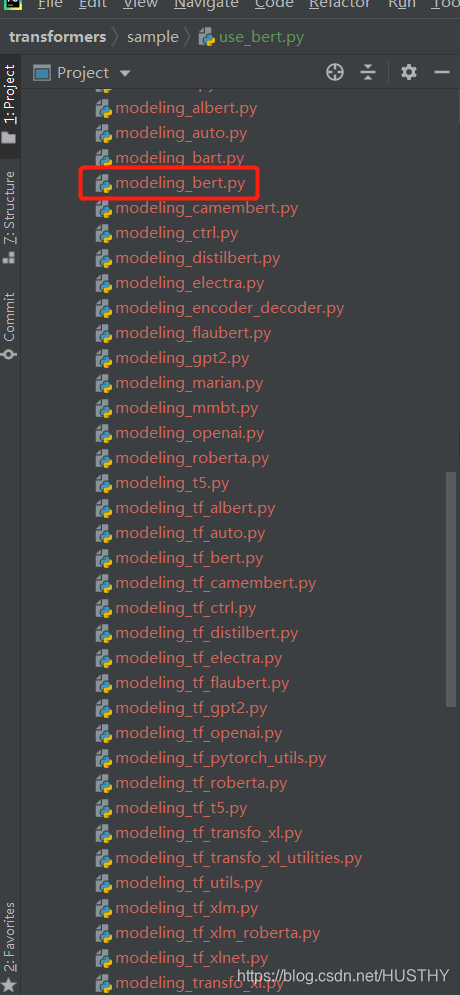
这么面封装了很多模型的构建,我们主要是阅读modeling_bert.py文件,它在里面详细的展示了如何构建一个Bert模型的:
-
class BertModel(BertPreTrainedModel):
-
"""
-
.......
-
-
"""
-
-
def __init__(self, config):
-
super().__init__(config)
-
self.config = config
-
-
self.embeddings = BertEmbeddings(config)
-
self.encoder = BertEncoder(config)
-
self.pooler = BertPooler(config)
-
-
self.init_weights()
-
-
def get_input_embeddings(self):
-
return self.embeddings.word_embeddings
-
-
def set_input_embeddings(self, value):
-
self.embeddings.word_embeddings = value
-
-
def _prune_heads(self, heads_to_prune):
-
""" Prunes heads of the model.
-
heads_to_prune: dict of {layer_num: list of heads to prune in this layer}
-
See base class PreTrainedModel
-
"""
-
for layer, heads
in heads_to_prune.items():
-
self.encoder.layer[layer].attention.prune_heads(heads)
-
-
@add_start_docstrings_to_callable(BERT_INPUTS_DOCSTRING)
-
def forward(
-
self,
-
input_ids=None,
-
attention_mask=None,
-
token_type_ids=None,
-
position_ids=None,
-
head_mask=None,
-
inputs_embeds=None,
-
encoder_hidden_states=None,
-
encoder_attention_mask=None,
-
):
-
r""".......
-
"""
-
-
if input_ids
is
not
None
and inputs_embeds
is
not
None:
-
raise ValueError(
"You cannot specify both input_ids and inputs_embeds at the same time")
-
elif input_ids
is
not
None:
-
input_shape = input_ids.size()
-
elif inputs_embeds
is
not
None:
-
input_shape = inputs_embeds.size()[:
-1]
-
else:
-
raise ValueError(
"You have to specify either input_ids or inputs_embeds")
-
-
device = input_ids.device
if input_ids
is
not
None
else inputs_embeds.device
-
-
if attention_mask
is
None:
-
attention_mask = torch.ones(input_shape, device=device)
-
if token_type_ids
is
None:
-
token_type_ids = torch.zeros(input_shape, dtype=torch.long, device=device)
-
-
# We can provide a self-attention mask of dimensions [batch_size, from_seq_length, to_seq_length]
-
# ourselves in which case we just need to make it broadcastable to all heads.
-
extended_attention_mask: torch.Tensor = self.get_extended_attention_mask(
-
attention_mask, input_shape, self.device
-
)
-
-
# If a 2D ou 3D attention mask is provided for the cross-attention
-
# we need to make broadcastabe to [batch_size, num_heads, seq_length, seq_length]
-
if self.config.is_decoder
and encoder_hidden_states
is
not
None:
-
encoder_batch_size, encoder_sequence_length, _ = encoder_hidden_states.size()
-
encoder_hidden_shape = (encoder_batch_size, encoder_sequence_length)
-
if encoder_attention_mask
is
None:
-
encoder_attention_mask = torch.ones(encoder_hidden_shape, device=device)
-
encoder_extended_attention_mask = self.invert_attention_mask(encoder_attention_mask)
-
else:
-
encoder_extended_attention_mask =
None
-
-
# Prepare head mask if needed
-
# 1.0 in head_mask indicate we keep the head
-
# attention_probs has shape bsz x n_heads x N x N
-
# input head_mask has shape [num_heads] or [num_hidden_layers x num_heads]
-
# and head_mask is converted to shape [num_hidden_layers x batch x num_heads x seq_length x seq_length]
-
head_mask = self.get_head_mask(head_mask, self.config.num_hidden_layers)
-
-
embedding_output = self.embeddings(
-
input_ids=input_ids, position_ids=position_ids, token_type_ids=token_type_ids, inputs_embeds=inputs_embeds
-
)
-
encoder_outputs = self.encoder(
-
embedding_output,
-
attention_mask=extended_attention_mask,
-
head_mask=head_mask,
-
encoder_hidden_states=encoder_hidden_states,
-
encoder_attention_mask=encoder_extended_attention_mask,
-
)
-
sequence_output = encoder_outputs[
0]
-
pooled_output = self.pooler(sequence_output)
-
-
outputs = (sequence_output, pooled_output,) + encoder_outputs[
-
1:
-
]
# add hidden_states and attentions if they are here
-
return outputs
# sequence_output, pooled_output, (hidden_states), (attentions)
以上就是BertModel的全部代码,可以看到在BertModel类中,首先__init__()函数中定义了模型的基本模块,然后在forward()函数里面使用这些结构模块具体实现了Bert的逻辑。
-
def __init__(self, config):
-
super().__init__(config)
-
self.config = config
-
-
self.embeddings = BertEmbeddings(config)
-
self.encoder = BertEncoder(config)
-
self.pooler = BertPooler(config)
-
-
self.init_weights()
__init__()函数中定义的模型模块主要是3个,分别是BertEmbedding、BertEncoder和BertPooler。然后在forward(),输入顺序的经过这3个模块的处理就得到了我们要的结果——对应文本的bert向量。
下面来阅读forward():
-
if input_ids
is
not
None
and inputs_embeds
is
not
None:
-
raise ValueError(
"You cannot specify both input_ids and inputs_embeds at the same time")
-
elif input_ids
is
not
None:
-
input_shape = input_ids.size()
-
elif inputs_embeds
is
not
None:
-
input_shape = inputs_embeds.size()[:
-1]
-
else:
-
raise ValueError(
"You have to specify either input_ids or inputs_embeds")
-
-
device = input_ids.device
if input_ids
is
not
None
else inputs_embeds.device
-
-
if attention_mask
is
None:
-
attention_mask = torch.ones(input_shape, device=device)
-
if token_type_ids
is
None:
-
token_type_ids = torch.zeros(input_shape, dtype=torch.long, device=device)
-
-
# We can provide a self-attention mask of dimensions [batch_size, from_seq_length, to_seq_length]
-
# ourselves in which case we just need to make it broadcastable to all heads.
-
if attention_mask.dim() ==
3:
-
extended_attention_mask = attention_mask[:,
None, :, :]
-
elif attention_mask.dim() ==
2:
-
# Provided a padding mask of dimensions [batch_size, seq_length]
-
# - if the model is a decoder, apply a causal mask in addition to the padding mask
-
# - if the model is an encoder, make the mask broadcastable to [batch_size, num_heads, seq_length, seq_length]
-
if self.config.is_decoder:
-
batch_size, seq_length = input_shape
-
seq_ids = torch.arange(seq_length, device=device)
-
causal_mask = seq_ids[
None,
None, :].repeat(batch_size, seq_length,
1) <= seq_ids[
None, :,
None]
-
causal_mask = causal_mask.to(
-
attention_mask.dtype
-
)
# causal and attention masks must have same type with pytorch version < 1.3
-
extended_attention_mask = causal_mask[:,
None, :, :] * attention_mask[:,
None,
None, :]
-
else:
-
extended_attention_mask = attention_mask[:,
None,
None, :]
-
else:
-
raise ValueError(
-
"Wrong shape for input_ids (shape {}) or attention_mask (shape {})".format(
-
input_shape, attention_mask.shape
-
)
-
)
-
-
# Since attention_mask is 1.0 for positions we want to attend and 0.0 for
-
# masked positions, this operation will create a tensor which is 0.0 for
-
# positions we want to attend and -10000.0 for masked positions.
-
# Since we are adding it to the raw scores before the softmax, this is
-
# effectively the same as removing these entirely.
-
extended_attention_mask = extended_attention_mask.to(dtype=next(self.parameters()).dtype)
# fp16 compatibility
-
extended_attention_mask = (
1.0 - extended_attention_mask) *
-10000.0
-
-
# If a 2D ou 3D attention mask is provided for the cross-attention
-
# we need to make broadcastabe to [batch_size, num_heads, seq_length, seq_length]
-
if self.config.is_decoder
and encoder_hidden_states
is
not
None:
-
encoder_batch_size, encoder_sequence_length, _ = encoder_hidden_states.size()
-
encoder_hidden_shape = (encoder_batch_size, encoder_sequence_length)
-
if encoder_attention_mask
is
None:
-
encoder_attention_mask = torch.ones(encoder_hidden_shape, device=device)
-
-
if encoder_attention_mask.dim() ==
3:
-
encoder_extended_attention_mask = encoder_attention_mask[:,
None, :, :]
-
elif encoder_attention_mask.dim() ==
2:
-
encoder_extended_attention_mask = encoder_attention_mask[:,
None,
None, :]
-
else:
-
raise ValueError(
-
"Wrong shape for encoder_hidden_shape (shape {}) or encoder_attention_mask (shape {})".format(
-
encoder_hidden_shape, encoder_attention_mask.shape
-
)
-
)
-
-
encoder_extended_attention_mask = encoder_extended_attention_mask.to(
-
dtype=next(self.parameters()).dtype
-
)
# fp16 compatibility
-
encoder_extended_attention_mask = (
1.0 - encoder_extended_attention_mask) *
-10000.0
-
else:
-
encoder_extended_attention_mask =
None
-
-
# Prepare head mask if needed
-
# 1.0 in head_mask indicate we keep the head
-
# attention_probs has shape bsz x n_heads x N x N
-
# input head_mask has shape [num_heads] or [num_hidden_layers x num_heads]
-
# and head_mask is converted to shape [num_hidden_layers x batch x num_heads x seq_length x seq_length]
-
if head_mask
is
not
None:
-
if head_mask.dim() ==
1:
-
head_mask = head_mask.unsqueeze(
0).unsqueeze(
0).unsqueeze(
-1).unsqueeze(
-1)
-
head_mask = head_mask.expand(self.config.num_hidden_layers,
-1,
-1,
-1,
-1)
-
elif head_mask.dim() ==
2:
-
head_mask = (
-
head_mask.unsqueeze(
1).unsqueeze(
-1).unsqueeze(
-1)
-
)
# We can specify head_mask for each layer
-
head_mask = head_mask.to(
-
dtype=next(self.parameters()).dtype
-
)
# switch to fload if need + fp16 compatibility
-
else:
-
head_mask = [
None] * self.config.num_hidden_layers
以上是一些预处理的代码。判定input_ids的合法性,不能为空不能和inputs_embeds同时输入;接着就获取使用的设备是CPU还是GPU;判定attention_mask和token_type_ids的合法性,为None的话就新建一个;处理attention_mask得到encoder_extended_attention_mask,把它传播给所有的注意力头;最后就是判定是否启用decoder——bert模型是基于encoder的,我认为这里就不必要做这个判定,bert的encoder的结果只是传递给下一层encoder,并没有传递到decoder。
下面具体看核心的部分。
上面把输入做一些预处理后,使得输入都合法,然后就可以喂入模型的功能模块中。第一个就是
BertEmbedding子模型
其中的self.embeddings()就是__inti__()的BertEmbeddings(config)模块,它可以看做是一个起embedding功能作用的子模型,具体代码:
-
class BertEmbeddings(nn.Module):
-
"""Construct the embeddings from word, position and token_type embeddings.
-
"""
-
-
def __init__(self, config):
-
super().__init__()
-
self.word_embeddings = nn.Embedding(config.vocab_size, config.hidden_size, padding_idx=
0)
-
self.position_embeddings = nn.Embedding(config.max_position_embeddings, config.hidden_size)
-
self.token_type_embeddings = nn.Embedding(config.type_vocab_size, config.hidden_size)
-
-
# self.LayerNorm is not snake-cased to stick with TensorFlow model variable name and be able to load
-
# any TensorFlow checkpoint file
-
self.LayerNorm = BertLayerNorm(config.hidden_size, eps=config.layer_norm_eps)
-
self.dropout = nn.Dropout(config.hidden_dropout_prob)
-
-
def forward(self, input_ids=None, token_type_ids=None, position_ids=None, inputs_embeds=None):
-
if input_ids
is
not
None:
-
input_shape = input_ids.size()
-
else:
-
input_shape = inputs_embeds.size()[:
-1]
-
-
seq_length = input_shape[
1]
-
device = input_ids.device
if input_ids
is
not
None
else inputs_embeds.device
-
if position_ids
is
None:
-
position_ids = torch.arange(seq_length, dtype=torch.long, device=device)
-
position_ids = position_ids.unsqueeze(
0).expand(input_shape)
-
if token_type_ids
is
None:
-
token_type_ids = torch.zeros(input_shape, dtype=torch.long, device=device)
-
-
if inputs_embeds
is
None:
-
inputs_embeds = self.word_embeddings(input_ids)
-
position_embeddings = self.position_embeddings(position_ids)
-
token_type_embeddings = self.token_type_embeddings(token_type_ids)
-
-
embeddings = inputs_embeds + position_embeddings + token_type_embeddings
-
embeddings = self.LayerNorm(embeddings)
-
embeddings = self.dropout(embeddings)
-
return embeddings
它的具体作用就是:首先把我们输入的input_ids、token_type_ids和position_ids——(这里输入的是对应元素在词典中的index集合)经过torch.nn.Embedding()在各自的词典中得到词嵌入。然后把这3个向量直接做加法运算,接着做层归一化以及dropout()操作。这里为何可以直接相加是可以做一个专门的问题来讨论的,这里的归一化的作用应该就是避免一些数值问题、梯度问题和模型收敛问题以及分布改变问题,dropout操作随机丢弃掉一部分特征,可以增加模型的泛化性能。
BertEncoder
经过上述的处理后,我们就得到了一个维度是[batch_size,sequence_length,hidden_states]的向量embeddings。然后再把这个embeddings输入到Encoder中,代码如下,参数都很清晰明确:
这里的self.encoder同样是__init__()中的BertEncoder(config)模型,全部代码如下:
-
class BertEncoder(nn.Module):
-
def __init__(self, config):
-
super().__init__()
-
self.output_attentions = config.output_attentions
-
self.output_hidden_states = config.output_hidden_states
-
self.layer = nn.ModuleList([BertLayer(config)
for _
in range(config.num_hidden_layers)])
-
-
def forward(
-
self,
-
hidden_states,
-
attention_mask=None,
-
head_mask=None,
-
encoder_hidden_states=None,
-
encoder_attention_mask=None,
-
):
-
all_hidden_states = ()
-
all_attentions = ()
-
for i, layer_module
in enumerate(self.layer):
-
if self.output_hidden_states:
-
all_hidden_states = all_hidden_states + (hidden_states,)
-
-
layer_outputs = layer_module(
-
hidden_states, attention_mask, head_mask[i], encoder_hidden_states, encoder_attention_mask
-
)
-
hidden_states = layer_outputs[
0]
-
-
if self.output_attentions:
-
all_attentions = all_attentions + (layer_outputs[
1],)
-
-
# Add last layer
-
if self.output_hidden_states:
-
all_hidden_states = all_hidden_states + (hidden_states,)
-
-
outputs = (hidden_states,)
-
if self.output_hidden_states:
-
outputs = outputs + (all_hidden_states,)
-
if self.output_attentions:
-
outputs = outputs + (all_attentions,)
-
return outputs
其中模型定义部分的核心代码如下:
self.layer = nn.ModuleList([BertLayer(config) for _ in range(config.num_hidden_layers)])
通过这句代码和config中的参数——"num_hidden_layers": 12——可以得出BertEncoder使用12个(层)BertLayer组成的。对每一层的bertlayer在forward()中的for循环做如下操作:
-
for i, layer_module
in enumerate(self.layer):
-
if self.output_hidden_states:
-
all_hidden_states = all_hidden_states + (hidden_states,)
-
-
layer_outputs = layer_module(
-
hidden_states, attention_mask, head_mask[i], encoder_hidden_states, encoder_attention_mask
-
)
-
hidden_states = layer_outputs[
0]
-
-
if self.output_attentions:
-
all_attentions = all_attentions + (layer_outputs[
1],)
更新hidden_states(也就是layer_outputs[0]),然后把更新后的hidden_states传入到下一层BertLayer中,同时把每一层的hidden_states和attentions(也就是layer_outputs[1])记录下来,然后作为一个整体输出。所有最后的输出里包含的有最后一层BertLayer的hidden_states和12层所有的hidden_states以及attentions。
BertLayer具体又是什么样的呢?这里就需要看看具体的BertLayer的实现:
-
class BertLayer(nn.Module):
-
def __init__(self, config):
-
super().__init__()
-
self.attention = BertAttention(config)
-
self.is_decoder = config.is_decoder
-
if self.is_decoder:
-
self.crossattention = BertAttention(config)
-
self.intermediate = BertIntermediate(config)
-
self.output = BertOutput(config)
可以看到BertLayer是由BertAttention()、BertIntermediate()和BertOutput()构成。它的forward()是比较简单的,没有什么奇特的操作,都是顺序的把输入经过BertAttention()、BertIntermediate()和BertOutput()这些子模型。这里主要来看看这些子模型的实现:
BertAttention
这里它又嵌套了一层,由BertSelfAttention()和BertSelfOutput()子模型组成!
这里马上就看到self-attention机制的实现了!感觉好激动!——Self-Attention则利用了Attention机制,计算每个单词与其他所有单词之间的关联(说实话理解的不是很透彻!)
-
class BertSelfAttention(nn.Module):
-
def __init__(self, config):
-
super().__init__()
-
if config.hidden_size % config.num_attention_heads !=
0
and
not hasattr(config,
"embedding_size"):
-
raise ValueError(
-
"The hidden size (%d) is not a multiple of the number of attention "
-
"heads (%d)" % (config.hidden_size, config.num_attention_heads)
-
)
-
self.output_attentions = config.output_attentions
-
-
self.num_attention_heads = config.num_attention_heads
-
self.attention_head_size = int(config.hidden_size / config.num_attention_heads)
-
self.all_head_size = self.num_attention_heads * self.attention_head_size
-
-
self.query = nn.Linear(config.hidden_size, self.all_head_size)
-
self.key = nn.Linear(config.hidden_size, self.all_head_size)
-
self.value = nn.Linear(config.hidden_size, self.all_head_size)
-
-
self.dropout = nn.Dropout(config.attention_probs_dropout_prob)
-
-
def transpose_for_scores(self, x):
-
new_x_shape = x.size()[:
-1] + (self.num_attention_heads, self.attention_head_size)
-
x = x.view(*new_x_shape)
-
return x.permute(
0,
2,
1,
3)
-
-
def forward(
-
self,
-
hidden_states,
-
attention_mask=None,
-
head_mask=None,
-
encoder_hidden_states=None,
-
encoder_attention_mask=None,
-
):
-
mixed_query_layer = self.query(hidden_states)
-
-
# If this is instantiated as a cross-attention module, the keys
-
# and values come from an encoder; the attention mask needs to be
-
# such that the encoder's padding tokens are not attended to.
-
if encoder_hidden_states
is
not
None:
-
mixed_key_layer = self.key(encoder_hidden_states)
-
mixed_value_layer = self.value(encoder_hidden_states)
-
attention_mask = encoder_attention_mask
-
else:
-
mixed_key_layer = self.key(hidden_states)
-
mixed_value_layer = self.value(hidden_states)
-
-
query_layer = self.transpose_for_scores(mixed_query_layer)
-
key_layer = self.transpose_for_scores(mixed_key_layer)
-
value_layer = self.transpose_for_scores(mixed_value_layer)
-
-
# Take the dot product between "query" and "key" to get the raw attention scores.
-
attention_scores = torch.matmul(query_layer, key_layer.transpose(
-1,
-2))
-
attention_scores = attention_scores / math.sqrt(self.attention_head_size)
-
if attention_mask
is
not
None:
-
# Apply the attention mask is (precomputed for all layers in BertModel forward() function)
-
attention_scores = attention_scores + attention_mask
-
-
# Normalize the attention scores to probabilities.
-
attention_probs = nn.Softmax(dim=
-1)(attention_scores)
-
-
# This is actually dropping out entire tokens to attend to, which might
-
# seem a bit unusual, but is taken from the original Transformer paper.
-
attention_probs = self.dropout(attention_probs)
-
-
# Mask heads if we want to
-
if head_mask
is
not
None:
-
attention_probs = attention_probs * head_mask
-
-
context_layer = torch.matmul(attention_probs, value_layer)
-
-
context_layer = context_layer.permute(
0,
2,
1,
3).contiguous()
-
new_context_layer_shape = context_layer.size()[:
-2] + (self.all_head_size,)
-
context_layer = context_layer.view(*new_context_layer_shape)
-
-
outputs = (context_layer, attention_probs)
if self.output_attentions
else (context_layer,)
-
return outputs
阅读代码之前先回顾一下,self-attention的公式是什么样的,公式编辑比较麻烦直接上2个图,都是来自Attention机制详解(二)——Self-Attention与Transformer文章中:
首先定义Q、K、V
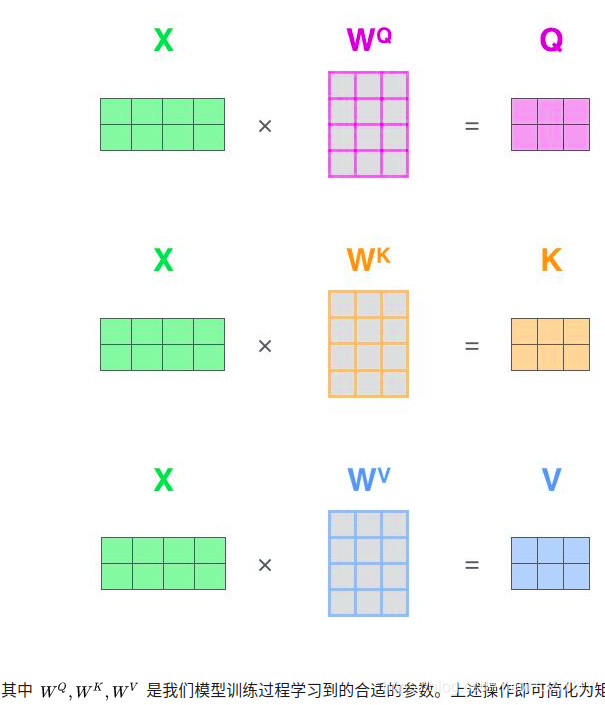
然后应用到公式中:

以上就是单个头的self-attention的公式,多头的话就可以计算多次,然后在合并起来。这里就可以应用到矩阵运算了,还要注意的点就是Q、K、V的学习参数都是共享的——(要去验证),代码对应的就是:
-
self.query = nn.Linear(config.hidden_size, self.all_head_size)
-
self.key = nn.Linear(config.hidden_size, self.all_head_size)
-
self.value = nn.Linear(config.hidden_size, self.all_head_size)
-
#注意这里的nn.Linear包含的学习参数一个是权重参数weights一个是偏置参数bias
-
#而且这里的query、key以及value它们的参数不一样,也就是并不共享参数
参数都包含在nn.Linear中了,这里的self.query对应的是12个头的self-attention机制对应的Q的学习参数模型,当然query、key以及value它们的参数不一样,也就是并不共享参数。
那么在forward()中是如何实现的呢?
-
mixed_query_layer = self.query(hidden_states)
#计算Q
-
if encoder_hidden_states
is
not
None:
-
mixed_key_layer = self.key(encoder_hidden_states)
-
mixed_value_layer = self.value(encoder_hidden_states)
-
attention_mask = encoder_attention_mask
-
else:
-
mixed_key_layer = self.key(hidden_states)
#计算K
-
mixed_value_layer = self.value(hidden_states)
#计算V
-
-
#做转置操作——这有点特殊:mixed_query_layer[batch_size,sequence_length,hidden_states]
-
#query_layer的维度:[batch_size,num_attention_heads,sequence_length,attention_head_size]
-
query_layer = self.transpose_for_scores(mixed_query_layer)
-
key_layer = self.transpose_for_scores(mixed_key_layer)
-
value_layer = self.transpose_for_scores(mixed_value_layer)
-
-
#Q和K做点积
-
attention_scores = torch.matmul(query_layer, key_layer.transpose(
-1,
-2))
-
#Q和K做点积后然后除以根号下多头主力的尺寸
-
attention_scores = attention_scores / math.sqrt(self.attention_head_size)
-
if attention_mask
is
not
None:
-
# Apply the attention mask is (precomputed for all layers in BertModel forward() function)
-
attention_scores = attention_scores + attention_mask
-
-
# Normalize the attention scores to probabilities.
-
#做softmax操作,归一化
-
attention_probs = nn.Softmax(dim=
-1)(attention_scores)
-
-
# This is actually dropping out entire tokens to attend to, which might
-
# seem a bit unusual, but is taken from the original Transformer paper.
-
attention_probs = self.dropout(attention_probs)
-
-
# Mask heads if we want to
-
if head_mask
is
not
None:
-
attention_probs = attention_probs * head_mask
-
#中间结果和V做点积,得到最终结果——注意力得分也就是公式中的Z
-
context_layer = torch.matmul(attention_probs, value_layer)
以上代码的中文注释就把计算过程分析清楚了,计算mixed_query_layer、mixed_key_layer和mixed_value_layer,然后做转置(说是维度变换更贴切一点);接着mixed_query_layer、mixed_key_layer做点积操作,然后除以注意力头的尺寸的开方,做softmax操作;最后和mixed_value_layer相乘,得到注意力得分————矩阵计算代码就很好的实现了self-attention。
以上就是完成了self-attention,然后接下来就进入BertSelfOutput():
-
class BertSelfOutput(nn.Module):
-
def __init__(self, config):
-
super().__init__()
-
self.dense = nn.Linear(config.hidden_size, config.hidden_size)
-
self.LayerNorm = BertLayerNorm(config.hidden_size, eps=config.layer_norm_eps)
-
self.dropout = nn.Dropout(config.hidden_dropout_prob)
-
-
def forward(self, hidden_states, input_tensor):
-
hidden_states = self.dense(hidden_states)
-
hidden_states = self.dropout(hidden_states)
-
hidden_states = self.LayerNorm(hidden_states + input_tensor)
-
return hidden_states
以上BertSelfOutput()代码很简单,把self-attention输出的结果经过线性模型和dropout操作,最后做层归一化。到这里就跳出了BertAttention()模型,然后就进入中间层BertIntermediate()。
BertIntermediate
BertIntermediate()作为中间层代码很简单:
-
class BertIntermediate(nn.Module):
-
def __init__(self, config):
-
super().__init__()
-
self.dense = nn.Linear(config.hidden_size, config.intermediate_size)
-
if isinstance(config.hidden_act, str):
-
self.intermediate_act_fn = ACT2FN[config.hidden_act]
-
else:
-
self.intermediate_act_fn = config.hidden_act
-
-
def forward(self, hidden_states):
-
hidden_states = self.dense(hidden_states)
-
hidden_states = self.intermediate_act_fn(hidden_states)
-
return hidden_states
经过一个全连接层,由于config.hidden_size<config.intermediate_size,这里的Linear把特征空间变大了,然后进过了gelu激活函数,增加了特征的非线性性。
BertOutput(config)
跳出BertIntermediate()作为中间层后,就进入了BertOutput(config)模型,这个是BertLayer()模型的最后一个子模型。
-
class BertOutput(nn.Module):
-
def __init__(self, config):
-
super().__init__()
-
self.dense = nn.Linear(config.intermediate_size, config.hidden_size)
-
self.LayerNorm = BertLayerNorm(config.hidden_size, eps=config.layer_norm_eps)
-
self.dropout = nn.Dropout(config.hidden_dropout_prob)
-
-
def forward(self, hidden_states, input_tensor):
-
hidden_states = self.dense(hidden_states)
-
hidden_states = self.dropout(hidden_states)
-
hidden_states = self.LayerNorm(hidden_states + input_tensor)
-
return hidden_states
经过线性模型和dropout操作,最后做层归一化,把特征空间又缩小回来了。最后输出一个hidden_states,这里就是一个BertLayer()的输出了。
BertPooler()
然后经历了12个BertLayer()的操作,一层一层的变换,最后得出的outputs进入BertPooler():
-
sequence_output = encoder_outputs[
0]
-
pooled_output = self.pooler(sequence_output)
pooler代码如下:
-
class BertPooler(nn.Module):
-
def __init__(self, config):
-
super().__init__()
-
self.dense = nn.Linear(config.hidden_size, config.hidden_size)
-
self.activation = nn.Tanh()
-
-
def forward(self, hidden_states):
-
# We "pool" the model by simply taking the hidden state corresponding
-
# to the first token.
-
first_token_tensor = hidden_states[:,
0]
-
pooled_output = self.dense(first_token_tensor)
-
pooled_output = self.activation(pooled_output)
-
return pooled_output
-
-
-
#以上的pooler作用要具体的去调试hidden_states的shape。
由代码可知这个pooler的功能就是把last_hidden_states的第二维的第一维也就是文本对应的第一个;。。。、。。
以上差不多就是BertModel的具体实现,由于这个模型的代码嵌套调用过多,可能理解起来有一定的困惑,那么接下来就需要一个图片来可视化理解。上图:
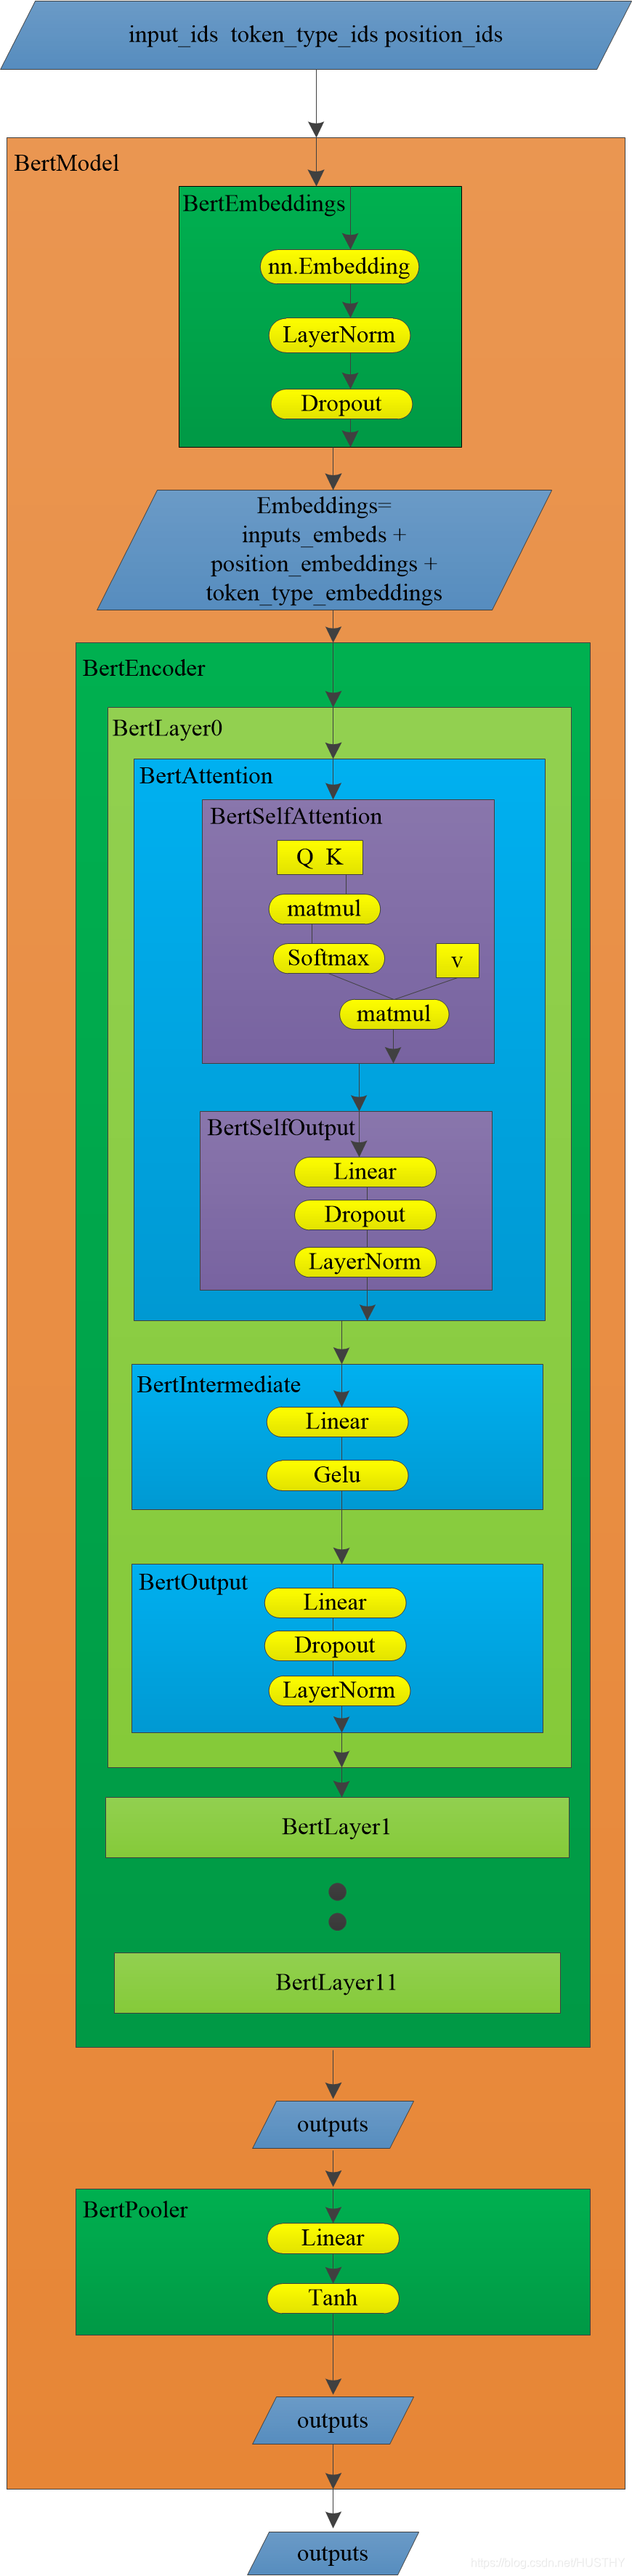
上图是huggingface中的BertModel的结构流程图(简图,有很多疏漏的地方勿怪!),bertModel的输入和基本的子模型以及数据的流向都显示出来了,对应着代码理解起来更加方便。黄色的图形就是torch中的基本函数模块(这里的Q、K和V不是),其他颜色的矩形就是模型,平行四边形就是数据。
以上就是对BertModel实现代码的简单解析,里面涉及到很多的细节:不同模型模块的参数以及它们的维度信息,还有就是变量的维度变化,以及每个模型模块的具体作用和意义,没有去深究,读者有精力的话可以自己去深究。
三、Bert文本分类任务实战
这里我们要写一个使用transformers项目中的分类器来实现一个简单的文本分类任务,这里我们没有自己取重写Dataloader以及模型的训练,就是直接把transformers项目中的bert分类器拿过来进行fine-tune,工作量少,结果也比较好!当然也可以完全自己实现(前面也自己实现过一个基于bert的句子分类的任务——使用bert模型做句子分类,有兴趣的可以移步),后续有时间的话可以写一个各个模型文本分类任务的比较博客,更加熟练文本分类的一些代码coding和知识——增加熟练度,也可以给大家分享一下。
来看本文的transformers项目中的bert分类器进行fine-tune作文本分类的任务,在这个项目里面已经把全部的代码写好了,我们只需要把我们的文本处理成项目能够识别和读取的形式。简单的分析一下,分类任务的代码:

主要的分类任务的代码是在run_glue.py文件中,这里面定义了main函数,命令行参数接收器,模型的加载和调用,模型的训练以及验证,和数据读取以及处理的功能模块调用。
我们看一下这里调用的分类模型,代码是这样的:
-
model = AutoModelForSequenceClassification.from_pretrained(
-
args.model_name_or_path,
-
from_tf=bool(
".ckpt"
in args.model_name_or_path),
-
config=config,
-
cache_dir=args.cache_dir,
-
)
其实最终这里的AutoModelForSequenceClassification.from_pretrained()调用的是modeling_bert.py中的BertForSequenceClassification类,它就是具体的分类器实现:
-
class BertForSequenceClassification(BertPreTrainedModel):
-
def __init__(self, config):
-
super().__init__(config)
-
self.num_labels = config.num_labels
-
-
self.bert = BertModel(config)
-
self.dropout = nn.Dropout(config.hidden_dropout_prob)
-
self.classifier = nn.Linear(config.hidden_size, self.config.num_labels)
-
-
self.init_weights()
-
-
def forward(
-
self,
-
input_ids=None,
-
attention_mask=None,
-
token_type_ids=None,
-
position_ids=None,
-
head_mask=None,
-
inputs_embeds=None,
-
labels=None,
-
):
-
outputs = self.bert(
-
input_ids,
-
attention_mask=attention_mask,
-
token_type_ids=token_type_ids,
-
position_ids=position_ids,
-
head_mask=head_mask,
-
inputs_embeds=inputs_embeds,
-
)
-
-
pooled_output = outputs[
1]
-
-
pooled_output = self.dropout(pooled_output)
-
logits = self.classifier(pooled_output)
-
-
outputs = (logits,) + outputs[
2:]
# add hidden states and attention if they are here
-
-
if labels
is
not
None:
-
if self.num_labels ==
1:
-
# We are doing regression
-
loss_fct = MSELoss()
-
loss = loss_fct(logits.view(
-1), labels.view(
-1))
-
else:
-
loss_fct = CrossEntropyLoss()
-
loss = loss_fct(logits.view(
-1, self.num_labels), labels.view(
-1))
-
outputs = (loss,) + outputs
-
-
return outputs
模型调用了BertModel,然后做使用nn.Linear(config.hidden_size, self.config.num_labels)做分类,loss函数是常用的交叉熵损失函数。以上就是分类器的一些简单的分析。 我们要做的工作就是仿照项目里的代码写一个任务处理器:
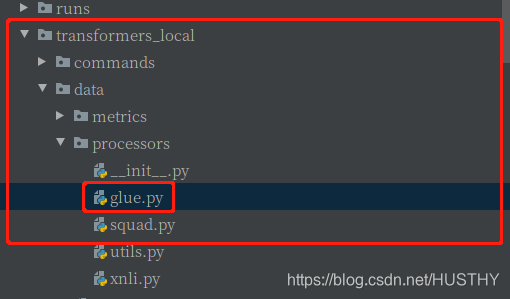
项目目录结构:transformerer_local/data/glue.py,注意这里的transformerer_local原本应该是transformerer,我这里已经做了修改。在glue.py添加上我们的分类任务代码——添加一个读取文件中的文本然后,然后把每条数据序列化成Example,注意get_labels()函数,把自己的类别数目实现过来,代码如下:
-
class MyownProcessor(DataProcessor):
-
"""Processor for the CoLA data set (GLUE version)."""
-
-
def get_example_from_tensor_dict(self, tensor_dict):
-
"""See base class."""
-
return InputExample(
-
tensor_dict[
"idx"].numpy(),
-
tensor_dict[
"sentence"].numpy().decode(
"utf-8"),
-
None,
-
str(tensor_dict[
"label"].numpy()),
-
)
-
-
def get_train_examples(self, data_dir):
-
"""See base class."""
-
return self._create_examples(self._read_tsv(os.path.join(data_dir,
"train.tsv")),
"train")
-
-
def get_dev_examples(self, data_dir):
-
"""See base class."""
-
return self._create_examples(self._read_tsv(os.path.join(data_dir,
"dev.tsv")),
"dev")
-
-
def get_predict_examples(self, data_dir):
-
return self._create_examples(self._read_tsv(os.path.join(data_dir,
"test.tsv")),
"predict")
-
-
def get_labels(self):
-
"""See base class."""
-
return [
"0",
"1",
"2",
"3",
"4",
"5",
"6",
"7"]
-
-
def _create_examples(self, lines, set_type):
-
"""Creates examples for the training and dev sets."""
-
examples = []
-
for (i, line)
in enumerate(lines):
-
guid =
"%s-%s" % (set_type, i)
-
if len(line)==
2:
-
text_a = line[
0]
-
label = line[
1]
-
examples.append(InputExample(guid=guid, text_a=text_a, text_b=
None, label=label))
-
else:
-
print(line)
-
return examples
同时在验证的时候,对应评价指标函数,我们这里不是binary,计算f1_score的时候要采用其他的策略:
transformerer_local/data/metrics/__init__.py,注意这里的transformerer_local原本应该是transformerer,添加内容:
-
#添加多分类评价函数
-
def acc_and_f1_multi(preds, labels):
-
acc = simple_accuracy(preds, labels)
-
f1 = f1_score(y_true=labels, y_pred=preds,average=
'micro')
-
return {
-
"acc": acc,
-
"f1": f1,
-
"acc_and_f1": (acc + f1) /
2,
-
}
-
-
-
def glue_compute_metrics(task_name, preds, labels):
-
assert len(preds) == len(labels)
-
if task_name ==
"cola":
-
return {
"mcc": matthews_corrcoef(labels, preds)}
-
elif task_name ==
"sst-2":
-
return {
"acc": simple_accuracy(preds, labels)}
-
elif task_name ==
"mrpc":
-
return acc_and_f1(preds, labels)
-
elif task_name ==
"sts-b":
-
return pearson_and_spearman(preds, labels)
-
elif task_name ==
"qqp":
-
return acc_and_f1(preds, labels)
-
elif task_name ==
"mnli":
-
return {
"acc": simple_accuracy(preds, labels)}
-
elif task_name ==
"mnli-mm":
-
return {
"acc": simple_accuracy(preds, labels)}
-
elif task_name ==
"qnli":
-
return {
"acc": simple_accuracy(preds, labels)}
-
elif task_name ==
"rte":
-
return {
"acc": simple_accuracy(preds, labels)}
-
elif task_name ==
"wnli":
-
return {
"acc": simple_accuracy(preds, labels)}
-
elif task_name ==
"hans":
-
return {
"acc": simple_accuracy(preds, labels)}
-
#添加我们的多分类任务调用函数
-
elif task_name ==
"myown":
-
return acc_and_f1_multi(preds, labels)
-
else:
-
raise KeyError(task_name)
添加内容就在注释部分。
OK,现在代码部分已经做好了,接下来就是数据部分了。直接上数据:

数据截图部分就是上面这样的,把pat_summary和ipc_class属性提取出来,这里的数据质量比较好,然后只需要把超级长的文本去掉(长度大于510的):

数据长度分布直方图,发现几乎全部都是小于510的长度,只有少部分比较长,只有128条,这里数据集总规模是24.8W条,可以把这少部分的直接去掉。然后把数据分割成训练集和测试集比例(8:2),保存为tsv格式。
接下来就是直接进行训练了,编写如下命令行,在train_glue_classification.sh文件中:
-
export TASK_NAME=myown
-
-
python -W ignore ./examples/run_glue.py \
-
--model_type bert \
-
--model_name_or_path ./pretrain_model/Chinese-BERT-wwm/ \
-
--task_name $TASK_NAME \
-
__do_train \
-
--do_eval \
-
--data_dir ./data_set/patent/ \
-
--max_seq_length
510 \
-
--per_gpu_eval_batch_size=
8 \
-
--per_gpu_train_batch_size=
8 \
-
--per_gpu_predict_batch_size=
48 \
-
--learning_rate
2e-5 \
-
--num_train_epochs
5.0 \
-
--output_dir ./output/
直接在终端上运行这个sh文件,bash train_glue_classification.sh。注意这里的训练显卡显存得11G以上,不然跑步起来,batch_size不能太大。训练过程中,一个epoch大概时间3.5小时,所以时间还要蛮久的。最后给出结果:

可以看到acc=0.8508,一个8分类的任务准确率85%粗略一看还能接受。如果要详细的分析,可以把每一类的准确率和召回率给弄出来,或者分析一下ROC,对模型的性能做详细的分析,这里不做过多讨论。另外关于这个模型的优化,怎么提高准确率,也不做考虑。
小结:以上就是直接使用transformers项目中的bert分类器拿过来进行fine-tune,做文本分类,其实代码都写好了,我们只需要简单的修改一下代码和配置,就能很快的训练好自己的分类器。
四、Bert模型难点总结
其实关于Bert模型还有很多细节可以去探究,这里推荐知乎上的一些文章:超细节的BERT/Transformer知识点。
1、Bert模型怎么解决长文本问题?
如果文本的长度不是特别长,511-600左右,可以直接把大于510的部分直接去掉,这是一种最粗暴的处理办法。
如果文本内容很长,而且内容也比较重要,那么就不能够这么直接粗暴的处理了。主要思路是global norm + passage rank + sliding window——来自Amazon EMNLP的这篇文章:Multi-passage BERT。简单的说一下sliding window,滑窗法就是把文档分割成有部分重叠的短文本段落,然后把这些文本得出的向量拼接起来或者做mean pooling操作。具体的效果,要去做实验。
2、Bert的输入向量Token Embedding、Segment Embedding、Position Embedding,它们都有自己的物理含义,为什么可以相加后输入到模型中取呢?
这个问题在知乎上已经有人提问了,回答的大佬很多。我个人倾向接受这个解释:one hot向量concat后经过一个全连接等价于向量embedding后直接相加。
Token Embedding、Segment Embedding、Position Embedding分别代表了文本的具体语义,段落含义和位置含义,现在要把这3个不同的向量一起放到模型中去训练,我认为concat的操作就能完整的保留文本的含义。[input_ids] 、[token_type_ids] 和[position_ids]这3个向量,concat以后形成一个[input_ids token_type_ids position_ids]新的向量,这样丢入模型中取训练就应该是我们初始要的结果。但是在丢入模型之前这个向量[input_ids token_type_ids position_ids]是需要经过Embedding的,而[input_ids] 、[token_type_ids] 和[position_ids]先经过Embedding然后相加和上面的效果是等价的。这样的好处是降低了参数的维度的同时达到了同样的效果,所以就采用了直接相加。
3、BERT在第一句前会加一个[CLS]标志,为什么?作用是什么?
最后一层的transformer的输出该位置的向量,由于本身并不具有任何意义,就能很公平的融合整个句子的含义,然后做下游任务的时候就很好了。
其实在huggingface实现的bert代码中,作者认为这个向量并不是很好,要想做下有任务,还是得靠自己取把最后一层的hidden_states[B,S,D]去做一些操作,比如mean pool操作。我这里没有实验过,只是拿来使用,在使用bert模型做句子分类一文中使用了这样的思想。
4、Bert模型的非线性来自什么地方?
主要是来子前馈层的gelu激活函数和self-attention。
5、Bert模型为何要使用多头注意力机制?
谷歌bert作者在论文中提到的是模型有多头的话,就可以形成多个子空间,那么模型就可以去关注不同方面的信息。
可以这样理解,多头attention机制确实有点类似多个卷积核的作用,可以捕捉到文本更多更丰富的信息。
当然知乎有人专门研究这个问题,列举了头和头直接的异同关系,作了一个比较综合全面的回答,可以去阅读!为什么Transformer 需要进行 Multi-head Attention?
写在最后:
我个人理解的Bert模型就只有 这么多,其实Bert模型就是一个提取词向量的语言模型,由于提取的词向量能很好的包含文本的语义信息,它能够做很多任务并且取得不错的效果。NER、关系抽取、文本相似度计算、文本分类、阅读理解等等任务Bert都能做。
这个博客个人算是花了一定的精力了的(五一到现在,差不多10天时间吧),作为这段时间以来学习NLP的一个总结还是很有收获感的。加油!继续努力!当然博客可能写的不是干货,也许还有错误的地方,作者水平有限,望大家提出改正!
参考文章
目录
写在最前面,这篇博客篇幅有点长,原因是贴的代码和图有点多,感兴趣的可以坚持读下去!
一、bert模型简介
2018年bert模型被谷歌提出,它在NLP的11项任务中取得了state of the art 的结果。bert模型是由很多层transformer结构堆叠而成,这里简单看看一下transformer的结构,上一张经典的图片,如下:
可以看到transformer是由encoder和decoder模块构成,而bert模型则是利用了transformer的encoder模块。最轻量的bert买模型是由12层transformer,12头注意力,768维的hidden state,在论文中的结构简图如下:
这样的双向transformer的结构,在NLP的大部分任务中取得了很好的效果,具备较强的泛化能力。由于使用了海量的语料进行了训练,bert模型可以使用pretrain——fine-tune这种方式来进行各类NLP任务。
bert与训练的流程:
这个过程包括两个任务,一个是Masked Language Model(遮掩语言模型),另外一个是Next Sentence Prediction(下一句预测)。
Masked Language Model(遮掩语言模型)可以理解为是做完型填空,把语料中15%的词遮掩掉,来学习词和词之间的一些规律;
Next Sentence Prediction就是学习语料中上下文中2个句子之间的关系规律。
通过这2个阶段任务的学习,bert就会把文本的语法和语义信息学习到。bert模型中的self-attention机制可以使用文本其他的词来增强目标词的语义表示,这也是bert模型吊打其他模型的一个关键原因。
bert模型的输入
bert模型的输入可以是一个句子或者句子对,代码层面来说,就是输入了句子或者句子对对应的3个向量。它们分别是token embedding,segment embedding和position embedding,具体的含义:
token embedding:句子的词向量
segment embedding:是那个句子的0和1
position embedding:位置向量,指明每个字在句中的位置。
关于position embedding这里有两种求法,一种是有相应的三角函数公式得出的,这种是绝对向量;还有一种是学习得到的,这种是相对向量。具体形式如下:
二、huggingface的bert源码浅析
关于bert模型的使用,我主要是使用huggingface的transformer库来调用bert和使用——一般是直接用来bert来获取词向量。这里就bert的使用和huggingface中的源码进行一些解读。
bert提取文本词向量
首先看一段简单的代码,使用huggingface的transformers(其实就是实现的bert)来提取句——我爱武汉!我爱中国!——的向量。代码如下:
-
from transformers
import BertModel,BertTokenizer,BertConfig
-
import torch
-
-
config = BertConfig.from_pretrained(
'pretrain_model/chinese-bert-wwm')
#第一步加载模型配置文件
-
bertmodel = BertModel.from_pretrained(
'pretrain_model/chinese-bert-wwm',config=config)
#第二步初始化模型,并加载权重
-
# print('***************************bertmodel***************************')
-
tokenizer = BertTokenizer.from_pretrained(
'pretrain_model/chinese-bert-wwm')
#第三步加载tokenizer
-
-
text1 =
'我爱武汉!我爱中国!'
-
tokeniz_text1 = tokenizer.tokenize(text1)
-
# print(tokeniz_text1)
-
# print('tokeniz_text1:',len(tokeniz_text1))
-
indexed_tokens_1 = tokenizer.convert_tokens_to_ids(tokeniz_text1)
-
print(
'len(indexed_tokens_1):',len(indexed_tokens_1))
-
print(indexed_tokens_1)
-
-
-
-
input_ids_1 = indexed_tokens_1
-
# print(indexed_tokens_1)
-
# print('indexed_tokens_1:',len(indexed_tokens_1))
-
segments_ids_1 = [
0]*len(input_ids_1)
#其实这个输入可以不用的,因为是单句的原因
-
input_masks_1 = [
1]*len(input_ids_1)
#其实这个输入可以不用的,因为是单句的原因
-
-
input_ids_1_tensor = torch.tensor([input_ids_1])
-
vector1,pooler1 = bertmodel(input_ids_1_tensor)
#应该是输入3个向量的,但是单句情况下,它自会自己做判断,然后自动生成对应的segments_ids和input_masks向量
-
#这里的输出最后一层的last_hidden_state和最后一层首个token的hidden-state
-
-
-
text2 =
'[CLS]我爱武汉!我爱中国![SEP]'
-
tokeniz_text2 = tokenizer.tokenize(text2)
-
indexed_tokens_2 = tokenizer.convert_tokens_to_ids(tokeniz_text2)
-
-
input_ids_2 = indexed_tokens_2
-
segments_ids_2 = [
0]*len(input_ids_2)
#其实这个输入可以不用的,因为是单句的原因
-
input_masks_2 = [
1]*len(input_ids_2)
#其实这个输入可以不用的,因为是单句的原因
-
-
input_ids_2_tensor = torch.tensor([input_ids_2])
-
vector2,pooler2 = bertmodel(input_ids_2_tensor)
-
print(
'pooler2:',pooler2)
-
print(
'vector2[:,0:1,:]:',vector2[:,
0:
1,:])
-
-
-
-
text1_encode = tokenizer.encode(text1,add_special_tokens=
True)
-
print(
'len(text1_encode):',len(text1_encode))
-
print(
'text1_encode:',text1_encode)
-
#这里的text1_encode和indexed_tokens_2是一模一样的,encode()函数会自动为文本添加特殊字符[UNK][CLS][SEP][MASK]等
以上代码是基于pytorch来实现的,同时应用到了transoformers库!可以看到bert模型的使用非常简单!
第一步,初始化bert模型和加载权重。这个步骤中,首先加载配置文件、然后加载bert模型和载入权重。
第二步,对输入文本做词表映射,形成初始词向量。
第三步,输入喂入bert模型中得到输入文本的结果向量。
文中是bert模型的输入我这里只给出了一个那就是input_ids,另外的2个没有给出。这里的原因就是这里是单个句子,模型内部可以对另外2个输入做自动添加的处理——并不是没有,这点要注意到。
这里有个疑问因为bert的输入文本得添加一个[cls]特殊字符,我认为最后的输出lsat_hidden_state中的lsat_hidden_state[:,0:1,:]应该和pooler结果是一样的,可是这里是不一样的,有点理解的偏差,不知道为什么。
BertModel代码阅读
通过上文中的代码,大致可以知道怎么调用一些API来创建bert模型和应用它。那么huggingface中是怎么实现BertModel的这个也是比较重要的,这里我们就好好阅读以下其中关于BertModel实现的代码。看一张transformers项目文件结构图:
这么面封装了很多模型的构建,我们主要是阅读modeling_bert.py文件,它在里面详细的展示了如何构建一个Bert模型的:
-
class BertModel(BertPreTrainedModel):
-
"""
-
.......
-
-
"""
-
-
def __init__(self, config):
-
super().__init__(config)
-
self.config = config
-
-
self.embeddings = BertEmbeddings(config)
-
self.encoder = BertEncoder(config)
-
self.pooler = BertPooler(config)
-
-
self.init_weights()
-
-
def get_input_embeddings(self):
-
return self.embeddings.word_embeddings
-
-
def set_input_embeddings(self, value):
-
self.embeddings.word_embeddings = value
-
-
def _prune_heads(self, heads_to_prune):
-
""" Prunes heads of the model.
-
heads_to_prune: dict of {layer_num: list of heads to prune in this layer}
-
See base class PreTrainedModel
-
"""
-
for layer, heads
in heads_to_prune.items():
-
self.encoder.layer[layer].attention.prune_heads(heads)
-
-
@add_start_docstrings_to_callable(BERT_INPUTS_DOCSTRING)
-
def forward(
-
self,
-
input_ids=None,
-
attention_mask=None,
-
token_type_ids=None,
-
position_ids=None,
-
head_mask=None,
-
inputs_embeds=None,
-
encoder_hidden_states=None,
-
encoder_attention_mask=None,
-
):
-
r""".......
-
"""
-
-
if input_ids
is
not
None
and inputs_embeds
is
not
None:
-
raise ValueError(
"You cannot specify both input_ids and inputs_embeds at the same time")
-
elif input_ids
is
not
None:
-
input_shape = input_ids.size()
-
elif inputs_embeds
is
not
None:
-
input_shape = inputs_embeds.size()[:
-1]
-
else:
-
raise ValueError(
"You have to specify either input_ids or inputs_embeds")
-
-
device = input_ids.device
if input_ids
is
not
None
else inputs_embeds.device
-
-
if attention_mask
is
None:
-
attention_mask = torch.ones(input_shape, device=device)
-
if token_type_ids
is
None:
-
token_type_ids = torch.zeros(input_shape, dtype=torch.long, device=device)
-
-
# We can provide a self-attention mask of dimensions [batch_size, from_seq_length, to_seq_length]
-
# ourselves in which case we just need to make it broadcastable to all heads.
-
extended_attention_mask: torch.Tensor = self.get_extended_attention_mask(
-
attention_mask, input_shape, self.device
-
)
-
-
# If a 2D ou 3D attention mask is provided for the cross-attention
-
# we need to make broadcastabe to [batch_size, num_heads, seq_length, seq_length]
-
if self.config.is_decoder
and encoder_hidden_states
is
not
None:
-
encoder_batch_size, encoder_sequence_length, _ = encoder_hidden_states.size()
-
encoder_hidden_shape = (encoder_batch_size, encoder_sequence_length)
-
if encoder_attention_mask
is
None:
-
encoder_attention_mask = torch.ones(encoder_hidden_shape, device=device)
-
encoder_extended_attention_mask = self.invert_attention_mask(encoder_attention_mask)
-
else:
-
encoder_extended_attention_mask =
None
-
-
# Prepare head mask if needed
-
# 1.0 in head_mask indicate we keep the head
-
# attention_probs has shape bsz x n_heads x N x N
-
# input head_mask has shape [num_heads] or [num_hidden_layers x num_heads]
-
# and head_mask is converted to shape [num_hidden_layers x batch x num_heads x seq_length x seq_length]
-
head_mask = self.get_head_mask(head_mask, self.config.num_hidden_layers)
-
-
embedding_output = self.embeddings(
-
input_ids=input_ids, position_ids=position_ids, token_type_ids=token_type_ids, inputs_embeds=inputs_embeds
-
)
-
encoder_outputs = self.encoder(
-
embedding_output,
-
attention_mask=extended_attention_mask,
-
head_mask=head_mask,
-
encoder_hidden_states=encoder_hidden_states,
-
encoder_attention_mask=encoder_extended_attention_mask,
-
)
-
sequence_output = encoder_outputs[
0]
-
pooled_output = self.pooler(sequence_output)
-
-
outputs = (sequence_output, pooled_output,) + encoder_outputs[
-
1:
-
]
# add hidden_states and attentions if they are here
-
return outputs
# sequence_output, pooled_output, (hidden_states), (attentions)
以上就是BertModel的全部代码,可以看到在BertModel类中,首先__init__()函数中定义了模型的基本模块,然后在forward()函数里面使用这些结构模块具体实现了Bert的逻辑。
-
def __init__(self, config):
-
super().__init__(config)
-
self.config = config
-
-
self.embeddings = BertEmbeddings(config)
-
self.encoder = BertEncoder(config)
-
self.pooler = BertPooler(config)
-
-
self.init_weights()
__init__()函数中定义的模型模块主要是3个,分别是BertEmbedding、BertEncoder和BertPooler。然后在forward(),输入顺序的经过这3个模块的处理就得到了我们要的结果——对应文本的bert向量。
下面来阅读forward():
-
if input_ids
is
not
None
and inputs_embeds
is
not
None:
-
raise ValueError(
"You cannot specify both input_ids and inputs_embeds at the same time")
-
elif input_ids
is
not
None:
-
input_shape = input_ids.size()
-
elif inputs_embeds
is
not
None:
-
input_shape = inputs_embeds.size()[:
-1]
-
else:
-
raise ValueError(
"You have to specify either input_ids or inputs_embeds")
-
-
device = input_ids.device
if input_ids
is
not
None
else inputs_embeds.device
-
-
if attention_mask
is
None:
-
attention_mask = torch.ones(input_shape, device=device)
-
if token_type_ids
is
None:
-
token_type_ids = torch.zeros(input_shape, dtype=torch.long, device=device)
-
-
# We can provide a self-attention mask of dimensions [batch_size, from_seq_length, to_seq_length]
-
# ourselves in which case we just need to make it broadcastable to all heads.
-
if attention_mask.dim() ==
3:
-
extended_attention_mask = attention_mask[:,
None, :, :]
-
elif attention_mask.dim() ==
2:
-
# Provided a padding mask of dimensions [batch_size, seq_length]
-
# - if the model is a decoder, apply a causal mask in addition to the padding mask
-
# - if the model is an encoder, make the mask broadcastable to [batch_size, num_heads, seq_length, seq_length]
-
if self.config.is_decoder:
-
batch_size, seq_length = input_shape
-
seq_ids = torch.arange(seq_length, device=device)
-
causal_mask = seq_ids[
None,
None, :].repeat(batch_size, seq_length,
1) <= seq_ids[
None, :,
None]
-
causal_mask = causal_mask.to(
-
attention_mask.dtype
-
)
# causal and attention masks must have same type with pytorch version < 1.3
-
extended_attention_mask = causal_mask[:,
None, :, :] * attention_mask[:,
None,
None, :]
-
else:
-
extended_attention_mask = attention_mask[:,
None,
None, :]
-
else:
-
raise ValueError(
-
"Wrong shape for input_ids (shape {}) or attention_mask (shape {})".format(
-
input_shape, attention_mask.shape
-
)
-
)
-
-
# Since attention_mask is 1.0 for positions we want to attend and 0.0 for
-
# masked positions, this operation will create a tensor which is 0.0 for
-
# positions we want to attend and -10000.0 for masked positions.
-
# Since we are adding it to the raw scores before the softmax, this is
-
# effectively the same as removing these entirely.
-
extended_attention_mask = extended_attention_mask.to(dtype=next(self.parameters()).dtype)
# fp16 compatibility
-
extended_attention_mask = (
1.0 - extended_attention_mask) *
-10000.0
-
-
# If a 2D ou 3D attention mask is provided for the cross-attention
-
# we need to make broadcastabe to [batch_size, num_heads, seq_length, seq_length]
-
if self.config.is_decoder
and encoder_hidden_states
is
not
None:
-
encoder_batch_size, encoder_sequence_length, _ = encoder_hidden_states.size()
-
encoder_hidden_shape = (encoder_batch_size, encoder_sequence_length)
-
if encoder_attention_mask
is
None:
-
encoder_attention_mask = torch.ones(encoder_hidden_shape, device=device)
-
-
if encoder_attention_mask.dim() ==
3:
-
encoder_extended_attention_mask = encoder_attention_mask[:,
None, :, :]
-
elif encoder_attention_mask.dim() ==
2:
-
encoder_extended_attention_mask = encoder_attention_mask[:,
None,
None, :]
-
else:
-
raise ValueError(
-
"Wrong shape for encoder_hidden_shape (shape {}) or encoder_attention_mask (shape {})".format(
-
encoder_hidden_shape, encoder_attention_mask.shape
-
)
-
)
-
-
encoder_extended_attention_mask = encoder_extended_attention_mask.to(
-
dtype=next(self.parameters()).dtype
-
)
# fp16 compatibility
-
encoder_extended_attention_mask = (
1.0 - encoder_extended_attention_mask) *
-10000.0
-
else:
-
encoder_extended_attention_mask =
None
-
-
# Prepare head mask if needed
-
# 1.0 in head_mask indicate we keep the head
-
# attention_probs has shape bsz x n_heads x N x N
-
# input head_mask has shape [num_heads] or [num_hidden_layers x num_heads]
-
# and head_mask is converted to shape [num_hidden_layers x batch x num_heads x seq_length x seq_length]
-
if head_mask
is
not
None:
-
if head_mask.dim() ==
1:
-
head_mask = head_mask.unsqueeze(
0).unsqueeze(
0).unsqueeze(
-1).unsqueeze(
-1)
-
head_mask = head_mask.expand(self.config.num_hidden_layers,
-1,
-1,
-1,
-1)
-
elif head_mask.dim() ==
2:
-
head_mask = (
-
head_mask.unsqueeze(
1).unsqueeze(
-1).unsqueeze(
-1)
-
)
# We can specify head_mask for each layer
-
head_mask = head_mask.to(
-
dtype=next(self.parameters()).dtype
-
)
# switch to fload if need + fp16 compatibility
-
else:
-
head_mask = [
None] * self.config.num_hidden_layers
以上是一些预处理的代码。判定input_ids的合法性,不能为空不能和inputs_embeds同时输入;接着就获取使用的设备是CPU还是GPU;判定attention_mask和token_type_ids的合法性,为None的话就新建一个;处理attention_mask得到encoder_extended_attention_mask,把它传播给所有的注意力头;最后就是判定是否启用decoder——bert模型是基于encoder的,我认为这里就不必要做这个判定,bert的encoder的结果只是传递给下一层encoder,并没有传递到decoder。
下面具体看核心的部分。
上面把输入做一些预处理后,使得输入都合法,然后就可以喂入模型的功能模块中。第一个就是
BertEmbedding子模型
其中的self.embeddings()就是__inti__()的BertEmbeddings(config)模块,它可以看做是一个起embedding功能作用的子模型,具体代码:
-
class BertEmbeddings(nn.Module):
-
"""Construct the embeddings from word, position and token_type embeddings.
-
"""
-
-
def __init__(self, config):
-
super().__init__()
-
self.word_embeddings = nn.Embedding(config.vocab_size, config.hidden_size, padding_idx=
0)
-
self.position_embeddings = nn.Embedding(config.max_position_embeddings, config.hidden_size)
-
self.token_type_embeddings = nn.Embedding(config.type_vocab_size, config.hidden_size)
-
-
# self.LayerNorm is not snake-cased to stick with TensorFlow model variable name and be able to load
-
# any TensorFlow checkpoint file
-
self.LayerNorm = BertLayerNorm(config.hidden_size, eps=config.layer_norm_eps)
-
self.dropout = nn.Dropout(config.hidden_dropout_prob)
-
-
def forward(self, input_ids=None, token_type_ids=None, position_ids=None, inputs_embeds=None):
-
if input_ids
is
not
None:
-
input_shape = input_ids.size()
-
else:
-
input_shape = inputs_embeds.size()[:
-1]
-
-
seq_length = input_shape[
1]
-
device = input_ids.device
if input_ids
is
not
None
else inputs_embeds.device
-
if position_ids
is
None:
-
position_ids = torch.arange(seq_length, dtype=torch.long, device=device)
-
position_ids = position_ids.unsqueeze(
0).expand(input_shape)
-
if token_type_ids
is
None:
-
token_type_ids = torch.zeros(input_shape, dtype=torch.long, device=device)
-
-
if inputs_embeds
is
None:
-
inputs_embeds = self.word_embeddings(input_ids)
-
position_embeddings = self.position_embeddings(position_ids)
-
token_type_embeddings = self.token_type_embeddings(token_type_ids)
-
-
embeddings = inputs_embeds + position_embeddings + token_type_embeddings
-
embeddings = self.LayerNorm(embeddings)
-
embeddings = self.dropout(embeddings)
-
return embeddings
它的具体作用就是:首先把我们输入的input_ids、token_type_ids和position_ids——(这里输入的是对应元素在词典中的index集合)经过torch.nn.Embedding()在各自的词典中得到词嵌入。然后把这3个向量直接做加法运算,接着做层归一化以及dropout()操作。这里为何可以直接相加是可以做一个专门的问题来讨论的,这里的归一化的作用应该就是避免一些数值问题、梯度问题和模型收敛问题以及分布改变问题,dropout操作随机丢弃掉一部分特征,可以增加模型的泛化性能。
BertEncoder
经过上述的处理后,我们就得到了一个维度是[batch_size,sequence_length,hidden_states]的向量embeddings。然后再把这个embeddings输入到Encoder中,代码如下,参数都很清晰明确:
这里的self.encoder同样是__init__()中的BertEncoder(config)模型,全部代码如下:
-
class BertEncoder(nn.Module):
-
def __init__(self, config):
-
super().__init__()
-
self.output_attentions = config.output_attentions
-
self.output_hidden_states = config.output_hidden_states
-
self.layer = nn.ModuleList([BertLayer(config)
for _
in range(config.num_hidden_layers)])
-
-
def forward(
-
self,
-
hidden_states,
-
attention_mask=None,
-
head_mask=None,
-
encoder_hidden_states=None,
-
encoder_attention_mask=None,
-
):
-
all_hidden_states = ()
-
all_attentions = ()
-
for i, layer_module
in enumerate(self.layer):
-
if self.output_hidden_states:
-
all_hidden_states = all_hidden_states + (hidden_states,)
-
-
layer_outputs = layer_module(
-
hidden_states, attention_mask, head_mask[i], encoder_hidden_states, encoder_attention_mask
-
)
-
hidden_states = layer_outputs[
0]
-
-
if self.output_attentions:
-
all_attentions = all_attentions + (layer_outputs[
1],)
-
-
# Add last layer
-
if self.output_hidden_states:
-
all_hidden_states = all_hidden_states + (hidden_states,)
-
-
outputs = (hidden_states,)
-
if self.output_hidden_states:
-
outputs = outputs + (all_hidden_states,)
-
if self.output_attentions:
-
outputs = outputs + (all_attentions,)
-
return outputs
其中模型定义部分的核心代码如下:
self.layer = nn.ModuleList([BertLayer(config) for _ in range(config.num_hidden_layers)])
通过这句代码和config中的参数——"num_hidden_layers": 12——可以得出BertEncoder使用12个(层)BertLayer组成的。对每一层的bertlayer在forward()中的for循环做如下操作:
-
for i, layer_module
in enumerate(self.layer):
-
if self.output_hidden_states:
-
all_hidden_states = all_hidden_states + (hidden_states,)
-
-
layer_outputs = layer_module(
-
hidden_states, attention_mask, head_mask[i], encoder_hidden_states, encoder_attention_mask
-
)
-
hidden_states = layer_outputs[
0]
-
-
if self.output_attentions:
-
all_attentions = all_attentions + (layer_outputs[
1],)
更新hidden_states(也就是layer_outputs[0]),然后把更新后的hidden_states传入到下一层BertLayer中,同时把每一层的hidden_states和attentions(也就是layer_outputs[1])记录下来,然后作为一个整体输出。所有最后的输出里包含的有最后一层BertLayer的hidden_states和12层所有的hidden_states以及attentions。
BertLayer具体又是什么样的呢?这里就需要看看具体的BertLayer的实现:
-
class BertLayer(nn.Module):
-
def __init__(self, config):
-
super().__init__()
-
self.attention = BertAttention(config)
-
self.is_decoder = config.is_decoder
-
if self.is_decoder:
-
self.crossattention = BertAttention(config)
-
self.intermediate = BertIntermediate(config)
-
self.output = BertOutput(config)
可以看到BertLayer是由BertAttention()、BertIntermediate()和BertOutput()构成。它的forward()是比较简单的,没有什么奇特的操作,都是顺序的把输入经过BertAttention()、BertIntermediate()和BertOutput()这些子模型。这里主要来看看这些子模型的实现:
BertAttention
这里它又嵌套了一层,由BertSelfAttention()和BertSelfOutput()子模型组成!
这里马上就看到self-attention机制的实现了!感觉好激动!——Self-Attention则利用了Attention机制,计算每个单词与其他所有单词之间的关联(说实话理解的不是很透彻!)
-
class BertSelfAttention(nn.Module):
-
def __init__(self, config):
-
super().__init__()
-
if config.hidden_size % config.num_attention_heads !=
0
and
not hasattr(config,
"embedding_size"):
-
raise ValueError(
-
"The hidden size (%d) is not a multiple of the number of attention "
-
"heads (%d)" % (config.hidden_size, config.num_attention_heads)
-
)
-
self.output_attentions = config.output_attentions
-
-
self.num_attention_heads = config.num_attention_heads
-
self.attention_head_size = int(config.hidden_size / config.num_attention_heads)
-
self.all_head_size = self.num_attention_heads * self.attention_head_size
-
-
self.query = nn.Linear(config.hidden_size, self.all_head_size)
-
self.key = nn.Linear(config.hidden_size, self.all_head_size)
-
self.value = nn.Linear(config.hidden_size, self.all_head_size)
-
-
self.dropout = nn.Dropout(config.attention_probs_dropout_prob)
-
-
def transpose_for_scores(self, x):
-
new_x_shape = x.size()[:
-1] + (self.num_attention_heads, self.attention_head_size)
-
x = x.view(*new_x_shape)
-
return x.permute(
0,
2,
1,
3)
-
-
def forward(
-
self,
-
hidden_states,
-
attention_mask=None,
-
head_mask=None,
-
encoder_hidden_states=None,
-
encoder_attention_mask=None,
-
):
-
mixed_query_layer = self.query(hidden_states)
-
-
# If this is instantiated as a cross-attention module, the keys
-
# and values come from an encoder; the attention mask needs to be
-
# such that the encoder's padding tokens are not attended to.
-
if encoder_hidden_states
is
not
None:
-
mixed_key_layer = self.key(encoder_hidden_states)
-
mixed_value_layer = self.value(encoder_hidden_states)
-
attention_mask = encoder_attention_mask
-
else:
-
mixed_key_layer = self.key(hidden_states)
-
mixed_value_layer = self.value(hidden_states)
-
-
query_layer = self.transpose_for_scores(mixed_query_layer)
-
key_layer = self.transpose_for_scores(mixed_key_layer)
-
value_layer = self.transpose_for_scores(mixed_value_layer)
-
-
# Take the dot product between "query" and "key" to get the raw attention scores.
-
attention_scores = torch.matmul(query_layer, key_layer.transpose(
-1,
-2))
-
attention_scores = attention_scores / math.sqrt(self.attention_head_size)
-
if attention_mask
is
not
None:
-
# Apply the attention mask is (precomputed for all layers in BertModel forward() function)
-
attention_scores = attention_scores + attention_mask
-
-
# Normalize the attention scores to probabilities.
-
attention_probs = nn.Softmax(dim=
-1)(attention_scores)
-
-
# This is actually dropping out entire tokens to attend to, which might
-
# seem a bit unusual, but is taken from the original Transformer paper.
-
attention_probs = self.dropout(attention_probs)
-
-
# Mask heads if we want to
-
if head_mask
is
not
None:
-
attention_probs = attention_probs * head_mask
-
-
context_layer = torch.matmul(attention_probs, value_layer)
-
-
context_layer = context_layer.permute(
0,
2,
1,
3).contiguous()
-
new_context_layer_shape = context_layer.size()[:
-2] + (self.all_head_size,)
-
context_layer = context_layer.view(*new_context_layer_shape)
-
-
outputs = (context_layer, attention_probs)
if self.output_attentions
else (context_layer,)
-
return outputs
阅读代码之前先回顾一下,self-attention的公式是什么样的,公式编辑比较麻烦直接上2个图,都是来自Attention机制详解(二)——Self-Attention与Transformer文章中:
首先定义Q、K、V
然后应用到公式中:
以上就是单个头的self-attention的公式,多头的话就可以计算多次,然后在合并起来。这里就可以应用到矩阵运算了,还要注意的点就是Q、K、V的学习参数都是共享的——(要去验证),代码对应的就是:
-
self.query = nn.Linear(config.hidden_size, self.all_head_size)
-
self.key = nn.Linear(config.hidden_size, self.all_head_size)
-
self.value = nn.Linear(config.hidden_size, self.all_head_size)
-
#注意这里的nn.Linear包含的学习参数一个是权重参数weights一个是偏置参数bias
-
#而且这里的query、key以及value它们的参数不一样,也就是并不共享参数
参数都包含在nn.Linear中了,这里的self.query对应的是12个头的self-attention机制对应的Q的学习参数模型,当然query、key以及value它们的参数不一样,也就是并不共享参数。
那么在forward()中是如何实现的呢?
-
mixed_query_layer = self.query(hidden_states)
#计算Q
-
if encoder_hidden_states
is
not
None:
-
mixed_key_layer = self.key(encoder_hidden_states)
-
mixed_value_layer = self.value(encoder_hidden_states)
-
attention_mask = encoder_attention_mask
-
else:
-
mixed_key_layer = self.key(hidden_states)
#计算K
-
mixed_value_layer = self.value(hidden_states)
#计算V
-
-
#做转置操作——这有点特殊:mixed_query_layer[batch_size,sequence_length,hidden_states]
-
#query_layer的维度:[batch_size,num_attention_heads,sequence_length,attention_head_size]
-
query_layer = self.transpose_for_scores(mixed_query_layer)
-
key_layer = self.transpose_for_scores(mixed_key_layer)
-
value_layer = self.transpose_for_scores(mixed_value_layer)
-
-
#Q和K做点积
-
attention_scores = torch.matmul(query_layer, key_layer.transpose(
-1,
-2))
-
#Q和K做点积后然后除以根号下多头主力的尺寸
-
attention_scores = attention_scores / math.sqrt(self.attention_head_size)
-
if attention_mask
is
not
None:
-
# Apply the attention mask is (precomputed for all layers in BertModel forward() function)
-
attention_scores = attention_scores + attention_mask
-
-
# Normalize the attention scores to probabilities.
-
#做softmax操作,归一化
-
attention_probs = nn.Softmax(dim=
-1)(attention_scores)
-
-
# This is actually dropping out entire tokens to attend to, which might
-
# seem a bit unusual, but is taken from the original Transformer paper.
-
attention_probs = self.dropout(attention_probs)
-
-
# Mask heads if we want to
-
if head_mask
is
not
None:
-
attention_probs = attention_probs * head_mask
-
#中间结果和V做点积,得到最终结果——注意力得分也就是公式中的Z
-
context_layer = torch.matmul(attention_probs, value_layer)
以上代码的中文注释就把计算过程分析清楚了,计算mixed_query_layer、mixed_key_layer和mixed_value_layer,然后做转置(说是维度变换更贴切一点);接着mixed_query_layer、mixed_key_layer做点积操作,然后除以注意力头的尺寸的开方,做softmax操作;最后和mixed_value_layer相乘,得到注意力得分————矩阵计算代码就很好的实现了self-attention。
以上就是完成了self-attention,然后接下来就进入BertSelfOutput():
-
class BertSelfOutput(nn.Module):
-
def __init__(self, config):
-
super().__init__()
-
self.dense = nn.Linear(config.hidden_size, config.hidden_size)
-
self.LayerNorm = BertLayerNorm(config.hidden_size, eps=config.layer_norm_eps)
-
self.dropout = nn.Dropout(config.hidden_dropout_prob)
-
-
def forward(self, hidden_states, input_tensor):
-
hidden_states = self.dense(hidden_states)
-
hidden_states = self.dropout(hidden_states)
-
hidden_states = self.LayerNorm(hidden_states + input_tensor)
-
return hidden_states
以上BertSelfOutput()代码很简单,把self-attention输出的结果经过线性模型和dropout操作,最后做层归一化。到这里就跳出了BertAttention()模型,然后就进入中间层BertIntermediate()。
BertIntermediate
BertIntermediate()作为中间层代码很简单:
-
class BertIntermediate(nn.Module):
-
def __init__(self, config):
-
super().__init__()
-
self.dense = nn.Linear(config.hidden_size, config.intermediate_size)
-
if isinstance(config.hidden_act, str):
-
self.intermediate_act_fn = ACT2FN[config.hidden_act]
-
else:
-
self.intermediate_act_fn = config.hidden_act
-
-
def forward(self, hidden_states):
-
hidden_states = self.dense(hidden_states)
-
hidden_states = self.intermediate_act_fn(hidden_states)
-
return hidden_states
经过一个全连接层,由于config.hidden_size<config.intermediate_size,这里的Linear把特征空间变大了,然后进过了gelu激活函数,增加了特征的非线性性。
BertOutput(config)
跳出BertIntermediate()作为中间层后,就进入了BertOutput(config)模型,这个是BertLayer()模型的最后一个子模型。
-
class BertOutput(nn.Module):
-
def __init__(self, config):
-
super().__init__()
-
self.dense = nn.Linear(config.intermediate_size, config.hidden_size)
-
self.LayerNorm = BertLayerNorm(config.hidden_size, eps=config.layer_norm_eps)
-
self.dropout = nn.Dropout(config.hidden_dropout_prob)
-
-
def forward(self, hidden_states, input_tensor):
-
hidden_states = self.dense(hidden_states)
-
hidden_states = self.dropout(hidden_states)
-
hidden_states = self.LayerNorm(hidden_states + input_tensor)
-
return hidden_states
经过线性模型和dropout操作,最后做层归一化,把特征空间又缩小回来了。最后输出一个hidden_states,这里就是一个BertLayer()的输出了。
BertPooler()
然后经历了12个BertLayer()的操作,一层一层的变换,最后得出的outputs进入BertPooler():
-
sequence_output = encoder_outputs[
0]
-
pooled_output = self.pooler(sequence_output)
pooler代码如下:
-
class BertPooler(nn.Module):
-
def __init__(self, config):
-
super().__init__()
-
self.dense = nn.Linear(config.hidden_size, config.hidden_size)
-
self.activation = nn.Tanh()
-
-
def forward(self, hidden_states):
-
# We "pool" the model by simply taking the hidden state corresponding
-
# to the first token.
-
first_token_tensor = hidden_states[:,
0]
-
pooled_output = self.dense(first_token_tensor)
-
pooled_output = self.activation(pooled_output)
-
return pooled_output
-
-
-
#以上的pooler作用要具体的去调试hidden_states的shape。
由代码可知这个pooler的功能就是把last_hidden_states的第二维的第一维也就是文本对应的第一个;。。。、。。
以上差不多就是BertModel的具体实现,由于这个模型的代码嵌套调用过多,可能理解起来有一定的困惑,那么接下来就需要一个图片来可视化理解。上图:
上图是huggingface中的BertModel的结构流程图(简图,有很多疏漏的地方勿怪!),bertModel的输入和基本的子模型以及数据的流向都显示出来了,对应着代码理解起来更加方便。黄色的图形就是torch中的基本函数模块(这里的Q、K和V不是),其他颜色的矩形就是模型,平行四边形就是数据。
以上就是对BertModel实现代码的简单解析,里面涉及到很多的细节:不同模型模块的参数以及它们的维度信息,还有就是变量的维度变化,以及每个模型模块的具体作用和意义,没有去深究,读者有精力的话可以自己去深究。
三、Bert文本分类任务实战
这里我们要写一个使用transformers项目中的分类器来实现一个简单的文本分类任务,这里我们没有自己取重写Dataloader以及模型的训练,就是直接把transformers项目中的bert分类器拿过来进行fine-tune,工作量少,结果也比较好!当然也可以完全自己实现(前面也自己实现过一个基于bert的句子分类的任务——使用bert模型做句子分类,有兴趣的可以移步),后续有时间的话可以写一个各个模型文本分类任务的比较博客,更加熟练文本分类的一些代码coding和知识——增加熟练度,也可以给大家分享一下。
来看本文的transformers项目中的bert分类器进行fine-tune作文本分类的任务,在这个项目里面已经把全部的代码写好了,我们只需要把我们的文本处理成项目能够识别和读取的形式。简单的分析一下,分类任务的代码:
主要的分类任务的代码是在run_glue.py文件中,这里面定义了main函数,命令行参数接收器,模型的加载和调用,模型的训练以及验证,和数据读取以及处理的功能模块调用。
我们看一下这里调用的分类模型,代码是这样的:
-
model = AutoModelForSequenceClassification.from_pretrained(
-
args.model_name_or_path,
-
from_tf=bool(
".ckpt"
in args.model_name_or_path),
-
config=config,
-
cache_dir=args.cache_dir,
-
)
其实最终这里的AutoModelForSequenceClassification.from_pretrained()调用的是modeling_bert.py中的BertForSequenceClassification类,它就是具体的分类器实现:
-
class BertForSequenceClassification(BertPreTrainedModel):
-
def __init__(self, config):
-
super().__init__(config)
-
self.num_labels = config.num_labels
-
-
self.bert = BertModel(config)
-
self.dropout = nn.Dropout(config.hidden_dropout_prob)
-
self.classifier = nn.Linear(config.hidden_size, self.config.num_labels)
-
-
self.init_weights()
-
-
def forward(
-
self,
-
input_ids=None,
-
attention_mask=None,
-
token_type_ids=None,
-
position_ids=None,
-
head_mask=None,
-
inputs_embeds=None,
-
labels=None,
-
):
-
outputs = self.bert(
-
input_ids,
-
attention_mask=attention_mask,
-
token_type_ids=token_type_ids,
-
position_ids=position_ids,
-
head_mask=head_mask,
-
inputs_embeds=inputs_embeds,
-
)
-
-
pooled_output = outputs[
1]
-
-
pooled_output = self.dropout(pooled_output)
-
logits = self.classifier(pooled_output)
-
-
outputs = (logits,) + outputs[
2:]
# add hidden states and attention if they are here
-
-
if labels
is
not
None:
-
if self.num_labels ==
1:
-
# We are doing regression
-
loss_fct = MSELoss()
-
loss = loss_fct(logits.view(
-1), labels.view(
-1))
-
else:
-
loss_fct = CrossEntropyLoss()
-
loss = loss_fct(logits.view(
-1, self.num_labels), labels.view(
-1))
-
outputs = (loss,) + outputs
-
-
return outputs
模型调用了BertModel,然后做使用nn.Linear(config.hidden_size, self.config.num_labels)做分类,loss函数是常用的交叉熵损失函数。以上就是分类器的一些简单的分析。 我们要做的工作就是仿照项目里的代码写一个任务处理器:
项目目录结构:transformerer_local/data/glue.py,注意这里的transformerer_local原本应该是transformerer,我这里已经做了修改。在glue.py添加上我们的分类任务代码——添加一个读取文件中的文本然后,然后把每条数据序列化成Example,注意get_labels()函数,把自己的类别数目实现过来,代码如下:
-
class MyownProcessor(DataProcessor):
-
"""Processor for the CoLA data set (GLUE version)."""
-
-
def get_example_from_tensor_dict(self, tensor_dict):
-
"""See base class."""
-
return InputExample(
-
tensor_dict[
"idx"].numpy(),
-
tensor_dict[
"sentence"].numpy().decode(
"utf-8"),
-
None,
-
str(tensor_dict[
"label"].numpy()),
-
)
-
-
def get_train_examples(self, data_dir):
-
"""See base class."""
-
return self._create_examples(self._read_tsv(os.path.join(data_dir,
"train.tsv")),
"train")
-
-
def get_dev_examples(self, data_dir):
-
"""See base class."""
-
return self._create_examples(self._read_tsv(os.path.join(data_dir,
"dev.tsv")),
"dev")
-
-
def get_predict_examples(self, data_dir):
-
return self._create_examples(self._read_tsv(os.path.join(data_dir,
"test.tsv")),
"predict")
-
-
def get_labels(self):
-
"""See base class."""
-
return [
"0",
"1",
"2",
"3",
"4",
"5",
"6",
"7"]
-
-
def _create_examples(self, lines, set_type):
-
"""Creates examples for the training and dev sets."""
-
examples = []
-
for (i, line)
in enumerate(lines):
-
guid =
"%s-%s" % (set_type, i)
-
if len(line)==
2:
-
text_a = line[
0]
-
label = line[
1]
-
examples.append(InputExample(guid=guid, text_a=text_a, text_b=
None, label=label))
-
else:
-
print(line)
-
return examples
同时在验证的时候,对应评价指标函数,我们这里不是binary,计算f1_score的时候要采用其他的策略:
transformerer_local/data/metrics/__init__.py,注意这里的transformerer_local原本应该是transformerer,添加内容:
-
#添加多分类评价函数
-
def acc_and_f1_multi(preds, labels):
-
acc = simple_accuracy(preds, labels)
-
f1 = f1_score(y_true=labels, y_pred=preds,average=
'micro')
-
return {
-
"acc": acc,
-
"f1": f1,
-
"acc_and_f1": (acc + f1) /
2,
-
}
-
-
-
def glue_compute_metrics(task_name, preds, labels):
-
assert len(preds) == len(labels)
-
if task_name ==
"cola":
-
return {
"mcc": matthews_corrcoef(labels, preds)}
-
elif task_name ==
"sst-2":
-
return {
"acc": simple_accuracy(preds, labels)}
-
elif task_name ==
"mrpc":
-
return acc_and_f1(preds, labels)
-
elif task_name ==
"sts-b":
-
return pearson_and_spearman(preds, labels)
-
elif task_name ==
"qqp":
-
return acc_and_f1(preds, labels)
-
elif task_name ==
"mnli":
-
return {
"acc": simple_accuracy(preds, labels)}
-
elif task_name ==
"mnli-mm":
-
return {
"acc": simple_accuracy(preds, labels)}
-
elif task_name ==
"qnli":
-
return {
"acc": simple_accuracy(preds, labels)}
-
elif task_name ==
"rte":
-
return {
"acc": simple_accuracy(preds, labels)}
-
elif task_name ==
"wnli":
-
return {
"acc": simple_accuracy(preds, labels)}
-
elif task_name ==
"hans":
-
return {
"acc": simple_accuracy(preds, labels)}
-
#添加我们的多分类任务调用函数
-
elif task_name ==
"myown":
-
return acc_and_f1_multi(preds, labels)
-
else:
-
raise KeyError(task_name)
添加内容就在注释部分。
OK,现在代码部分已经做好了,接下来就是数据部分了。直接上数据:
数据截图部分就是上面这样的,把pat_summary和ipc_class属性提取出来,这里的数据质量比较好,然后只需要把超级长的文本去掉(长度大于510的):
数据长度分布直方图,发现几乎全部都是小于510的长度,只有少部分比较长,只有128条,这里数据集总规模是24.8W条,可以把这少部分的直接去掉。然后把数据分割成训练集和测试集比例(8:2),保存为tsv格式。
接下来就是直接进行训练了,编写如下命令行,在train_glue_classification.sh文件中:
-
export TASK_NAME=myown
-
-
python -W ignore ./examples/run_glue.py \
-
--model_type bert \
-
--model_name_or_path ./pretrain_model/Chinese-BERT-wwm/ \
-
--task_name $TASK_NAME \
-
__do_train \
-
--do_eval \
-
--data_dir ./data_set/patent/ \
-
--max_seq_length
510 \
-
--per_gpu_eval_batch_size=
8 \
-
--per_gpu_train_batch_size=
8 \
-
--per_gpu_predict_batch_size=
48 \
-
--learning_rate
2e-5 \
-
--num_train_epochs
5.0 \
-
--output_dir ./output/
直接在终端上运行这个sh文件,bash train_glue_classification.sh。注意这里的训练显卡显存得11G以上,不然跑步起来,batch_size不能太大。训练过程中,一个epoch大概时间3.5小时,所以时间还要蛮久的。最后给出结果:
可以看到acc=0.8508,一个8分类的任务准确率85%粗略一看还能接受。如果要详细的分析,可以把每一类的准确率和召回率给弄出来,或者分析一下ROC,对模型的性能做详细的分析,这里不做过多讨论。另外关于这个模型的优化,怎么提高准确率,也不做考虑。
小结:以上就是直接使用transformers项目中的bert分类器拿过来进行fine-tune,做文本分类,其实代码都写好了,我们只需要简单的修改一下代码和配置,就能很快的训练好自己的分类器。
四、Bert模型难点总结
其实关于Bert模型还有很多细节可以去探究,这里推荐知乎上的一些文章:超细节的BERT/Transformer知识点。
1、Bert模型怎么解决长文本问题?
如果文本的长度不是特别长,511-600左右,可以直接把大于510的部分直接去掉,这是一种最粗暴的处理办法。
如果文本内容很长,而且内容也比较重要,那么就不能够这么直接粗暴的处理了。主要思路是global norm + passage rank + sliding window——来自Amazon EMNLP的这篇文章:Multi-passage BERT。简单的说一下sliding window,滑窗法就是把文档分割成有部分重叠的短文本段落,然后把这些文本得出的向量拼接起来或者做mean pooling操作。具体的效果,要去做实验。
2、Bert的输入向量Token Embedding、Segment Embedding、Position Embedding,它们都有自己的物理含义,为什么可以相加后输入到模型中取呢?
这个问题在知乎上已经有人提问了,回答的大佬很多。我个人倾向接受这个解释:one hot向量concat后经过一个全连接等价于向量embedding后直接相加。
Token Embedding、Segment Embedding、Position Embedding分别代表了文本的具体语义,段落含义和位置含义,现在要把这3个不同的向量一起放到模型中去训练,我认为concat的操作就能完整的保留文本的含义。[input_ids] 、[token_type_ids] 和[position_ids]这3个向量,concat以后形成一个[input_ids token_type_ids position_ids]新的向量,这样丢入模型中取训练就应该是我们初始要的结果。但是在丢入模型之前这个向量[input_ids token_type_ids position_ids]是需要经过Embedding的,而[input_ids] 、[token_type_ids] 和[position_ids]先经过Embedding然后相加和上面的效果是等价的。这样的好处是降低了参数的维度的同时达到了同样的效果,所以就采用了直接相加。
3、BERT在第一句前会加一个[CLS]标志,为什么?作用是什么?
最后一层的transformer的输出该位置的向量,由于本身并不具有任何意义,就能很公平的融合整个句子的含义,然后做下游任务的时候就很好了。
其实在huggingface实现的bert代码中,作者认为这个向量并不是很好,要想做下有任务,还是得靠自己取把最后一层的hidden_states[B,S,D]去做一些操作,比如mean pool操作。我这里没有实验过,只是拿来使用,在使用bert模型做句子分类一文中使用了这样的思想。
4、Bert模型的非线性来自什么地方?
主要是来子前馈层的gelu激活函数和self-attention。
5、Bert模型为何要使用多头注意力机制?
谷歌bert作者在论文中提到的是模型有多头的话,就可以形成多个子空间,那么模型就可以去关注不同方面的信息。
可以这样理解,多头attention机制确实有点类似多个卷积核的作用,可以捕捉到文本更多更丰富的信息。
当然知乎有人专门研究这个问题,列举了头和头直接的异同关系,作了一个比较综合全面的回答,可以去阅读!为什么Transformer 需要进行 Multi-head Attention?
写在最后:
我个人理解的Bert模型就只有 这么多,其实Bert模型就是一个提取词向量的语言模型,由于提取的词向量能很好的包含文本的语义信息,它能够做很多任务并且取得不错的效果。NER、关系抽取、文本相似度计算、文本分类、阅读理解等等任务Bert都能做。
这个博客个人算是花了一定的精力了的(五一到现在,差不多10天时间吧),作为这段时间以来学习NLP的一个总结还是很有收获感的。加油!继续努力!当然博客可能写的不是干货,也许还有错误的地方,作者水平有限,望大家提出改正!
参考文章