查找表(LUT,LookUp Table)是图像颜色转换的强大工具,在许多图形和视频编辑器中使用。
2D LUT
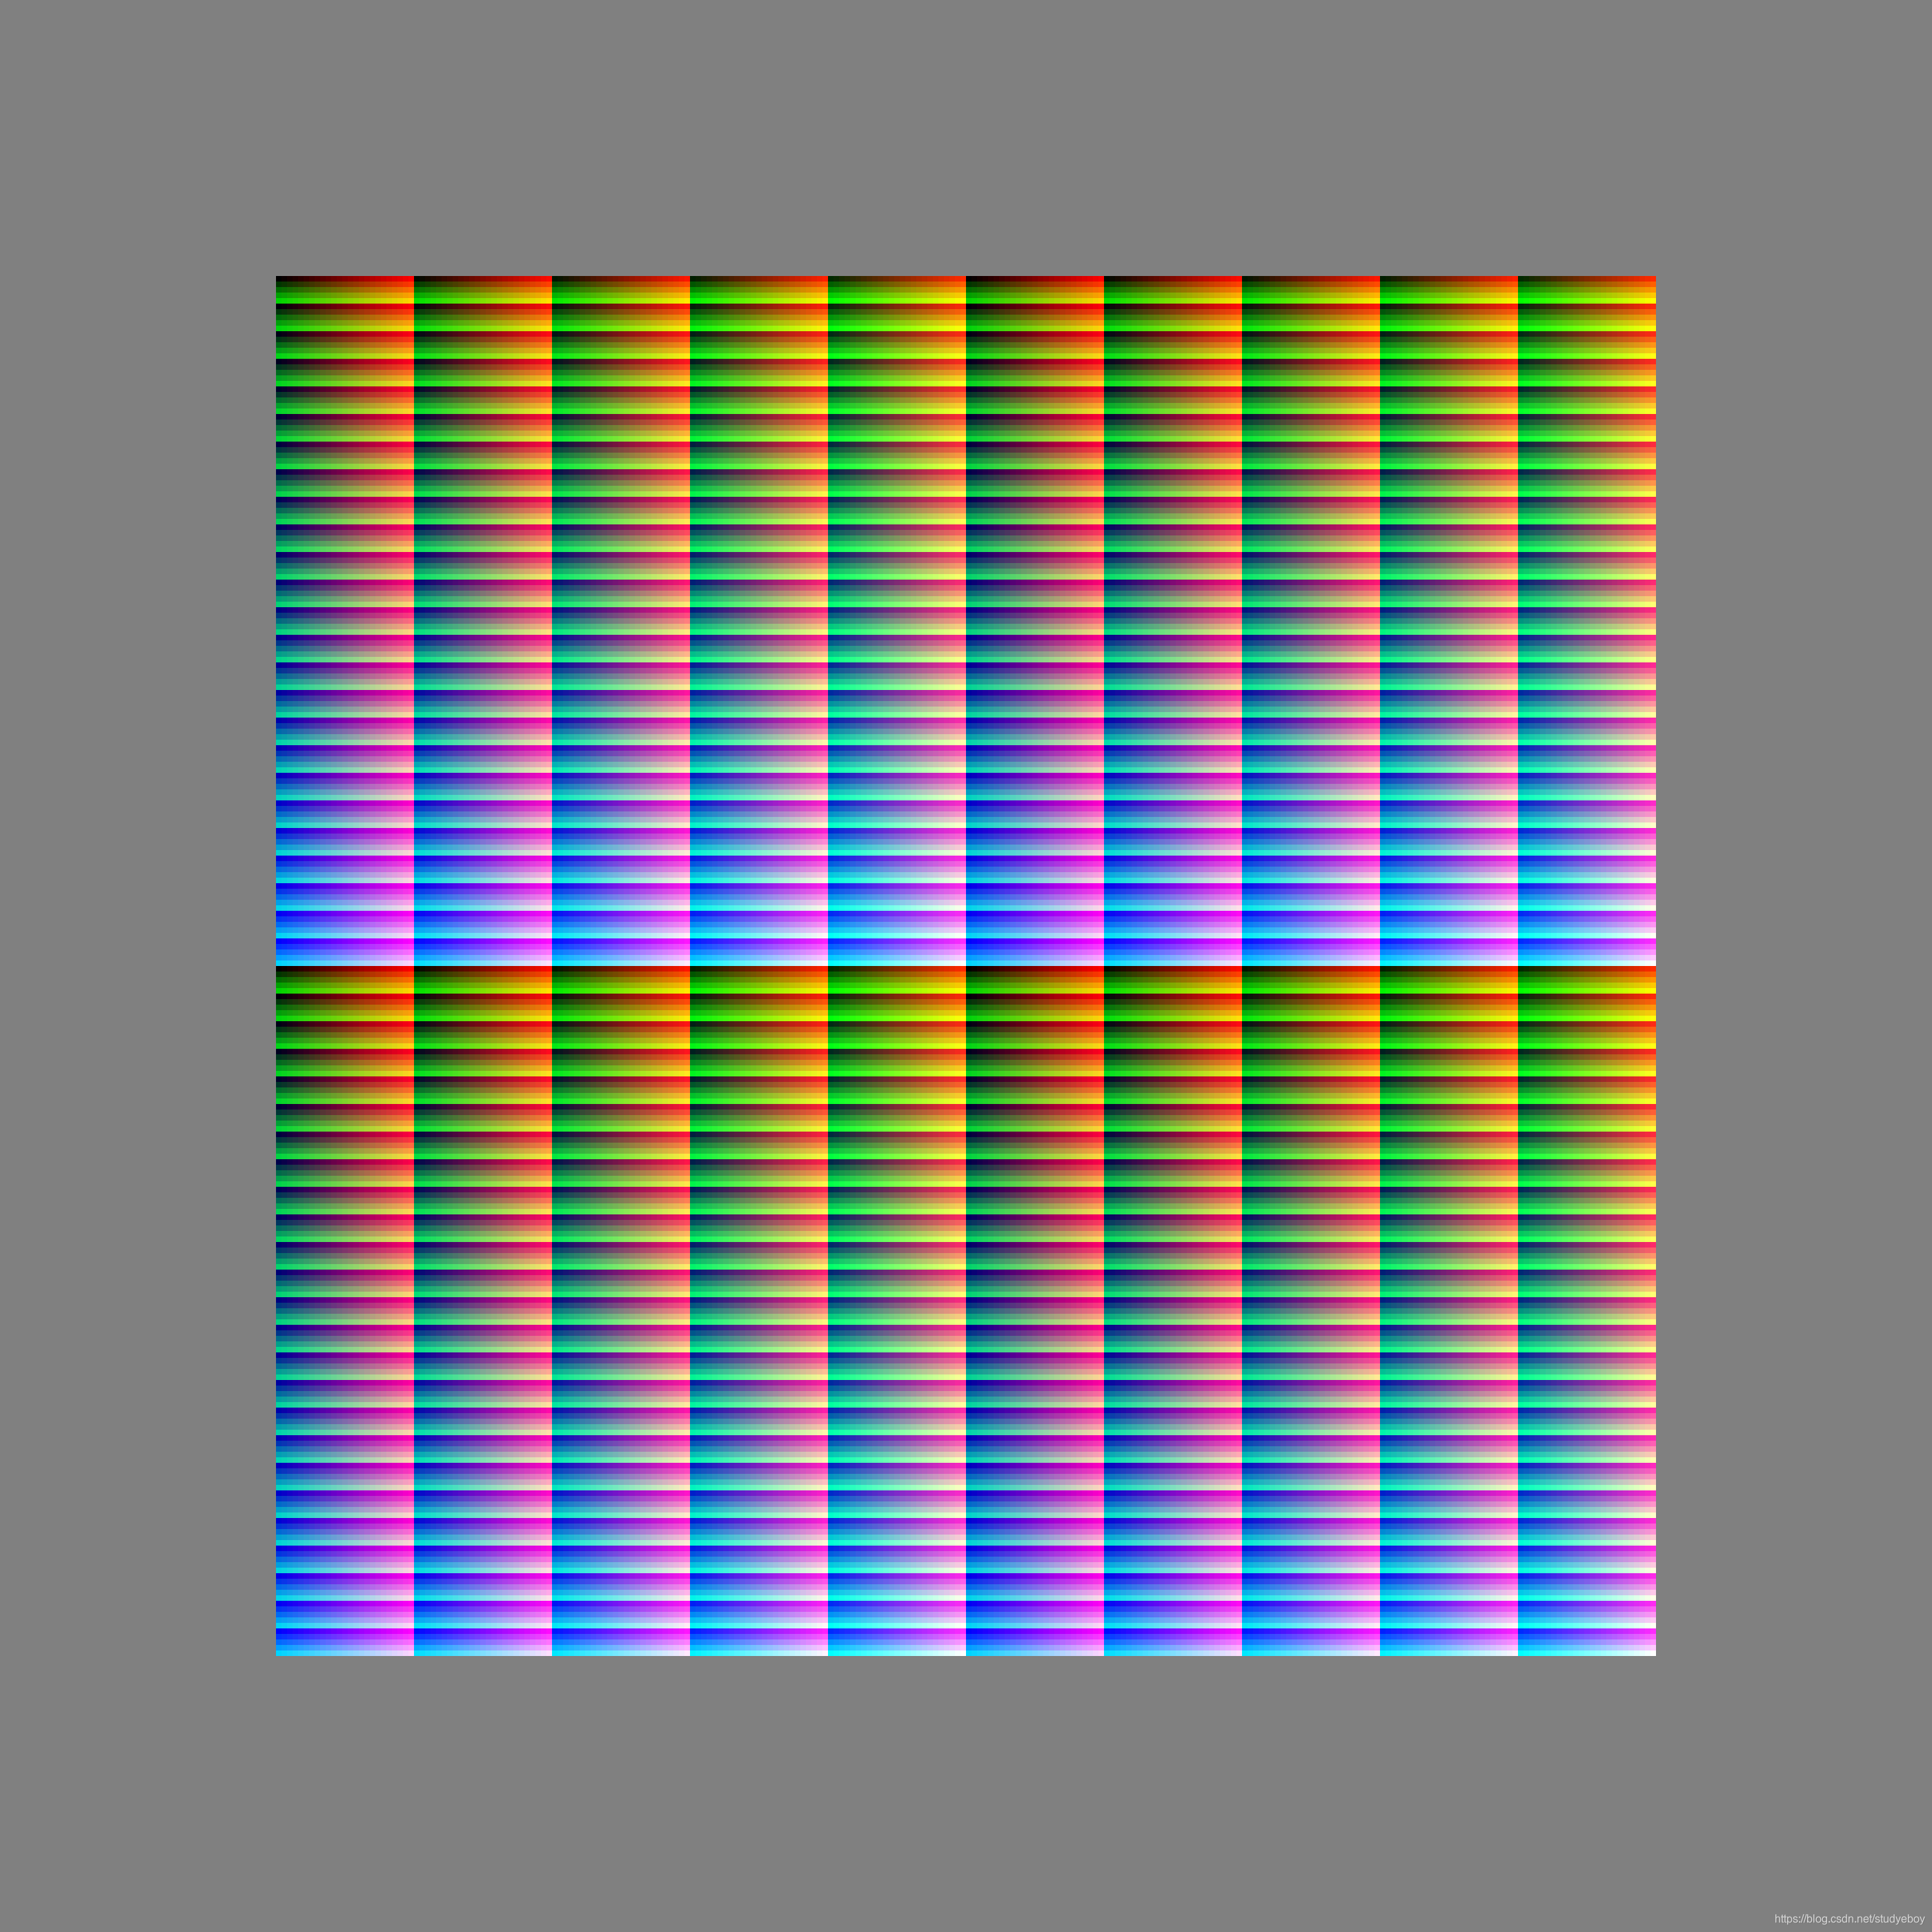
2D LUT生成
def generate_identify_color_matrix(width, height, channel):
    img = np.zeros((width, height, channels), dtype=np.uint8)
    for by in range(8):
        for bx in range(8):
            for g in range(64):
                for r in range(64):
                    x = r + bx * 64
                    y = g + by * 64
                    img[y][x][0] = int(r * 255.0 / 63.0 + 0.5)
                    img[y][x][1] = int(g * 255.0 / 63.0 + 0.5)
                    img[y][x][2] = int((bx + by * 8.0) * 255.0 / 63.0 + 0.5)
    return img
 identity_lut = generate_identify_color_matrix()

2D LUT 用于图像转换
from typing import Tuple
from functools import lru_cache
from math import floor
import numpy as np
import cv2

def lut_apply(image, lut):
    img_list = image.tolist()
    # dst_img = image.copy()
    dst_img = np.zeros((image.shape[0], image.shape[1], image.shape[2]), dtype=np.uint8)
    for iy in range(image.shape[0]):
        for ix in range(image.shape[1]):
            b, g, r = img_list[iy][ix] #bgr mode
            x, y, bx, by = color_coordinate(r, g, b)
            lut_y = y + by * 64
            lut_x = x + bx * 64
            dst_img[iy][ix][0] = lut[lut_y][lut_x][0]
            dst_img[iy][ix][1] = lut[lut_y][lut_x][1]
            dst_img[iy][ix][2] = lut[lut_y][lut_x][2]
    return dst_img
@lru_cache(maxsize=512)
def color_coordinate(r, g, b) -> Tuple[int, int, int, int]:
    x, y, bx, by = 0, 0, 0, 0
    x = floor(r / 4.0)
    y = floor(g / 4.0)
    bx, by = blue_coordinate(floor(b / 4.0))
    return x, y, bx, by


@lru_cache(maxsize=64)
def blue_coordinate(b: int) -> Tuple[int, int]:
    assert b >= 0 and b <= 63, 'GOT {}'.format(b)
    x, y = 0, 0
    y = floor(floor(b) / 8.0)
    x = int(floor(b) - y * 8.0)
    return x, y

image = cv2.imread('./test.jpg')
lut = cv2.imread('./YV2.JPG')
result_img = lut_apply(image, lut)
cv2.imwrite('./test_YV2_cv.jpg', result_img)

class LUT_WHITEN:
    def __init__(self, lut):
        cube64rows = 8
        cube64size = 64
        cube256size = 256
        cubescale = (int)(cube256size / cube64size) #4

        reshapelut = np.zeros((cube256size, cube256size, cube256size, 3))
        for i in range(cube64size):
            tmp = math.floor(i / cube64rows)
            cx = int((i - tmp * cube64rows) * cube64size)
            cy = int(tmp * cube64size)
            cube64 = lut[cy:cy+cube64size, cx:cx+cube64size]#cube64 in lut(512*512 (512=8*64))
            _rows, _cols, _ = cube64.shape
            if _rows == 0 or _cols == 0:
                continue
            cube256 = cv2.resize(cube64, (cube256size, cube256size))
            i = i * cubescale
            for k in range(cubescale):
                reshapelut[i + k] = cube256
        self.lut = reshapelut
        # print('reshapelut shape:', reshapelut.shape)

    def imageInLut(self, src):
        arr = src.copy()
        bs = arr[:, :, 0]
        gs = arr[:, :, 1]
        rs = arr[:, :, 2]
        arr[:, :] = self.lut[bs, gs, rs]
        return arr
3D LUT
3D LUT的常见格式:
- Hald CLUT(.png)
- 3D LUT(.3dl)
- Cube LUT(.cube)
3D LUT的生成(Hald CLUT)
-
创建identity image(3D LUT)
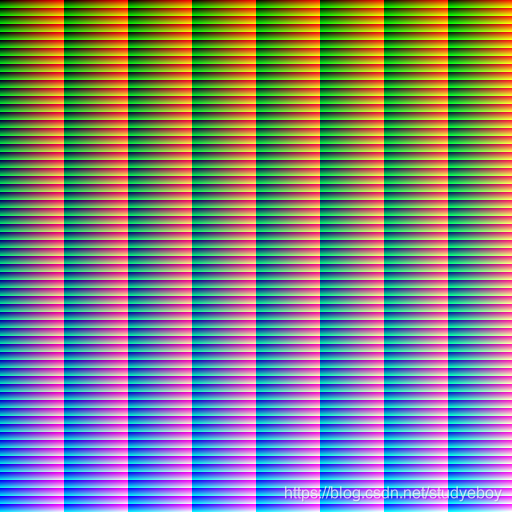
./bin/generate.pydef generate_hald(size): b, g, r = numpy.mgrid[ 0 : 255 : size**2*1j, 0 : 255 : size**2*1j, 0 : 255 : size**2*1j ].astype(numpy.uint8) rgb = numpy.stack((r, g, b), axis=-1) return Image.fromarray(rgb.reshape(size**3, size**3, 3))为了防止在变换期间可能发生的失真、,如渐晕、划痕、渐变和JPEG伪影。生成的 25 × 25 × 25 25 \times 25 \times 25 25×25×25d的hadl image如下所示(显示了4个):
-
使用图像处理软件对hald image图像进行变换处理,得到同样尺寸的filtered hald image。

-
改进方法,用高斯模糊filtered image进行处理减少噪声。
如果目标滤波器在局部水平上有严重的失真或图像中心有显著的梯度,则可能出现一些不期望的效果。有问题滤波图像如下所示:
./bin/convert.py raw/15.Hudson.jpg halds/ --smooth 1.5 -
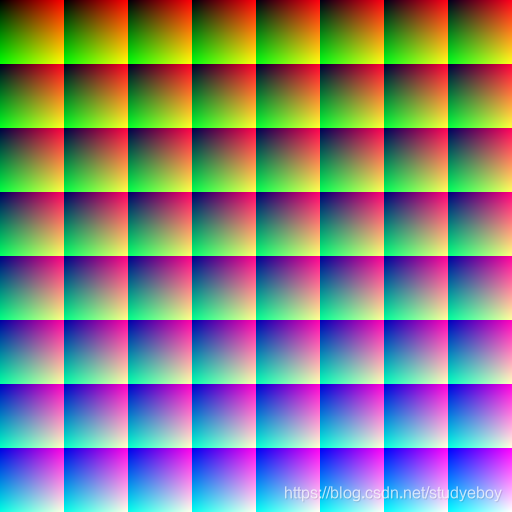
将滤波后的图像转换为真实的hald image(显示的4个中裁剪了一个)。

3D LUT(Hald CLUT)应用于图像(Pillow库)
pillow-lut-tools
Pillow LUT tools
Pillow LUT工具包含用于加载、操作和生成三维查找表的工具,是专为Pillow库设计的。
from PIL import Image
from pillow_lut import load_hald_image

hefe = load_hald_image('./res/test_hald.5.png')
img = Image.open('./res/test.jpg')
img.filter(hefe).save('./res/test.hald.jpg')
Pillow LUT中包含的函数:
-
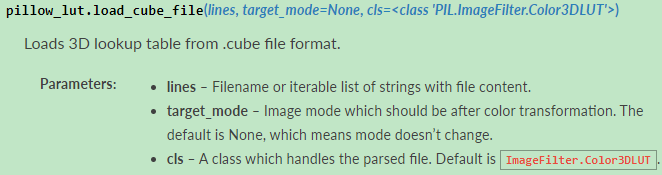
load_cube_file从.cube文件格式加载三维查找表
-
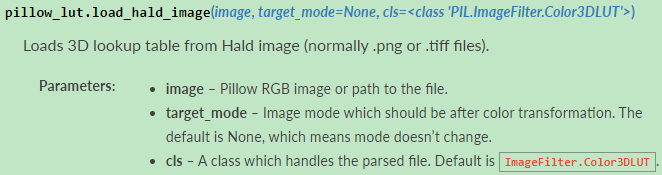
load_hald_image从Hald图像(通常是.png或.tiff文件)加载三维查找表。
-
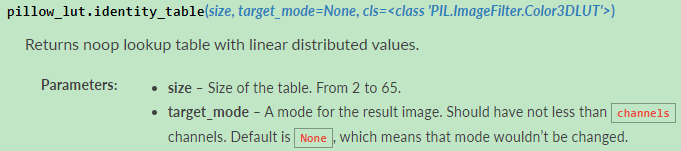
identity_table返回具有线性分布值的noop查找表。
-
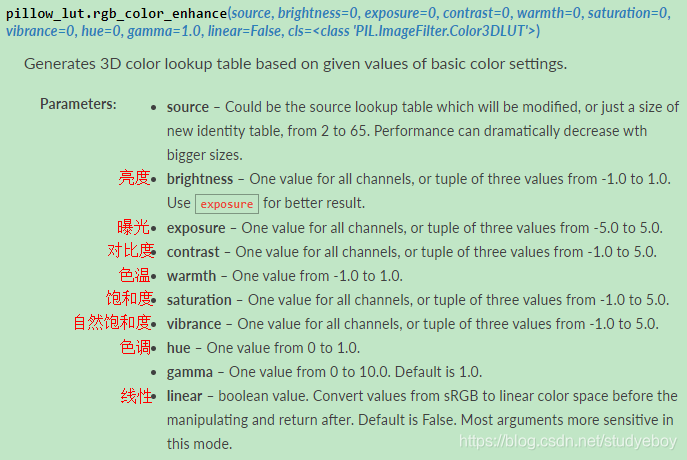
rgb_color_enhance根据基本颜色设置的给定值生成三维颜色查找表。
-
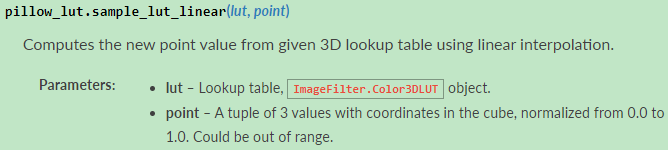
sample_lut_linear使用线性插值从给定的三维查找表计算新的点值。
-
sample_lut_cubic使用三次插值从给定的三维查找表计算新的点值。

-
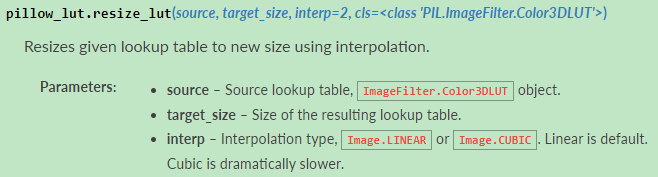
resize_lut使用插值将给定的查找表调整为新大小。
-
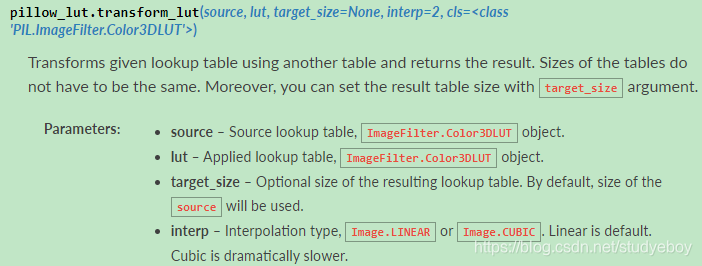
transform_lut使用另一个表转换给定的查找表并返回结果。
-
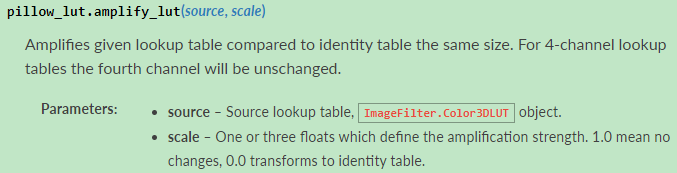
amplity_lut放大给定的查找表
Pillow LUT函数的使用例子:
from PIL import Image
from pillow_lut import load_hald_image
hefe = load_hald_image('./res/hald.6.hefe.png')
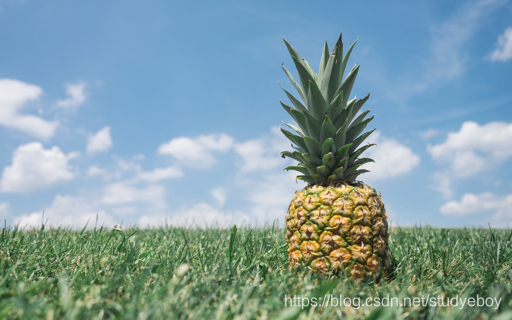
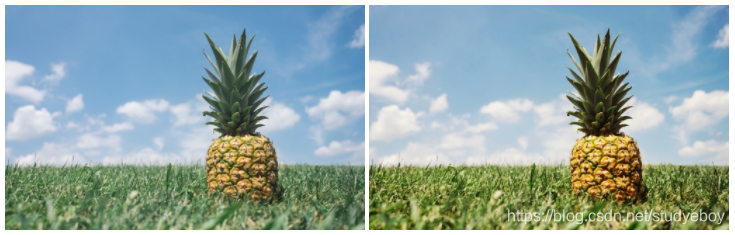
im = Image.open('./res/pineapple.jpeg')
im.filter(hefe).save('./res/pineapple.hefe.jpeg')
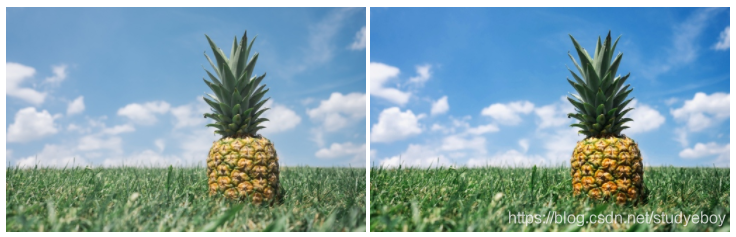
from pillow_lut import rgb_color_enhance
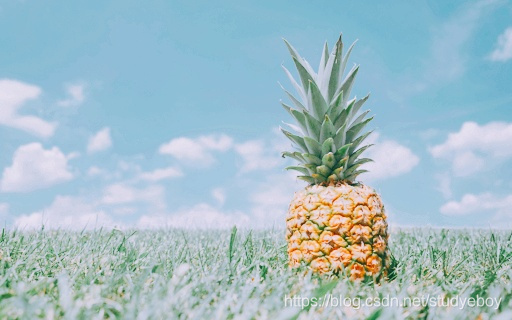
lut = rgb_color_enhance(11, exposure=0.2, contrast=0.1, vibrance=0.5, gamma=1.3)
im = Image.open('./res/pineapple.jpeg')
im.filter(lut).save('./res/pineapple.enhance.jpeg')
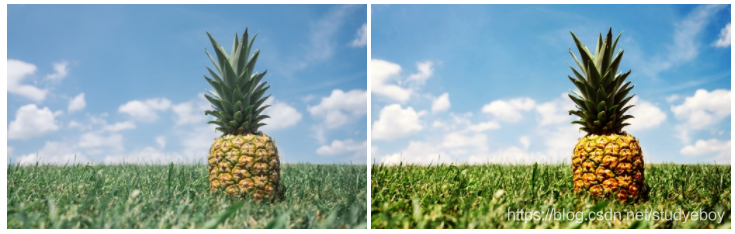
from pillow_lut import load_hald_image, rgb_color_enhance

hefe = load_hald_image('./res/hald.6.hefe.png')
lut = rgb_color_enhance(hefe, exposure=0.2, contrast=0.1, vibrance=0.5, gamma=1.3)
im = Image.open('./res/pineapple.jpeg')
im.filter(lut).save('./res/pineapple.hefe.enhance.jpeg')
3D LUT(Hald CLUT )转换为2D square CLUT
import numpy, cv2

hald = cv2.imread('1.Clarendon.png')

size = int(hald.shape[0] ** (1.0/3.0) + .5)
clut = numpy.concatenate([
    numpy.concatenate(im.reshape((size, size, size**2, size**2, 3))[row], axis=1)
    for row in range(size)
])

cv2.imwrite("clut.png", clut)

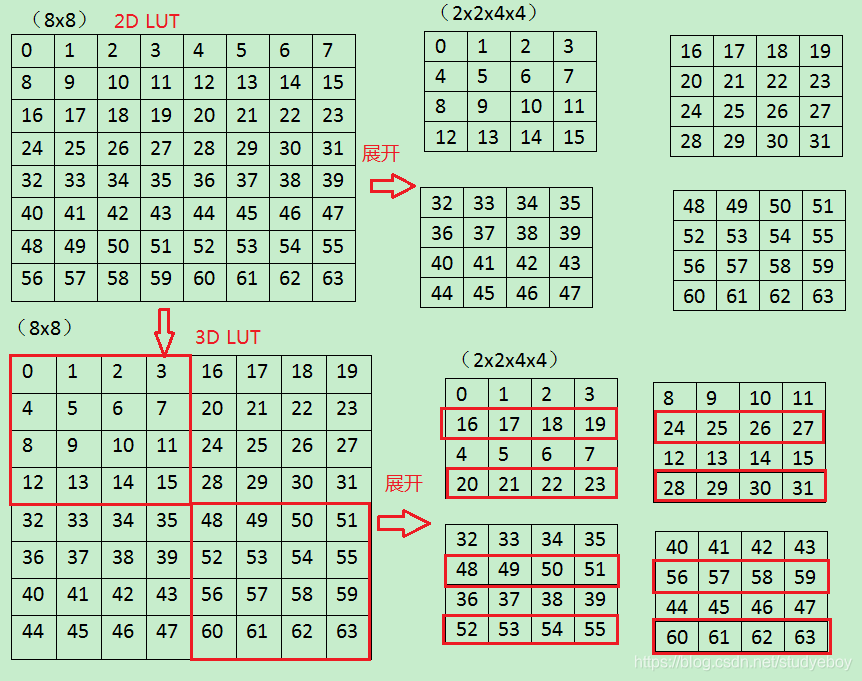
2D LUT和3D LUT之间相互转换
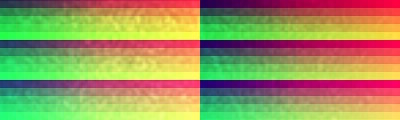
单通道转换示意图,便于理解,3D LUT转 2D LUT容易出错的地方已标红。
2D LUT到3D LUT的转换
# 2D LUT(size**3, size**3, 3) ->  3D LUT(size**3, size**3, 3)
clut = cv2.imread('./identity_clut_8.png')
size = int(clut.shape[0] ** (1.0 / 3.0) + 0.5)
clut_result = np.zeros((size ** 2, size ** 2, size ** 2, 3))
for i in range(size ** 2):
    tmp1 = math.floor(i / size)
    cx = int((i - tmp1 * size) * size ** 2)
    cy = int(tmp1 * size ** 2)
    clut_result[i] = clut[cy: cy + size ** 2, cx : cx + size ** 2]

hald = clut_result.reshape((size ** 3, size ** 3, 3))

cv2.imwrite('./identity_hald_{}_test.png'.format(size), hald)


3D LUT到2D LUT的转换
#3D LUT(size**3, size**3, 3) ->  2D LUT(size**3, size**3, 3)
hald = cv2.imread('./identity_hald_8.png')

size = int(hald.shape[0] ** (1.0/3.0) + .5)
#method1
clut = np.concatenate([
    np.concatenate(hald.reshape((size, size, size**2, size**2, 3))[row], axis=1)
    for row in range(size)
])
cv2.imwrite("2d_identity.png", clut)
#method2
hald_reshape = hald.reshape((size, size, size ** 2, size ** 2, 3))
print('hald_reshape shape:', hald_reshape.shape)
img_list = []
for i in range(size):
    print('hald_reshape[i] shape:', hald_reshape[i].shape)
    tmp = np.concatenate(hald_reshape[i], axis=1)
    print('tmp shape:', tmp.shape)
    img_list.append(tmp)

result = np.concatenate(img_list)
print('result shape:', result.shape)

cv2.imwrite("identity_clut_8_test.png", result)
参考资料
color-filters-reconstruction
pillow-lut-tools
Pillow LUT tools
Create your own LUT
CLUT-from-images