实验要求:
使用client的xiaoming用户基于秘钥认证方式通过端口2000使用ssh登录server端的xiaoming用户和xiaohei用户,server端的其他用户都不可被远程登录。
1、关闭服务端(sever)防火墙和selinux
[root@sever ~]# systemctl stop firewalld
[root@sever ~]# setenforce 0

2、服务器端下载安装包openssh-server
[root@sever ~]# yum install -y openssh-server

3、 在服务端(sever)创建用户xiaoming和xiaohei,并给用户设定密码
在客户端(client)创建用户xiaomnig,并给用户设定密码
[root@sever ~]# useradd xiaoming
[root@sever ~]# useradd xiaohei
[root@sever ~]# echo xiaoming | passwd --stdin xiaoming     //xiaoming用户的密码设为xiaoming
更改用户 xiaoming 的密码 。
passwd:所有的身份验证令牌已经成功更新。
[root@sever ~]# echo xiaohei | passwd --stdin xiaohei       //xiaohei用户的密码设为xiaohei
更改用户 xiaohei 的密码 。
passwd:所有的身份验证令牌已经成功更新。
[root@client ~]# useradd xiaoming
[root@client ~]# echo xiaoming | passwd --stdin xiaoming    //修改xiaoming用户密码为xiaoming
更改用户 xiaoming 的密码 。
passwd:所有的身份验证令牌已经成功更新。
4、在客户端产生秘钥对,并查看是否成功创建
[root@client ~]# ssh-keygen -t rsa
Generating public/private rsa key pair.
Enter file in which to save the key (/root/.ssh/id_rsa):       //存到哪个文件(默认则回车)
Created directory '/root/.ssh'.
Enter passphrase (empty for no passphrase):                    //设置密码(默认则回车)
Enter same passphrase again:
Your identification has been saved in /root/.ssh/id_rsa.
Your public key has been saved in /root/.ssh/id_rsa.pub.
The key fingerprint is:                                       //设置指纹(默认则回车)
6b:83:07:b4:6a:9e:ca:ac:ac:fc:98:6a:05:9f:98:9c root@client
The key's randomart image is:
+--[ RSA 2048]----+
|                 |
|                 |
|      .          |
| .   . .         |
|. * . o S        |
| E + . o .       |
|  . o . =        |
|o+oo . o .       |
|B*=oo            |
+-----------------+
5、 将客户端(client)产生的公钥传给服务端(sever)的用户xiaoming和xiaohei家目录下.ssh/authorized_keys文件
[root@client ~]# ssh-copy-id [email protected] -p 2000
[root@client ~]# ssh-copy-id [email protected] -p 2000


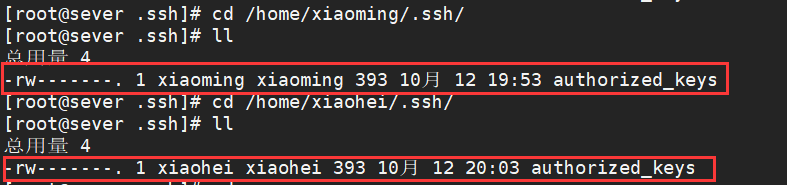
6、在服务端xiaomnig和xiaohei用户家目录下.ssh/下查看公钥文件是否传输成功
7、查看2000端口是否被占用
查看端口是否被占用使用以下两个命令都可: ① ss -lntup | grep 2000
② netstat -lntup | grep 2000
![]()
8、端口若没有被占用,则更改服务端配置文件/etc/ssh/sshd_config。
(修改端口为2000,在文件最后添加白名单:允许客户端登录该服务端的哪些用户(xiaoming和xiaohei)
其他用户都将被禁止登录)
[root@sever ~]# vim /etc/ssh/sshd_config


9、重启sshd服务并查看该服务是否正常运行
[root@sever ~]# systemctl restart sshd

10、测试
[root@client .ssh]# ssh -i /root/.ssh/id_rsa [email protected] -p 2000
[root@client .ssh]# ssh -i /root/.ssh/id_rsa [email protected] -p 2000
