1、概述
本文主要介绍了HaaS100 ADC硬件接口和软件使用方法。
2、ADC硬件接口说明
HaaS100开发板支持3路10bit GPADC,ADC测量范围0-1.8V,
对应IO口引脚如下图

3、ADC功能测试
3.1、测试用例说明
分别使用ADC0、ADC1、ADC2接到稳压电源1.6V,用来测试ADC值是否准确。
3.2、硬件接线说明
排针30脚(ADC0)接到稳压电源1.6V正极;
排针25脚(ADC2)接到稳压电源1.6V正极;
排针15脚(ADC1)接到稳压电源1.6V正极;
排针4脚(GND)接到稳压电源负极;
3.3、软件测试代码
参考以下链接下载、编译helloword、烧录
3.4、HaaS100 ADC API介绍
ADC初始化
| 函数原型 |
int32_t hal_adc_init(adc_dev_t *adc) |
| 功能描述 |
初始化ADC |
| 输入参数 |
adc_dev_t:
|
| 返回值 |
0 |
获取ADC值
| 函数原型 |
int32_t hal_adc_value_get(adc_dev_t *adc, uint32_t *output, uint32_t timeout) |
| 功能描述 |
获取adc值 |
| 输入参数 |
|
| 返回值 |
0 |
关闭ADC
| 函数原型 |
int32_t hal_adc_finalize(adc_dev_t *adc) |
| 功能描述 |
关闭ADC功能 |
| 输入参数 |
与初始化输入参数一致 |
| 返回值 |
0 |
3.5、HaaS100 ADC代码(基于helloword_demo修改)
由于ADC采样有一定的误差,所以需要多次采样减少误差;连续获取34次ADC采样值,去掉最高值与最低值,剩余的取平均值,以此来减少误差,然后判断是否在1600±200mV的范围内,如果在范围内,则代表采样准确,如果不在范围内,则采样不准确。
- 修改 application/example/helloworld_demo/appdemo.c 中代码如下
/*
 * Copyright (C) 2015-2020 Alibaba Group Holding Limited
 */

#include <stdio.h>
#include <stdlib.h>
#include <aos/kernel.h>
#include "aos/init.h"
#include "aos/hal/adc.h"
#include "board.h"
#include <k_api.h>


#define TEST_VOLT_MV  1600     //测试电压值1.6v
#define TEST_ADC_PORT_ADC0 0   //ADC0 对应排针30脚
#define TEST_ADC_PORT_ADC1 1   //ADC1 对应排针15脚
#define TEST_ADC_PORT_ADC2 2   //ADC2 对应排针25脚

static int32_t adc_test_process(uint8_t port)
{
    int32_t ret = 0;
    uint32_t output = 0;
    uint32_t test_sum = 0;
    uint32_t test_avrg = 0;
    uint32_t test_min = 3300;
    uint32_t test_max = 0;

    adc_dev_t adc;
    adc.port = port;
    adc.config.sampling_cycle = 1000;
    ret = hal_adc_init(&adc);
    if(ret)
    {
        printf("\r\n=====adc test : adc init failed===\r\n");
        return -1;
    }

    for(int32_t i = 0; i < 34; i++)
    {
        hal_adc_value_get(&adc, &output, 1000);
        test_sum += output;

        /* the min sampling voltage */
        if(test_min >= output)
        {
            test_min = output;
        }
        /* the max sampling voltage */
        if(test_max <= output)
        {
            test_max = output;
        }

        osDelay(20);
    }

    hal_adc_finalize(&adc);

    test_avrg = (test_sum - test_min - test_max) >> 5;

    printf("\r\n=====adc test : the samping volage is:%dmv===\r\n", test_avrg);

    if(((test_avrg - 200) > TEST_VOLT_MV) || ((test_avrg + 200) < TEST_VOLT_MV))
    {
        printf("\r\n=====adc test : the samping volage is out of scope===\r\n");
        printf("\r\n=====adc test : FAIL===\r\n");
        return -1;
    }

    printf("=====adc test : Done=====\r\n");

    return 0;
}

static int adc_autotest()
{
    int32_t ret = 0;

    printf("\r\n\r\n");
    printf("***************************************************************\r\n");
    printf("*************************** ADC Test **************************\r\n");
    printf("***************************************************************\r\n");
    printf("** Note: adc Test pin is 15, 25, 30 in 21*2 male pin header  **\r\n");
    printf("** Note: the testing voltage : 1.6v                          **\r\n");
    printf("** How to test: pls connect the dc power supply to Pin 15,25,30\r\n");
    printf("***************************************************************\r\n");
    printf("=====adc test : Start=====\r\n");

    ret = adc_test_process(TEST_ADC_PORT_ADC0);
    if (ret)
    {
        printf("\r\n=====adc test port %d : FAIL ===\r\n",TEST_ADC_PORT_ADC0);
        return -1;
    }

    printf("\r\n=====adc test prot %d : PASS===\r\n",TEST_ADC_PORT_ADC0);
    ret = adc_test_process(TEST_ADC_PORT_ADC1);
    if (ret)
    {
        printf("\r\n=====adc test port %d : FAIL ===\r\n",TEST_ADC_PORT_ADC1);
        return -1;
    }

    printf("\r\n=====adc test prot %d : PASS===\r\n",TEST_ADC_PORT_ADC1);
    ret = adc_test_process(TEST_ADC_PORT_ADC2);
    if (ret)
    {
        printf("\r\n=====adc test port %d : FAIL ===\r\n",TEST_ADC_PORT_ADC2);
        return -1;
    }

    printf("\r\n=====adc test prot %d : PASS===\r\n",TEST_ADC_PORT_ADC2);
    return 0;
}


int application_start(int argc, char *argv[])
{

    printf("nano entry here!\r\n");
    adc_autotest();
}
按HaaS100快速开始的方法编译并烧录固件,烧录完成后重启HaaS100开发板。
aos make disclean
aos make clean
aos make helloworld_demo@haas100 -c config && aos make
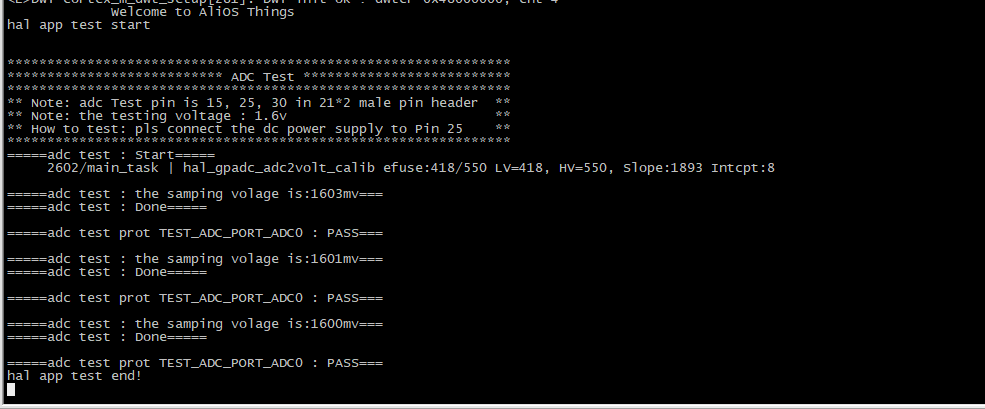
3.6、测试结果
观察串口打印输出,从下图可以看出ADC测试出来的结果都是在1600±200mV的范围内,符合预期。
4、小结
如需更多技术支持,可加入钉钉开发者群

更多技术与解决方案介绍,请访问阿里云AIoT首页https://iot.aliyun.com/