最近,我的应用需要使用跨平台的分享链接,刚好华为AppGallery Connect的AppLinking服务满足我的使用场景。
关于集成步骤,官网的资料写的有点多,我总结一下步骤
i. 步骤一:创建应用,开通AppLinking服务
ii. 步骤二:创建一个链接前缀
iii. 步骤三:在Android项目里集成AppLinking SDK;
iv. 步骤四:创建AppLinking
v. 步骤五:接收AppLinking链接并且测试。
1、创建应用,开通AppLinking服务
在AGC控制台,创建应用, 或者使用已有的应用,在界面上找到 我的项目 -> 增长–>AppLinking,点击立即开通 。

开通好以后,记得去 我的项目 -> 项目设置–> 常规 下面,下载agconnect-services.json文件到你的Android项目的app路径下。

2、创建一个链接前缀
在刚刚开通的AppLinking下面,点击链接前缀页签,点击添加链接前缀,根据需要创建一个现网唯一的前缀。
系统会自动帮你检测,保证你域名的全网唯一。


3、在Android项目里面集成AppLinking SDK
配置SDK地址,打开Android工程,在项目级build.gradle文件中,配置如下内容
buildscript {
repositories {
//….
maven {url 'https://developer.huawei.com/repo/'}
}
dependencies {
//….
classpath 'com.huawei.agconnect:agcp:1.4.1.300'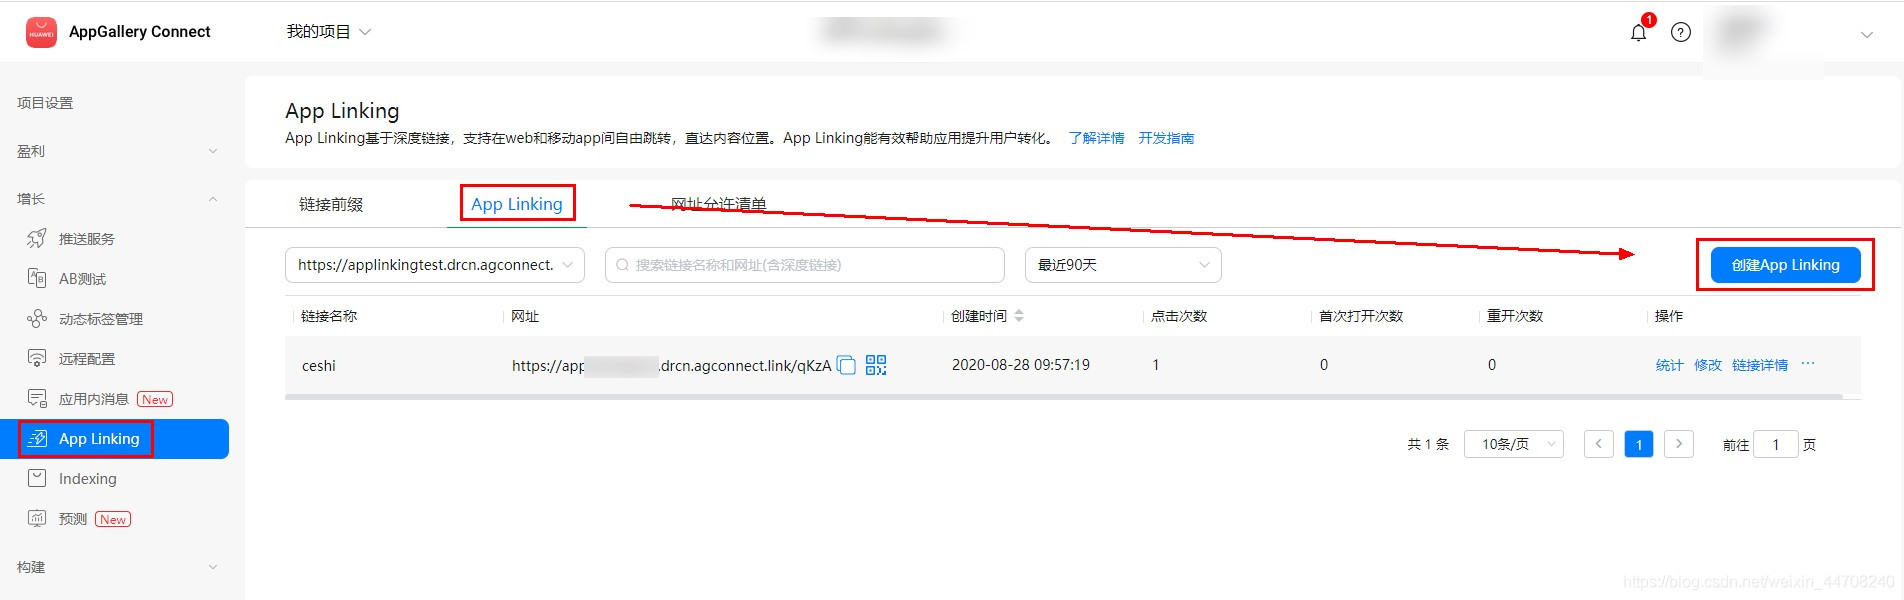
}
}
allprojects {
repositories {
//….
maven {url 'https://developer.huawei.com/repo/'}
}
}打开应用级的build.gradle文件,配置好AppLinking和华为分析的SDK,配置下面标红的内容即可
…
apply plugin: 'com.huawei.agconnect'
 ...
dependencies {
 ...
implementation "com.huawei.agconnect:agconnect-applinking:1.4
implementation 'com.huawei.hms:hianalytics:5.0.4.301'.1.300"
}
4、创建AppLinking
有两种方式创建AppLinking: 一种是直接在AGC界面上创建,另外一个是在Android项目里面用代码的API接口创建。
4.1 AGC界面创建AppLinking:
1、界面入口如下:点击创建AppLinking,然后根据步骤一步一步创建即可。

2、默认的深度链接配置,我就直接随意找了一个华为官网的。注意Android的深度链接的配置。

3、安卓链接行为,配置为:在Android应用中打开。

创建好以后,就可以复制下来使用了

4.2 端侧代码创建AppLinking
1、在activity_main.xml里面先把界面配置好:整两个按钮,一个创建,一个分享;再创建一个TextView显示框,用来显示AppLinking。
<Button
        android:id="@+id/create"
        android:layout_width="wrap_content"
        android:layout_height="wrap_content"
        android:text="Create App Linking"
        app:layout_constraintBottom_toBottomOf="parent"
        app:layout_constraintLeft_toLeftOf="parent"
        app:layout_constraintRight_toRightOf="parent"
        app:layout_constraintTop_toTopOf="parent"
        app:layout_constraintVertical_bias="0.4" />

    <TextView
        android:id="@+id/showLink"
        android:layout_width="wrap_content"
        android:layout_height="wrap_content"
        android:text="your App Linking"
        app:layout_constraintBottom_toBottomOf="parent"
        app:layout_constraintLeft_toLeftOf="parent"
        app:layout_constraintRight_toRightOf="parent"
        app:layout_constraintTop_toTopOf="parent"
        app:layout_constraintVertical_bias="0.5" />

    <Button
        android:id="@+id/shareLink"
        android:layout_width="wrap_content"
        android:layout_height="wrap_content"
        android:text="Share App Linking"
        app:layout_constraintBottom_toBottomOf="parent"
        app:layout_constraintLeft_toLeftOf="parent"
        app:layout_constraintRight_toRightOf="parent"
        app:layout_constraintTop_toTopOf="parent"
        app:layout_constraintVertical_bias="0.8" />
如下图所示:

2、然后把刚刚创建的链接前缀,复制添加到常量,另外再先把需要打开的DeepLink地址配置好。
private static final String DOMAIN_URI_PREFIX = "https://testapplinking1016.drcn.agconnect.link";
 private static final String DEEP_LINK = " https://consumer.huawei.com/cn/";
private static final String Android_DEEP_LINK = "myapp://testapplinking/?data=1016";
 private String shortLink;
2、在MainActivity的OnCreate里面,利用create按钮创建AppLinking
findViewById(R.id.create).setOnClickListener(new View.OnClickListener() {
    @Override
    public void onClick(View v) {
                 AppLinking.Builder builder = new AppLinking.Builder()
                         .setUriPrefix(DOMAIN_URI_PREFIX)
                         .setDeepLink(Uri.parse(DEEP_LINK))
                         .setAndroidLinkInfo(new AppLinking.AndroidLinkInfo.Builder()
.setAndroidDeepLink(Android_DEEP_LINK).build());.build());

                 builder.buildShortAppLinking().addOnSuccessListener(shortAppLinking -> {
                         shortLink = shortAppLinking.getShortUrl().toString();
                         TextView showAppLinking = findViewById(R.id.showLink);
                         showAppLinking.setText(shortLink);
                 }).addOnFailureListener(e -> {
                         Log.e("AppLinking", "Failure + "+ e.getMessage());
                 });
    }
});
3、在用shareLink按钮将刚刚创建的AppLinking分享出去
findViewById(R.id.shareLink).setOnClickListener(new View.OnClickListener() {
    @Override
    public void onClick(View v) {
        Intent intent = new Intent(Intent.ACTION_SEND);
        intent.setType("text/plain");
        intent.putExtra(Intent.EXTRA_TEXT, shortLink);
        startActivity(intent);
    }
});
5、接收相关AppLinking
接收的时候有两步操作,一个是需要配置manifest文件,另外一个在链接的入口配置getAppLinking方法:
1、 配置manifest文件:注意这里是将DeepLink的域名的Scheme配置进去:
比如我这里的DeepLink是:DEEP_LINK = "myapp://testapplinking/?data=1016";
private static final String DEEP_LINK = "myapp://testapplinking/?data=1016";
那么manifest文件就需要这样配置
<intent-filter>
    <action android:name="android.intent.action.VIEW" />
    <category android:name="android.intent.category.DEFAULT" />
        <category android:name="android.intent.category.BROWSABLE" />
        <data android:host="testapplinking" android:scheme="myapp" />
</intent-filter>
2、在OnCreate的主入口里面,配置getAppLinking,获取并且显示链接
AGConnectAppLinking.getInstance().getAppLinking(this).addOnSuccessListener(resolvedLinkData -> {
        if (resolvedLinkData != null) {
                 String Result = resolvedLinkData.getDeepLink().toString();
                 TextView showAppLinking = findViewById(R.id.showLink);
                 showAppLinking.setText(Result);
        }
});
6、打包测试,查看现象。
1、应用运行以后,点击Create按钮,创建一个AppLinking链接,显示在界面上。


2、 点击Share按钮,将AppLinking链接分享到便签里面暂存,然后,在便签里点击链接,通过浏览器打开。浏览器可以直接打开应用,测试完成。
(从界面上创建的AppLinking也是一样的,可以先复制到便签里面,然后通过便签点击测试)
欲了解更多详情,请参见:
https://developer.huawei.com/consumer/cn/doc/development/AppGallery-connect-Guides/agc-applinking-introduction


7、总结
集成简单,SDK依赖体积小,可以实现跨平台的分享,Android和iOS都可以支持,不需要在不同的平台做不同的适配了,节约工作量。
运营做推广可以再AGC界面上创建,开发做分享功能可以在端侧用代码创建,简直完美。
参考文档:
华为AGC AppLinking服务开发文档:https://developer.huawei.com/consumer/cn/doc/development/AppGallery-connect-Guides/agc-applinking-introduction
原文链接:https://developer.huawei.com/consumer/cn/forum/topic/0204406653695530273?fid=0101271690375130218
原作者:Jessyyyyy