文章目录
1.Java NIO简介
Java NIO(New IO)是从Java 1.4版本开始引入的一个新的IO API,可以替代标准的Java IO API。NIO与原来的IO有同样的作用和目的,但是使用的方式完全不同,NIO支持面向缓冲区的、基于通道的IO操作。NIO将以更加高效的方式进行文件的读写操作。
2.Java NIO和传统IO的区别

3.通道和缓冲区
Java NIO系统的核心在于:通道(Channel)和缓冲区(Buffer)。通道表示打开到 IO 设备(例如:文件、套接字)的连接。若需要使用 NIO 系统,需要获取用于连接 IO 设备的通道以及用于容纳数据的缓冲区。然后操作缓冲区,对数据进行处理。
简而言之,Channel 负责传输, Buffer 负责存储
3.1 缓冲区
缓冲区(Buffer):在 Java NIO 中负责数据的存取。缓冲区就是数组。用于存储不同数据类型的数据。
Buffer 就像一个数组,可以保存多个相同类型的数据。根据数据类型不同(boolean 除外) ,有以下Buffer常用子类: ByteBuffer,CharBuffer,ShortBuffer IntBuffer,LongBuffer, FloatBuffer,DoubleBuffer
Java NIO 中的 Buffer 主要用于与 NIO 通道进行交互,数据是从通道读入缓冲区,从缓冲区写入通道中的。
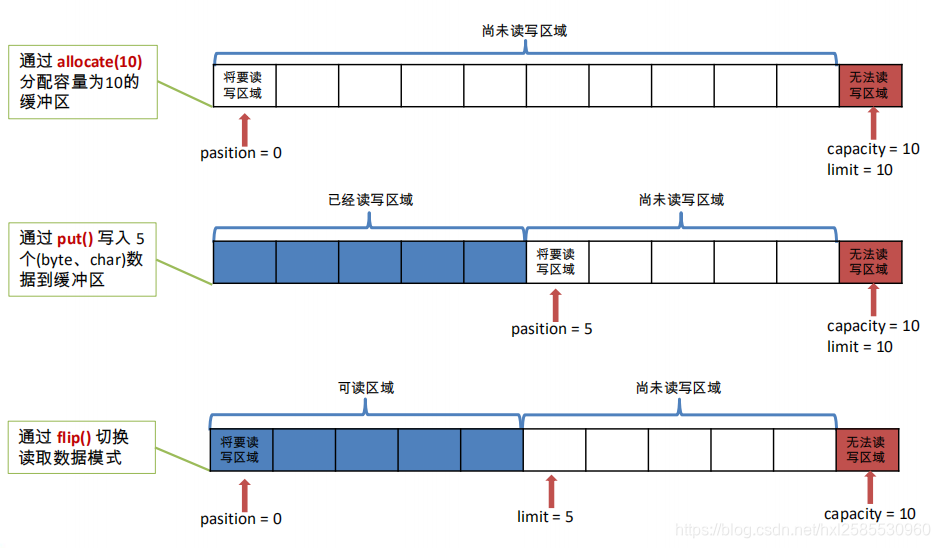
3.2 缓冲区中的四个核心属性
-
capacity : 容量,表示缓冲区中最大存储数据的容量。一旦声明不能改变。
-
limit : 界限,表示缓冲区中可以操作数据的大小。(limit 后数据不能进行读写)
-
position : 位置,表示缓冲区中正在操作数据的位置。
-
mark : 标记,表示记录当前 position 的位置。可以通过 reset() 恢复到 mark 的位置
遵守 0 <= mark <= position <= limit <= capacity
3.3 缓冲区存取数据的两个核心方法
put() : 存入数据到缓冲区中
put(byte b):将给定单个字节写入缓冲区的当前位置
put(byte[] src):将 src 中的字节写入缓冲区的当前位置
put(int index, byte b):将指定字节写入缓冲区的索引位置(不会移动 position)
get() : 获取缓冲区中的数据
get() :读取单个字节
get(byte[] dst):批量读取多个字节到 dst 中
get(int index):读取指定索引位置的字节(不会移动 position)
3.4 缓冲区的常用方法
Buffer clear() 清空缓冲区并返回对缓冲区的引用
Buffer flip() 将缓冲区的界限设置为当前位置,并将当前位置充值为 0
int capacity() 返回 Buffer 的 capacity 大小
boolean hasRemaining() 判断缓冲区中是否还有元素
int limit() 返回 Buffer 的界限(limit) 的位置
Buffer limit(int n) 将设置缓冲区界限为 n, 并返回一个具有新 limit 的缓冲区对象
Buffer mark() 对缓冲区设置标记
int position() 返回缓冲区的当前位置 position
Buffer position(int n) 将设置缓冲区的当前位置为 n , 并返回修改后的 Buffer 对象
int remaining() 返回 position 和 limit 之间的元素个数
Buffer reset() 将位置 position 转到以前设置的 mark 所在的位置
Buffer rewind() 将位置设为为 0, 取消设置的 mark
public class TestBuffer {


	@Test
	public void test3(){


		//分配直接缓冲区
		ByteBuffer buf = ByteBuffer.allocateDirect(1024);

		System.out.println(buf.isDirect());
	}

	@Test
	public void test2(){


		String str = "abcde";

		ByteBuffer buf = ByteBuffer.allocate(1024);

		buf.put(str.getBytes());

		buf.flip();

		byte[] dst = new byte[buf.limit()];
		buf.get(dst, 0, 2);
		System.out.println(new String(dst, 0, 2));
		System.out.println(buf.position());

		//mark() : 标记
		buf.mark();

		buf.get(dst, 2, 2);
		System.out.println(new String(dst, 2, 2));
		System.out.println(buf.position());

		//reset() : 恢复到 mark 的位置
		buf.reset();
		System.out.println(buf.position());

		//判断缓冲区中是否还有剩余数据
		if(buf.hasRemaining()){


			//获取缓冲区中可以操作的数量
			System.out.println(buf.remaining());
		}
	}

	@Test
	public void test1(){


		String str = "abcde";

		//1. 分配一个指定大小的缓冲区
		ByteBuffer buf = ByteBuffer.allocate(1024);

		System.out.println("-----------------allocate()----------------");
		System.out.println(buf.position());
		System.out.println(buf.limit());
		System.out.println(buf.capacity());

		//2. 利用 put() 存入数据到缓冲区中
		buf.put(str.getBytes());

		System.out.println("-----------------put()----------------");
		System.out.println(buf.position());
		System.out.println(buf.limit());
		System.out.println(buf.capacity());

		//3. 切换读取数据模式
		buf.flip();

		System.out.println("-----------------flip()----------------");
		System.out.println(buf.position());
		System.out.println(buf.limit());
		System.out.println(buf.capacity());

		//4. 利用 get() 读取缓冲区中的数据
		byte[] dst = new byte[buf.limit()];
		buf.get(dst);
		System.out.println(new String(dst, 0, dst.length));

		System.out.println("-----------------get()----------------");
		System.out.println(buf.position());
		System.out.println(buf.limit());
		System.out.println(buf.capacity());

		//5. rewind() : 可重复读
		buf.rewind();

		System.out.println("-----------------rewind()----------------");
		System.out.println(buf.position());
		System.out.println(buf.limit());
		System.out.println(buf.capacity());

		//6. clear() : 清空缓冲区. 但是缓冲区中的数据依然存在,但是处于“被遗忘”状态
		buf.clear();

		System.out.println("-----------------clear()----------------");
		System.out.println(buf.position());
		System.out.println(buf.limit());
		System.out.println(buf.capacity());

		System.out.println((char)buf.get());

	}

}
//test1输出
/*-----------------allocate()----------------
0
1024
1024
-----------------put()----------------
5
1024
1024
-----------------flip()----------------
0
5
1024
abcde
-----------------get()----------------
5
5
1024
-----------------rewind()----------------
0
5
1024
-----------------clear()----------------
0
1024
1024
a*/
3.5 直接缓冲区和非直接缓冲区
-
非直接缓冲区:通过 allocate() 方法分配缓冲区,将缓冲区建立在 JVM 的内存中

-
直接缓冲区:通过 allocateDirect() 方法分配直接缓冲区,将缓冲区建立在物理内存中。可以提高效率。
Java 虚拟机会尽最大努力直接在此缓冲区上执行本机 I/O 操作。也就是说,在每次调用基础操作系统的一个本机 I/O 操作之前(或之后),虚拟机都会尽量避免将缓冲区的内容复制到中间缓冲区中(或从中间缓冲区中复制内容)

字节缓冲区是直接缓冲区还是非直接缓冲区可通过调用其 isDirect() 方法来确定。提供此方法是为了能够在性能关键型代码中执行显式缓冲区管理。
4.通道
通道(Channel):用于源节点与目标节点的连接。在 Java NIO 中负责缓冲区中数据的传输。Channel 本身不存储数据,因此需要配合缓冲区进行传输

4.1 Java 为 Channel 接口提供的最主要实现类
FileChannel:用于读取、写入、映射和操作文件的通道。
DatagramChannel:通过 UDP 读写网络中的数据通道。
SocketChannel:通过 TCP 读写网络中的数据。
ServerSocketChannel:可以监听新进来的 TCP 连接,对每一个新进来
的连接都会创建一个 SocketChannel。
4.2 利用通道完成文件的复制(非直接缓冲区)
	public void test1(){


		FileInputStream fis = null;
		FileOutputStream fos = null;
		//①获取通道
		FileChannel inChannel = null;
		FileChannel outChannel = null;
		try {


			fis = new FileInputStream("one.jpg");
			fos = new FileOutputStream("two.jpg");

			inChannel = fis.getChannel();  //获取通道
			outChannel = fos.getChannel();

			//②分配指定大小的缓冲区
			ByteBuffer buf = ByteBuffer.allocate(1024);

			//③将通道中的数据存入缓冲区中
			while(inChannel.read(buf) != -1){


				buf.flip(); //切换读取数据的模式
				//④将缓冲区中的数据写入通道中
				outChannel.write(buf);
				buf.clear(); //清空缓冲区
			}
		} catch (IOException e) {


			e.printStackTrace();
		} finally {


		//通道使用完要关闭
			if(outChannel != null){


				try {


					outChannel.close();
				} catch (IOException e) {


					e.printStackTrace();
				}
			}

			if(inChannel != null){


				try {


					inChannel.close();
				} catch (IOException e) {


					e.printStackTrace();
				}
			}

			if(fos != null){


				try {


					fos.close();
				} catch (IOException e) {


					e.printStackTrace();
				}
			}

			if(fis != null){


				try {


					fis.close();
				} catch (IOException e) {


					e.printStackTrace();
				}
			}
		}

	}
4.3 使用直接缓冲区完成文件的复制(内存映射文件)
public void test2() throws IOException{


		FileChannel inChannel = FileChannel.open(Paths.get("one.jpg"), StandardOpenOption.READ);
		FileChannel outChannel = FileChannel.open(Paths.get("three.jpg"), StandardOpenOption.WRITE, StandardOpenOption.READ, StandardOpenOption.CREATE);

		//内存映射文件
		MappedByteBuffer inMappedBuf = inChannel.map(MapMode.READ_ONLY, 0, inChannel.size());
		MappedByteBuffer outMappedBuf = outChannel.map(MapMode.READ_WRITE, 0, inChannel.size());

		//直接对缓冲区进行数据的读写操作
		byte[] dst = new byte[inMappedBuf.limit()];
		inMappedBuf.get(dst);
		outMappedBuf.put(dst);

		inChannel.close();
		outChannel.close();

	}
4.4 通道之间的数据传输(直接缓冲区) 简单
	public void test3() throws Exception{


		FileChannel inChannel = FileChannel.open(Paths.get("one.jpg"), StandardOpenOption.READ);
		FileChannel outChannel = FileChannel.open(Paths.get("four.jpg"), StandardOpenOption.WRITE, StandardOpenOption.READ, StandardOpenOption.CREATE);

//		inChannel.transferTo(0, inChannel.size(), outChannel);
		outChannel.transferFrom(inChannel, 0, inChannel.size());

		inChannel.close();
		outChannel.close();
	}