手写一个简易版的 vue-router(支持 history 和 hash)
简介:vue-router 相信大家都用过,内部到底是如何实现的呢,我根据源码以及一些参考资料,手写了一个简易版的 vue-router,供大家参考。
下面是实现步骤
1.项目依赖:(先安装,步骤略)
package.json
{


  "name": "vue-my-router",
  "version": "0.1.0",
  "private": true,
  "scripts": {


    "serve": "vue-cli-service serve",
    "build": "vue-cli-service build",
    "lint": "vue-cli-service lint"
  },
  "dependencies": {


    "core-js": "^3.6.4",
    "register-service-worker": "^1.7.1",
    "vue": "^2.6.11",
    "vue-router": "^3.1.6",
    "vuex": "^3.1.3"
  },
  "devDependencies": {


    "@vue/cli-plugin-babel": "~4.3.0",
    "@vue/cli-plugin-eslint": "~4.3.0",
    "@vue/cli-plugin-pwa": "~4.3.0",
    "@vue/cli-plugin-router": "~4.3.0",
    "@vue/cli-plugin-vuex": "~4.3.0",
    "@vue/cli-service": "~4.3.0",
    "@vue/eslint-config-prettier": "^6.0.0",
    "babel-eslint": "^10.1.0",
    "eslint": "^6.7.2",
    "eslint-plugin-prettier": "^3.1.1",
    "eslint-plugin-vue": "^6.2.2",
    "less": "^3.0.4",
    "less-loader": "^5.0.0",
    "lint-staged": "^9.5.0",
    "prettier": "^1.19.1",
    "vue-template-compiler": "^2.6.11"
  }
}
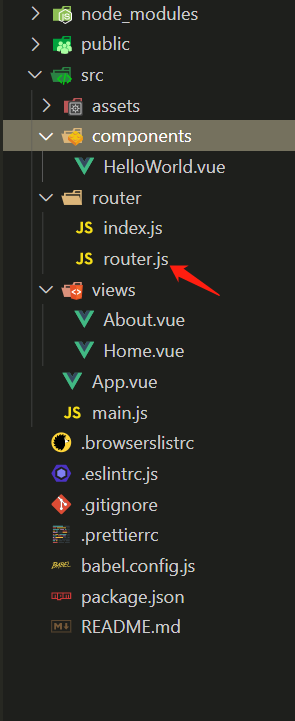
2.项目目录结构
3.核心代码
/src/router/router.js
export let Vue

class MyRouter {


  constructor(options) {


    this.$options = options

    // 路由数组映射成键值对
    this.routeMap = {

    }

    // 借助vue使其是响应式的,原因是为了更新router-view组件
    this.app = new Vue({


      data() {


        return {

     current: '/' }
      }
    })
  }

  // vue 插件必须实现的 install 方法
  static install(_Vue) {


    Vue = _Vue

    // 在混入的beforeCreate生命周期中为Vue.prototype添加  $router
    Vue.mixin({


      beforeCreate() {


        // 这里的this指向的是vue 的实例
        if (this.$options.router) {


          Vue.prototype.$router = this.$options.router
          Vue.prototype.$router.push = this.$options.router.push
          this.$options.router.init()
        }
      }
    })
  }

  // 路由的push方法
  push(path) {


    const {

     mode } = this.$options
    const _path = path || '/'
    if (mode === 'history') {


      window.history.pushState(_path, null, _path)
      this.app.current = _path
    } else {


      window.location.hash = '#' + _path
    }
  }

  // 初始化
  init() {


    this.createRouteMap()
    this.bindEvent()
    this.registerComponents()
  }

  // 创建路由映射 这里是一层遍历,实际是需要递归操作的,vue-router支持子路由
  createRouteMap() {


    this.$options.routes.forEach(item => {


      this.routeMap[item.path] = item.component
    })
  }

  // 绑定事件
  bindEvent() {


    const {

     mode } = this.$options
    // 绑定this的原因是this.onLocationChange函数里的this指向的是window,遵循谁调用指向谁原则
    // 然而我们希望this指向的是MyRouter 的实例
    window.addEventListener('load', this.onLocationChange.bind(this))
    const event = mode === 'history' ? 'popstate' : 'hashchange'
    // popstate 方法并不会监听到 window.history.pushState 和 window.history.replaceState
    // this.onLocationChange  不会执行
    window.addEventListener(event, this.onLocationChange.bind(this))
  }

  // 修改路由
  onLocationChange() {


    const {

     mode } = this.$options
    const isHistory = mode === 'history'
    let path = '/'
    if (isHistory) {


      path = window.location.pathname
    } else {


      if (window.location.hash) {


        path = window.location.hash.slice(1)
      } else {


        window.location.href = '#/'
      }
    }
    this.app.current = path || '/'
  }

  // 注册全局组件
  registerComponents() {


    const _this = this

    // 全局注册router-link
    Vue.component('router-link', {


      props: {


        to: {


          type: String,
          required: true,
          default: ''
        }
      },
      render(h) {


        const {

     mode } = _this.$options
        const isHistory = mode === 'history'
        const attrs = isHistory ? {

     href: '' } : {

     href: '#' + this.to }
        const clickHandler = e => {


          e.preventDefault()
          const _path = this.to || '/'
          window.history.pushState(_path, null, _path)
          _this.app.current = this.to
        }
        const on = isHistory
          ? {


              click: clickHandler
            }
          : {

    }

        // h即createElement,用法参考官方链接
        // https://cn.vuejs.org/v2/guide/render-function.html#createElement-%E5%8F%82%E6%95%B0
        return h(
          'a',
          {


            class: {


              'router-link': true
            },
            attrs,
            on
          },
          // this.$slots.default default 属性包括了所有没有被包含在具名插槽中的节点
          // https://cn.vuejs.org/v2/api/#vm-slots
          [this.$slots.default]
        )
      }
    })

    // 全局注册router-view
    Vue.component('router-view', {


      // eslint-disable-next-line no-unused-vars
      render(h) {


        const Component = _this.routeMap[_this.app.current]
        // 下面使用的是jsx语法,也可以用h(Component)
        return <Component />
      }
    })
  }
}

export default MyRouter
/src/App.vue
<template>
  <div id="app">
    <div id="nav">
      <h1>便签导航</h1>
      <router-link to="/">Home</router-link> |
      <router-link to="/about">About</router-link>

      <h1>编程式导航</h1>
      <button @click="toHome">Home</button>
      <button @click="toAbout">About</button>
    </div>
    <router-view />
  </div>
</template>

<script>
  export default {


    created() {


      console.log(this.$router)
    },
    methods: {


      toHome() {


        this.$router.push('/')
      },
      toAbout() {


        this.$router.push('/about')
      }
    }
  }
</script>

<style lang="less">
  #app {


    font-family: Avenir, Helvetica, Arial, sans-serif;
    -webkit-font-smoothing: antialiased;
    -moz-osx-font-smoothing: grayscale;
    text-align: center;
    color: #2c3e50;
  }

  #nav {


    padding: 30px;

    a {


      font-weight: bold;
      color: #2c3e50;

      &.router-link-exact-active {


        color: #42b983;
      }
    }
  }
</style>
4.实现效果
history
hash
参考链接
1.https://cn.vuejs.org/v2/guide/render-function.html
2.https://github.com/57code/vue-study
扫描二维码关注公众号,回复:
11995379 查看本文章
