前言
微信小程序(后面统称小程序)在page中已经自带下拉刷新功能,只需要在json文件中开启配置就可以便捷使用下拉刷新功能。但是在开发场景中下拉刷新的使用频次是很高的,有时候不止要在page层级实现下拉刷新功能。那么我们想对任意的view都能实现下拉刷新可以实现么?答案是:yes!
思路
通过查阅官方API文档,发现scroll-view在最低版本为2.10.1可以支持下拉刷新功能。那么我们就可以通过封装scroll-view来实现下拉刷新任意view的功能,而且我们要实现的是官方样式,用系统自带的兼容性更好。

实现步骤
既然是提供一个通用组件(Component),所以第一步我们先定义一个组件(Component)。之前写过一篇自定义组件的文章微信小程序自定义组件,不太清楚流程的可以去看下这篇文章。
定义组件
- 在和pages同级的目录新建component文件夹
- 然后在component文件夹右键【新建目录】pullfresh
- 然后在pullfresh文件夹右键【新建component】pullfresh
做完上面三部会自动帮你生成pullfresh组件的四个文件
具体实现
首先我们先列举下这个下拉刷新组件需要对外暴露的属性和函数:
- 控件的高度:height
- 控件的宽度:width
- 控件的背景:background
- 控件刷新超时时间:timeout
- 是否支持上拉加载:enablemore
- 刷新回调函数:onRefresh()
- 刷新重置回调函数:onRestore()
- 刷新中止回调函数:onAbort()
- 刷新结束回调函数:onRefreshEnd()
- 上拉更多回调函数:onLoadmore()
接下来就是代码实现了,关键地方我会做好注释
js代码实现
//js文件代码实现
const app = getApp()
var that
Component({


  /**
   * 组件的属性列表
   */
  properties: {


    //刷新控件高度,单位rpx
    height: {


      type: Number,
      value: 0
    },
    //刷新控件宽度,单位rpx
    width: {


      type: Number,
      value: 0
    },
    //刷新控件背景颜色
    background: {


      type: String,
      value: 'white'
    },
    //刷新控件刷新超时时间
    timeout: {


      type: Number,
      value: 4000
    },
    //是否开启上拉加载更多,默认不开启
    enablemore: {


      type: Boolean,
      value: false
    }
  },
  options: {


    multipleSlots: true // 在组件定义时的选项中启用slot支持
  },

  /**
   * 组件的初始数据
   */
  data: {


    triggered: false
  },
  // 以下是旧式的定义方式,可以保持对 <2.2.3 版本基础库的兼容
  attached: function () {


    console.log('attached')
    that = this
  },
  //在组件在视图层布局完成后执行
  ready: function () {


    console.log('ready')
  },
  // 在组件实例被从页面节点树移除时执行
  detached: function () {


    console.log('detached')
    that.endFresh()
  },
  /**
   * 组件的方法列表
   */
  methods: {


    //拖拽下拉回调函数
    onPulling(e) {


      that.setData({


        triggered: true
      })
    },
    //刷新回调
    onRefresh(e) {


      if (that._freshing) return
      that._freshing = true
      //超过超时时间结束刷新状态
      setTimeout(() => {


        that.endFresh()
      }, that.properties.timeout)
      //对外暴露的刷新方法
      that.triggerEvent("onRefresh")
    },
    //刷新重置回调
    onRestore(e) {


      //对外暴露的刷新重置方法
      that.triggerEvent("onRestore")
    },
    //刷新中断回调
    onAbort(e) {


      //对外暴露的刷新中断方法
      that.triggerEvent("onAbort")
    },
    //刷新结束回调
    endFresh(){


      that.setData({


        triggered: false,
      })
      that._freshing = false
      //对外暴露的刷新结束方法
      that.triggerEvent("onRefreshEnd")
    },
    //上拉更多回调
    onLoadmore(e){


      if (!that.properties.enablemore){


        return
      }
      //对外暴露的上拉方法
      that.triggerEvent("onLoadmore")
    }
  }
})
布局实现
这里用到的slot节点主要是用来实现占位,可以替换自己的布局,刷新任意view就体现在这里。关于slot不清楚的可以查看我之前的文章微信小程序自定义组件。
<scroll-view scroll-y style="width: {

    {width}}rpx; height: {

    {height}}rpx;background:{

    {background}};" refresher-enabled="{

    {true}}"  refresher-default-style="black" refresher-triggered="{

    {triggered}}" bindrefresherpulling="onPulling" bindrefresherrefresh="onRefresh"
  bindrefresherrestore="onRestore" bindrefresherabort="onAbort" bindscrolltolower='onLoadmore'>
  <!--这里用slot节点占位,可以替换任意布局-->
  <slot name='content'></slot>
</scroll-view>
样式
由于未使用样式,所以样式文件没有。
使用
核心的代码我们已经写好了,使用的话就直接引用组件就行,这里以在页面中使用为例。
页面json配置
在页面的json文件中做配置
"usingComponents": {


    "pullfresh": "../../component/pullfresh/pullfresh"
  }
页面布局
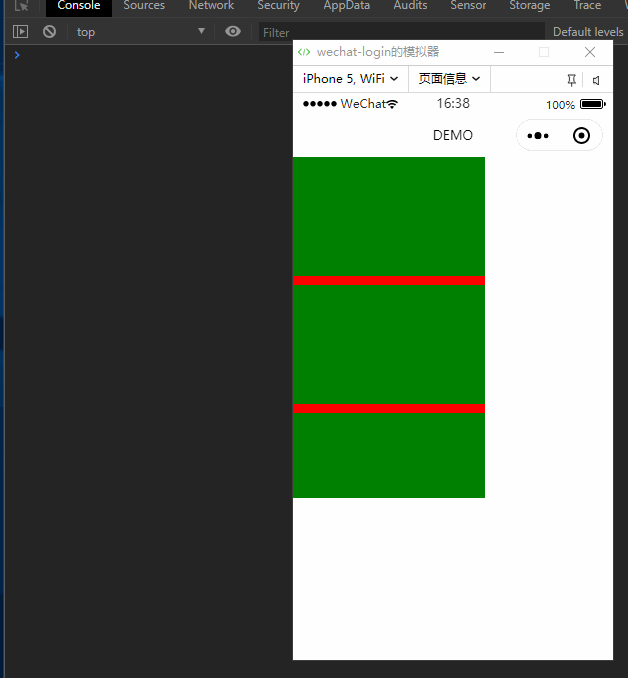
这里先设置宽度450,高度800,超时时间,背景为红色(方便查看宽度和高度是否生效),然后按需要设置好各个回调函数
<pullfresh width='450' height='800' timeout='2000' background='red' bind:onRefresh='_onRefresh' bind:onRestore='_onRestore' bind:onAbort='_onAbort' bind:onRefreshEnd='_onRefreshEnd' bind:onLoadmore='_onLoadmore'>
  <!--替换组件中name为content的slot,这是真正要下拉刷新的view-->
  <view slot='content' wx:for="1234567" style="display: flex; height: 300rpx;">
    <view style="width:100%;height:280rpx;background:green;"></view>
  </view>
</pullfresh>
js实现
主要是回调的各个函数
  ...
  _onRefresh(e){


    console.log('_onRefresh')
  },
  _onRestore(e){


    console.log('_onRestore')
  },
  _onAbort(e) {


    console.log('_onAbort')
  },
  _onRefreshEnd() {


    console.log('_onRefreshEnd')
  },
  _onLoadmore(e){


    console.log('_onLoadmore')
  }
  ...
这没有使用样式文件,所以wxss文件没有,接下来我们看下效果
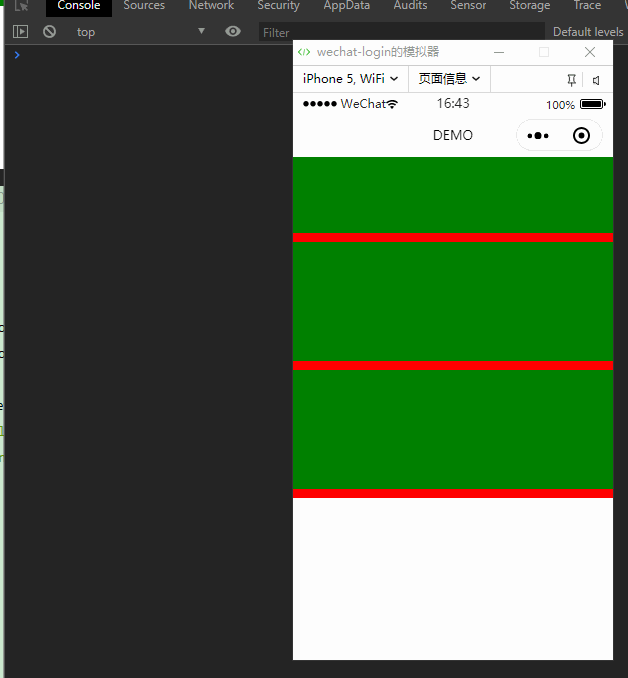
接下来我们稍微更改下参数,宽度改成750,超时时间改成500,支持上拉加载
<pullfresh width='750' height='800' timeout='500' enablemore='true' background='red' bind:onRefresh='_onRefresh' bind:onRestore='_onRestore' bind:onAbort='_onAbort' bind:onRefreshEnd='_onRefreshEnd' bind:onLoadmore='_onLoadmore'>
  <!--替换组件中name为content的slot,这是真正要下拉刷新的view-->
  <view slot='content' wx:for="1234567" style="display: flex; height: 300rpx;">
    <view style="width:100%;height:280rpx;background:green;"></view>
  </view>
</pullfresh>
上面演示的是被动结束刷新,当然你也可以手动调用endFresh()函数主动结束刷新的方法,这里就不做演示了。
动态宽高度,充满屏幕
那如果我想动态的来更改高度和宽度了,比如说我想让高度充满屏幕。当然也是可以的,我们再data中定义好参数,然后获取windowHeight和windowWidth,然后按你自己的需求来就行,这里以充满屏幕为例。注意,data中的contentH默认值建议最好是不小于200。
//js文件
var that
Page({


  /**
   * 页面的初始数据
   */
  data: {


    contentH: 200,
    contentW: 0
  },

  /**
   * 生命周期函数--监听页面加载
   */
  onLoad: function (options) {


    that = this
    //这里单位是px
    var windowHeight = wx.getSystemInfoSync().windowHeight
    var windowWidth = wx.getSystemInfoSync().windowWidth
    //转成rpx
    var windowHeightRpx = windowHeight * 750 / windowWidth
    var windowWidthRpx = 750
    that.setData({


      contentH: windowHeightRpx,
      contentW: windowWidthRpx
    })
  },
  _onRefresh(e){


    console.log('_onRefresh')
  },
  _onRestore(e){


    console.log('_onRestore')
  },
  _onAbort(e) {


    console.log('_onAbort')
  },
  _onRefreshEnd() {


    console.log('_onRefreshEnd')
  },
  _onLoadmore(e){


    console.log('_onLoadmore')
  }
})
然后布局中的宽度和高度分别用data中的参数来替代
<pullfresh width='{

    {contentW}}' height='{

    {contentH}}' timeout='2000' enablemore='true' background='red' bind:onRefresh='_onRefresh' bind:onRestore='_onRestore' bind:onAbort='_onAbort' bind:onRefreshEnd='_onRefreshEnd' bind:onLoadmore='_onLoadmore'>
  <view slot='content' wx:for="1234567" style="display: flex; height: 300rpx;">
    <view style="width:100%;height:280rpx;background:green;"></view>
  </view>
</pullfresh>
接下来在看效果:
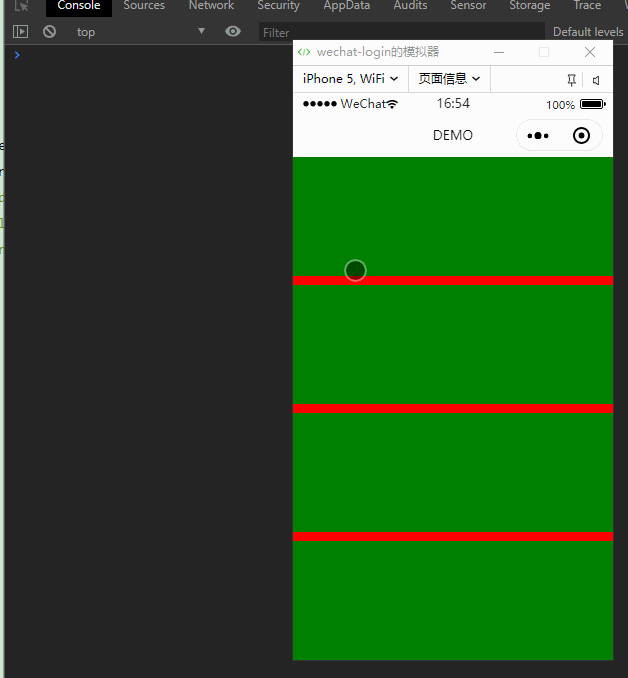
可以看到已经达到了我们预期的效果,但是如果你想在页面中充满整个下拉刷新控件的话不建议,因为页面已经自带了刷新功能了,直接开启页面下拉刷新功能。至于这里为什么做这个充满屏幕的演示是告诉读者,下拉刷新控件可以动态的计算和设置。
存在问题
利用组件component来实现的下拉刷新控件在一个页面中只能引用一次,因为在同一个页面引用多次组件引入的是一个单例的scroll-view,在使用bindxxx函数时会导致只有最后一个生效,这里要特别注意。
应用
接下来我们就用这个swiper+今天实现下拉刷新功能模仿一个在Android开发中常用的组合:ViewPager+fragment+下拉刷新,效果图如下:
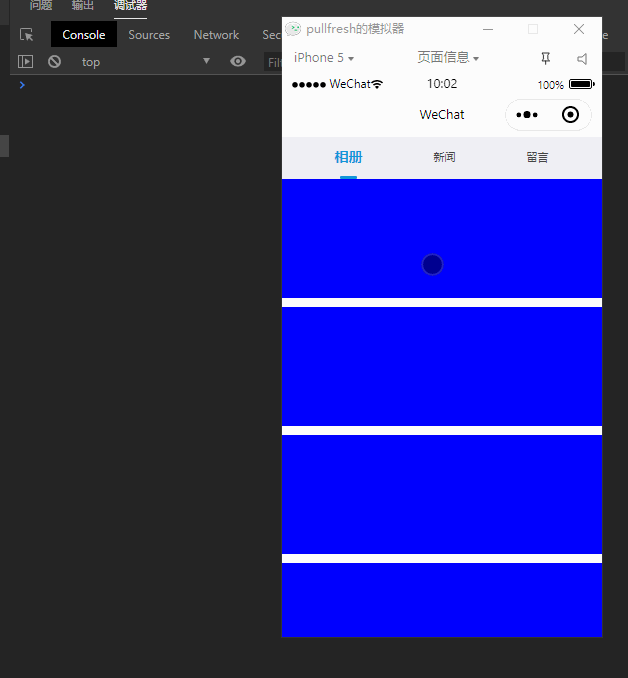
有人可能有疑问了,你上面不是说了一个页面 不能引用多次么?那么问题来了,我真的多次引用了吗?
请戳
↓↓↓↓
点击用开发者工具打开demo
尾巴
今天的文章到这里就结束了,美中不足的是以组件形式引用的话一个页面引用多次会导致回调事件只有最后一次绑定的才会生效。如果想在 一个页面中引用多次的话,就参考demo中的写法吧!
老规矩,喜欢我的文章,欢迎素质三连:点赞,评论,关注,谢谢大家!