Spring Security
Spring Security是一个能够为基于Spring的企业应用系统提供声明式的安全访问控制解决方案的安全框架。它提供了一组可以在Spring应用上下文中配置的Bean,充分利用了Spring IoC,DI和AOP(面向切面编程)功能,为应用系统提供声明式的安全访问控制功能,减少了为企业系统安全控制编写大量重复代码的工作。
官网:https://spring.io/projects/spring-security
在springboot中使用Spring Security
用户认证和授权
搭建项目,引入依赖
编写配置类
@EnableWebSecurity
public class SecurityConfig extends WebSecurityConfigurerAdapter {
//授权
@Override
protected void configure(HttpSecurity http) throws Exception {
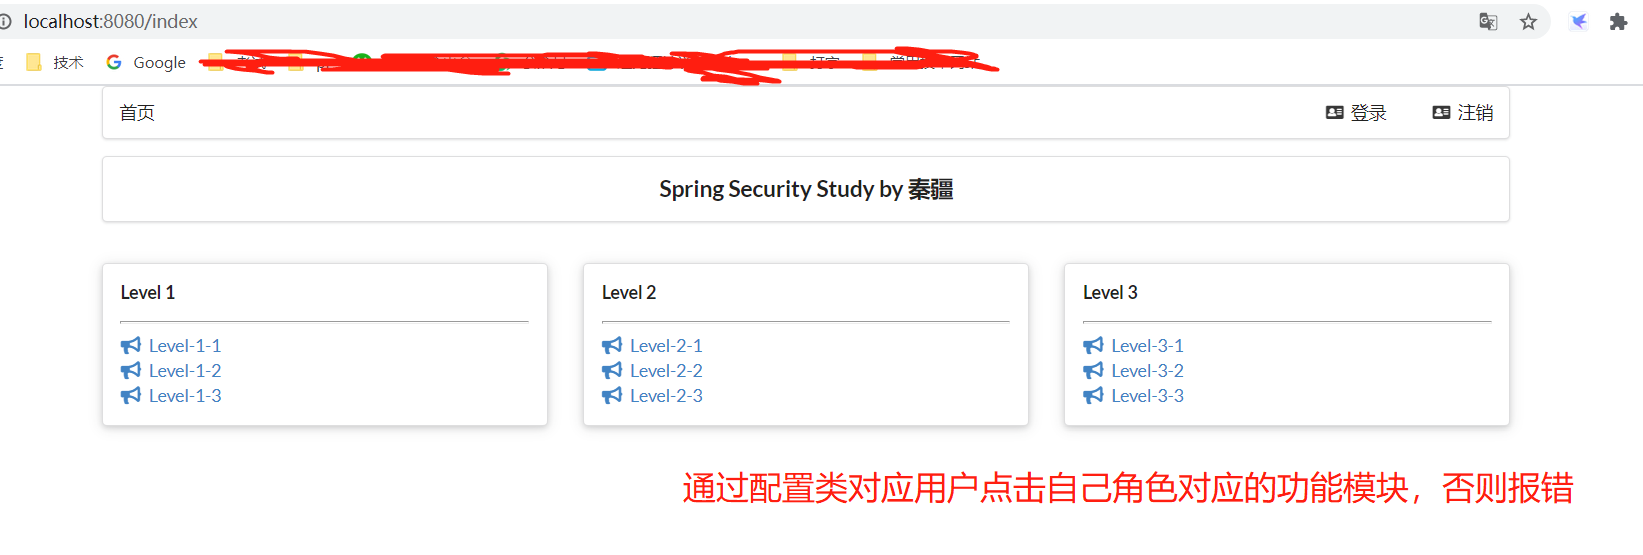
//配置首页所有人都可以访问,功能只有对应角色的才能访问
http.authorizeRequests()
.antMatchers("/").permitAll()
.antMatchers("/level1/**").hasRole("vip1")
.antMatchers("/level2/**").hasRole("vip2")
.antMatchers("/level3/**").hasRole("vip3");
//没有权限会到登陆页面
http.formLogin();
//关闭csrf功能,保证正常注销
http.csrf().disable();
//开启注销功能
http.logout().logoutSuccessUrl("/");
}
//配置用户角色(认证)
@Override
protected void configure(AuthenticationManagerBuilder auth) throws Exception {
//数据来源于数据库,但在springboot 2.1.x可以这样使用
//密码需要加密,spring security5.0+有很多加密方法
auth.inMemoryAuthentication().passwordEncoder(new BCryptPasswordEncoder())
.withUser("huang").password(new BCryptPasswordEncoder().encode("123456")).roles("vip2", "vip3")
.and()
.withUser("root").password(new BCryptPasswordEncoder().encode("123456")).roles("vip1","vip2", "vip3")
.and()
.withUser("guest").password(new BCryptPasswordEncoder().encode("123456")).roles("vip1");
}
}
level相当于菜单,目前还没有权限控制,只是把权限控制放在了菜单下的资源下
Spring Security和thymeleaf整合
Spring Security在后台进行安全控制,当然权限的控制离不开前端也页面的一些操作,因此需要Spring Security和thymeleaf整合,使得thymeleaf可以使用Security的一些东西进行逻辑判断。
首先引入依赖(只在springboot2.1.0以下版本可用)
<!--security-thymeleaf整合-->
<!--可以在thymeleaf中写一些security的东西-->
  <dependency>
    <groupId>org.thymeleaf.extras</groupId>
    <artifactId>thymeleaf-extras-springsecurity4</artifactId>
    <version>3.0.4.RELEASE</version>
</dependency>
控制用户名和注销按钮的权限控制

<!--未登录,则不显示-->
<div sec:authorize="!isAuthenticated()" >
<a class="item" th:href="@{/toLogin}">
<i class="address card icon"></i> 登录
</a>
</div>
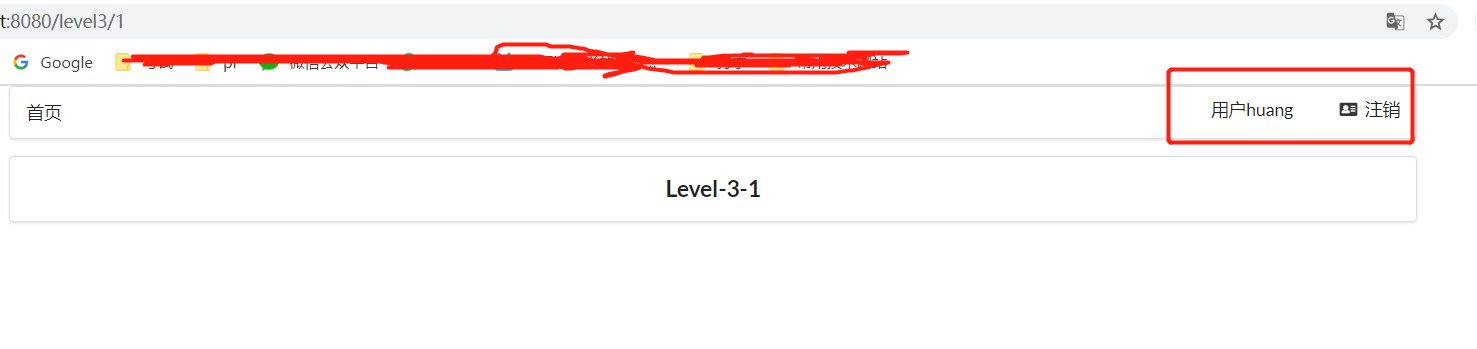
<!--登录,显示用户名-->
<div sec:authorize="isAuthenticated()" >
<a class="item" >
用户 <span sec:authentication="name"></span>
<!-- 角色 <span sec:authentication=""></span>-->
</a>
</div>
<!--登录,显示注销按钮-->
<div sec:authorize="isAuthenticated()" >
<a class="item" th:href="@{/logout}">
<i class="address card icon"></i> 注销
</a>
</div>
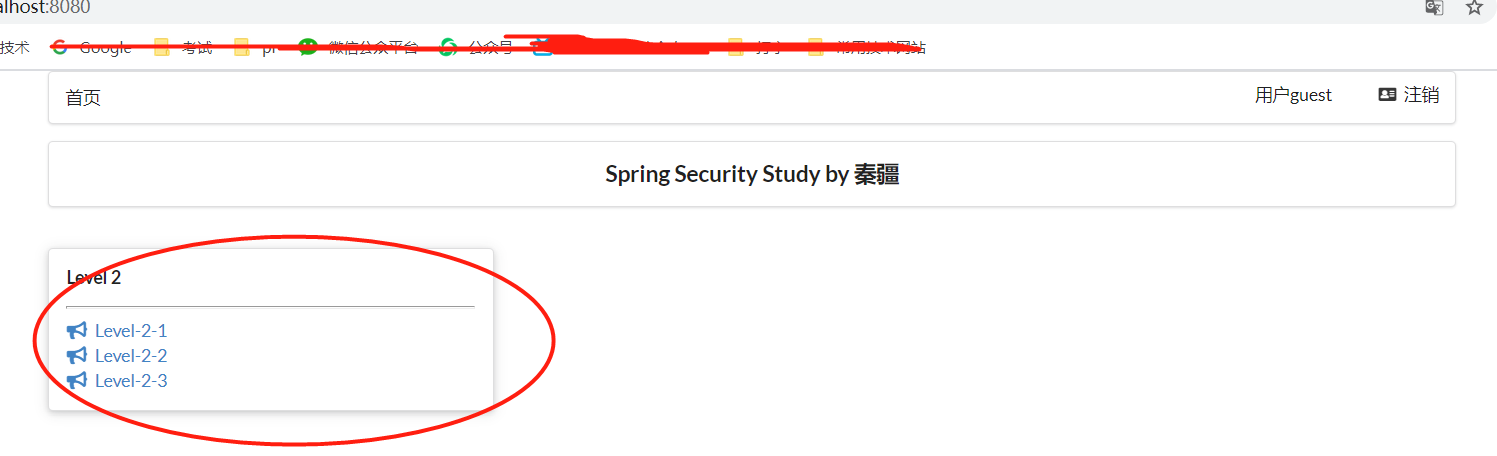
 菜单的权限控制
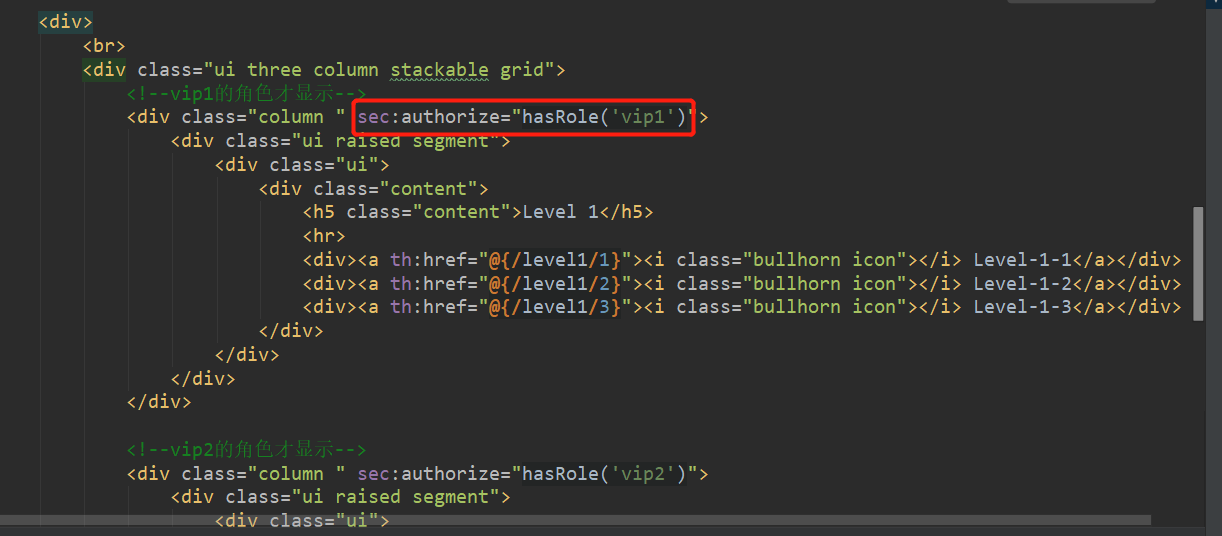
guest用户只有vip2角色,所以只能看到自己的菜单
shiro
Apache Shiro是一个强大且易用的Java安全框架,执行身份验证、授权、密码和会话管理。使用Shiro的易于理解的API,您可以快速、轻松地获得任何应用程序,从最小的移动应用程序到最大的网络和企业应用程序。
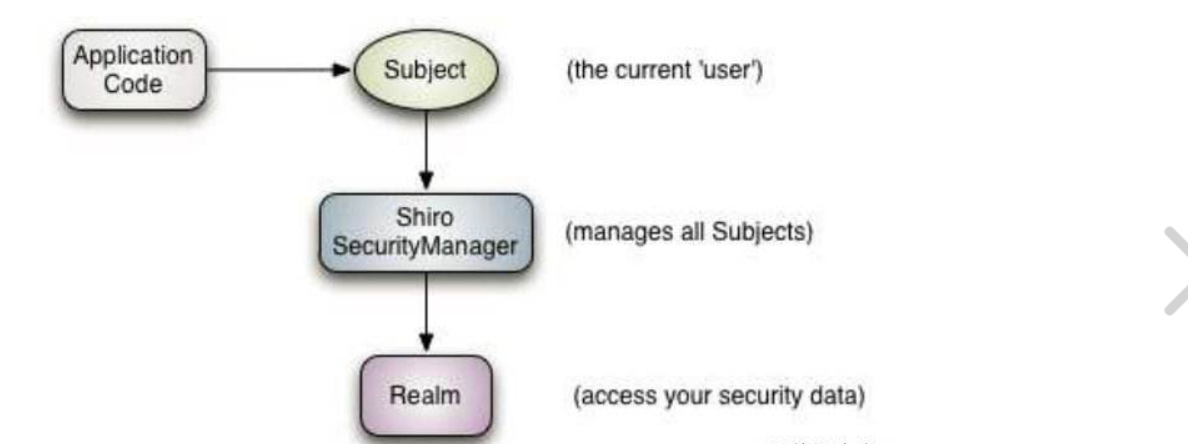
三个核心组件:Subject, SecurityManager 和 Realms.
Subject:即“当前操作用户”。但是,在Shiro中,Subject这一概念并不仅仅指人,也可以是第三方进程、后台帐户(Daemon Account)或其他类似事物。它仅仅意味着“当前跟软件交互的东西”。
Subject代表了当前用户的安全操作,SecurityManager则管理所有用户的安全操作。
SecurityManager:它是Shiro框架的核心,典型的Facade模式,Shiro通过SecurityManager来管理内部组件实例,并通过它来提供安全管理的各种服务。
Realm: Realm充当了Shiro与应用安全数据间的“桥梁”或者“连接器”。也就是说,当对用户执行认证(登录)和授权(访问控制)验证时,Shiro会从应用配置的Realm中查找用户及其权限信息。
springboot集成Shiro
环境搭建
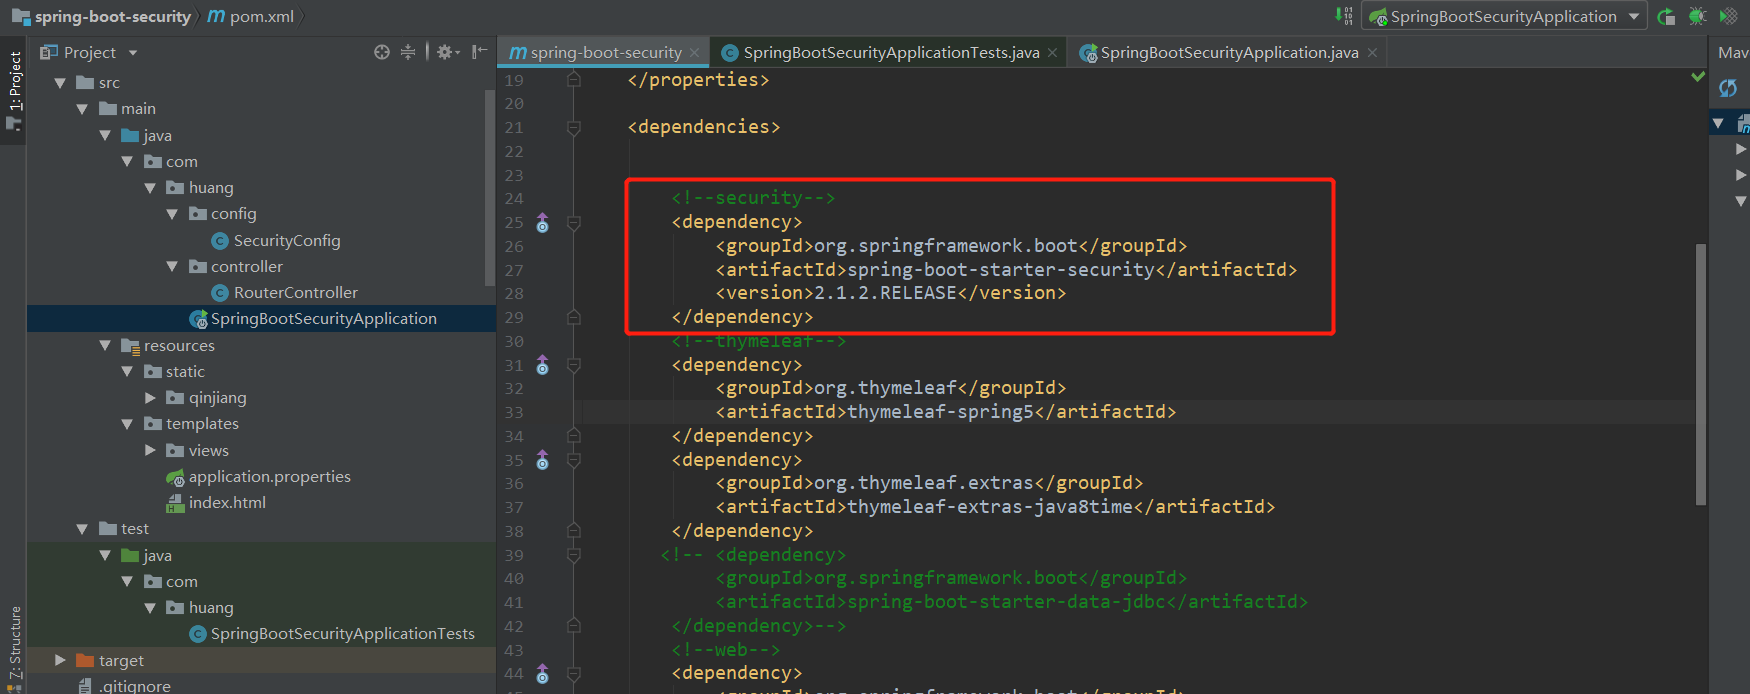
首先导入依赖
<!--shiro-->
<dependency>
    <groupId>org.apache.shiro</groupId>
    <artifactId>shiro-spring</artifactId>
    <version>1.6.0</version>
创建对应配置类和页面
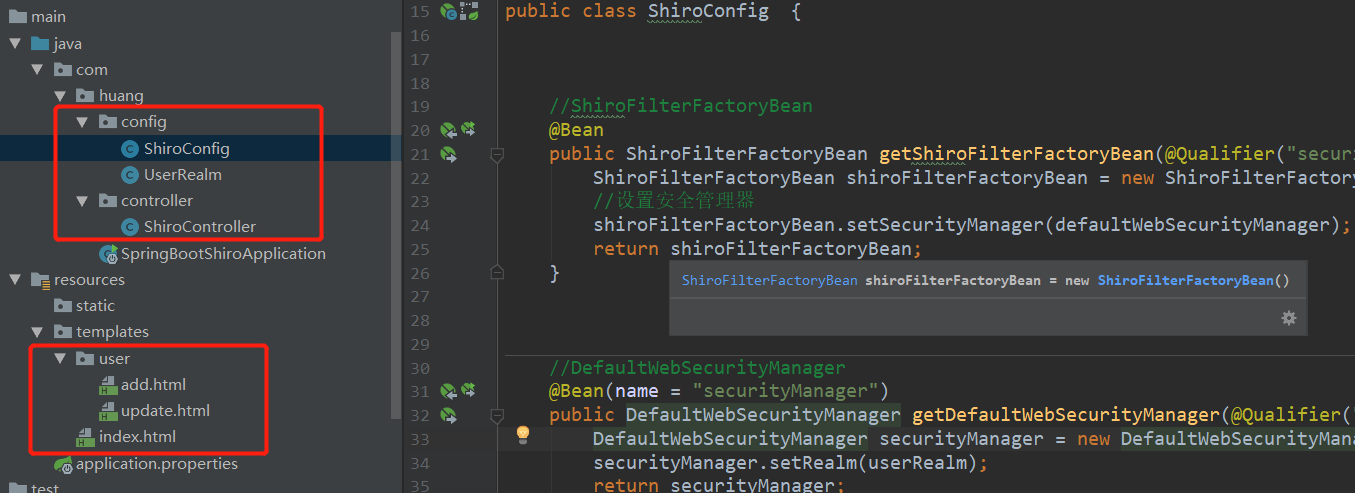
@Configuration
public class ShiroConfig  {


    //ShiroFilterFactoryBean
    @Bean
    public ShiroFilterFactoryBean getShiroFilterFactoryBean(@Qualifier("securityManager")DefaultWebSecurityManager defaultWebSecurityManager){


        ShiroFilterFactoryBean shiroFilterFactoryBean = new ShiroFilterFactoryBean();
        //设置安全管理器
        shiroFilterFactoryBean.setSecurityManager(defaultWebSecurityManager);
        return shiroFilterFactoryBean;
    }


    //DefaultWebSecurityManager
    @Bean(name = "securityManager")
    public DefaultWebSecurityManager getDefaultWebSecurityManager(@Qualifier("userRealm")UserRealm userRealm){


        DefaultWebSecurityManager securityManager = new DefaultWebSecurityManager();
        securityManager.setRealm(userRealm);
        return securityManager;
    }

    //创建Realm对象,需要自定义类
    @Bean
    public UserRealm userRealm(){


        return  new UserRealm();
    }
}
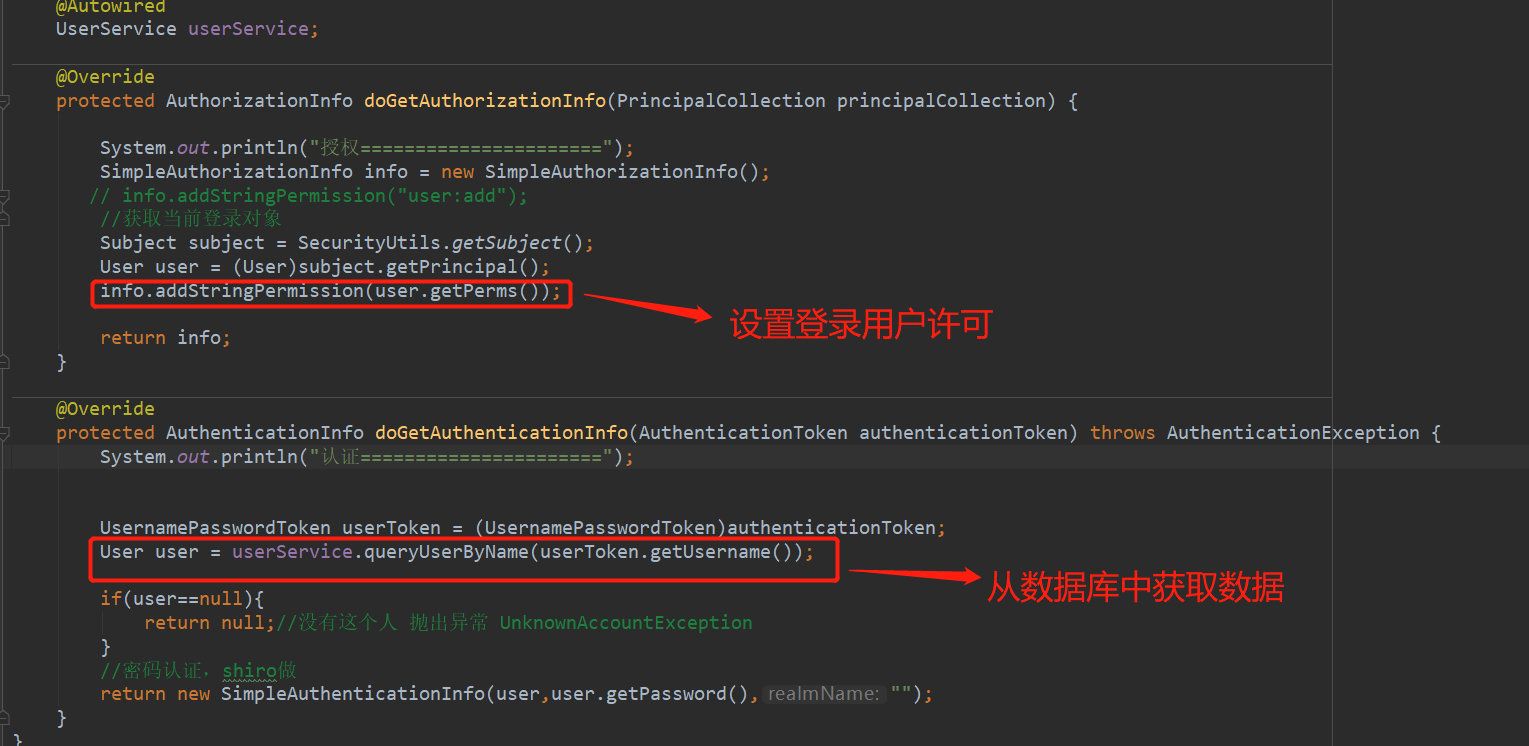
public class UserRealm  extends AuthorizingRealm {


    @Override
    protected AuthorizationInfo doGetAuthorizationInfo(PrincipalCollection principalCollection) {


        System.out.println("授权======================");
        return null;
    }

    @Override
    protected AuthenticationInfo doGetAuthenticationInfo(AuthenticationToken authenticationToken) throws AuthenticationException {


        System.out.println("认证======================");
        return null;
    }
}
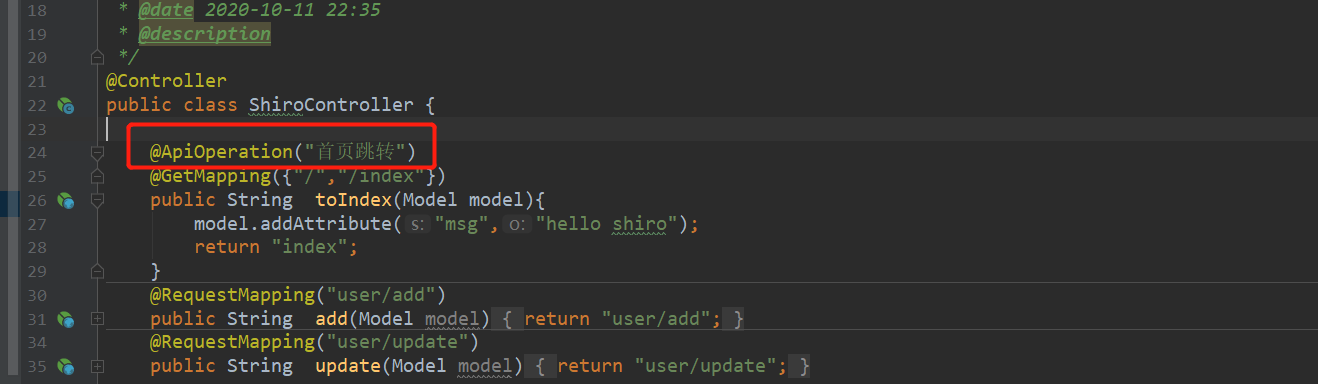
@Controller
public class ShiroController {


    @RequestMapping({

    "/","/index"})
    public String  toIndex(Model model){


        model.addAttribute("msg","hello shiro");
        return "index";
    }
    @RequestMapping("user/add")
    public String  add(Model model){


        return "user/add";
    }
    @RequestMapping("user/update")
    public String  update(Model model){


        return "user/update";
    }

}
<!DOCTYPE html>
<html lang="en">
<head>
    <meta charset="UTF-8">
    <title>Title</title>
</head>
<body>
<p >add</p>
</body>
</html>
<!DOCTYPE html>
<html lang="en">
<head>
    <meta charset="UTF-8">
    <title>Title</title>
</head>
<body>
<p >update</p>
</body>
</html>
<!DOCTYPE html>
<html lang="en" xmlns:th="http://www.thymeleaf.org">
<head>
<title>shiro</title>
</head>
<body>
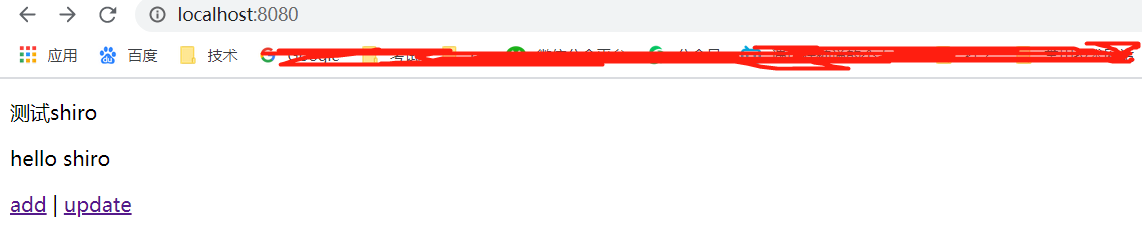
<p>测试shiro</p>
<P th:text="${msg}"></P>
<a th:href="@{/user/add}">add</a> | <a th:href="@{/user/update}">update</a>
</body>
</html>
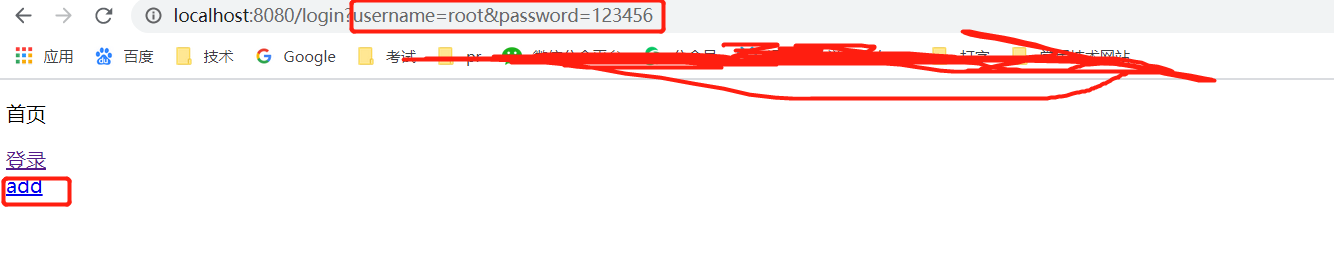
结果:点击连接可以跳转到对应页面
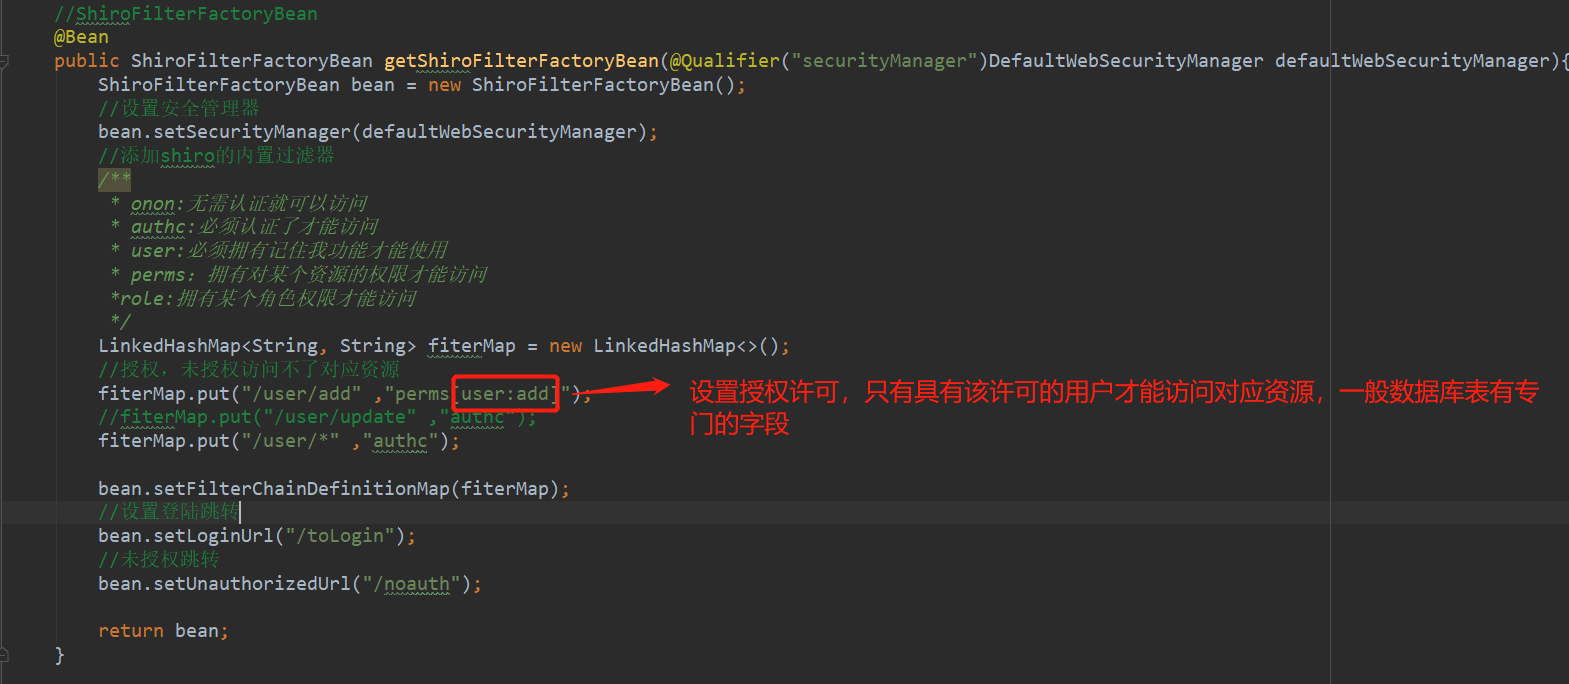
配置过滤功能
此时添加过滤器,只有具有authc的/user/*才会放行,否则报错。
//ShiroFilterFactoryBean
@Bean
public ShiroFilterFactoryBean getShiroFilterFactoryBean(@Qualifier("securityManager")DefaultWebSecurityManager defaultWebSecurityManager){


    ShiroFilterFactoryBean bean = new ShiroFilterFactoryBean();
    //设置安全管理器
    bean.setSecurityManager(defaultWebSecurityManager);

    //添加shiro的内置过滤器
    /**
     * onon:无需认证就可以访问
     * authc:必须认证了才能访问
     * user:必须拥有记住我功能才能使用
     * perms:拥有对某个资源的权限才能访问
     *role:拥有某个角色权限才能访问
     */
    LinkedHashMap<String, String> fiterMap = new LinkedHashMap<>();
    //fiterMap.put("/user/add" ,"authc");
    //fiterMap.put("/user/update" ,"authc");
    fiterMap.put("/user/*" ,"authc");

    bean.setFilterChainDefinitionMap(fiterMap);
    //设置登陆跳转
    bean.setLoginUrl("/toLogin");

    return bean;
}
添加登录页以及授权和认证功能
用户名和密码校验(认证)
登录页面
<!DOCTYPE html>
<html lang="en"xmlns:th="http://www.thymeleaf.org">
<head>
    <meta charset="UTF-8">
    <title>Title</title>
</head>
<body>
<p>登录</p>
<p th:text="${msg}" style="color: red"></p>
<form th:action="@{/login}">
<p>用户名<input type="text" name="username"></p>
<p>密码<input type="text" name="password"></p>
<p><input type="submit" ></p>
</form>
</body>
</html>
@RequestMapping("/login")
public String  login(String username, String password,Model model){


    //获取当前用户
    Subject subject = SecurityUtils.getSubject();
    UsernamePasswordToken token = new UsernamePasswordToken(username, password);
    try {


        subject.login(token);
        return "index";
    }catch (UnknownAccountException e){


        model.addAttribute("msg","用户名错误");
        return "login";
    }catch (IncorrectCredentialsException e ){


        model.addAttribute("msg","密码错误");
        return "login";
    }

}
public class UserRealm  extends AuthorizingRealm {


    @Override
    protected AuthorizationInfo doGetAuthorizationInfo(PrincipalCollection principalCollection) {


        System.out.println("授权======================");
        return null;
    }

    @Override
    protected AuthenticationInfo doGetAuthenticationInfo(AuthenticationToken authenticationToken) throws AuthenticationException {


        System.out.println("认证======================");

        String name = "root";
        String password = "123456";

        UsernamePasswordToken userToken = (UsernamePasswordToken)authenticationToken;

        if(!userToken.getUsername().equals(name)){


            return null;//抛出异常 UnknownAccountException
        }
        //密码认证,shiro做
        return new SimpleAuthenticationInfo("",zhpassword,"");
    }
}
这里自定义了用户名和密码,模拟数据库数据,当前端用这个账号登录时,会进行校验,是在realm里面做的,controller里面只需要获取当前Subject,调用登录方法即可,这两部分看起来并没有什么关联。
##### 用户授权

shiro整合thymeleaf
前面的权限都是后端控制的,在前端页面如果只有某个功能权限,那么也只能看到自己的功能菜单,因此前端页面需要做一些逻辑控制。
首先导入依赖
<!--shiro-thymeleaf-->
<dependency>
    <groupId>com.github.theborakompanioni</groupId>
    <artifactId>thymeleaf-extras-shiro</artifactId>
    <version>2.0.0</version>
</dependency>
注册ShiroDialect
@Bean
public  ShiroDialect  getShiroDialect(){


    return new ShiroDialect();
}
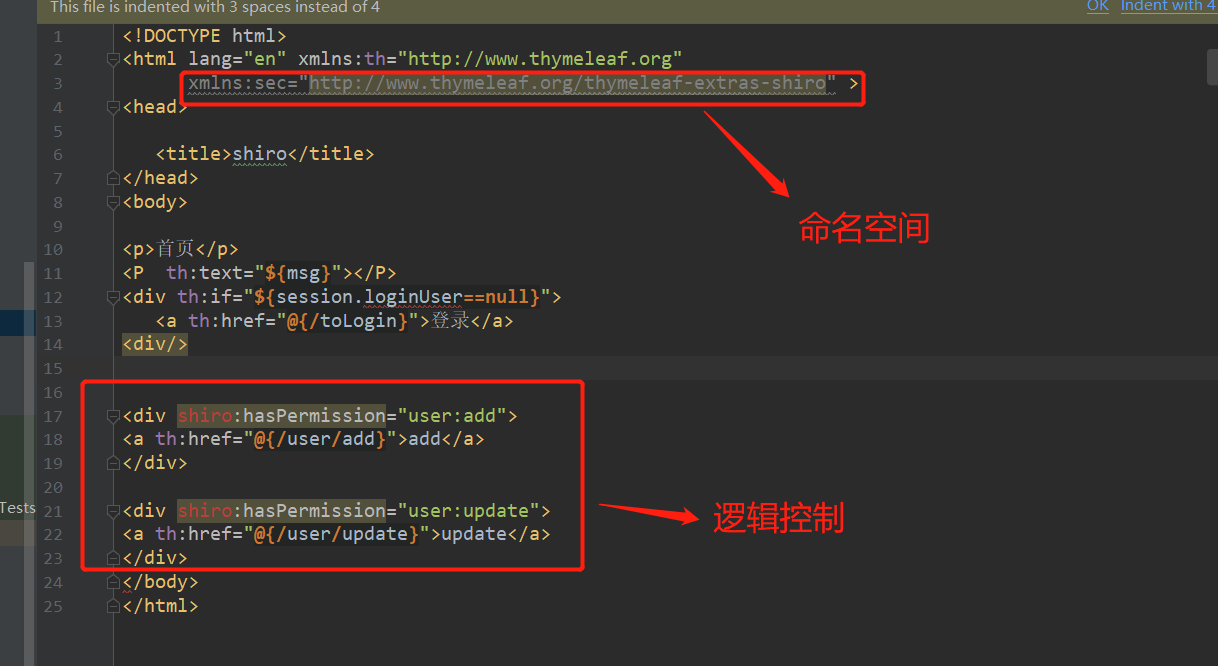
用户进来只能看到自己的功能菜单
Swagger
swagger是一个专门用于管理后端接口的web服务,最大的优点是能实时同步api与文档,方便前后端联调,也可以给接口添加注释信息,可以在线测试。
springboot集成swagger
导入依赖
<!--swagger-->
<dependency>
    <groupId>io.springfox</groupId>
    <artifactId>springfox-swagger-ui</artifactId>
    <version>2.9.2</version>
</dependency>
<dependency>
    <groupId>io.springfox</groupId>
    <artifactId>springfox-swagger2</artifactId>
    <version>2.9.2</version>
配置类
@Configuration
@EnableSwagger2
public class SwaggerConfig {
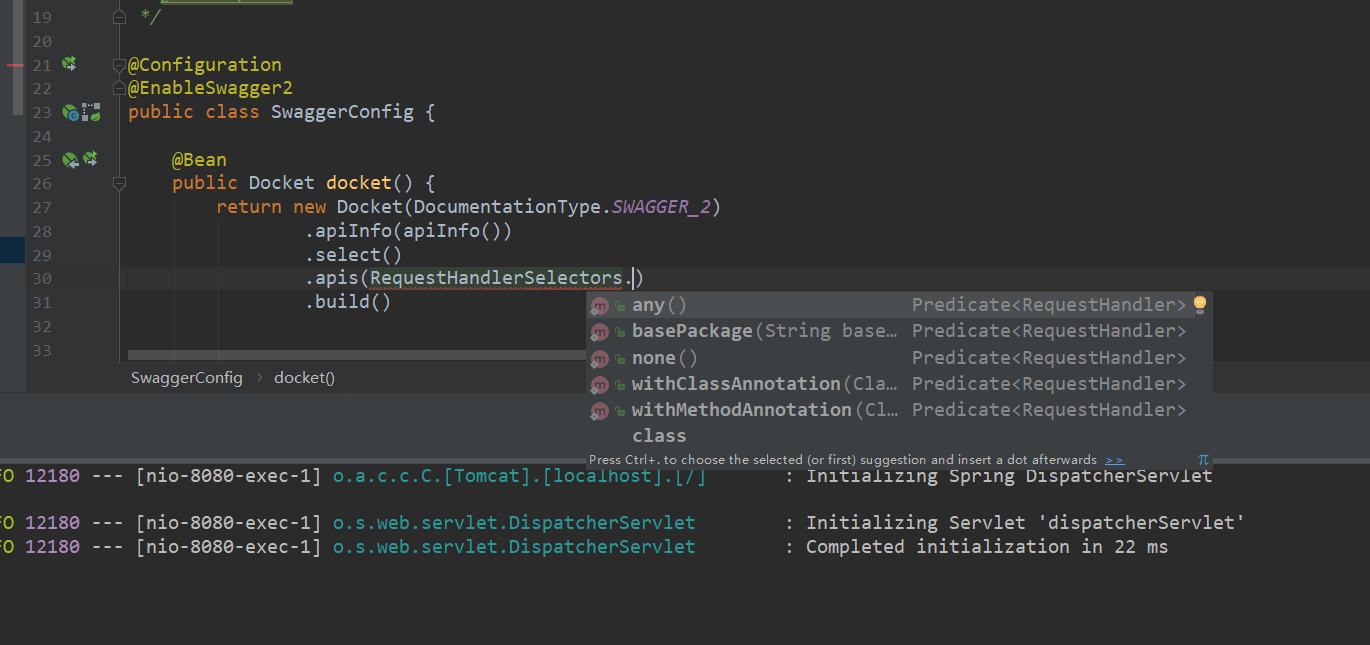
@Bean
public Docket docket() {
return new Docket(DocumentationType.SWAGGER_2)
.apiInfo(apiInfo())
.select()
//指定包扫描
.apis(RequestHandlerSelectors.basePackage("com.huang.controller.ShiroController"))
.build();
}
private ApiInfo apiInfo() {
Contact contact = new Contact("test", "https://www.baidu.com/?tn=02003390_10_hao_pg", "[email protected]");
return new ApiInfo(
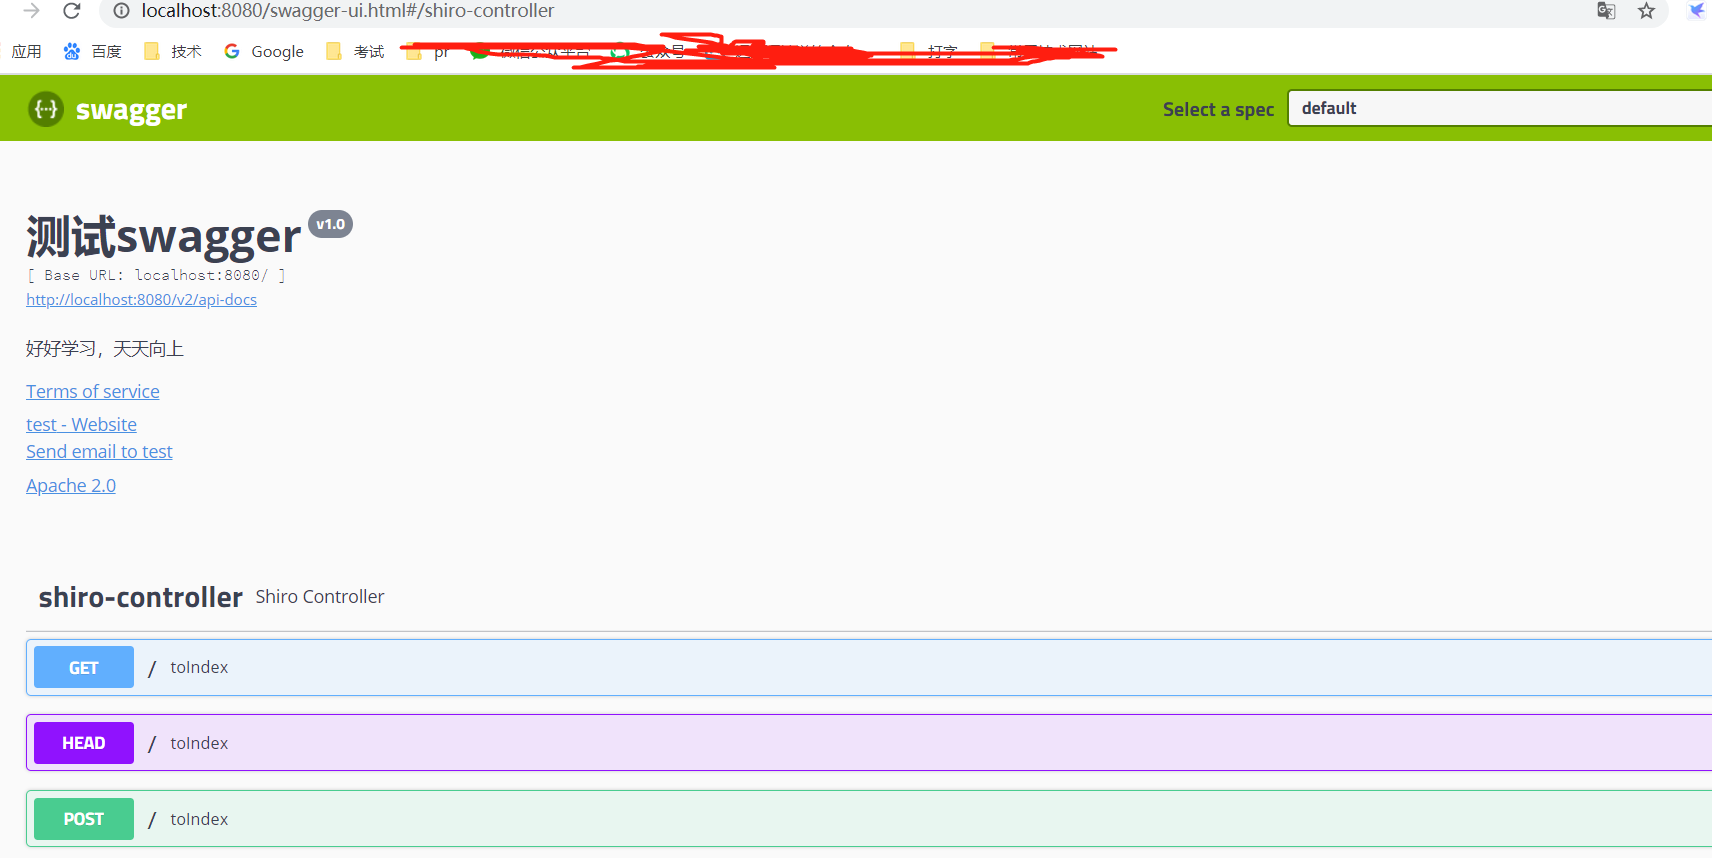
"测试swagger",
"好好学习,天天向上",
"v1.0",
"https://www.baidu.com/?tn=02003390_10_hao_pg",
contact,
"Apache 2.0",
"https://www.baidu.com/?tn=02003390_10_hao_pg",
new ArrayList()
);
}
}
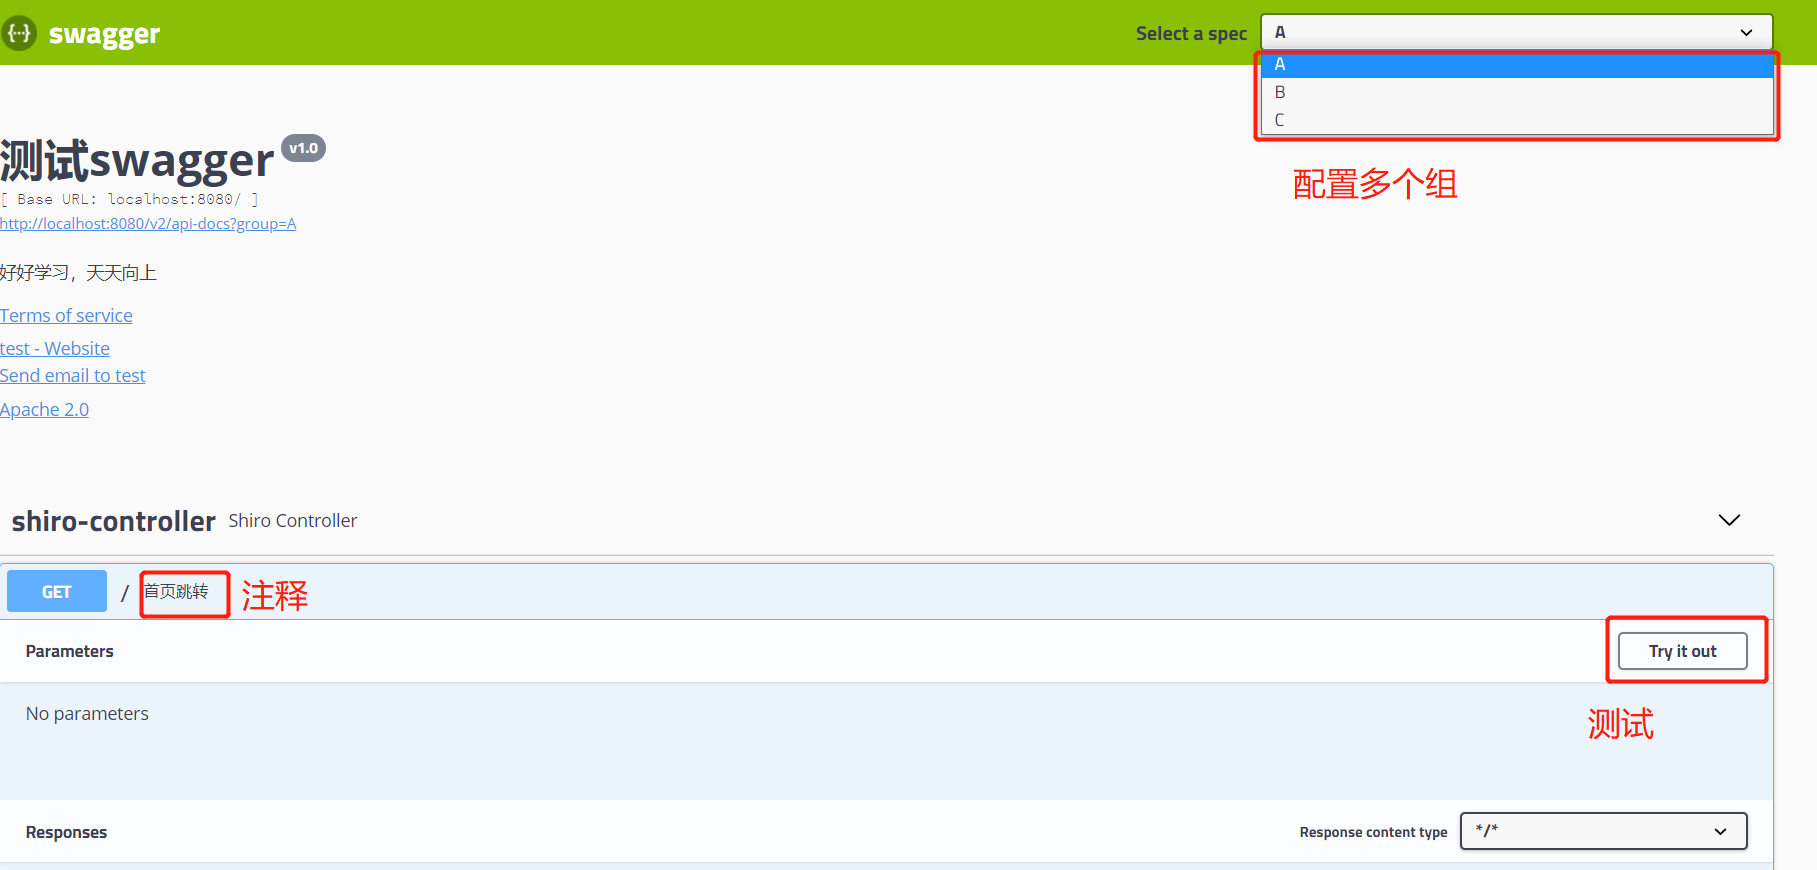
测试
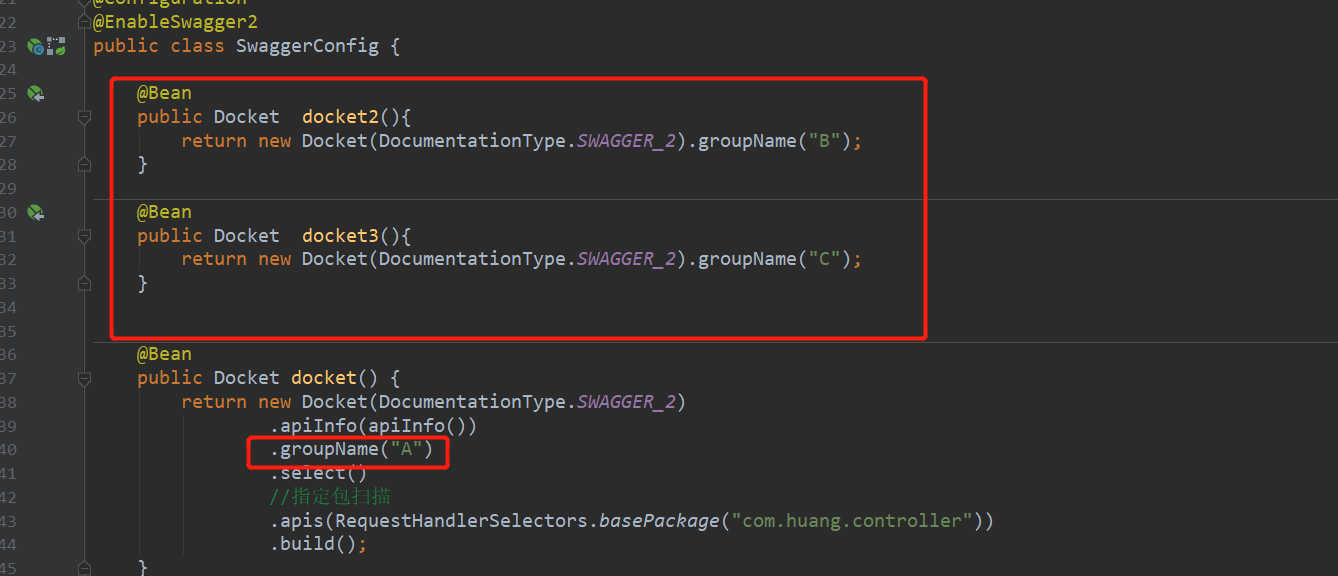
配置多个组和注释