目录
项目第三周,要求保证接口的安全性,决定使用springboot/springcloud+springsecurity的组合
简介
Spring Security is a powerful and highly customizable authentication and access-control framework. It is the de-facto standard for securing Spring-based applications.It focuses on providing both authentication and authorization to Java applications. Like all Spring projects, the real power of Spring Security is found in how easily it can be extended to meet custom requirements
基本要素
账户密码、角色、受保护的资源。
鉴权:Spring security可以规定什么样的资源(接口,图片视频)可以被什么样的角色访问,
验证:根据用户提交的账号密码验证用户的身份和角色,可以从内存中验证也可以从数据库中。
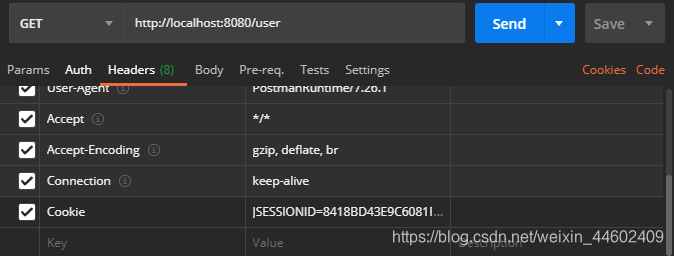
cookies
浏览器会为登录用户保存cookies,postman若要访问受保护资源,需要在headers里加上登录验证后的Cookies字段,这是Spring Security实现安全访问的基础。

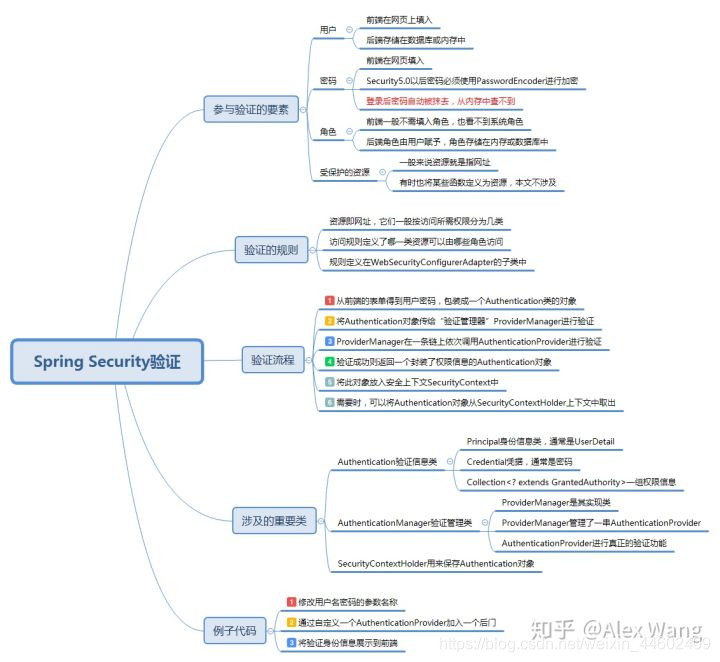
验证流程图片详解
概念和类很多,可以先大概的看一遍。
代码
引入依赖
<dependency>
    <groupId>org.springframework.boot</groupId>
    <artifactId>spring-boot-starter-security</artifactId>
</dependency>
springboot版本为2.x时,将默认安装5.x的spring security(与之前版本相差较大)
配置securityConfig类
可以先看下基本结构,SecurityConfiguration继承WebSecurityConfigurerAdapter类,可以重载多个参数不同的configure(parameter)方法,参数这里用到了AuthenticationManagerBuilder或者是HttpSecurity,具体配置和代码接下来说。
@EnableWebSecurity
@EnableGlobalMethodSecurity(prePostEnabled = true)
public class SecurityConfiguration extends WebSecurityConfigurerAdapter {


    @Override
    protected void configure(AuthenticationManagerBuilder auth) throws Exception {

    }
    @Override
    protected void configure(HttpSecurity http) throws Exception {

    }
}
配置AuthenticationManager
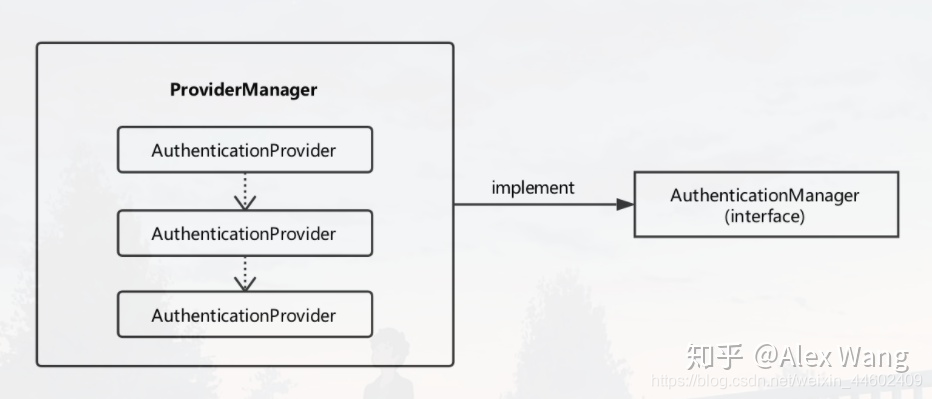
首先理解一下概念,AuthenticationManager,它是验证管理类的总接口;ProviderManager类实现了AuthenticationManager接口,其含有一条含有多个AuthenticationProvider的验证链,这条验证链上任何一个实例Provider验证通过即验证通过。验证成功后,验证实例Authentication会被存入SecurityContextHolder中,之后可以取出进行分析。
后端从前端的表单得到用户密码,包装成一个Authentication类的对象;
将Authentication对象传给“验证管理器”ProviderManager进行验证;
ProviderManager在一条链上依次调用AuthenticationProvider进行验证;
验证成功则返回一个封装了权限信息的Authentication对象(即对象的Collection<? extends GrantedAuthority>属性被赋值);
将此对象放入安全上下文SecurityContext中;
需要时,可以将Authentication对象从SecurityContextHolder上下文中取出。
具体见代码注释。
    @Override
    protected void configure(AuthenticationManagerBuilder auth) throws Exception {


        /**
         * 在内存中创建一个名为 "user" 的用户,密码为 "pwd",拥有 "USER" 权限,
         * 密码使用BCryptPasswordEncoder加密,
         * 之后以username=user,password=pwd访问时就会获得USER角色
         */
        auth.inMemoryAuthentication().passwordEncoder(new BCryptPasswordEncoder())
                .withUser("user").password(new BCryptPasswordEncoder().encode("pwd")).roles("USER");
        /*
         * 在验证链中加入了由数据库验证的一道关卡,并重载了加密和匹配工作
         *
         */
        auth.userDetailsService(myUserDetailsService).passwordEncoder(new PasswordEncoder() {


            @Override
            public String encode(CharSequence charSequence) {


                return charSequence.toString();
            }

            @Override
            public boolean matches(CharSequence charSequence, String s) {


                return s.equals(charSequence.toString());
            }
        });
    }
如果你认真看了上面的文字,就知道内存或者数据库中的用户数据,只要有一个满足就可以算验证成功。
配置HttpSecurity
这个函数用来配置各种角色的访问权限,具体解释见注释。
/**
 * 每种配置从配置名开始(.authorizeRequests()/.formLogin()/.logout()) 到.end()结束,最后一种不需要.end()
 */
    @Override
    protected void configure(HttpSecurity http) throws Exception {


        http
        		/*
				 * authorizeRequests 总体的指定不同角色的资源使用权限,
				 * antMatchers("path").permitAll() path可以被任何用户访问
       	 		 * anyRequest().authenticated() 其他path都需要授权才能访问
       	 		 */
                .authorizeRequests()
                .antMatchers("/auth/register","/auth/auth").permitAll()
                .anyRequest().authenticated()
                .and()
				/*
				 * formLogin 指定表格方式登录的配置信息,
				 * loginProcessingUrl("/auth/auth") 访问哪个接口时会触发登录(此时controller不需要再登录接口,由security来完成)
       	 		 * loginPage("/login") 需要验证时,redirect到这个页面
       	 		 * 注意,loginProcessingUrl指定的接口需要被authorizeRequest所包含,否则会redirect到loginPage所指定的
       	 		 */
                .formLogin()
                .loginProcessingUrl("/auth/auth")
                .loginPage("/login")
                .permitAll()
                .and()
                //logout相关,不解释
                .logout().logoutUrl("/logout").logoutSuccessUrl("/login")
                .and()
                //关闭csrf跨域
                .csrf()
                .disable()
                .exceptionHandling()
                .accessDeniedHandler((req, resp, e) -> {


                    resp.setStatus(403);
                    resp.setContentType("application/json;charset=utf-8");
                    PrintWriter out = resp.getWriter();
                    out.write(new ObjectMapper().writeValueAsString("You are not a valid iLife user!"));
                    out.flush();
                    out.close();
                });
                //为了使用json方式传递登录信息,需要添加这个filter来覆盖源码的实现
        http.addFilterAt(customAuthenticationFilter(), UsernamePasswordAuthenticationFilter.class);
    }
配置数据库访问
由上文可知,要加入想自定义的验证功能,就是向ProviderManager中加入一个自定义的AuthenticationProvider实例。可以使用AuthenticationManagerBuilder类的userDetailsService(UserDetailsService)方法,加入使用数据库进行验证的DaoAuthenticationProvider类:
package com.ilife.authservice.config;

import com.ilife.authservice.entity.Users;
import com.ilife.authservice.service.UserService;
import org.springframework.beans.factory.annotation.Autowired;
import org.springframework.security.core.GrantedAuthority;
import org.springframework.security.core.authority.SimpleGrantedAuthority;
import org.springframework.security.core.userdetails.User;
import org.springframework.security.core.userdetails.UserDetails;
import org.springframework.security.core.userdetails.UserDetailsService;
import org.springframework.security.core.userdetails.UsernameNotFoundException;
import org.springframework.stereotype.Service;

import java.util.ArrayList;
import java.util.Collection;

/**
 * UserDetailsService的实现类,用于在程序中引入一个自定义的AuthenticationProvider,实现数据库访问模式的验证
 */
@Service
public class MyUserDetailsService implements UserDetailsService {


    @Autowired
    UserService userService;

    @Override
    public UserDetails loadUserByUsername(String account) throws UsernameNotFoundException {


        Collection<GrantedAuthority> authorities = new ArrayList<>();
        // 从数据库中取出用户信息
        Users user = userService.findByAccount(account);

        // 判断用户是否存在
        if (user == null) {


            throw new UsernameNotFoundException("用户名不存在");
        }

        // 添加权限
        authorities.add(new SimpleGrantedAuthority(user.getType()));

        // 返回UserDetails实现类
        return new User(user.getAccount(), user.getPassword(), authorities);
    }
}
然后在刚才的configure(AuthenticationManagerBuilder auth)中加入auth.userDetailsService(myUserDetailsService).passwordEncoder(new BCryptPasswordEncoder());即可,上一节的代码已经给出
使用json来传递登录数据
REST接口统一使用JSON在前后端传递数据,而目前默认的是使用表单数据
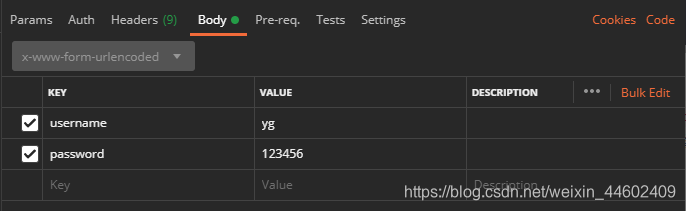
想要变成下图的形式来传递json数据,需要覆盖源码:
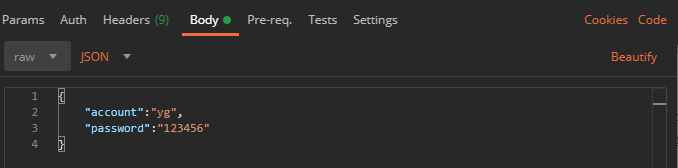
首先覆盖UsernamePasswordAuthenticationFilter过滤器,让它用Body中提取的json来作为用户名和密码,这里可以改变字段的值以适配你自己的schema.
package com.ilife.authservice.config;

import com.fasterxml.jackson.databind.ObjectMapper;
import org.springframework.http.MediaType;
import org.springframework.security.authentication.UsernamePasswordAuthenticationToken;
import org.springframework.security.core.Authentication;
import org.springframework.security.core.AuthenticationException;
import org.springframework.security.web.authentication.UsernamePasswordAuthenticationFilter;

import javax.servlet.http.HttpServletRequest;
import javax.servlet.http.HttpServletResponse;
import java.io.IOException;
import java.io.InputStream;
import java.util.Map;

public class CustomAuthenticationFilter extends UsernamePasswordAuthenticationFilter {


    @Override
    public Authentication attemptAuthentication(HttpServletRequest request, HttpServletResponse response) throws AuthenticationException {


        if (request.getContentType().equals(MediaType.APPLICATION_JSON_UTF8_VALUE)
                || request.getContentType().equals(MediaType.APPLICATION_JSON_VALUE)) {


            ObjectMapper mapper = new ObjectMapper();
            UsernamePasswordAuthenticationToken authRequest = null;
            try (InputStream is = request.getInputStream()) {


                Map authenticationBean = mapper.readValue(is, Map.class);
                authRequest = new UsernamePasswordAuthenticationToken(
                        authenticationBean.get("username"), authenticationBean.get("password"));
            } catch (IOException e) {


                e.printStackTrace();
                authRequest = new UsernamePasswordAuthenticationToken(
                        "", "");
            } finally {


                assert authRequest != null;
                setDetails(request, authRequest);
                return this.getAuthenticationManager().authenticate(authRequest);
            }
        }
        else {


            return super.attemptAuthentication(request, response);
        }
    }
}
接着在SecurityConfiguration添加如下类,并注入
    @Bean
    CustomAuthenticationFilter customAuthenticationFilter() throws Exception {


        CustomAuthenticationFilter filter = new CustomAuthenticationFilter();
        filter.setAuthenticationSuccessHandler((req, resp, authentication) -> {


            resp.setContentType("application/json;charset=utf-8");
            PrintWriter out = resp.getWriter();
            out.write(new ObjectMapper().writeValueAsString("iLife login success"));
            out.flush();
            out.close();
        });
        filter.setAuthenticationFailureHandler((req, resp, e) -> {


            resp.setContentType("application/json;charset=utf-8");
            PrintWriter out = resp.getWriter();
            out.write(new ObjectMapper().writeValueAsString("iLife login failure"));
            out.flush();
            out.close();
        });
        filter.setAuthenticationManager(authenticationManagerBean());
        return filter;
    }
在configure中增加一条
    @Override
    protected void configure(HttpSecurity http) throws Exception {


		...
		...
        http.addFilterAt(customAuthenticationFilter(), UsernamePasswordAuthenticationFilter.class);
    }
大功告成,看下目前的代码结构
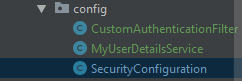
MyUserDetailsService和CustomAuthenticationFilter类代码都已经给出,这里再放出SecurityConfiguration类的完整代码
package com.ilife.authservice.config;

import com.fasterxml.jackson.databind.ObjectMapper;
import org.springframework.beans.factory.annotation.Autowired;
import org.springframework.context.annotation.Bean;
import org.springframework.security.config.annotation.authentication.builders.AuthenticationManagerBuilder;
import org.springframework.security.config.annotation.method.configuration.EnableGlobalMethodSecurity;
import org.springframework.security.config.annotation.web.builders.HttpSecurity;
import org.springframework.security.config.annotation.web.configuration.EnableWebSecurity;
import org.springframework.security.config.annotation.web.configuration.WebSecurityConfigurerAdapter;
import org.springframework.security.crypto.bcrypt.BCryptPasswordEncoder;
import org.springframework.security.crypto.password.PasswordEncoder;
import org.springframework.security.web.authentication.UsernamePasswordAuthenticationFilter;


import java.io.PrintWriter;


@EnableWebSecurity
@EnableGlobalMethodSecurity(prePostEnabled = true)
public class SecurityConfiguration extends WebSecurityConfigurerAdapter {


    @Autowired
    private MyUserDetailsService myUserDetailsService;

    @Override
    protected void configure(AuthenticationManagerBuilder auth) throws Exception {


        /*
         * 在验证链中加入了由数据库验证的一道关卡,并重载了加密和匹配工作
         */
        auth.userDetailsService(myUserDetailsService).passwordEncoder(new PasswordEncoder() {


            @Override
            public String encode(CharSequence charSequence) {


                return charSequence.toString();
            }

            @Override
            public boolean matches(CharSequence charSequence, String s) {


                return s.equals(charSequence.toString());
            }
        });
        /**
         * 在内存中创建一个名为 "user" 的用户,密码为 "pwd",拥有 "USER" 权限,密码使用BCryptPasswordEncoder加密
         */
        auth.inMemoryAuthentication().passwordEncoder(new BCryptPasswordEncoder())
                .withUser("user").password(new BCryptPasswordEncoder().encode("pwd")).roles("USER");
        /**
         * 在内存中创建一个名为 "admin" 的用户,密码为 "pwd",拥有 "USER" 和"ADMIN"权限
         */
        auth.inMemoryAuthentication().passwordEncoder(new BCryptPasswordEncoder())
                .withUser("admin").password(new BCryptPasswordEncoder().encode("pwd")).roles("USER", "ADMIN");
    }


    @Override
    protected void configure(HttpSecurity http) throws Exception {


        http
                .authorizeRequests()
                .antMatchers("/auth/register","/auth/test","/auth/auth").permitAll()
                .anyRequest().authenticated()
                .and()
                .formLogin()
                .loginProcessingUrl("/auth/auth")
                .loginPage("/login")
                .permitAll()
                .and()
                .logout().logoutUrl("/logout").logoutSuccessUrl("/login")
                .and()
                .csrf()
                .disable()
                .exceptionHandling()
                .accessDeniedHandler((req, resp, e) -> {


                    resp.setStatus(403);
                    resp.setContentType("application/json;charset=utf-8");
                    PrintWriter out = resp.getWriter();
                    out.write(new ObjectMapper().writeValueAsString("You are not a valid iLife user!"));
                    out.flush();
                    out.close();
                });
        http.addFilterAt(customAuthenticationFilter(), UsernamePasswordAuthenticationFilter.class);
    }
    @Bean
    CustomAuthenticationFilter customAuthenticationFilter() throws Exception {


        CustomAuthenticationFilter filter = new CustomAuthenticationFilter();
        filter.setAuthenticationSuccessHandler((req, resp, authentication) -> {


            resp.setContentType("application/json;charset=utf-8");
            PrintWriter out = resp.getWriter();
            out.write(new ObjectMapper().writeValueAsString("iLife login success"));
            out.flush();
            out.close();
        });
        filter.setAuthenticationFailureHandler((req, resp, e) -> {


            resp.setContentType("application/json;charset=utf-8");
            PrintWriter out = resp.getWriter();
            out.write(new ObjectMapper().writeValueAsString("iLife login failure"));
            out.flush();
            out.close();
        });
        filter.setAuthenticationManager(authenticationManagerBean());
        return filter;
    }
}
其他事项
在application.properties加上这一句:spring.datasource.hikari.max-lifetime =30000 防止出现这样的错误
参考
https://zhuanlan.zhihu.com/p/47224331
spring参考手册
使用json来传递登录数据
https://blog.csdn.net/yuanlaijike/article/details/80249235