四、哈希表、树
1、哈希表(散列表)
(1)什么是哈希表?
哈希表是一种 根据 关键码(key) 直接访问值(value)的 一种数据映射结构。其通过一个映射函数,将 关键码 映射到 表中的某一个位置 进行访问(可以提高查找速度)。
哈希表可以使用 数组 + 链表、 或者 数组 + 二叉树 的形式实现。
适用于 查询性能要求高、数据之间无逻辑关系 的场景。
【数组 + 链表 形式实现哈希表:】
基本结构:
    使用 数组(连续的存储空间) 表示一个散列表。
    每个数组元素 存储的 是一个 单链表(用于存储 映射函数 相同的值)。
    即 链表数组,定义一个 链表结构,在用其 定义数组。

基本过程:
    对于一个数,通过 散列函数(hash(),可以通过 取模 或者 位运算) 计算 key,并将其映射到 散列表(数组)的 某个位置。
    对于相同的 hash 值(产生 hash 冲突),通常采用 拉链法来解决。
    简单地讲,就是将 hash(key) 得到的结果 作为 数组的下标,若多个 key 的 hash(key) 相同,那么在当前数组下标的位置建立一个链表来保存数据。

【数组 + 链表 形式实现哈希表 核心代码结构:】
Step1:定义链表节点:
    /**
     * 链表节点
     * @param <K> key
     * @param <V> value
     */
    class Node<K, V> {
        K key; // key,用于 散列函数 计算的值
        V value; // value,节点真实存储数据
        Node<K, V> next; // 指向下一个节点

        public Node(K key, V value) {
            this.key = key;
            this.value = value;
        }
    }

Step2:构建链表:
    /**
     * 链表,用于存储数据
     * @param <K>
     * @param <V>
     */
    class NodeList<K, V> {
        Node<K, V> first; // 第一个节点,即存储真实数据,非头指针
    }

Step3:构建链表数组,以及散列函数。
    /**
     * 定义 哈希 结构,链表数组
     * @param <K>
     * @param <V>
     */
    class HashTable<K, V> {
        private int size = 16; // 默认大小为 16
        NodeList<K, V>[] table; // 链表数组,散列函数 确定 数组下标位置,数组元素(链表) 用于存储值

        public HashTable() {
            this(16);
        }

        public HashTable(int size) {
            // 保存哈希表大小
            this.size = size;
            // 构建哈希表(数组)
            this.table = new NodeList[this.size];
            // 初始化每个数组元素 -- 链表,否则默认为 null
            for (int i = 0; i < this.size; i++) {
                this.table[i] = new NodeList<>();
            }
        }

        /**
         * 散列函数,此处以 模运算 为例,可以使用 位运算
         * @param key 待计算的 key
         * @return 哈希值(数组下标)
         */
        public int hash(K key) {
            return key.hashCode() % size;
        }
    }

【实现简单的增、查:】
添加节点:
    首先根据 key 通过 散列函数 计算后,得到 数组下标。
    根据数组下标定位到 相应的链表,然后进行添加操作。
        若当前链表为空,则添加数据为第一个节点。
        若当前链表不空,则遍历链表,若发现相同 key,则替换其 value。
        若没有相同 key,则遍历到链表末尾并添加节点。

查找节点:
    同样根据 key 计算出数组下标,然后定位到相应的链表。
    遍历链表,并比较 key,若 key 相同则返回 value,
    若链表遍历完成仍不存在相同 key 则返回 null。
(2)代码实现
【代码实现:】
package com.lyh.tree;

public class HashTableDemo {

    public static void main(String[] args) {
        HashTable<Integer, String> hashTable = new HashTable<>(4);
        hashTable.list();

        System.out.println("=================");
        for (int i = 0; i < 10; i++) {
            hashTable.put(i, i + "");
        }
        hashTable.list();

        System.out.println("=================");
        hashTable.put(1, "Java");
        hashTable.put(2, "Python");
        hashTable.list();
        System.out.println("=================");

        System.out.println("key = 2 的 value 为: " + hashTable.get(2));
    }
}

/**
 * 定义 哈希 结构,链表数组
 * @param <K>
 * @param <V>
 */
class HashTable<K, V> {
    private int size = 16; // 默认大小为 16
    NodeList<K, V>[] table; // 链表数组,散列函数 确定 数组下标位置,数组元素(链表) 用于存储值

    public HashTable() {
        this(16);
    }

    public HashTable(int size) {
        // 保存哈希表大小
        this.size = size;
        // 构建哈希表(数组)
        this.table = new NodeList[this.size];
        // 初始化每个数组元素 -- 链表,否则默认为 null
        for (int i = 0; i < this.size; i++) {
            this.table[i] = new NodeList<>();
        }
    }

    /**
     * 散列函数,此处以 模运算 为例,可以使用 位运算
     * @param key 待计算的 key
     * @return 哈希值(数组下标)
     */
    public int hash(K key) {
        return key.hashCode() % size;
    }

    /**
     * 向哈希表中添加数据
     * @param key
     * @param value
     */
    public void put(K key, V value) {
        // 通过 散列函数 根据 key 计算出 数组下标位置,然后向链表中添加数据
        this.table[hash(key)].add(key, value);
    }

    /**
     * 查找节点
     * @param key 查找条件
     * @return 节点数据
     */
    public V get(K key) {
        // 通过 散列函数 根据 key 计算出 数组下标位置,然后从链表中取出数据
        return this.table[hash(key)].find(key);
    }

    /**
     * 输出哈希表
     */
    public void list() {
        // 遍历数组,输出每个链表
        for (int i = 0; i < this.size; i++) {
            this.table[i].list(i);
        }
    }
}

/**
 * 链表,用于存储数据
 * @param <K>
 * @param <V>
 */
class NodeList<K, V> {
    Node<K, V> first; // 第一个节点,即存储真实数据,非头指针

    /**
     * 在链表末尾添加节点
     * @param key key
     * @param value value
     */
    public void add(K key, V value) {
        // 保存数据到 链表第一个节点
        if (first == null) {
            first = new Node<>(key, value);
            return;
        }
        Node<K, V> temp = first; // 使用临时变量保存 第一个节点,用于辅助链表遍历
        // 遍历链表到末尾,并添加节点
        while(temp.next != null) {
            // 如果 key 相等,则替换原来的 value
            if (key.equals(temp.key)) {
                temp.value = value;
                return;
            }
            temp = temp.next;
        }
        temp.next = new Node<>(key, value);
    }

    /**
     * 遍历输出链表
     * @param i 当前数组下标,表示当前为第 i+1 链表
     */
    public void list(int i) {
        Node<K, V> temp = first; // 使用临时变量保存 第一个节点,用于辅助链表遍历
        // 判断链表是否为空
        if (temp == null) {
            System.out.println("第 " + (i + 1) + " 链表为空");
            return;
        }
        // 遍历输出链表
        System.out.print("第 " + (i + 1) + " 链表为: ");
        while(temp != null) {
            System.out.print("[ key = " + temp.key + ", value = " + temp.value + " ]  ==> ");
            temp = temp.next;
        }
        System.out.println();
    }

    /**
     * 查找节点
     * @param key 查找条件
     * @return 查找失败返回 null,查找成功返回相应节点的 value
     */
    public V find(K key) {
        Node<K, V> temp = first; // 使用临时变量保存 第一个节点,用于辅助链表遍历
        // 遍历链表,若发现相同 key,则返回
        while(temp != null) {
            if (key.equals(temp.key)) {
                return temp.value;
            }
            temp = temp.next;
        }
        return null;
    }
}

/**
 * 链表节点
 * @param <K> key
 * @param <V> value
 */
class Node<K, V> {
    K key; // key,用于 散列函数 计算的值
    V value; // value,节点真实存储数据
    Node<K, V> next; // 指向下一个节点

    public Node(K key, V value) {
        this.key = key;
        this.value = value;
    }
}

【输出结果:】
第 1 链表为空
第 2 链表为空
第 3 链表为空
第 4 链表为空
=================
第 1 链表为: [ key = 0, value = 0 ]  ==> [ key = 4, value = 4 ]  ==> [ key = 8, value = 8 ]  ==>
第 2 链表为: [ key = 1, value = 1 ]  ==> [ key = 5, value = 5 ]  ==> [ key = 9, value = 9 ]  ==>
第 3 链表为: [ key = 2, value = 2 ]  ==> [ key = 6, value = 6 ]  ==>
第 4 链表为: [ key = 3, value = 3 ]  ==> [ key = 7, value = 7 ]  ==>
=================
第 1 链表为: [ key = 0, value = 0 ]  ==> [ key = 4, value = 4 ]  ==> [ key = 8, value = 8 ]  ==>
第 2 链表为: [ key = 1, value = Java ]  ==> [ key = 5, value = 5 ]  ==> [ key = 9, value = 9 ]  ==>
第 3 链表为: [ key = 2, value = Python ]  ==> [ key = 6, value = 6 ]  ==>
第 4 链表为: [ key = 3, value = 3 ]  ==> [ key = 7, value = 7 ]  ==>
=================
key = 2 的 value 为: Python
2、树
(1)什么是树?
树是一种 由 n 个节点组成的一种 具有层次关系的、类似树形的 数据结构。
其每个节点 均有 零个或 多个 子节点,每一个节点最多只有一个 父节点,没有父节点的 节点 称为 根节点。
(2)为什么需要树 这种 数据结构?
前面介绍了 数组、链表、以及 哈希表 等数据结构,可以用来存储数据。
所谓 存在即合理,每种数据结构的出现,必然能解决某种问题,下面分析一下优缺点。
【数组存储:】
    数组采用 连续的 存储方式来 存储元素。查询快、增删慢。
优点:
    可以通过 下标的方式 来访问(查找)元素,速度快。
    且对于有序数组,可以通过 折半查找、插值查找 等方式提高 查找(检索)效率。
缺点:
    对于 插入操作,可能会伴随着 数组扩容、数组元素整体后移等操作,效率较低。

【链表存储:】
   链表采用 不连续的 存储方式来 存储元素。增删快、查询慢。
优点:
    插入、删除节点时,无需整体移动元素,只需要修改 前、后 指针域 即可。效率较高。
缺点:
    进行查找时,需要从头开始遍历链表,若链表过长,查询效率将会较低。

 【哈希存储:】
     哈希 采用 数组 + 链表 的方式存储元素,每个 数组元素 存储的是一个 链表。
优点:
    其结合了 数组、链表 的优点,增、删、改、查 效率都可以,时间复杂度为 O(1)。
缺点:
    由于哈希 存储的元素是无序的,若想按 顺序输出,实现起来就有点 麻烦。
    且哈希只是单次查询效率高,若执行 n 次查找,时间复杂度将退化到 O(n)。
    哈希表由数组实现,扩容也是影响效率的一个问题。

【树存储:(以二叉排序树为例)】
    二叉排序树要求 任何一个 非叶子节点,其左子节点小于 当前节点,其右子节点 大于当前节点。
    即 数据是有序的(中序遍历可得到有序序列)。其在一定程度上保证 增删 以及 查找的速率 较高。
注:
    二叉排序树可能存在三种定义:
        左子节点 小于等于 当前节点,右子节点 大于 当前节点。
        左子节点 小于 当前节点,右子节点 大于等于 当前节点。
        左子节点 小于 当前节点,右子节点 大于 当前节点。
(3)常见树分类:
二叉树、二叉排序树(BST)、平衡二叉树(AVL)、2-3 树、B 树(B-Tree)、B+ 树、赫夫曼树、红黑树 等。
3、二叉树、遍历二叉树(递归实现 前序、中序、后序 遍历)
(1)二叉树基本概念:
二叉树 是一种要求 每个节点 最多只有 两个子节点 的树结构。
注:
树 转 数组:
可以通过 前序遍历、中序遍历、后序遍历 三种遍历形式 遍历 二叉树 得到。
数组 转 树:
根据 前序遍历 + 中序遍历 得到的数组数据 逆向推出 二叉树。
根据 中序遍历 + 后序遍历 得到的数组数据 逆向推出 二叉树。
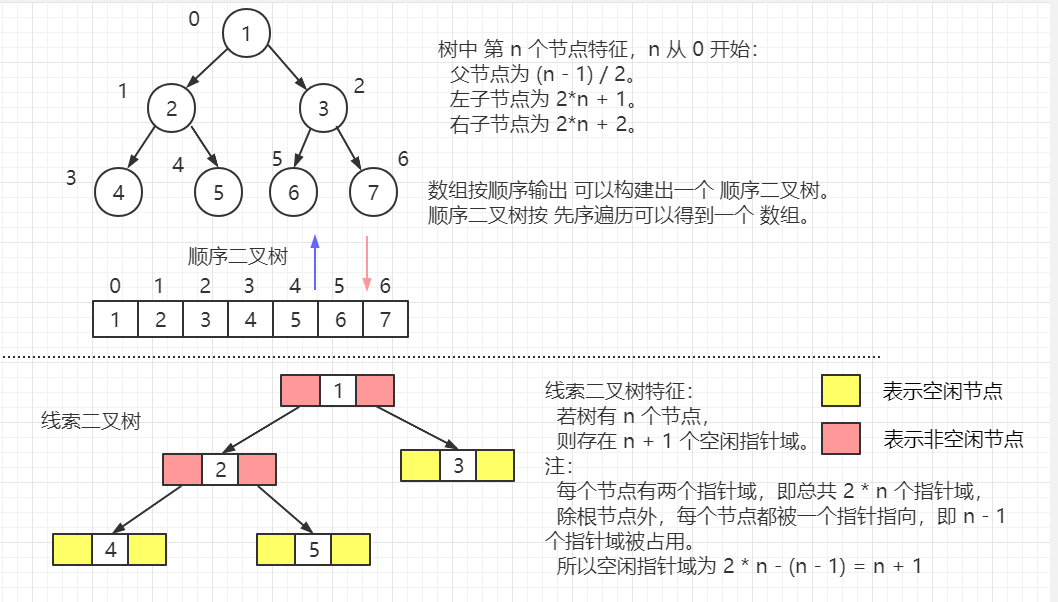
根据顺序二叉树的 特点(2*n + 1 、2*n + 2) 构建 顺序二叉树。
【二叉树常见分类:】
满二叉树:
    如果 一个 n 层的二叉树 的所有叶子节点均在最后一层,
    且节点总数为 2^n - 1,则该树为 满二叉树。

完全二叉树:
    一棵深度为 k 的有 n 个结点的二叉树,对树中的结点按从上至下、从左到右的顺序进行编号,
    如果编号为 i(1 ≤ i ≤ n)的结点与满二叉树中编号为 i 的结点在二叉树中的位置相同,则这棵二叉树称为完全二叉树。

顺序二叉树:
    是二叉树的一种 存储形式(按照数组顺序,从上到下、从左到右 依次 给二叉树 添加树节点,得到一个完全二叉树 或者 满二叉树),
    其 可以在 数组 与 树 之间相互转换。即 根据一个数组,可以得到 树 的结构,从树也可以反推 数组。
  特点:
    顺序二叉树通常只考虑 完全二叉树。
    其第 n 个元素的左子节点为 2*n + 1。
    其第 n 个元素的右子节点为 2*n + 2。
    其第 n 个元素的父节点为 (n - 1) / 2。 (n 从 0 开始,即从数组第一个元素下标开始计数)。

线索二叉树:
    对于 n 个节点的 二叉树,其总共含有 2*n - (n - 1) = n + 1 个空的指针域。
    利用这些空的指针域,存放 当前节点 在 某次遍历(前序、中序、后续)下的 前驱、后继 节点的指针。
    这些指向 前驱、后继 节点的指针称为 线索,使用这种线索的二叉树 称为线索二叉树。

    即 线索二叉树的本质 是 将二叉树 当前节点的空闲指针 改为 指向当前节点 前驱 或者 后继 节点的过程。
而根据遍历的分类,前驱、后继节点会不同,可以分为:
    前序线索二叉树、中序线索二叉树、后序线索二叉树。

还有 二叉搜索树(BST)、平衡二叉搜索树(AVT)等后续介绍。
(2)二叉树三种遍历方式(树 转 数组)
树 转 数组:
树 转 数组,也即 树的各节点 的遍历顺序,按照 当前节点、左子节点、右子节点 遍历的先后可以分为三种遍历:前序遍历、中序遍历、后序遍历。
此时以 递归方式实现,后续会补充 迭代实现。
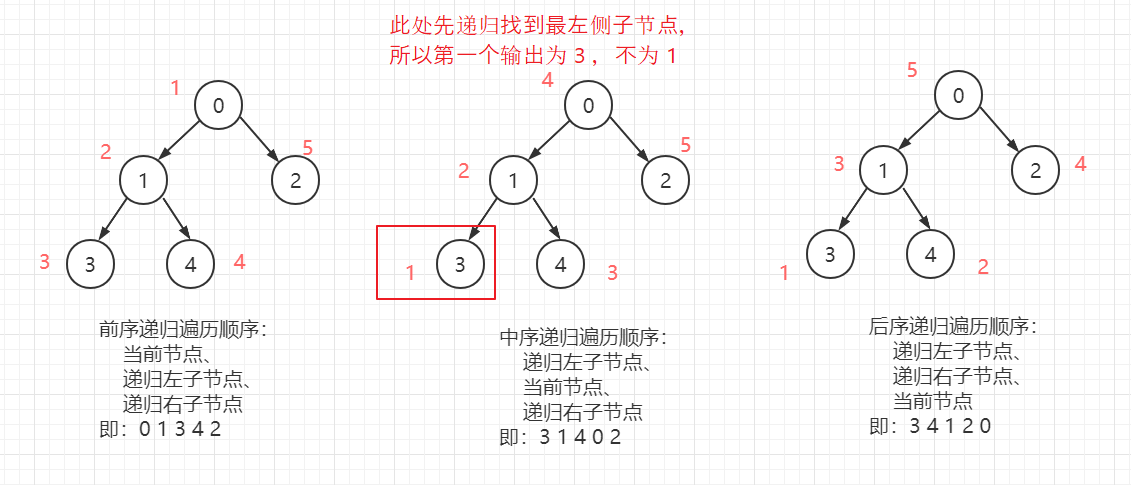
【前序遍历:】
节点遍历顺序:
    先输出 当前节点,再输出 左子节点,最后输出 右子节点。
遍历、查找步骤:
    对于一颗 二叉树,若二叉树为空,则直接结束。
    否则
        输出 当前节点(若为查找,则在此处进行 值 比较,查找成功则退出)。
        前序遍历 左子树。
        前序遍历 右子树。
删除节点:
    删除的规则可以自定义,不同的规则对应不同的代码实现。
    比如:删除某带有左、右子树的节点,是整体删除 还是 将子节点 旋转到当前节点位置。
    此处以整体删除为例:
        由于二叉树是单向的(此处可以理解成 单链表 删除处理),
        需要判断 当前节点的 子节点 是否为待删除的节点。若是,则直接将当前节点 子节点 置 null 即可。
        即:
         if (this.left.data == key) {
            this.left = null;
            return;
         }
         if (this.right.data == key) {
            this.right = null;
            return;
         }

【中序遍历:】
节点遍历顺序:
    先输出 左子节点,再输出 当前节点,最后输出 右子节点。
遍历、查找步骤:
    对于一颗 二叉树,若二叉树为空,则直接结束。
    否则
        前序遍历 左子树。
        输出 当前节点(若为查找,则在此处进行 值 比较)。
        前序遍历 右子树。

【后序遍历:】
节点遍历顺序:
    先输出 左子节点,再输出 右子节点,最后输出 当前节点。
遍历、查找步骤:
    对于一颗 二叉树,若二叉树为空,则直接结束。
    否则
        前序遍历 左子树。
        前序遍历 右子树。
        输出 当前节点(若为查找,则在此处进行 值 比较)。

【代码实现:】
package com.lyh.tree;

/**
 * 构建二叉树
 * @param <K>
 */
public class BinaryTree<K> {
    private TreeNode<K> root; // 设置根节点

    public BinaryTree(TreeNode<K> root) {
        this.root = root;
    }

    public static void main(String[] args) {
        // 构建二叉树
        TreeNode<String> root = new TreeNode<>("0");
        TreeNode<String> treeNode = new TreeNode<>("1");
        TreeNode<String> treeNode2 = new TreeNode<>("2");
        TreeNode<String> treeNode3 = new TreeNode<>("3");
        TreeNode<String> treeNode4 = new TreeNode<>("4");
        root.left = treeNode;
        root.right = treeNode2;
        treeNode.left = treeNode3;
        treeNode.right = treeNode4;

        // 设置树 根节点
        BinaryTree<String> binaryTree = new BinaryTree<>(root);
        // 前序遍历
        System.out.print("前序遍历: ");
        binaryTree.prefixList();
        System.out.println("\n=====================");

        // 中序遍历
        System.out.print("中序遍历: ");
        binaryTree.infixList();
        System.out.println("\n=====================");

        // 后序遍历
        System.out.print("后序遍历: ");
        binaryTree.suffixList();
        System.out.println("\n=====================");

        // 前序查找
        System.out.print("前序查找, ");
        TreeNode<String> search = binaryTree.prefixSearch("1");
        if (search != null) {
            System.out.println("查找成功, 当前节点为: " + search + " ,其左节点为: "  + search.left + " ,其右节点为: " + search.right);
        } else {
            System.out.println("查找失败");
        }
        System.out.println("\n=====================");

        // 删除节点
        System.out.print("删除节点, ");
        int result = binaryTree.deleteNode("3");
        if (result != -1) {
            System.out.println("成功");
        } else {
            System.out.println("失败");
        }
        System.out.print("当前树的前序遍历为: ");
        binaryTree.prefixList();
        System.out.println("\n=====================");
    }

    /**
     * 前序遍历
     */
    public void prefixList() {
        // 判断根节点是否存在
        if (root == null) {
            System.out.println("当前树为 空树");
            return;
        }
        // 存在根节点,则进行前序遍历
        root.prefixList();
    }

    /**
     * 前序查找
     */
    public TreeNode<K> prefixSearch(K data) {
        // 判断根节点是否存在
        if (root == null) {
            return null;
        }
        // 存在根节点,则进行前序遍历
        return root.prefixSearch(data);
    }

    /**
     * 中序遍历
     */
    public void infixList() {
        // 判断根节点是否存在
        if (root == null) {
            System.out.println("当前树为 空树");
            return;
        }
        // 存在根节点,则进行中序遍历
        root.infixList();
    }

    /**
     * 后序遍历
     */
    public void suffixList() {
        // 判断根节点是否存在
        if (root == null) {
            System.out.println("当前树为 空树");
            return;
        }
        // 存在根节点,则进行后序遍历
        root.suffixList();
    }

    /**
     * 删除节点,删除失败返回 -1,否则返回 1
     * @param data 待删除节点
     * @return 删除失败返回 -1,否则返回 1
     */
    public int deleteNode(K data) {
        // 当根节点存在时,才可以进行删除节点操作
        if (root != null) {
            // 若恰好为 根节点,则直接将根节点置 null
            if (data.equals(root.data)) {
                root = null;
                return 1;
            }
            // 否则递归删除
            return root.deleteNode(data);
        }
        return -1;
    }
}

/**
 * 定义树节点
 * @param <K>
 */
class TreeNode<K> {
    K data; // 保存节点数据
    TreeNode<K> left; // 保存节点的 左子节点
    TreeNode<K> right; // 保存节点的 右子节点

    public TreeNode(K data) {
        this.data = data;
    }

    @Override
    public String toString() {
        return "TreeNode{ data= " + data + "}";
    }

    /**
     * 前序遍历
     */
    public void prefixList() {
        // 输出当前节点
        System.out.print(this + " ");
        // 若左子树不为空,则递归前序遍历 左子树
        if (this.left != null) {
            this.left.prefixList();
        }
        // 若右子树不为空,则递归前序遍历 右子树
        if (this.right != null) {
            this.right.prefixList();
        }
    }

    /**
     * 前序查找
     * @param data 待查找数据
     * @return 查找失败返回 null,查找成功返回相应的数据
     */
    public TreeNode<K> prefixSearch(K data) {
        // 若当前节点即为待查找节点,则直接返回
        if (data.equals(this.data)) {
          return this;
        }
        TreeNode<K> result = null; // 用于保存查找节点
        // 如果左子树不为空,则递归前序查找 左子树
        if (this.left != null) {
            result = this.left.prefixSearch(data);
        }
        // 若左子树查找成功,则返回
        if (result != null) {
            return result;
        }
        // 如果右子树不为空,则递归前序查找 右子树
        if (this.right != null) {
            result = this.right.prefixSearch(data);
        }
        return result;
    }

    /**
     * 中序遍历
     */
    public void infixList() {
        // 若左子树不为空,则递归中序遍历 左子树
        if (this.left != null) {
            this.left.infixList();
        }
        // 输出当前节点
        System.out.print(this + " ");
        // 若右子树不为空,则递归中序遍历 右子树
        if (this.right != null) {
            this.right.infixList();
        }
    }

    /**
     * 后序遍历
     */
    public void suffixList() {
        // 若左子树不为空,则递归后序遍历 左子树
        if (this.left != null) {
            this.left.suffixList();
        }
        // 若右子树不为空,则递归后序遍历 右子树
        if (this.right != null) {
            this.right.suffixList();
        }
        // 输出当前节点
        System.out.print(this + " ");
    }

    /**
     * 删除节点,此处若为非叶子节点,直接连同其 子节点 一起删除
     * @param data 待删除数据
     * @return 删除失败返回 -1,否则 返回 1
     */
    public int deleteNode(K data) {
        // 如果删除节点 恰好为 左子节点,则直接将 左子节点 置 null
        if (this.left != null && data.equals(this.left.data)) {
            this.left = null;
            return 1;
        }
        // 如果删除节点 恰好为 右子节点,则直接将 右子节点 置 null
        if (this.right != null && data.equals(this.right.data)) {
            this.right = null;
            return 1;
        }
        int result = -1;
        // 若左子树不为 null,则递归左子树 查找节点并删除
        if (this.left != null) {
            result = this.left.deleteNode(data);
            if (result != -1) {
                return result;
            }
        }
        // 若右子树不为 null,则递归右子树 查找节点并删除
        if (this.right != null) {
            result = this.right.deleteNode(data);
        }
        return result;
    }
}

【输出结果:】
前序遍历: TreeNode{ data= 0} TreeNode{ data= 1} TreeNode{ data= 3} TreeNode{ data= 4} TreeNode{ data= 2}
=====================
中序遍历: TreeNode{ data= 3} TreeNode{ data= 1} TreeNode{ data= 4} TreeNode{ data= 0} TreeNode{ data= 2}
=====================
后序遍历: TreeNode{ data= 3} TreeNode{ data= 4} TreeNode{ data= 1} TreeNode{ data= 2} TreeNode{ data= 0}
=====================
前序查找, 查找成功, 当前节点为: TreeNode{ data= 1} ,其左节点为: TreeNode{ data= 3} ,其右节点为: TreeNode{ data= 4}

=====================
删除节点, 成功
当前树的前序遍历为: TreeNode{ data= 0} TreeNode{ data= 1} TreeNode{ data= 4} TreeNode{ data= 2}
=====================
4、还原二叉树(前序 + 中序、后序 + 中序)
(1) 还原二叉树(数组 转 树)
前面通过 前序、中序、后序 遍历 可以 得到树的节点数据,那么根据 前序遍历、中序遍历、后序遍历 得到的数据能否反推 出 树结构呢?
数组 转 树(此处 不考虑 数组中存在相同值的情况,即各个树节点均不同):
使用 前序遍历 + 中序遍历 或者 后序遍历 + 中序遍历 的形式可以反推。
其中:
前序遍历、后序遍历 存在是为了 定位 根节点 所在位置。
根节点定位后,就可以将 中序遍历 数组 分为 左、右 两部分(形成左、右 子树),递归处理即可。
使用 前序 + 后序 数组的方式 虽然可以定位 根节点,但是不知道如何 划分 左、右子树,从而无法正确推导出 二叉树。
(2)思路分析、代码实现
【前序遍历结果 + 中序遍历结果 还原 二叉树:】
前序遍历结果格式为:
    [{根节点}{左子树}{右子树}]
中序遍历结果格式为:
    [{左子树}{根节点}{右子树}]

还原步骤:
    前序结果 第一个值 必为 根节点(当前节点),
    通过该节点,可以将 中序结果 划分为 左子树、右子树。
    通过 中序结果 划分的左子树的大小 可以将 前序结果 除根节点外 的值 划分为 左子树、右子树。
    然后将 前序、中序 划分的 左子树、右子树 进行递归处理。

举例:
    前序遍历结果: [0, 1, 3, 4, 2]
    中序遍历结果: [3, 1, 4, 0, 2]
   第一次划分:
       前序结果:[0, 1, 3, 4, 2],中序结果:[3, 1, 4, 0, 2]
       根节点为 0,将中序结果划分为 左子树:[3, 1, 4], 右子树: [2]
       根据中序结果 左子树大小划分 前序结果为 左子树:[1, 3 ,4], 右子树:[2]
   第二次划分:
       前序结果:[1, 3, 4],中序结果:[3, 1, 4]
       根节点为 1,将中序结果划分为 左子树:[3], 右子树: [4]
       根据中序结果 左子树大小划分 前序结果为 左子树:[3], 右子树:[4]
   第三次划分:
       前序结果:[3],中序结果:[3]
       根节点为 3,将中序结果划分为 左子树:[], 右子树: []
       根据中序结果 左子树大小划分 前序结果为 左子树:[], 右子树:[]
   第四次划分:
       前序结果、中序结果 均为空,退出。
   同理依次进行处理。。。

【后序遍历结果 + 中序遍历结果 还原 二叉树:】
后序遍历结果格式为:
    [{左子树}{右子树}{根节点}]
中序遍历结果格式为:
    [{左子树}{根节点}{右子树}]

与 前序遍历 处理类似,只是此时根节点 位于末尾。
还原步骤:
    后序结果 最后一个值 必为 根节点(当前节点),
    通过该节点,可以将 中序结果 划分为 左子树、右子树。
    通过 中序结果 划分的左子树的大小 可以将 后序结果 除根节点外 的值 划分为 左子树、右子树。
    然后将 后序、中序 划分的 左子树、右子树 进行递归处理。

【代码实现:】
package com.lyh.tree;

import java.util.ArrayList;
import java.util.Arrays;
import java.util.List;

public class ArrayToBinaryTree<K> {

    public static void main(String[] args) {
        // 构建二叉树
        TreeNode6<String> root = new TreeNode6<>("0");
        TreeNode6<String> treeNode = new TreeNode6<>("1");
        TreeNode6<String> treeNode2 = new TreeNode6<>("2");
        TreeNode6<String> treeNode3 = new TreeNode6<>("3");
        TreeNode6<String> treeNode4 = new TreeNode6<>("4");
        root.left = treeNode;
        root.right = treeNode2;
        treeNode.left = treeNode3;
        treeNode.right = treeNode4;

        // 设置树 根节点
        ArrayToBinaryTree<String> binaryTree = new ArrayToBinaryTree<>();
        // 获取前序遍历结果
        List<String> prefixResult = binaryTree.prefixList(root);
        List<String> prefixResult2 = binaryTree.prefixList2(root);
        System.out.println("前序遍历结果(方式一): " + prefixResult);
        System.out.println("前序遍历结果(方式二): " + prefixResult2);
        System.out.println("=================================");

        // 获取中序遍历结果
        List<String> infixResult = binaryTree.infixList(root);
        System.out.println("中序遍历结果: " + infixResult);
        System.out.println("=================================");

        // 获取后序遍历结果
        List<String> suffixResult = binaryTree.suffixList(root);
        System.out.println("后序遍历结果: " + suffixResult);
        System.out.println("=================================");

        // 使用 前序遍历结果 + 中序遍历结果 还原 二叉树
        TreeNode6 root2 = binaryTree.prefixAndInfixToTree(prefixResult.toArray(new String[]{}), infixResult.toArray(new String[]{}));
        System.out.println("还原后的二叉树前序遍历如下: " + binaryTree.prefixList(root2));
        System.out.println("还原后的二叉树中序遍历如下: " + binaryTree.infixList(root2));
        System.out.println("还原后的二叉树后序遍历如下: " + binaryTree.suffixList(root2));
        System.out.println("=================================");

        // 使用 后序遍历结果 + 中序遍历结果 还原 二叉树
        TreeNode6 root3 = binaryTree.suffixAndInfixToTree(suffixResult.toArray(new String[]{}), infixResult.toArray(new String[]{}));
        System.out.println("还原后的二叉树前序遍历如下: " + binaryTree.prefixList(root3));
        System.out.println("还原后的二叉树中序遍历如下: " + binaryTree.infixList(root3));
        System.out.println("还原后的二叉树后序遍历如下: " + binaryTree.suffixList(root3));
        System.out.println("=================================");
    }

    /**
     * 根据 前序遍历结果 + 中序遍历结果 还原 二叉树(此处不考虑 二叉树 节点相同值,即默认 二叉树 节点均不相同、没有重复元素)
     * @param prefixResult 前序遍历结果
     * @param infixResult 中序遍历结果
     * @return 树的根节点
     */
    public TreeNode6<K> prefixAndInfixToTree(K[] prefixResult, K[] infixResult) {
        // 递归结束条件
        if (prefixResult == null || infixResult == null || prefixResult.length <= 0 || infixResult.length <= 0) {
            return null;
        }
        // 前序遍历结果 第一个值 肯定为 树的根节点
        TreeNode6<K> root = new TreeNode6<>(prefixResult[0]);
        // 查找、记录 中序序列 中 根节点 位置
        int index = 0;
        for (int i = 0; i < infixResult.length; i++) {
            if (prefixResult[0].equals(infixResult[i])) {
                index = i;
                break;
            }
        }

        // 根据 根节点,将 中序遍历结果 划分为 左子树 以及 右子树,中序结果 左边即为左子树,右边即为 右子树
        // 中序遍历结果:[{左子树}{根节点}{右子树}]
        K[] leftInfixResult = Arrays.copyOfRange(infixResult, 0, index);
        K[] rightInfixResult = Arrays.copyOfRange(infixResult, index + 1, infixResult.length);

        // 根据左子树 个数,将剩余 前序遍历 结果划分为 左子树、右子树
        // 前序遍历结果为:[{根节点}{左子树}{右子树}]
        K[] leftPrefixResult = Arrays.copyOfRange(prefixResult, 1, leftInfixResult.length + 1);
        K[] rightPrefixResult = Arrays.copyOfRange(prefixResult, leftInfixResult.length + 1, prefixResult.length);

        // 设置 根(当前)节点 左、右子树
        root.left = prefixAndInfixToTree(leftPrefixResult, leftInfixResult);
        root.right = prefixAndInfixToTree(rightPrefixResult, rightInfixResult);
        return root;
    }

    /**
     * 根据 后序遍历结果 + 前序遍历结果 还原 二叉树
     * @param suffixResult 后序遍历结果
     * @param infixResult 前序遍历结果
     * @return 树的根节点
     */
    public TreeNode6<K> suffixAndInfixToTree(K[] suffixResult, K[] infixResult) {
        if (suffixResult == null || infixResult == null || suffixResult.length <= 0 || infixResult.length <= 0) {
            return null;
        }
        // 后序遍历结果 最后一个值 肯定为 根节点(当前节点)
        TreeNode6<K> root = new TreeNode6<>(suffixResult[suffixResult.length - 1]);
        // 查找、记录 中序序列 中 根节点 位置
        int index = 0;
        for(int i = 0; i < infixResult.length; i++) {
            if (root.data.equals(infixResult[i])) {
                index = i;
                break;
            }
        }

        // 根据 根节点,将 中序遍历结果 划分为 左子树 以及 右子树,中序结果 左边即为左子树,右边即为 右子树
        // 中序遍历结果:[{左子树}{根节点}{右子树}]
        K[] leftInfixResult = Arrays.copyOfRange(infixResult, 0, index);
        K[] rightInfixResult = Arrays.copyOfRange(infixResult, index + 1, infixResult.length);

        // 根据左子树 个数,将剩余 后序遍历 结果划分为 左子树、右子树
        // 后序遍历结果为:[{左子树}{右子树}{根节点}]
        K[] leftSuffixResult = Arrays.copyOfRange(suffixResult, 0, leftInfixResult.length);
        K[] rightSuffixResult = Arrays.copyOfRange(suffixResult, leftInfixResult.length, suffixResult.length - 1);

        // 设置 根(当前)节点 左、右子树
        root.left = suffixAndInfixToTree(leftSuffixResult, leftInfixResult);
        root.right = suffixAndInfixToTree(rightSuffixResult, rightInfixResult);
        return root;
    }

    /**
     * 返回前序遍历结果(方式一)
     * @param root 树的根节点
     * @return 前序遍历结果
     */
    public List<K> prefixList(TreeNode6<K> root) {
        if (root == null) {
            System.out.println("当前为空树");
            return null;
        }
        return root.prefixList(new ArrayList<>());
    }

    /**
     * 返回前序遍历结果(方式二)
     * @param root 树的根节点
     * @return 前序遍历结果
     */
    public List<K> prefixList2(TreeNode6<K> root) {
        if (root == null) {
            System.out.println("当前为空树");
            return null;
        }
        List<K> result = new ArrayList<>();
        root.prefixList2(result);
        return result;
    }

    /**
     * 中序遍历
     * @param root 树的根节点
     * @return 中序遍历结果
     */
    public List<K> infixList(TreeNode6<K> root) {
        if (root == null) {
            System.out.println("当前为空树");
            return null;
        }
        List<K> result = new ArrayList<>();
        root.infixList(result);
        return result;
    }

    /**
     * 后序遍历
     * @param root 树的根节点
     * @return 后序遍历结果
     */
    public List<K> suffixList(TreeNode6<K> root) {
        if (root == null) {
            System.out.println("当前为空树");
            return null;
        }
        List<K> result = new ArrayList<>();
        root.suffixList(result);
        return result;
    }
}

/**
 * 定义树节点
 * @param <K>
 */
class TreeNode6<K> {
    K data; // 保存节点数据
    TreeNode6<K> left; // 保存 左子节点
    TreeNode6<K> right; // 保存 右子节点

    public TreeNode6(K data) {
        this.data = data;
    }

    /**
     * 前序遍历(第一种方式:带有返回值的遍历)
     * @param list 前序遍历序列
     * @return 前序遍历结果
     */
    public List<K> prefixList(List<K> list) {
        // 用于保存当前序列,作用域只存在当前方法,返回时 作用域消失,即 递归时无需考虑会影响 上一次结果
        List<K> result = new ArrayList<>(list);
        // 添加当前节点
        result.add(this.data);
        // 递归添加左子节点
        if (this.left != null) {
            result = this.left.prefixList(result);
        }
        // 递归添加右子节点
        if (this.right != null) {
            result = this.right.prefixList(result);
        }
        return result;
    }

    /**
     * 前序遍历(第二种方式:无返回值的遍历)
     * @param result 前序遍历序列
     */
    public void prefixList2(List<K> result) {
        // 保存当前节点
        result.add(this.data);
        // 递归添加左子节点
        if (this.left != null) {
            this.left.prefixList2(result);
        }
        // 递归添加右子节点
        if (this.right != null) {
            this.right.prefixList2(result);
        }
    }

    /**
     * 中序遍历
     * @param result 中序遍历序列
     */
    public void infixList(List<K> result) {
        // 递归遍历 左子节点
        if (this.left != null) {
            this.left.infixList(result);
        }
        // 保存当前节点
        result.add(this.data);
        // 递归遍历 右子节点
        if (this.right != null) {
            this.right.infixList(result);
        }
    }

    /**
     * 后序遍历
     * @param result 后序遍历序列
     */
    public void suffixList(List<K> result) {
        // 递归遍历 左子节点
        if (this.left != null) {
            this.left.suffixList(result);
        }
        // 递归遍历 右子节点
        if (this.right != null) {
            this.right.suffixList(result);
        }
        // 保存当前节点
        result.add(this.data);
    }
}

【输出结果:】
前序遍历结果(方式一): [0, 1, 3, 4, 2]
前序遍历结果(方式二): [0, 1, 3, 4, 2]
=================================
中序遍历结果: [3, 1, 4, 0, 2]
=================================
后序遍历结果: [3, 4, 1, 2, 0]
=================================
还原后的二叉树前序遍历如下: [0, 1, 3, 4, 2]
还原后的二叉树中序遍历如下: [3, 1, 4, 0, 2]
还原后的二叉树后序遍历如下: [3, 4, 1, 2, 0]
=================================
还原后的二叉树前序遍历如下: [0, 1, 3, 4, 2]
还原后的二叉树中序遍历如下: [3, 1, 4, 0, 2]
还原后的二叉树后序遍历如下: [3, 4, 1, 2, 0]
=================================
5、顺序二叉树(数组 与 树 互转)
(1)什么是顺序二叉树:
是二叉树的一种 存储形式(按照数组顺序,从上到下、从左到右 依次 给二叉树 添加树节点,得到一个完全二叉树 或者 满二叉树),
其 可以在 数组 与 树 之间相互转换。即 根据一个数组,可以得到 树 的结构,从树也可以反推 数组。
特点:
顺序二叉树通常只考虑 完全二叉树。
其第 n 个元素的左子节点为 2*n + 1。
其第 n 个元素的右子节点为 2*n + 2。
其第 n 个元素的父节点为 (n - 1) / 2。 (n 从 0 开始,即从数组第一个元素下标开始计数)。
(2)代码实现:
【核心:】
    对于第 n 个元素(n 从 0 开始计数):
        其左子节点为 2*n + 1。
        其右子节点为 2*n + 2。
    无论 数组 转 树 还是 树 转 数组,都是根据这两个 值进行对应。
注:
    通过先序、中序、后序 可以遍历树,
    那么在遍历的同时将节点 设置到相应的 数组下标处,那么即可完成 树 转 数组。

【代码实现:】
package com.lyh.tree;

import java.util.Arrays;

public class ArrayBinaryTree<K> {
    private K[] arrays;

    public ArrayBinaryTree(K[] arrays) {
        this.arrays = arrays;
    }

    public static void main(String[] args) {
        // 构建数组
        Integer[] arrays = new Integer[]{1, 2, 3, 4, 5, 6, 7};
        ArrayBinaryTree<Integer> arrayBinaryTree = new ArrayBinaryTree<>(arrays);

        // 数组转为 树
        TreeNode2 root = arrayBinaryTree.arraysToTree();

        // 输出数组
        System.out.println("数组为: " + Arrays.toString(arrays));
        System.out.println("==============================");

        // 输出树 的前序遍历结果
        System.out.print("树 的前序遍历为: ");
        root.prefixList();
        System.out.println("\n==============================");

        // 输出树 的中序遍历结果
        System.out.print("树 的中序遍历为: ");
        root.infixList();
        System.out.println("\n==============================");

        // 输出树 的后序遍历结果
        System.out.print("树 的后序遍历为: ");
        root.suffixList();
        System.out.println("\n==============================");

        System.out.print("树 转为数组为: ");
        Object[] result = arrayBinaryTree.treeToArray(root);
        System.out.println(Arrays.toString(result));
    }

    /**
     * 数组 转 树
     * @return 树的根节点,若数组为空 则返回 null。
     */
    public TreeNode2<K> arraysToTree() {
        // 若数组为空,则不进行 转树 操作
        if (arrays == null || arrays.length == 0) {
            System.out.println("数据为空,无法转为树");
            return null;
        }
        // 设置根节点
        TreeNode2 root = new TreeNode2(arrays[0]);
        // 根据数组值 构建树
        root.arrayToTree(arrays, 0);
        return root;
    }

    public Object[] treeToArray(TreeNode2<K> root) {
        // 判断树 是否为空树
        if (root == null) {
            System.out.println("数据为空,无法转为数组");
            return null;
        }
        // 树非空,计算树节点个数
        int length = root.size() + 1;
        // 声明一个数组
        Object[] arrays = new Object[length];
        // 将树的数据 放入 数组对应 下标处
        root.treeToArray(arrays, 0);
        return arrays;
    }
}

/**
 * 定义树节点
 * @param <K>
 */
class TreeNode2<K> {
    K data; // 保存节点数据
    TreeNode2<K> left; // 保存节点的 左子节点
    TreeNode2<K> right; // 保存节点的 右子节点

    public TreeNode2(K data) {
        this.data = data;
    }

    @Override
    public String toString() {
        return "TreeNode2{ data = " + data + " }";
    }

    /**
     * 数组 转 树
     * @param arrays 待转换数组
     * @param index 当前数组下标(从 0 开始,表示数组第一个元素,同样表示为 根节点)
     */
    public void arrayToTree(K[] arrays, int index) {
        // 若当前节点存在 左节点,则递归构建 左子树
        if (index * 2 + 1 < arrays.length) {
            this.left = new TreeNode2<>(arrays[index * 2 + 1]);
            this.left.arrayToTree(arrays, index * 2 + 1);
        }
        // 若当前节点存在 右节点,则递归构建 右子树
        if (index * 2 + 2 < arrays.length) {
            this.right = new TreeNode2<>(arrays[index * 2 + 2]);
            this.right.arrayToTree(arrays, index * 2 + 2);
        }
    }

    /**
     * 二叉树 转 数组(先序遍历实现)
     * @param arrays 待转换数组
     * @param index 数组下标
     */
    public void treeToArray(Object[] arrays, int index) {
        // 设置当前节点 到相应的数组下标处
        arrays[index] = this.data;
        // 遍历左子树
        if (this.left != null) {
            this.left.treeToArray(arrays, index * 2 + 1);
        }
        // 遍历右子树
        if (this.right != null) {
            this.right.treeToArray(arrays, index * 2 + 2);
        }
    }

    /**
     * 前序遍历
     */
    public void prefixList() {
        // 输出当前节点
        System.out.print(this + " ");
        // 若左子树不为空,则递归前序遍历 左子树
        if (this.left != null) {
            this.left.prefixList();
        }
        // 若右子树不为空,则递归前序遍历 右子树
        if (this.right != null) {
            this.right.prefixList();
        }
    }

    /**
     * 中序遍历
     */
    public void infixList() {
        // 若左子树不为空,则递归中序遍历 左子树
        if (this.left != null) {
            this.left.infixList();
        }
        // 输出当前节点
        System.out.print(this + " ");
        // 若右子树不为空,则递归中序遍历 右子树
        if (this.right != null) {
            this.right.infixList();
        }
    }

    /**
     * 后序遍历
     */
    public void suffixList() {
        // 若左子树不为空,则递归后序遍历 左子树
        if (this.left != null) {
            this.left.suffixList();
        }
        // 若右子树不为空,则递归后序遍历 右子树
        if (this.right != null) {
            this.right.suffixList();
        }
        // 输出当前节点
        System.out.print(this + " ");
    }

    /**
     * 求树节点总数
     * @return 树节点总数
     */
    public int size() {
        int left = 0; // 左节点个数
        int right = 0; // 右节点个数
        // 递归求左节点个数
        if (this.left != null) {
            left = 1 + this.left.size();
        }
        // 递归求右节点个数
        if (this.right != null) {
            right = 1 + this.right.size();
        }
        // 返回总个数
        return left + right;
    }
}

【输出结果:】
数组为: [1, 2, 3, 4, 5, 6, 7]
==============================
树 的前序遍历为: TreeNode2{ data = 1 } TreeNode2{ data = 2 } TreeNode2{ data = 4 } TreeNode2{ data = 5 } TreeNode2{ data = 3 } TreeNode2{ data = 6 } TreeNode2{ data = 7 }
==============================
树 的中序遍历为: TreeNode2{ data = 4 } TreeNode2{ data = 2 } TreeNode2{ data = 5 } TreeNode2{ data = 1 } TreeNode2{ data = 6 } TreeNode2{ data = 3 } TreeNode2{ data = 7 }
==============================
树 的后序遍历为: TreeNode2{ data = 4 } TreeNode2{ data = 5 } TreeNode2{ data = 2 } TreeNode2{ data = 6 } TreeNode2{ data = 7 } TreeNode2{ data = 3 } TreeNode2{ data = 1 }
==============================
树 转为数组为: [1, 2, 3, 4, 5, 6, 7]
6、线索二叉树
(1)什么是线索二叉树?
对于 n 个节点的 二叉树,其总共含有 2*n - (n - 1) = n + 1 个空的指针域。
利用这些空的指针域,存放 当前节点 在 某次遍历(前序、中序、后续)下的 前驱、后继 节点的指针。
这些指向 前驱、后继 节点的指针称为 线索,使用这种线索的二叉树 称为线索二叉树。
即 线索二叉树的本质 是 将二叉树 当前节点的空闲指针 改为 指向当前节点 前驱 或者 后继 节点的过程。
而根据遍历的分类,前驱、后继节点会不同,可以分为:
前序线索二叉树、中序线索二叉树、后序线索二叉树。
(2)代码实现 中序线索二叉树
【定义树节点:】
    对于每个节点的 左、右指针域 来说,可能是 空闲指针域,也可能指向 左、右 子节点。
    需要对其进行区分,可以定义指针类型,比如:leftType,值为 0 时表示指向子节点, 值为 1 时表示为 空闲指针域(存储线索 -- 前驱、后继节点)
树节点:
    class TreeNode3<K> {
        K data; // 保存节点数据
        TreeNode3<K> left; // 保存左子节点
        TreeNode3<K> right; // 保存右子节点
        byte leftType; // 值为 0 时表示为 左子节点,值为 1 时表示存储线索 -- 前驱节点
        byte rightType; // 值为 0 时表示为 右子节点,值为 1 时表示存储线索 -- 后继节点

        public TreeNode3(K data) {
            this.data = data;
        }

        @Override
        public String toString() {
            return "TreeNode3{ data= " + data + " }";
        }
    }

【构建线索二叉树(以 中序遍历 构建 线索二叉树 为例):】
    首先得构建一个 二叉树,可以使用 顺序二叉树(详见上例,数组 转 二叉树) 或者 手动构建。
    中序遍历二叉树时,无法直接 明确 当前节点的 前驱、后继 节点。
  可以使用变量 preNode 用于记录 当前节点的前驱节点。
    若 当前节点 node 的左指针域 left 为 null,则将其 指向 前驱节点 preNode,并修改指针类型为 线索。
    若 前驱节点 preNode 的右指针域 right 为 null,则将其 指向 当前节点 node,并修改指针类型为 线索。
    在进入下一个 节点前,需要使用 前驱节点 保存 当前节点。
  注:
    此处使用变量记录 前驱节点 即可,当然使用 另一个变量 nextNode 记录 后继节点亦可实现。
  即:
    // 设置前驱节点
    if (node.left == null) {
        node.left = preNode; // 指向 当前节点 的前驱节点
        node.leftType = 1; // 修改左指针域 指针类型为 线索
    }
    // 设置后继节点
    if (preNode != null && preNode.right == null) {
        preNode.right = node;
        preNode.rightType = 1; // 修改右指针域 指针类型为 线索
    }
    // 进入下一个节点前,保存当前节点,作为前驱节点
    preNode = node;

【遍历 线索二叉树(使用中序遍历 并根据 后继节点 的方式输出 中序线索二叉树):】
    由于 树节点 的 左、右指针 并不一定为空(存放了 前驱、后继 节点),原始的二叉树 前序、中序、后序遍历 方式已不适用。
    但是一般通过其 前驱节点 或者 后继节点 查找。
以后继节点为例:
    与 原始遍历 相同,按照 左子节点、当前节点、右子节点 的顺序 访问。
    访问左子树,若 当前节点 左子节点为 线索(指向 前驱节点),则输出 当前节点,若不是,则按照 中序遍历 方式进行遍历。
    访问右子树,若 当前节点 右子节点为 线索(指向 后继节点),则输出 后继节点,若不是,则按照 中序遍历 方式进行遍历。
  即:
    // 从 根节点 开始遍历(中序方式)
    while(node != null) {
        // 遍历左指针域, leftType = 0 时为左子树,依次往下遍历,直至 leftType = 1。表示当前节点的左指针域 线索化(即当前节点为有效节点)
        while(node.leftType == 0) {
            node = node.left;
        }
        // 操作当前节点
        System.out.print(node + " ");
        // 遍历右指针域,若当前节点的 右指针域 线索化,则输出当前节点的 后继节点
        while(node.rightType == 1) {
            node = node.right;
            System.out.print(node + " ");
        }
        // 当前节点 右指针域 非线索化,则替换当前节点,开始下一次循环
        node = node.right;
    }

前驱节点方式:
    与后继节点相反处理,按照 右子节点、当前节点、左子节点 的顺序访问。
    最后返回的是 树的 逆序中序遍历 的顺序。

【代码实现:】
package com.lyh.tree;

import java.util.Arrays;

/**
 * 线索二叉树
 * @param <K>
 */
public class ThreadBinaryTree<K> {
    private TreeNode3<K> preNode; // 用于记录当前节点的上一个节点

    public static void main(String[] args) {
        // 将数组 转为 顺序二叉树
        Integer[] arrays = new Integer[]{1, 2, 3, 4, 5};
        ThreadBinaryTree<Integer> threadBinaryTree = new ThreadBinaryTree<>();
        TreeNode3<Integer> root = threadBinaryTree.arrayToTree(arrays, 0);

        // 使用 中序遍历 遍历 顺序二叉树,并添加线索,使其成为 中序线索二叉树
        threadBinaryTree.infixCreateThreadBinaryTree(root);
        // 中序遍历 以 后继节点 的方式 输出 中序线索二叉树
        System.out.println("原数组为: " + Arrays.toString(arrays));
        System.out.println("数组 ==> 转为中序线索二叉树(后继节点方式) 输出为: ");
        threadBinaryTree.infixNextNodeList(root);
        System.out.println("\n数组 ==> 转为中序线索二叉树(前驱节点方式) 输出为: ");
        threadBinaryTree.infixPreNodeList(root);
    }

    /**
     * 根据数组构建一个 顺序二叉树
     * @param arrays 数组
     * @param index 数组下标
     * @return 顺序二叉树
     */
    public TreeNode3<K> arrayToTree(K[] arrays, int index) {
        TreeNode3<K> root = null; // 设置根节点
        // 递归数组并将对应的值存入 顺序二叉树
        if (index >= 0 && index < arrays.length) {
            // 设置当前节点
            root = new TreeNode3<>(arrays[index]);
            // 设置当前节点左子节点
            root.left = arrayToTree(arrays, index * 2 + 1);
            // 设置当前节点右子节点
            root.right = arrayToTree(arrays, index * 2 + 2);
        }
        return root;
    }

    /**
     * 中序遍历并创建线索化二叉树
     * @param node 树节点
     */
    public void infixCreateThreadBinaryTree(TreeNode3<K> node) {
        // 判断当前节点是否为空,即 叶子节点 或者 空树
        if (node == null) {
            return;
        }
        // 遍历左子节点
        infixCreateThreadBinaryTree(node.left);
        // 操作当前节点
        // 设置前驱节点
        if (node.left == null) {
            node.left = preNode; // 指向 当前节点 的前驱节点
            node.leftType = 1; // 修改左指针域 指针类型为 线索
        }
        // 设置后继节点
        if (preNode != null && preNode.right == null) {
            preNode.right = node;
            preNode.rightType = 1; // 修改右指针域 指针类型为 线索
        }
        // 进入下一个节点前,保存当前节点,作为前驱节点
        preNode = node;
        // 遍历右子节点
        infixCreateThreadBinaryTree(node.right);
    }

    /**
     * 以中序遍历方式 并根据 后继节点 输出 中序线索二叉树
     * @param node 根节点
     */
    public void infixNextNodeList(TreeNode3<K> node) {
        // 从 根节点 开始遍历(中序方式)
        while(node != null) {
            // 遍历左指针域, leftType = 0 时为左子树,依次往下遍历,直至 leftType = 1。表示当前节点的左指针域 线索化(即当前节点为有效节点)
            while(node.leftType == 0) {
                node = node.left;
            }
            // 操作当前节点
            System.out.print(node + " ");
            // 遍历右指针域,若当前节点的 右指针域 线索化,则输出当前节点的 后继节点
            while(node.rightType == 1) {
                node = node.right;
                System.out.print(node + " ");
            }
            // 当前节点 右指针域 非线索化,则替换当前节点,开始下一次循环
            node = node.right;
        }
    }

    /**
     * 以中序遍历方式 并根据 前驱节点 反向输出 中序线索二叉树
     * @param node 根节点
     */
    public void infixPreNodeList(TreeNode3 node) {
        // 从根节点开始遍历
        while(node != null) {
            // 遍历右指针域,找到线索化 节点
            while(node.right != null && node.rightType == 0) {
                node = node.right;
            }
            // 操作当前节点
            System.out.print(node + " ");
            // 遍历左指针域,若当前左指针域 线索化,则输出当前节点的 前驱节点
            while(node.left != null && node.leftType == 1) {
                node = node.left;
                System.out.print(node + " ");
            }
            // 当前节点 左指针域 非线索化,则替换当前节点,开始下一次循环
            node = node.left;
        }
    }
}

/**
 * 定义树节点
 * @param <K>
 */
class TreeNode3<K> {
    K data; // 保存节点数据
    TreeNode3<K> left; // 保存左子节点
    TreeNode3<K> right; // 保存右子节点
    byte leftType; // 值为 0 时表示为 左子节点,值为 1 时表示存储线索 -- 前驱节点
    byte rightType; // 值为 0 时表示为 右子节点,值为 1 时表示存储线索 -- 后继节点

    public TreeNode3(K data) {
        this.data = data;
    }

    @Override
    public String toString() {
        return "TreeNode3{ data= " + data + " }";
    }
}

【输出结果:】
原数组为: [1, 2, 3, 4, 5]
数组 ==> 转为中序线索二叉树(后继节点方式) 输出为:
TreeNode3{ data= 4 } TreeNode3{ data= 2 } TreeNode3{ data= 5 } TreeNode3{ data= 1 } TreeNode3{ data= 3 }
数组 ==> 转为中序线索二叉树(前驱节点方式) 输出为:
TreeNode3{ data= 3 } TreeNode3{ data= 1 } TreeNode3{ data= 5 } TreeNode3{ data= 2 } TreeNode3{ data= 4 }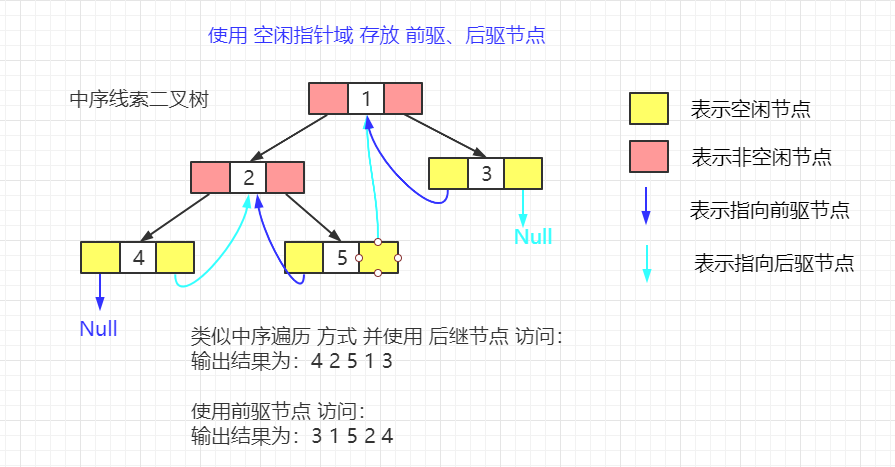
7、哈夫曼树(HuffmanTree、最优二叉树)
(1)什么是哈夫曼树?
哈夫曼树 又称 最优二叉树。对于 n 个节点 且 每个节点有一个值(权值),将这 n 个节点构建成一个 二叉树,使得该树的 带权路径长度(weighted path length,简称 wpl)最小。这样的二叉树 称为 最优二叉树(或者 哈夫曼树)。
注:
哈夫曼树构建完成后,n 个节点 均为 哈夫曼树 的叶子节点。
【基本关键词概念:】
路径 与 路径长度:
    在一棵树中,一个节点 到达 另一个节点 之间的 分支通路 称为 路径。
    通路中 分支的总数 称为 路径长度。

节点的权:
    简单的理解为 节点中带有某含义的值。

节点的带权路径长度:
    从根节点 到 该节点之间的路径长度 与 该节点的 权的乘积。

树的带权路径长度:
    该树所有的 叶子节点 的带权路径长度 之和。

哈夫曼树(最优二叉树):
    树的带权路径(wpl)最小的二叉树 为 哈夫曼树。
    一般权值越大的节点 离 根节点 越近 的二叉树才是最优二叉树。
    wpl 相同的二叉树 其 哈夫曼树可能不同。
(2)创建 哈夫曼树
【哈夫曼树创建步骤:】
Step1:对于一组数据,先将数据 按照 权值 从小到大 排序。
Step2:将数据中每一个值 视为一个树节点(最简单的二叉树),
  Step2.1:从数据中选取 权值 最小的两个值 作为 左、右子节点 并构建一个新的二叉树。
  Step2.2:新的二叉树 权值为 左、右子节点 权值之和。
  Step2.3:删除已被选择的左、右节点,并将新的节点 加入 数据中(按照权值从小到大排序)。
Step3:重复 Step2 操作,直至数据中只剩 一个值,即 哈夫曼树的 根节点。

注:
    一般来说 权值最大 的叶子节点 离 根节点越近的 二叉树为 最优二叉树。
    所以每次拼接时,均选取当前节点中 最小权值的两个节点进行拼接,将最大权值的节点留在最后拼接。

【代码实现:】
package com.lyh.tree;

import java.util.ArrayList;
import java.util.Arrays;
import java.util.Collections;
import java.util.List;

/**
 * 哈夫曼树
 */
public class HuffmanTree<K> {
    public static void main(String[] args) {
        // 根据数组构建哈夫曼树(此处构建规则为 左子节点权值 小于 右子节点)
        int[] arrays = new int[]{8, 3, 7, 13};
        HuffmanTree<String> huffmanTree = new HuffmanTree<>();
        TreeNode4 root = huffmanTree.createHuffmanTree(arrays);
        // 输出哈夫曼树前序遍历
        System.out.print("哈夫曼树前序遍历为: ");
        root.prefixList();
    }

    /**
     * 构建哈夫曼树,返回树的根节点
     * @param arrays 待构建树的数组(节点 权值 组成的数组)
     * @return 哈夫曼树根节点
     */
    public TreeNode4<K> createHuffmanTree(int[] arrays) {
        // 构建树节点,此处借用 集合,并利用集合进行排序操作
        List<TreeNode4<K>> lists = new ArrayList<>();
        Arrays.stream(arrays).forEach( x -> {
            lists.add(new TreeNode4<>(x));
        });
        // 遍历构建哈夫曼树,此处规则为 左子节点权值 小于 右子节点权值
        while (lists.size() > 1) {
            // 节点按权值 从小到大排序
            Collections.sort(lists);
            // 获取左子节点
            TreeNode4<K> leftNode = lists.get(0);
            // 获取右子节点
            TreeNode4<K> rightNode = lists.get(1);
            // 组合成 二叉树
            TreeNode4<K> parentNode = new TreeNode4<>(leftNode.value + rightNode.value);
            parentNode.left = leftNode;
            parentNode.right = rightNode;
            // 从集合中移除已使用节点,并将新节点添加到集合中
            lists.remove(leftNode);
            lists.remove(rightNode);
            lists.add(parentNode);
        }
        // 集合中最后元素即为 哈夫曼树 根节点
        return lists.get(0);
    }
}

/**
 * 定义树节点
 * @param <K>
 */
class TreeNode4<K> implements Comparable<TreeNode4<K>>{
    K data; // 保存节点值
    int value; // 保存节点权值
    TreeNode4<K> left; // 保存左子节点
    TreeNode4<K> right; // 保存右子节点

    public TreeNode4(int value) {
        this.value = value;
    }

    @Override
    public String toString() {
        return "TreeNode4{ value = " + value + " }";
    }

    @Override
    public int compareTo(TreeNode4<K> o) {
        return this.value - o.value;
    }

    /**
     * 前序遍历
     */
    public void prefixList() {
        // 输出当前节点
        System.out.print(this + " ");
        // 遍历左子节点
        if (this.left != null) {
            this.left.prefixList();
        }
        // 遍历右子节点
        if (this.right != null) {
            this.right.prefixList();
        }
    }
}

【输出结果:】
哈夫曼树前序遍历为: TreeNode4{ value = 31 } TreeNode4{ value = 13 } TreeNode4{ value = 18 } TreeNode4{ value = 8 } TreeNode4{ value = 10 } TreeNode4{ value = 3 } TreeNode4{ value = 7 }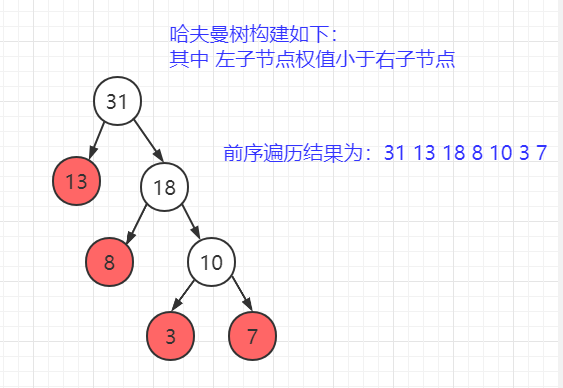
8、哈夫曼编码 实现 文件压缩、解压
(1)什么是 哈夫曼编码?
哈夫曼编码 是一种 可变字长编码,可用于数据压缩、节省存储空间。
将文件转为 字节数组,并根据 各字节 出现频率为权值,构建哈夫曼树,并得到每个字节的 哈夫曼编码(出现频率越高的字节 其编码 越短,从而达到缩减存储空间的目的),再根据 哈夫曼编码将 字节转换为对应的 二进制 串,最后以 8 位为单位 压缩二进制串 成 字节数组,即可实现 文件的压缩。
(2)补充点 二进制 与 整数 相互转换的概念
【Java 中二进制 与 整数 互相转换:】
String 转 int:
    int parseInt(String s, int radix);
其中:
    s 表示 二进制字符串, radix 表示进制,
    即 按照 几进制 去 处理 二进制字符串。

int 转 String:
    String toBinaryString(int i);
其中:
    i 表示待转换的整数。
注:
    若结果为非负数,输出结果 前面的 0 会省略(处理时需要额外注意)。
    比如: 5 可以为 101、0101、00101,,但是最终输出结果为 101.

int 转 byte(强转):
    byte (byte)parseInt(String s, int radix)


【Java 中整数以 二进制 补码形式存储:】
    Java 中整数使用 二进制 补码 的形式存储,
    正数的 补码、反码、原码 均相同。
    负数的 补码为 反码 加 1。
    反码为 符号位不变,其余各位取反。
比如:
    "10000101" 转为 int 型整数时, 即 Integer.parseInt("10000101", 2);
    由于 "1000 0101" 转为 int,而 int 为 4 字节,即为 "0000 0000 0000 0000 0000 0000 1000 0101",
    其符号位为 0,即整数,补码与原码相同,即最终显示为整数 133.

    "10000101" 转为 byte 型整数时,即 (byte)Integer.parseInt("10000101", 2);
    由于 "10000101" 转为 byte,而 byte 为 1 字节,即为 "10000101",
    其符号位为 1,表示负数,其反码为符号位不变,各位取反,即 "11111010"。
    而 补码为其反码 加 1,即最终为 "11111011",即最终显示为整数 -123.
注:
    byte 范围为 -128 ~ 127,即 10000000 ~ 01111111。符号位不做计算。


【压缩处理最后一个字节可能遇到的问题:】
    以 8 位为单位 将 二进制串 转为 字节(整数)数组 的时候,若 最后一个二进制串 不足 8 位,需要额外注意:
    若不足 8 位直接存储为 字节,则解码时 可能会出错。
比如:
    (byte)Integer.parseInt("0101", 2);  转为 byte 时其值为 5.
    (byte)Integer.parseInt("00101", 2);  转为 byte 时其值也为 5.
    若直接存储,那么解码时, Integer.toBinaryString(5); 输出为 101,
    由于转换的是非负数,其前面的 0 会省略。并不知道其前面到底有 几个 0,从而解码失败。

我的解决方法是:
    额外增加一个字节用于记录 最后一个 二进制串 的实际位数。
    若 最后一个二进制串 转换为 byte 整数时 为 负数,则其符号位肯定为 1,肯定满足 8 位,此时记录 有效位数为 8 位。
    若 最后一个二进制串 转换为 非负数,则其 解码时 前面的 0 会省略,此时先将其 高位补 0,然后根据最后一个 字节记录的 有效位数 去截取即可。
比如:
    0101      转为 byte 整数 5,则额外增加一个字节整数 4,表示有效位数为 4 位。
    00101     转为 byte 整数 5,则额外增加一个字节整数 5,表示有效位数为 5 位。
    10000101  转为 byte 整数 -123,则额外增加要给字节整数 8,表示有效位数为 8 位。

注:
    由于 0 会被省略,所以需要对 非负数 进行 高位补位,即 0101 需要变为 00000101。
    可以与 256 进行 按位与运算,即 5 | 256 = 0101 | 100000000 = 100000101,
    此时截取 后 8 位二进制串即为 补位成功的 二进制串。
    此时,对于 0101,其有效位数为 4 位,即截取 后四位 二进制串。
    对于 00101,其有效位数为 5 位,即截取 后五为 二进制串。
(3)哈夫曼如何 压缩、解压
【压缩文件的流程:】
Step1:读取文件,根据文件中 字节(字符) 出现的频率 作为权值,构建出 哈夫曼树。
    将 字节 频率按 从小到大 排序,并构建 哈夫曼树。

Step2:通过 哈夫曼树,可以得到每个 字节 的唯一编码。
    将指向左子节点分支命名为 0,指向右子节点分支命名为 1,
    则从根节点 到 某个节点的路径 记为 该节点的 编码(比如:00,010,001 等)。

Step3:使用编码 去替换掉 字节。
    将文件中所有的 字节 替换成 二进制编码。

Step4:将 8 位二进制 作为一个字节 进行转码,转成字节数组 进行存储,
    最后一个 二进制串 不足 8 位时按 8 位处理,并额外增加一个字节用于记录其实际位数。

Step5:将 字节数组 以及 编码表 同时 输出到文件中(完成压缩)。

【解压文件的流程:】
Step1:读取文件中的 字节数组 以及 编码表。

Step2:将 字节数组 转为对应 的二进制串。

Step3:根据编码表 得到解码表,并根据 解码表 将 二进制串 转为字符。

Step4:输出到文件即可。
(3)代码实现
【代码实现:】
package com.lyh.tree;

import java.io.*;
import java.util.*;

public class HuffmanCode {
    private Map<Byte, String> huffmanCodes = new HashMap<>(); // 用于保存 编码集,字节为 key,编码为 value
    private Map<String, Byte> huffmanDeCodes = new HashMap<>(); // 用于保存 解码集,字节为 value,编码为 key

    public static void main(String[] args) {
        // 测试 普通字符串
        test();
        // 测试读取、压缩文件
//        String srcFile = "G:/1.pdf";
//        String zipFile = "G:/zip.pdf";
//        String unzipFile = "G:/unzip.pdf";
//        testZipFile(srcFile, zipFile);
//        testUnzipFile(zipFile, unzipFile);
    }

    /**
     * 测试文件 压缩
     */
    public static void testZipFile(String srcFile, String zipFile) {
        FileInputStream fis = null;
        OutputStream os = null;
        ObjectOutputStream oos = null;
        try {
            // 读取文件,将文件转为 对应的字节数组
            fis = new FileInputStream(srcFile);
            byte[] b = new byte[fis.available()];
            fis.read(b);

            // 根据 字节数组 生成 哈夫曼树 以及 哈夫曼编码,根据 哈夫曼编码将 原字节数组 压缩 成新的字节数组
            HuffmanCode huffmanCode = new HuffmanCode();
            byte[] zipResult = huffmanCode.zipFile(b);

            // 输出文件,将 字节数组 输出到文件中,以对象的形式存储 数据,方便读取。
            os = new FileOutputStream(zipFile);
            oos = new ObjectOutputStream(os);
            // 记录压缩后的字节数组
            oos.writeObject(zipResult);
            // 记录编码集
            oos.writeObject(huffmanCode.huffmanCodes);
        } catch (Exception e) {
            System.out.println("文件操作异常");
        } finally {
            try {
                fis.close();
                oos.close();
                os.close();
            } catch (IOException e) {
                System.out.println("文件关闭失败");
            }
        }
    }

    /**
     * 测试文件 解压
     */
    public static void testUnzipFile(String srcFile, String unzipFile) {
        InputStream is = null;
        ObjectInputStream ois = null;
        FileOutputStream fos = null;
        try {
            // 读取文件,将文件转为 对应的 字节数组 以及 哈夫曼编码
            is = new FileInputStream(srcFile);
            ois = new ObjectInputStream(is);
            // 读取 字节数组
            byte[] b = (byte[])ois.readObject();
            // 读取 编码集
            Map<Byte, String> codes = (Map<Byte, String>) ois.readObject();

            // 根据 编码集 将 字节数组 解码,得到解压后的数组
            HuffmanCode huffmanCode = new HuffmanCode();
            huffmanCode.huffmanCodes = codes;
            byte[] unzipResult = huffmanCode.deCompressAndConvert(b);

            // 将解压后的数组写入文件
            fos = new FileOutputStream(unzipFile);
            fos.write(unzipResult);
        } catch (Exception e) {
            System.out.println("文件操作异常");
        } finally {
            try {
                ois.close();
                is.close();
                fos.close();
            } catch (Exception e) {
                System.out.println("文件");
            }

        }
    }

    /**
     * 测试 压缩、解压 普通字符串
     *  Step1:读取 普通字符串 转为字节数组,
     *  Step2:根据字节数组 构建 哈夫曼树,
     *  Step3: 根据 哈夫曼树 得到 所有叶子节点的 编码,组成编码集。
     */
    public static void test() {
        // 将字符转为 字节数组,并生成对应的 哈夫曼树
        HuffmanCode huffmanCode = new HuffmanCode();
        String data = "Java C++";
        TreeNode5 root = huffmanCode.createHuffman(data.getBytes());

        System.out.println("当前字符串为: " + data);
        System.out.println("转为字节数组为: " + Arrays.toString(data.getBytes()));
        // 前序遍历输出 哈夫曼树
        System.out.println("字节数组转哈夫曼树后,前序遍历输出哈夫曼树: ");
        root.prefixList();
        System.out.println("\n===============================");

        // 根据 哈夫曼树,生成 字节对应的 编码表
        huffmanCode.getCodes(root);
        System.out.println("输出当前哈夫曼树 叶子节点 对应的编码表: ");
        huffmanCode.hufumanCodesList();
        System.out.println("\n===============================");

        // 根据编码集,将 字符串对应的字节数组 转为 二进制,并以 8 位为单位 进一步转为 字节数组存储
        System.out.println("压缩前的字节数组为: " + Arrays.toString(data.getBytes()));
        byte[] result = huffmanCode.convertAndCompress(data.getBytes());
        System.out.println("压缩后的字节数组为: " + Arrays.toString(result));
        System.out.println("\n===============================");

        // 解压字节数组
        byte[] newReult = huffmanCode.deCompressAndConvert(result);
        System.out.println("解压后的字节数组为: " + Arrays.toString(newReult));
        System.out.println("解压后的字符串为:" + new String(newReult));
    }

    /**
     * 压缩文件
     * @param arrays 待压缩字节数组
     * @return 压缩后的字节数组
     */
    public byte[] zipFile(byte[] arrays) {
        // 根据字节数组 字节出现频率 构建 哈夫曼树,根据 哈夫曼树 生成对应的 哈夫曼编码
        getCodes(createHuffman(arrays));
        // 根据 哈夫曼编码 将字节数组 对应的字节 转为 二进制串,二进制串 以 8 位为单位再转为 字节数组存储
        return convertAndCompress(arrays);
    }

    /**
     * 解压文件
     * @param arrays 待解压字节数组
     * @return 解压后的字节数组
     */
    public byte[] unzipFile(byte[] arrays) {
        return deCompressAndConvert(arrays);
    }

    /**
     * 构建哈夫曼树
     * @param arrays 字节数组
     * @return 哈夫曼树根节点
     */
    public TreeNode5 createHuffman(byte[] arrays) {
        // 遍历字节数组,记录 每个字节 出现的频率作为 权值,使用 哈希表,key 存字节,value 存字节出现频率
        Map<Byte, Long> map = new HashMap<>();
        for (byte temp : arrays) {
            map.put(temp, map.getOrDefault(temp, 0L) + 1);
        }
        // 根据 权值 创建树节点
        List<TreeNode5> lists = new ArrayList<>();
        for (Map.Entry<Byte, Long> temp : map.entrySet()) {
            lists.add(new TreeNode5(temp.getKey(), temp.getValue()));
        }
//         Collections.sort(lists);
//         System.out.println("权值集合为: " + lists);
//         System.out.println("===============================");

        // 遍历构建 哈夫曼树
        while(lists.size() > 1) {
            // 排序,从小到大排序(即 哈夫曼树 左子节点权值 小于 右子节点)
            Collections.sort(lists);
            // 获取左子节点
            TreeNode5 leftNode = lists.get(0);
            // 获取右子节点
            TreeNode5 rightNode = lists.get(1);
            // 创建二叉树(此处非叶子节点 值为 null,只含有权值)
            TreeNode5 parentNode = new TreeNode5(null, leftNode.value + rightNode.value);
            parentNode.left = leftNode;
            parentNode.right = rightNode;
            // 移除已使用节点,添加新节点
            lists.remove(leftNode);
            lists.remove(rightNode);
            lists.add(parentNode);
        }
        // 返回哈夫曼树根节点
        return lists.get(0);
    }

    /**
     * 获取 哈夫曼树 所有 叶子节点 的路径,即 编码字符串。
     * 规定:左分支为 0,右分支 为 1.
     * @param node 哈夫曼树根节点
     */
    public void getCodes(TreeNode5 node, String code, StringBuilder stringBuilder) {
        // 构建一个新的 StringBuilder 用于拼接字符串,当某次递归方法调用结束后,此变量作用域会消失,即不会影响之前的 StringBuilder
        StringBuilder stringBuilder2 = new StringBuilder(stringBuilder);
        stringBuilder2.append(code);
        // 判断当前节点是否为 空
        if (node != null) {
            // 若当前节点值不为 null,即为 叶子节点
            if (node.data != null) {
                // 保存到 编码集 中
                huffmanCodes.put(node.data, stringBuilder2.toString());
            } else {
                // 递归遍历左子树(左子节点),左分支为 0
                getCodes(node.left, "0", stringBuilder2);
                // 递归遍历右子树(右子节点),右分支为 1
                getCodes(node.right, "1", stringBuilder2);
            }
        }
    }

    /**
     * 重载 获取 编码集方法,根据 根节点 遍历 哈夫曼树
     * @param root 哈夫曼树根节点
     */
    public void getCodes(TreeNode5 root) {
        getCodes(root, "", new StringBuilder());
    }

    /**
     * 根据 编码集 得到 解码集
     * @param huffmanCodes 解码集
     */
    public void getDeCodes(Map<Byte, String> huffmanCodes) {
        for (Map.Entry<Byte, String> temp : huffmanCodes.entrySet()) {
            huffmanDeCodes.put(temp.getValue(), temp.getKey());
        }
    }

    /**
     * 输出 编码表
     */
    public void hufumanCodesList() {
        for(Map.Entry<Byte, String> map : huffmanCodes.entrySet()) {
            System.out.print("[ Byte = " + map.getKey() + ", String = " + map.getValue() + " ]  ==> ");
        }
    }

    /**
     * 输出 解码表
     */
    public void hufumanDeCodesList() {
        for(Map.Entry<String, Byte> map : huffmanDeCodes.entrySet()) {
            System.out.print("[ String = " + map.getKey() + ", Byte = " + map.getValue() + " ]  ==> ");
        }
    }

    /**
     * 将 字符串 对应的字节数组,根据 编码表 转为 对应的 二进制串。
     * 将 二进制串 以 8 位为 一个单位,进一步转为 字节数组
     * @param arrays 待压缩的字节数组(字符串转换的字节数组)
     * @return 压缩后的字节数组
     */
    public byte[] convertAndCompress(byte[] arrays) {
        // 根据 编码表,将 字节数组 转为对应的 二进制串 并 拼接
        StringBuilder stringBuilder = new StringBuilder();
        for (byte temp : arrays) {
            stringBuilder.append(huffmanCodes.get(temp));
        }
        // System.out.println("转换的二进制串为: " + stringBuilder.toString());
        // 以 8 位二进制为单位,将 二进制串 转为字节数组,不足 8 位 按 8 位处理,并额外增加一个字节用于记录其实际长度。
//        byte[] result = new byte[stringBuilder.length() % 8 == 0 ? stringBuilder.length() / 8 : stringBuilder.length() / 8 + 1];
        byte[] result = new byte[(stringBuilder.length() + 7) / 8 + 1];
        for(int i = 0, j = 0; i < result.length && j < stringBuilder.length(); i++, j += 8) {
            if (j + 8 < stringBuilder.length()) {
                /**
                 * 整数使用 补码 的形式存储,
                 * 正数的 补码、反码、原码 均相同。
                 * 负数的 补码为 反码 加 1。
                 * 反码为 符号位不变,其余各位取反。
                 * 比如: 1110 0110,其符号位为 1,表示负数,则其转为整数后 为 其反码 加 1,即 1001 1010,即 -26
                 */
                result[i] = (byte)Integer.parseInt(stringBuilder.substring(j, j + 8), 2);
            } else {
                // 额外增加一个字节用于记录其实际长度,若 恰好为 8 位,则记录 8 位,否则 记录 1 ~ 7
                result[i] = (byte)Integer.parseInt(stringBuilder.substring(j), 2);
                result[i + 1] = (byte)stringBuilder.substring(j).length();
            }
        }
        return result;
    }

    /**
     * 将压缩后的字节数组 转为 二进制字符串,并根据 编码表(解码表) 转为 字节数组
     * @param arrays 压缩后的字节数组
     * @return 解压后的字节数组
     */
    public byte[] deCompressAndConvert(byte[] arrays) {
        // 用于字符串拼接
        StringBuilder stringBuilder = new StringBuilder();
        // 遍历压缩后的字节数组,转为对应的 二进制 字符串
        for (int i = 0; i < arrays.length - 1; i++) {
            /**
             * 使用 Integer.toBinaryString() 可以将 int 型 转为 二进制 字符串。
             * 所以先将 byte 转为 int,但由于 int 为 4 字节,byte 为 1 字节,所以需要截取 int 后 8 位作为 byte 对应的 二进制字符串。
             * Integer.toBinaryString() 对于非负数,其前面的 0 会默认不显示,可能造成不足 8 位的情况,所以需要对其 进行 补位。
             * 比如:
             *  Integer.toBinaryString(5) 输出为 101,但其真实对应的应该为 0000 0101,
             *  可以使用 5 | 256 的方式,即 101 | 1 0000 0000 进行 按位与运算。结果为 1 0000 0101,再截取 后 8 位即为对应的 二进制字符串。
             *
             * Integer.toBinaryString() 对于负数,转换为 int 后,会显示 32 位,首位为 1,所以无需补位,直接截取低 8 位即可。
             *
             * 倒数最后一个字节,表示 倒数第二个字节 实际转换的 二进制串 位数,
             * 所以 处理倒数第二个字节时,需要根据 倒数最后一个字节 进行 字符串截取操作。
             */
            int temp = arrays[i];
            // 低 8 位 与 1 0000 0000 进行按位与运算,比如: 101 | 1 0000 0000 = 1 0000 0101
            temp |= 256;
            String str = Integer.toBinaryString(temp);
            // 若当前为倒数第二个字节,则根据 倒数第一个字节 记录的值 去截取 倒数第二个字节 的实际字符串
            if (i + 1 == arrays.length - 1) {
                stringBuilder.append(str.substring(arrays[i + 1] + 1));
            } else {
                stringBuilder.append(str.substring(str.length() - 8));
            }
        }

        // 根据 编码集 得到 解码集
        getDeCodes(huffmanCodes);
        System.out.println("输出编码表 对应的 解码表: ");
        hufumanDeCodesList();
        System.out.println("\n===============================");

        // 保存转换的二进制字符串
        List<Byte> list = new ArrayList<>();
        // 根据解码集,将 二进制字符串 转换成 字节数组
        for(int i = 0, j = 1; j <= stringBuilder.length(); j++) {
            Byte temp = huffmanDeCodes.get(stringBuilder.substring(i, j));
            if (temp != null) {
                list.add(temp);
                i = j;
            }
        }
        // 第一种返回方式:Byte[] newResult = list.toArray(new Byte[list.size()]);
        // 第二种返回方式:
        byte[] result = new byte[list.size()];
        for(int i = 0; i < list.size(); i++) {
            result[i] = list.get(i);
        }
        return result;
    }
}

/**
 * 定义树节点
 */
class TreeNode5 implements Comparable<TreeNode5> {
    Byte data; // 保存节点数据
    Long value; // 保存节点权值(字符出现频率)
    TreeNode5 left; // 保存左子节点
    TreeNode5 right; // 保存右子节点

    @Override
    public int compareTo(TreeNode5 o) {
        return (int)(this.value - o.value);
    }

    public TreeNode5(Byte data, Long value) {
        this.data = data;
        this.value = value;
    }

    @Override
    public String toString() {
        return "TreeNode5{ data = " + data + ", value = " + value + " }";
    }

    /**
     * 前序遍历
     */
    public void prefixList() {
        // 输出当前节点
        System.out.print(this + " ");
        // 遍历左子节点
        if (this.left != null) {
            this.left.prefixList();
        }
        // 遍历右子节点
        if (this.right != null) {
            this.right.prefixList();
        }
    }
}

【输出结果:】
当前字符串为: Java C++
转为字节数组为: [74, 97, 118, 97, 32, 67, 43, 43]
字节数组转哈夫曼树后,前序遍历输出哈夫曼树:
TreeNode5{ data = null, value = 8 } TreeNode5{ data = null, value = 4 } TreeNode5{ data = 97, value = 2 } TreeNode5{ data = 43, value = 2 } TreeNode5{ data = null, value = 4 } TreeNode5{ data = null, value = 2 } TreeNode5{ data = 32, value = 1 } TreeNode5{ data = 67, value = 1 } TreeNode5{ data = null, value = 2 } TreeNode5{ data = 118, value = 1 } TreeNode5{ data = 74, value = 1 }
===============================
输出当前哈夫曼树 叶子节点 对应的编码表:
[ Byte = 32, String = 100 ]  ==> [ Byte = 97, String = 00 ]  ==> [ Byte = 67, String = 101 ]  ==> [ Byte = 118, String = 110 ]  ==> [ Byte = 74, String = 111 ]  ==> [ Byte = 43, String = 01 ]  ==>
===============================
压缩前的字节数组为: [74, 97, 118, 97, 32, 67, 43, 43]
压缩后的字节数组为: [-26, 37, 5, 4]

===============================
输出编码表 对应的 解码表:
[ String = 00, Byte = 97 ]  ==> [ String = 110, Byte = 118 ]  ==> [ String = 100, Byte = 32 ]  ==> [ String = 111, Byte = 74 ]  ==> [ String = 01, Byte = 43 ]  ==> [ String = 101, Byte = 67 ]  ==>
===============================
解压后的字节数组为: [74, 97, 118, 97, 32, 67, 43, 43]
解压后的字符串为:Java C++
9、二叉排序树(二叉搜索树、BST)
(1)什么是 BST?
BST 可以是 Binary Sort Tree 的缩写(二叉排序树),也可以是 Binary Search Sort 的缩写(二叉搜索树)。其查询效率 相比于 链式结构 高。
【BST 特点:】
对于一颗二叉树,其满足如下定义:
    任何一个非叶子节点,其左子节点的值 小于 当前节点。
    任何一个非叶子节点,其右子节点的值 大于 当前节点。

注:
    若存在 节点相等的情况,可以将该节点 放在 左子节点 或者 右子节点 处。
    即 二叉排序树可能存在三种定义:
        左子节点 小于等于 当前节点,右子节点 大于 当前节点。
        左子节点 小于 当前节点,右子节点 大于等于 当前节点。
        左子节点 小于 当前节点,右子节点 大于 当前节点。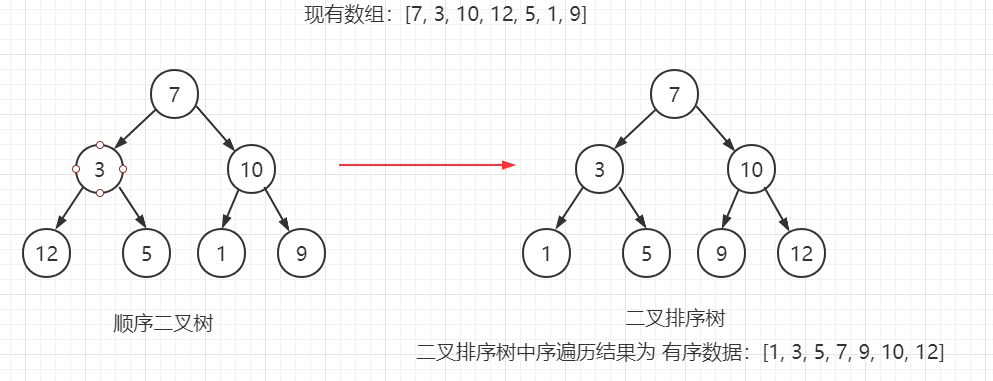
(2)BST 增、删、查 操作
此处规定 左子节点 小于 当前节点,右子节点 大于等于 当前节点。
【添加节点:】
若 待添加节点 小于 当前节点,则 递归向 当前节点 左子节点 进行添加操作。
若 待添加节点 大于等于 当前节点,则 递归向 当前节点 右子节点 进行添加操作。

【查找节点:】
若 待查找节点 等于 当前节点,则 查找成功。
若 待查找节点 小于 当前节点,则 递归向 左子节点 查找。
若 待查找节点 大于等于 当前节点,则 递归向 右子节点 查找。

【删除节点:】
删除节点可能存在三种情况:
    删除的是 叶子节点。
    删除的是 非叶子节点,且 只有一个子节点。
    删除的是 非叶子节点,且 有两个子节点。

若删除的是 叶子节点:
    Step1:先去查找需要删除的节点是否存在,存在则进行下面操作。
    Step2:若删除节点为 根节点,则根节点直接置 null。即 root = null;
    Step3:若删除节点不是 根节点,则 找到 待删除节点的 父节点,
        若 待删除节点为 父节点 的 左子节点,则将左子节点置 null。即 parent.left = null;
        若 待删除节点为 父节点 的 右子节点,则将右子节点置 null。即 parent.right = null;

若删除的是 非叶子节点,且 只有一个子节点。
    Step1 同上。
    Step2:若删除节点为 根节点,则根节点直接指向 子节点即可。
    Step3:找到 待删除节点的 父节点,并判断 待删除节点 子节点 是 左子节点 还是 右子节点。
        若 待删除节点为 父节点 的 左子节点,且 待删除节点 存在 左子节点,则 父节点的 左子节点 直接指向 删除节点的左子节点。即 parent.left = node.left;
        若 待删除节点为 父节点 的 左子节点,且 待删除节点 存在 右子节点,则 父节点的 左子节点 直接指向 删除节点的右子节点。即 parent.left = node.right;
        若 待删除节点为 父节点 的 右子节点,且 待删除节点 存在 左子节点,则 父节点的 右子节点 直接指向 删除节点的左子节点。即 parent.right = node.left;
        若 待删除节点为 父节点 的 右子节点,且 待删除节点 存在 右子节点,则 父节点的 右子节点 直接指向 删除节点的右子节点。即 parent.right = node.right;

若删除的是 非叶子节点,且 有两个子节点。
    Step1 同上。
    Step2:找到 待删除节点,并找到 其右子树最小值 或者 左子树最大值,
        删除找到的节点,并将其值置于 待删除节点处。
        即 保证将 左子树 的最大值 放置到 中间节点 或者 将 右子树 最小值 放到中间节点。
        使得 左子树的所有节点 小于 中间节点, 右子树的所有节点 大于等于 中间节点。


【代码实现:】
package com.lyh.tree;

import java.util.ArrayList;
import java.util.Arrays;
import java.util.List;

public class BinarySearchTree {
    private TreeNode7 root; // 设置根节点

    public static void main(String[] args) {
        // 构造二叉排序树
        BinarySearchTree binarySearchTree = new BinarySearchTree();
        int[] arrays = new int[]{7, 3, 10, 12, 5, 1, 9};
        for (int temp : arrays) {
            binarySearchTree.addNote(temp);
        }

        // 输出原数组
        System.out.println("原数组为: " + Arrays.toString(arrays));
        System.out.println("======================================");

        // 输出中序遍历结果
        System.out.println("二叉排序树中序遍历结果为: " + binarySearchTree.infixList());
        System.out.println("======================================");

        // 输出查找结果
        System.out.println("查找 10: " + binarySearchTree.search(10));
        System.out.println("查找 20: " + binarySearchTree.search(20));
        System.out.println("查找 9: " + binarySearchTree.search(9));
        System.out.println("======================================");

        // 输出查找节点的父节点
        System.out.println("查找 9: " + binarySearchTree.searchParent(9));
        System.out.println("查找 7: " + binarySearchTree.searchParent(7));
        System.out.println("======================================");

        // 输出删除后的 二叉搜索树
        for (int i = 0; i < arrays.length; i++) {
            System.out.println("删除 " + arrays[i] + " : " + binarySearchTree.deleteNode(arrays[i]));
            System.out.println("二叉排序树中序遍历结果为: " + binarySearchTree.infixList());
            System.out.println("======================================");
        }
    }

    /**
     * 添加节点
     * @param data 数据
     */
    public void addNote(int data) {
        if (root == null) {
            root = new TreeNode7(data);
            return;
        }
        root.addNode(new TreeNode7(data));
    }

    /**
     * 中序遍历
     * @return 中序遍历结果
     */
    public List infixList() {
        if (root == null) {
            System.out.println("为空树");
            return null;
        }
        return root.infixList(new ArrayList());
    }

    /**
     * 查找节点
     * @param data 待查找数据
     * @return 若查找失败返回 null
     */
    public TreeNode7 search(int data) {
        // 根节点不存在时,返回 null
        if (root == null) {
            return null;
        }
        return root.search(data);
    }

    /**
     * 查找节点的父节点
     * @param data 待查找数据
     * @return 若查找失败返回 null
     */
    public TreeNode7 searchParent(int data) {
        // 根节点不存在时,返回 null
        if (root == null) {
            return null;
        }
        return root.searchParent(data);
    }

    /**
     * 删除节点
     * @param data 待删除节点
     * @return 删除失败返回 -1,删除成功返回 0
     */
    public int deleteNode(int data) {
        // 先查找 待删除节点 是否存在
        TreeNode7 node = search(data);
        // 删除节点存在,则进行删除操作
        if (node != null) {
            // 查找待删除节点的父节点
            TreeNode7 parent = searchParent(data);

            // 删除节点不为根节点时,
            // 若删除的是 叶子节点,则判断当前 删除节点为 父节点的左子节点 还是 右子节点
            if (node.left == null && node.right == null) {
                // parent 为空,则删除节点为 根节点,直接将 根节点置 null
                if (parent == null) {
                    root = null;
                    return 0;
                }
                if (parent.left != null && parent.left.data == data) {
                    parent.left = null;
                } else {
                    parent.right = null;
                }
                return 0;
            }

            // 若删除的是 非叶子节点,且只有一个 左子节点。
            if (node.left != null && node.right == null) {
                // parent 为空,则删除节点为 根节点,直接赋值为 左子节点 即可
                if (parent == null) {
                    root = node.left;
                    return 0;
                }
                // 若待删除节点为 父节点的左子节点
                if (parent.left != null && parent.left.data == data) {
                    parent.left = node.left;
                } else {
                    // 若 待删除节点为 父节点的 右子节点
                    parent.right = node.left;
                }
                return 0;
            }

            // 若删除的是 非叶子节点,且只有一个 右子节点
            if (node.right != null && node.left == null) {
                // parent 为空,则删除节点为 根节点,直接赋值为 右子节点 即可
                if (parent == null) {
                    root = node.right;
                    return 0;
                }
                // 若待删除节点为 父节点的左子节点
                if (parent.left != null && parent.left.data == data) {
                    parent.left = node.right;
                } else {
                    // 若 待删除节点为 父节点的 右子节点
                    parent.right = node.right;
                }
                return 0;
            }

            // 若删除的是 非叶子节点,且有两个 子节点
            // 找到 右子树 最小值,并覆盖 待删除节点,则满足 二叉搜索树条件
            TreeNode7 minRightNode = node.right;
            while(minRightNode.left != null) {
                minRightNode = minRightNode.left;
            }
            // 记录 右子树最小值
            int minRightData = minRightNode.data;
            // 删除 右子树最小值
            deleteNode(minRightData);
            // 将最小值 覆盖 待删除节点,即完成 删除操作
            node.data = minRightData;
            return 0;
        }
        // 删除节点不存在,返回 -1,表示删除失败
        return -1;
    }
}

/**
 * 定义树节点
 */
class TreeNode7 {
    int data; // 保存节点数据
    TreeNode7 left; // 保存 左子节点
    TreeNode7 right; // 保存 右子节点

    public TreeNode7(int data) {
        this.data = data;
    }

    @Override
    public String toString() {
        return "TreeNode7{ data = " + data + ", left = " + left + ", right = " + right + " }";
    }

    /**
     * 中序遍历
     * @param result 中序遍历结果
     * @return 中序遍历结果
     */
    public List infixList(List result) {
        // 递归遍历 左子节点
        if (this.left != null) {
            this.left.infixList(result);
        }
        // 保存 当前节点
        result.add(this.data);
        // 递归遍历 右子节点
        if (this.right != null) {
            this.right.infixList(result);
        }
        return result;
    }

    /**
     * 添加节点
     * @param node 节点
     */
    public void addNode(TreeNode7 node) {
        // 节点不存在时,不添加
        if (node == null) {
            return;
        }
        // 节点存在时
        if (this.data > node.data) {
            // 数据小于当前节点时,在左子树进行添加
            if (this.left != null) {
                this.left.addNode(node);
            } else {
                this.left = node;
            }
        } else {
            // 数据大于等于当前节点是,在右子树进行添加
            if (this.right != null) {
                this.right.addNode(node);
            } else {
                this.right = node;
            }
        }
    }

    /**
     * 查找节点
     * @param data 待查找数据
     * @return 查找失败返回 null
     */
    public TreeNode7 search(int data) {
        // 当前节点 即为 待查找节点
        if (this.data == data) {
            return this;
        }
        // 若 当前节点 大于 待查找节点,则递归左子树进行查找
        if (this.data > data && this.left != null) {
            return this.left.search(data);
        }
        // 若 当前节点 小于等于 待查找节点,则递归右子树进行查找
        if (this.data <= data && this.right != null) {
            return this.right.search(data);
        }
        // 查找失败返回 null
        return null;
    }

    /**
     * 查找节点
     * @param data 待查找数据
     * @return 查找失败返回 null
     */
    public TreeNode7 searchParent(int data) {
        // 若当前节点 左子树 或者 右子树 查找数据成功,返回 当前节点
        if ((this.left != null && this.left.data == data) || (this.right != null && this.right.data == data)) {
            return this;
        }
        // 若 当前节点 大于 待查找节点,则递归 左子树查找
        if (this.data > data && this.left != null) {
            return this.left.searchParent(data);
        }
        // 若 当前节点 小于等于 待查找节点,则递归 右子树查找
        if (this.data <= data && this.right != null) {
            return this.right.searchParent(data);
        }
        // 查找失败,返回 null
        return null;
    }
}

【输出结果:】
原数组为: [7, 3, 10, 12, 5, 1, 9]
======================================
二叉排序树中序遍历结果为: [1, 3, 5, 7, 9, 10, 12]
======================================
查找 10: TreeNode7{ data = 10, left = TreeNode7{ data = 9, left = null, right = null }, right = TreeNode7{ data = 12, left = null, right = null } }
查找 20: null
查找 9: TreeNode7{ data = 9, left = null, right = null }
======================================
查找 9: TreeNode7{ data = 10, left = TreeNode7{ data = 9, left = null, right = null }, right = TreeNode7{ data = 12, left = null, right = null } }
查找 7: null
======================================
删除 7 : 0
二叉排序树中序遍历结果为: [1, 3, 5, 9, 10, 12]
======================================
删除 3 : 0
二叉排序树中序遍历结果为: [1, 5, 9, 10, 12]
======================================
删除 10 : 0
二叉排序树中序遍历结果为: [1, 5, 9, 12]
======================================
删除 12 : 0
二叉排序树中序遍历结果为: [1, 5, 9]
======================================
删除 5 : 0
二叉排序树中序遍历结果为: [1, 9]
======================================
删除 1 : 0
二叉排序树中序遍历结果为: [9]
======================================
删除 9 : 0
为空树
二叉排序树中序遍历结果为: null
======================================
10、平衡二叉树(AVL)
(1)什么是 平衡二叉树?
平衡二叉树(Balanced Binary Tree)也称为 自平衡二叉搜索树(Self Balanced Binary Search Tree),也称为 AVL 树(人名缩写)。用于提高 二叉搜索树 的查询效率。
其本质上 仍是 一颗 二叉搜索树,只是其会自动 旋转节点(平衡条件),用于保证 树的高度。
平衡条件:
每个节点 的 左、右子树 的高度差的绝对值 不超过 1。且 左、右两个子树 也是 平衡二叉树。
普通 二叉搜索树 构建如下:

平衡二叉搜索树构建如下:

(2)如何实现平衡?
当 左、右子树 出现高度差 大于 1 时,为了实现平衡,节点需要进行旋转。
【节点的 高度、深度:(此处仅个人理解,有不对的地方还望不吝赐教)】
当前节点的高度:从 当前节点 开始 到 叶子节点 最长路径 的节点数。
当前节点的深度:从 根节点 开始 到当前节点 最长路径 的节点数。
注:
此处假定 节点不存在时为 0。节点存在记为 1。
虽然树的 高度、深度相同,但具体到 某个节点的 高度、深度 不一定相同。
比如:
A
B C
E F
G
如上图所示,
B 节点 高度为 3(B->E->G,3个节点),深度为 2(A->B,2个节点)。
C 节点高度为 2(C->F,2个节点),深度为 2(A->C,两个节点)。
【旋转类型:】
左旋转。
右旋转。
双旋转(左旋转、右旋转)。
【左旋转:】
左子树高度 小于 右子树高度,且 高度差 大于 1,
此时 需要将 右子树节点 向左旋转,降低 右子树的高度。
步骤(某个节点需要旋转时):
Step1:创建一个新的节点,用于保存 当前节点的值。
Step2:将新节点的左子树 设置成 当前节点的 左子树。
Step3:将新节点的右子树 设置成 当前节点的 右子树的左子树。
Step4:将当前节点的值 设置成 右子树根节点的值。
Step5:将当前节点的右子树 设置成 右子树的右子树。
Step6:将当前节点的左子树 设置成 新节点。
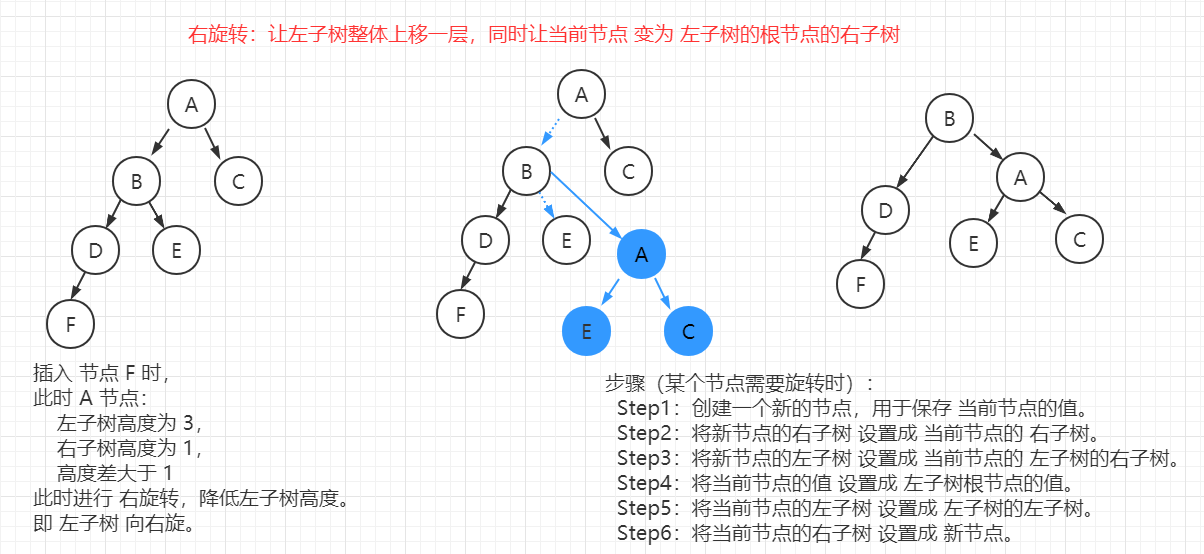
【右旋转:】
左子树高度 大于 右子树高度,且 高度差 大于 1,
此时 需要将 左子树节点 向右旋转,降低 左子树的高度。
步骤(某个节点需要旋转时):
Step1:创建一个新的节点,用于保存 当前节点的值。
Step2:将新节点的右子树 设置成 当前节点的 右子树。
Step3:将新节点的左子树 设置成 当前节点的 左子树的右子树。
Step4:将当前节点的值 设置成 左子树根节点的值。
Step5:将当前节点的左子树 设置成 右子树的左子树。
Step6:将当前节点的右子树 设置成 新节点。
【单一 左旋转、右旋转 出现的问题:】
只存在 左旋转、右旋转时,可能造成 死循环。需要两者结合使用。
比如:
插入节点 C 如下:
A
B
C
A 节点右子树高度为 2,左子树高度为 1,需要进行 左旋转。
左旋转后:
B
A
C
此时,B 节点左子树高度为 2,右子树高度为 1,需要进行 右旋转。
右旋转后:
A
B
C
发现右旋转后,又回到了最初的起点。从而出现死循环。
【双旋转:】
结合左旋转、右旋转。
先旋转 子节点,再旋转 当前节点。
步骤(存在两种情况):
情况一(当前节点符合右旋转时):
若当前节点 左子树 的 右子树的高度 大于 左子树 的 左子树的高度,
则先 对 当前节点的 左节点 进行 左旋转。
然后再 对当前节点 进行 右旋转。
情况二(当前节点符合左旋转时):
若当前节点 右子树 的 左子树的高度 大于 右子树的 右子树的高度,
则 先对 当前节点的 右节点 进行 右旋转。
然后再 对当前节点进行左旋转。


(3)代码实现
【代码实现:】
package com.lyh.tree;

import java.util.ArrayList;
import java.util.Arrays;
import java.util.List;

public class BalanceBinarySearchTree {
    private TreeNode8 root; // 设置根节点

    public static void main(String[] args) {
        int[] arrays = new int[]{3, 6, 7, 9, 10};
//        int[] arrays = new int[]{10, 11, 7, 6, 8, 9};
        System.out.println("原数组为: " + Arrays.toString(arrays));
        System.out.println("=====================================");

        // 构建普通的 二叉搜索树
        System.out.println("构建普通 二叉搜索树:");
        BalanceBinarySearchTree balanceBinarySearchTree2 = new BalanceBinarySearchTree();
        for (int temp : arrays) {
            balanceBinarySearchTree2.addNote2(temp);
        }
        System.out.println("中序遍历为: " + balanceBinarySearchTree2.infixList());
        // 输出根节点、以及根节点高度
        System.out.println(balanceBinarySearchTree2.root);
        System.out.println(balanceBinarySearchTree2.root.getHeight());
        System.out.println("=====================================");

        // 构建 平衡二叉树
        System.out.println("构建平衡二叉树:");
        BalanceBinarySearchTree balanceBinarySearchTree = new BalanceBinarySearchTree();
        for (int temp : arrays) {
            balanceBinarySearchTree.addNote(temp);
        }
        System.out.println("中序遍历为: " + balanceBinarySearchTree.infixList());
        // 输出根节点、以及根节点高度
        System.out.println(balanceBinarySearchTree.root);
        System.out.println(balanceBinarySearchTree.root.getHeight());
        System.out.println("=====================================");
    }

    /**
     * 添加节点(平衡二叉搜索树 添加节点的方式,节点会旋转)
     * @param data 数据
     */
    public void addNote(int data) {
        if (root == null) {
            root = new TreeNode8(data);
            return;
        }
        root.addNode(new TreeNode8(data));
    }

    /**
     * 添加节点(普通 二叉搜索树 添加节点的方式)
     * @param data 数据
     */
    public void addNote2(int data) {
        if (root == null) {
            root = new TreeNode8(data);
            return;
        }
        root.addNode2(new TreeNode8(data));
    }

    /**
     * 中序遍历
     * @return 中序遍历结果
     */
    public List infixList() {
        if (root == null) {
            System.out.println("为空树");
            return null;
        }
        return root.infixList(new ArrayList());
    }
}

/**
 * 定义树节点
 */
class TreeNode8 {
    int data; // 保存节点数据
    TreeNode8 left; // 保存 左子节点
    TreeNode8 right; // 保存 右子节点

    public TreeNode8(int data) {
        this.data = data;
    }

    @Override
    public String toString() {
        return "TreeNode8{ data = " + data + ", left = " + left + ", right = " + right + " }";
    }

    /**
     * 中序遍历
     *
     * @param result 中序遍历结果
     * @return 中序遍历结果
     */
    public List infixList(List result) {
        // 递归遍历 左子节点
        if (this.left != null) {
            this.left.infixList(result);
        }
        // 保存 当前节点
        result.add(this.data);
        // 递归遍历 右子节点
        if (this.right != null) {
            this.right.infixList(result);
        }
        return result;
    }

    /**
     * 添加节点(平衡二叉搜索树 添加节点的方式,节点会旋转)
     * @param node 节点
     */
    public void addNode(TreeNode8 node) {
        // 节点不存在时,不添加
        if (node == null) {
            return;
        }
        // 节点存在时
        if (this.data > node.data) {
            // 数据小于当前节点时,在左子树进行添加
            if (this.left != null) {
                this.left.addNode(node);
            } else {
                this.left = node;
            }
        } else {
            // 数据大于等于当前节点是,在右子树进行添加
            if (this.right != null) {
                this.right.addNode(node);
            } else {
                this.right = node;
            }
        }

        // 添加节点后需要判断 当前节点是否需要旋转
        // 当前节点左子树高度 大于 右子树高度,且差值超过 1,则需要进行 右旋转
        if (this.getLeftHeight() - this.getRightHeight() > 1) {
            // 当前节点 左子树 的左子节点高度 小于 左子树 的右子节点高度时,需要先对 左子树进行 左旋转
            if (this.left != null && this.left.getLeftHeight() < this.left.getRightHeight()) {
                this.left.leftRotate();
            }
            // 当前节点进行右旋转
            this.rightRotate();
            return;
        }
        // 当前节点右子树高度 大于 左子树高度,其差值超过 1,则需要进行 左旋转
        if (this.getRightHeight() - this.getLeftHeight() > 1) {
            // 当前节点 右子树 的左子节点高度 大于 右子树 的右子节点高度时,需要先对 右子树进行 右旋转
            if (this.right != null && this.right.getLeftHeight() > this.right.getRightHeight()) {
                this.right.rightRotate();
            }
            // 当前节点进行左旋转
            this.leftRotate();
        }
    }

    /**
     * 添加节点(普通 二叉搜索树 添加节点的方式)
     * @param node 节点
     */
    public void addNode2(TreeNode8 node) {
        // 节点不存在时,不添加
        if (node == null) {
            return;
        }
        // 节点存在时
        if (this.data > node.data) {
            // 数据小于当前节点时,在左子树进行添加
            if (this.left != null) {
                this.left.addNode2(node);
            } else {
                this.left = node;
            }
        } else {
            // 数据大于等于当前节点是,在右子树进行添加
            if (this.right != null) {
                this.right.addNode2(node);
            } else {
                this.right = node;
            }
        }
    }

    /**
     * 返回节点的高度
     * @return 节点的高度,节点不存在则返回 0。
     */
    public int getHeight() {
        return this == null ? 0 : Math.max(this.getLeftHeight(), this.getRightHeight()) + 1;
    }

    /**
     * 返回 左子树 的高度
     * @return 左子树的高度
     */
    public int getLeftHeight() {
        return this.left == null ? 0 : this.left.getHeight();
    }

    /**
     * 返回 右子树 的高度
     * @return 右子树的高度
     */
    public int getRightHeight() {
        return this.right == null ? 0 : this.right.getHeight();
    }

    /**
     * 节点进行左旋转
     */
    public void leftRotate() {
        // 创建一个新节点,并保存当前节点的值
        TreeNode8 newNode = new TreeNode8(this.data);
        // 新节点的 左子树设置成 当前节点的左子树
        newNode.left = this.left;
        // 新节点的 右子树设置成 当前节点的 右子树的左子树
        newNode.right = this.right.left;
        // 当前节点的值 设置成 其右子树 根节点的值
        this.data = this.right.data;
        // 当前节点的 左子树 设置成 新节点
        this.left = newNode;
        // 当前节点的 右子树 设置成 其右子树的右子树
        this.right = this.right.right;
    }

    /**
     * 节点进行右旋转
     */
    public void rightRotate() {
        // 创建一个新节点,用于保存当前节点的值
        TreeNode8 newNode = new TreeNode8(this.data);
        // 新节点的 左子树设置成 当前节点的 左子树的右子树
        newNode.left = this.left.right;
        // 新节点的 右子树设置成 当前节点的 右子树
        newNode.right = this.right;
        // 当前节点的值 设置成 其左子树 根节点的值
        this.data = this.left.data;
        // 当前节点的 左子树 设置成 其左子树的左子树
        this.left = this.left.left;
        // 当前节点的 右子树 设置成 其右子树的右子树
        this.right = newNode;
    }
}

【输出结果:】
原数组为: [3, 6, 7, 9, 10]
=====================================
构建普通 二叉搜索树:
中序遍历为: [3, 6, 7, 9, 10]
TreeNode8{ data = 3, left = null, right = TreeNode8{ data = 6, left = null, right = TreeNode8{ data = 7, left = null, right = TreeNode8{ data = 9, left = null, right = TreeNode8{ data = 10, left = null, right = null } } } } }
5
=====================================
构建平衡二叉树:
中序遍历为: [3, 6, 7, 9, 10]
TreeNode8{ data = 6, left = TreeNode8{ data = 3, left = null, right = null }, right = TreeNode8{ data = 9, left = TreeNode8{ data = 7, left = null, right = null }, right = TreeNode8{ data = 10, left = null, right = null } } }
3
=====================================
