win10系统下vmware+ubuntu安装+NS-3安装
tip:本篇是NS-3安装,vmware与ubuntu安装请看系列其他文章。
ps:以下仅记录了本人安装时遇到的各类问题。仅针对ubuntu。遇到其他问题&其他类型虚拟机请参考其他文章。
前言
信息网络建模与仿真这门课要装……具体的我也没学QAQ……好像这是个很nice的东西^ _ ^
操作环境:VMware Workstation 15 Pro
虚拟机发行版:ubuntu-20.04.1-desktop-amd64(64位虚拟机)
安装教程:参考我的同系列文章
NS安装包:直接通过linux shell获得ns-allinone-3.32
一、安装步骤
1.安装ns-3依赖
命令如下(示例):
 //缺少依赖、版本冲突什么的感觉安装不起来就用aptitude指令试一试:sudo aptitude install 加上软件包
//如果没有安装aptitude就sudo apt-get install aptitude
sudo apt-get install gcc g++ python python-dev  //这句会说需要选中python2 而非python之类的话,那么就再输入一个命令 sudo apt-get install python2;如此类推,后面出现类似提示也这么操作
sudo apt-get install mercurial
sudo apt-get install bzr
sudo apt-get install gdb valgrind
sudo apt-get install gsl-bin libgsl0-dev libgsl0ldbl    //这句在执行时出现错误libgsl0lbdl已经废弃,可以由其他软件包libgsl2取代,那么就输入sudo apt-get install libgsl2;诸如此类,后面出现类似提示也这么操作
sudo apt-get install flex bison libfl-dev
sudo apt-get install tcpdump
sudo apt-get install sqlite sqlite3 libsqlite3-dev
sudo apt-get install libxml2 libxml2-dev
sudo apt-get install libgtk2.0-0 libgtk2.0-dev
sudo apt-get install vtun lxc
sudo apt-get install uncrustify
sudo apt-get install doxygen graphviz imagemagick
sudo apt-get install texlive texlive-pdf texlive-latex-extra texlive-generic-extra texlive-generic-recommended     //这句在执行时出现错误E:无法定位软件包texlive-pdf 把不可以定位的软件包先删掉,重新执行这个指令,安装其余软件包。
sudo apt-get install texinfo dia texlive texlive-pdf texlive-latex-extra texlive-extra-utils texlive-generic-recommended texi2html
sudo apt-get install python-sphinx dia
sudo apt-get install python-pygraphviz python-kiwi python-pygoocanvas libgoocanvas-dev  //这里可能也会报错无法定位软件包blablabla看下面解决办法
sudo apt-get install qt4-qmake   //如果这一步不行 可以改成sudo apt-get install qt5-default
sudo apt-get install qt4-dev-tools //这个是后边NetAnim仿真界面需要依赖的软件包
sudo apt-get install libboost-signals-dev libboost-filesystem-dev
sudo apt-get install openmpi-bin openmpi-doc libopenmpi-dev
sudo apt-get install cmake libc6-dev libc6-dev-i386 libclang-dev llvm-dev automake
总结出现问题解决方案
- [1] 缺少依赖、版本冲突什么的安装不了
用aptitude指令试一试:
sudo aptitude install 加上软件包名称
- [2] 没有安装aptitude
sudo apt-get install aptitude
- [3] 需要选中python2 而非python之类:
那么就再输入一个命令 sudo apt-get install python2;如此类推,后面出现类似提示也这么操作
- [4] 执行时出现错误E:无法定位软件包texlive-pdf
把不可以定位的软件包先删掉,重新执行原来指令-无法定位的软件包名称,安装其余软件包。
- [5] 执行时出现错误libgsl0lbdl已经废弃,可以由其他软件包libgsl2取代
那么就输入sudo apt-get install libgsl2;诸如此类,出现类似提示也这么操作
- [6] E:无法定位软件包 python-pygoocanvas E: 无法定位软件包 libgoocanvas-dev
ps:这个加了之后能解决很多无法定位软件包的问题
step1 安装vim
sudo apt-get install vim
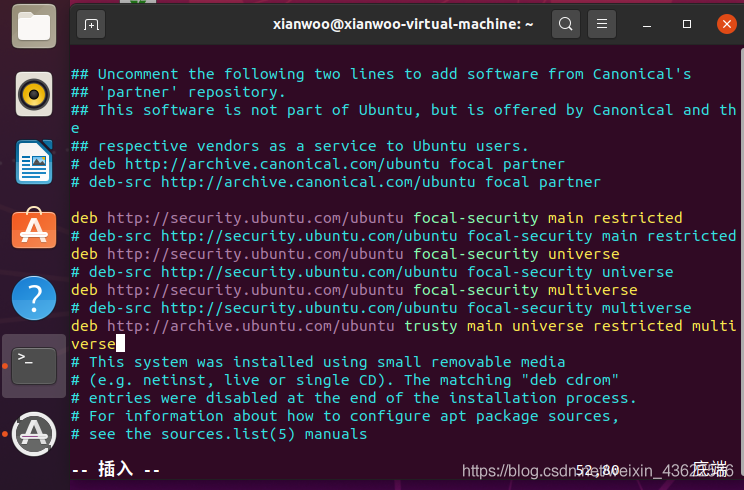
step2 编辑软件源文件sources.list
sudo vim /etc/apt/sources.list
step3 添加源
在sources.list文件末尾添加
deb http://archive.ubuntu.com/ubuntu/ trusty main universe restricted multiverse
step4 保存退出
:wq
step5 更新软件源
sudo apt-get update
step6 重新安装
sudo apt-get install ……
评论区有同学建议使用清华镜像源,对于没有科学上网的朋友的网速会很友好,所以给出使用清华镜像源的方式,请参考我的其他博客。
2.下载NS-3安装包
参考官网:
This option is for the new user who wishes to download and experiment
with the most recently released and packaged version of ns-3. ns-3
publishes its releases as compressed source archives, sometimes
referred to as a tarball. A tarball is a particular format of software
archive where multiple files are bundled together and the archive is
usually compressed. The process for downloading ns-3 via tarball is
simple; you just have to pick a release, download it and uncompress
it.Let’s assume that you, as a user, wish to build ns-3 in a local
directory called workspace. If you adopt the workspace directory
approach, you can get a copy of a release by typing the following into
your Linux shell (substitute the appropriate version numbers, of
course)
$ cd
$ mkdir workspace
$ cd workspace
$ wget https://www.nsnam.org/release/ns-allinone-3.32.tar.bz2
$ tar xjf ns-allinone-3.32.tar.bz2
评论区给的建议:安装在/opt/nsnam目录下面,这样方便日后删除
如果你和我一样这个虚拟机只是单纯为了跑这一个软件交作业……那就当上面没说Orz
Notice the use above of the wget utility, which is a command-line tool
to fetch objects from the web; if you do not have this installed, you
can use a browser for this step.Following these steps, if you change into the directory
ns-allinone-3.32, you should see a number of files and directories
$ cd ns-allinone-3.32
$ ls
bake      constants.py   ns-3.32                README
build.py  netanim-3.108  pybindgen-0.21.0       util.py
到这里ns-3发行版构建的准备工作就完成了
3.构建ns-
前面使用tarball下载,则进入、workspace/ns-allinone-3.32/ns-3.32这个目录下面,输入
$ ./build.py --enable-examples --enable-tests
等待一会……
如果没有问题的话,最终应该看到以下以下信息:
Waf: Leaving directory '/path/to/workspace/ns-allinone-3.32/ns-3.32/build'
'build' finished successfully (6m25.032s)

Modules built:
antenna                aodv                      applications
bridge                 buildings                 config-store
core                   csma                      csma-layout
dsdv                   dsr                       energy
fd-net-device          flow-monitor              internet
internet-apps          lr-wpan                   lte
mesh                   mobility                  mpi
netanim (no Python)    network                   nix-vector-routing
olsr                   point-to-point            point-to-point-layout
propagation            sixlowpan                 spectrum
stats                  tap-bridge                test (no Python)
topology-read          traffic-control           uan
virtual-net-device     visualizer                wave
wifi                   wimax

Modules not built (see ns-3 tutorial for explanation):
brite                  click                     openflow

Leaving directory ./ns-3.32
关于未构建模块的部分
Modules not built (see ns-3 tutorial for explanation):
brite                     click
官网解释如下:
This just means that some ns-3 modules that have dependencies on
outside libraries may not have been built, or that the configuration
specifically asked not to build them. It does not mean that the
simulator did not build successfully or that it will provide wrong
results for the modules listed as being built.
简单来说,就是没什么影响,并不意味着无法成功构建。
ok,继续跟着官网走,用waf构建
到目前为止,我们已经使用build.py脚本或
bake工具开始构建ns-3。这些工具对于构建ns-3和支持库很有用,它们调用ns-3目录来调用Waf构建工具进行实际构建。Waf的安装与ns-3源代码捆绑在一起。大多数用户迅速过渡到直接使用Waf来配置和构建ns-3。因此,要继续,请将您的工作目录更改为最初构建的ns-3目录。这不是严格要求的,但是稍微绕道并了解如何对项目的配置进行更改将非常有价值。您可能要做的最有用的配置更改是构建代码的优化版本。默认情况下,您已经配置了项目以构建调试版本。让我们告诉项目进行优化的构建。为了向Waf解释它应该进行包括示例和测试的优化构建,您将需要执行以下命令:
$ ./waf clean
$ ./waf configure --build-profile=optimized --enable-examples --enable-tests
等待一会后,能看见类似以下内容的输出:
Setting top to                           : /home/ns3user/workspace/bake/source/ns-3-dev
Setting out to                           : /home/ns3user/workspace/bake/source/ns-3-dev/build
Checking for 'gcc' (C compiler)          : /usr/bin/gcc
Checking for cc version                  : 7.3.0
Checking for 'g++' (C++ compiler)        : /usr/bin/g++
Checking for compilation flag -march=native support : ok
Checking for compilation flag -Wl,--soname=foo support : ok
Checking for compilation flag -std=c++11 support       : ok
Checking boost includes                                : headers not found, please provide a --boost-includes argument (see help)
Checking boost includes                                : headers not found, please provide a --boost-includes argument (see help)
Checking for program 'python'                          : /usr/bin/python
Checking for python version >= 2.3                     : 2.7.15
python-config                                          : /usr/bin/python-config
Asking python-config for pyembed '--cflags --libs --ldflags' flags : yes
Testing pyembed configuration                                      : yes
Asking python-config for pyext '--cflags --libs --ldflags' flags   : yes
Testing pyext configuration                                        : yes
Checking for compilation flag -fvisibility=hidden support          : ok
Checking for compilation flag -Wno-array-bounds support            : ok
Checking for pybindgen location                                    : ../pybindgen (guessed)
Checking for python module 'pybindgen'                             : 0.21.0
Checking for pybindgen version                                     : 0.21.0
Checking for code snippet                                          : yes
Checking for types uint64_t and unsigned long equivalence          : no
Checking for code snippet                                          : no
Checking for types uint64_t and unsigned long long equivalence     : yes
Checking for the apidefs that can be used for Python bindings      : gcc-LP64
Checking for internal GCC cxxabi                                   : complete
Checking for python module 'pygccxml'                              : not found
Checking for click location                                        : not found
Checking for program 'pkg-config'                                  : /usr/bin/pkg-config
Checking for 'gtk+-3.0'                                            : not found
Checking for 'libxml-2.0'                                          : yes
checking for uint128_t                                             : not found
checking for __uint128_t                                           : yes
Checking high precision implementation                             : 128-bit integer (default)
Checking for header stdint.h                                       : yes
Checking for header inttypes.h                                     : yes
Checking for header sys/inttypes.h                                 : not found
Checking for header sys/types.h                                    : yes
Checking for header sys/stat.h                                     : yes
Checking for header dirent.h                                       : yes
Checking for header stdlib.h                                       : yes
Checking for header signal.h                                       : yes
Checking for header pthread.h                                      : yes
Checking for header stdint.h                                       : yes
Checking for header inttypes.h                                     : yes
Checking for header sys/inttypes.h                                 : not found
Checking for library rt                                            : yes
Checking for header sys/ioctl.h                                    : yes
Checking for header net/if.h                                       : yes
Checking for header net/ethernet.h                                 : yes
Checking for header linux/if_tun.h                                 : yes
Checking for header netpacket/packet.h                             : yes
Checking for NSC location                                          : not found
Checking for 'sqlite3'                                             : not found
Checking for header linux/if_tun.h                                 : yes
Checking for python module 'gi'                                    : 3.26.1
Checking for python module 'gi.repository.GObject'                 : ok
Checking for python module 'cairo'                                 : ok
Checking for python module 'pygraphviz'                            : 1.4rc1
Checking for python module 'gi.repository.Gtk'                     : ok
Checking for python module 'gi.repository.Gdk'                     : ok
Checking for python module 'gi.repository.Pango'                   : ok
Checking for python module 'gi.repository.GooCanvas'               : ok
Checking for program 'sudo'                                        : /usr/bin/sudo
Checking for program 'valgrind'                                    : not found
Checking for 'gsl'                                                 : not found
python-config                                                      : not found
Checking for compilation flag -fstrict-aliasing support            : ok
Checking for compilation flag -fstrict-aliasing support            : ok
Checking for compilation flag -Wstrict-aliasing support            : ok
Checking for compilation flag -Wstrict-aliasing support            : ok
Checking for program 'doxygen'                                     : /usr/bin/doxygen
---- Summary of optional NS-3 features:
Build profile                 : optimized
Build directory               :
BRITE Integration             : not enabled (BRITE not enabled (see option --with-brite))
DES Metrics event collection  : not enabled (defaults to disabled)
Emulation FdNetDevice         : enabled
Examples                      : enabled
File descriptor NetDevice     : enabled
GNU Scientific Library (GSL)  : not enabled (GSL not found)
Gcrypt library                : not enabled (libgcrypt not found: you can use libgcrypt-config to find its location.)
GtkConfigStore                : not enabled (library 'gtk+-3.0 >= 3.0' not found)
MPI Support                   : not enabled (option --enable-mpi not selected)
NS-3 Click Integration        : not enabled (nsclick not enabled (see option --with-nsclick))
NS-3 OpenFlow Integration     : not enabled (Required boost libraries not found)
Network Simulation Cradle     : not enabled (NSC not found (see option --with-nsc))
PlanetLab FdNetDevice         : not enabled (PlanetLab operating system not detected (see option --force-planetlab))
PyViz visualizer              : enabled
Python API Scanning Support   : not enabled (Missing 'pygccxml' Python module)
Python Bindings               : enabled
Real Time Simulator           : enabled
SQlite stats data output      : not enabled (library 'sqlite3' not found)
Tap Bridge                    : enabled
Tap FdNetDevice               : enabled
Tests                         : enabled
Threading Primitives          : enabled
Use sudo to set suid bit      : not enabled (option --enable-sudo not selected)
XmlIo                         : enabled
'configure' finished successfully (6.387s)
4.测试ns-
运行./test.py 来运行ns-3的测试代码,如果权限不够,就改为sudo ./test.py
稍等片刻,应该能看到如下内容:
Waf: Entering directory `/path/to/workspace/ns-3-allinone/ns-3-dev/build'
Waf: Leaving directory `/path/to/workspace/ns-3-allinone/ns-3-dev/build'
'build' finished successfully (1.799s)

Modules built:
aodv                      applications              bridge
click                     config-store              core
csma                      csma-layout               dsdv
emu                       energy                    flow-monitor
internet                  lte                       mesh
mobility                  mpi                       netanim
network                   nix-vector-routing        ns3tcp
ns3wifi                   olsr                      openflow
point-to-point            point-to-point-layout     propagation
spectrum                  stats                     tap-bridge
template                  test                      tools
topology-read             uan                       virtual-net-device
visualizer                wifi                      wimax

PASS: TestSuite wifi-interference
PASS: TestSuite histogram

...

PASS: TestSuite object
PASS: TestSuite random-number-generators
92 of 92 tests passed (92 passed, 0 failed, 0 crashed, 0 valgrind errors)
接下来,常规操作helloworld来一下。
$ ./waf --run hello-simulator
获得结果:

完成撒花~❀❀❀