Person ReID
行人重识别(Person Re-identification)是目前深度学习计算机视觉领域内非常火热同时比较前沿的研究课题,这几年关于ReID的paper不少,开源到网上的也不少,这里我来带领大家来跑一次一个基于detect+reid方法的reid开源项目。
一 . 参考文章:
https://blog.csdn.net/ruotianxia/article/details/78540082
https://blog.csdn.net/weixin_36697338/article/details/82918049
https://blog.csdn.net/HUXINY/article/details/83990628 (这篇是我的,该项目是在fast-rcnn的基础上实现的,fast-rcnn工程结构和代码和fasterRCNN极为相似,很多东西都能照着改)
二 . 项目地址
Joint Detection and Identification Feature Learning for Person Search
https://github.com/ShuangLI59/person_search
三 . 准备工作
安装openmpi 1.10.7
因为我才用的是CPU运行环境,不需要GPU,所以正常安装就可以了。(openmpi上云计算的时候有学过,MPI全称是message passing interface,即信息传递接口,是用于跨节点通讯的基础软件环境。它提供让相关进程之间进行通信,同步等操作的API,是并行计算的牛逼玩意)
安装可参考下面这篇文章:
https://www.xuebuyuan.com/3225420.html
下载训练好的caffemodel
如果你不想重新开训练数据的话,可以使用下面地址提供的caffemodel(需要翻墙,不想翻的可以在我的CSND里下载),因为CPU环境训练慢的要死。
https://drive.google.com/open?id=0B67_d0rLRTQYbVFENlVjdXRSWVE
https://download.csdn.net/download/huxiny/10787167
四 . 下载编译Person Search
拷贝项目
git clone --recursive https://github.com/ShuangLI59/person_search.git
修改几个文件
该项目是给予fastRcnn改写的,工程结构跟fasterRCNN很像,要使用CPU环境,跟fasterRCNN的改动类似。
① . 修改person_search/lib/setup.py文件,修改后如下:
(注释掉 # ONLY CPU 下的内容)
# --------------------------------------------------------
# Fast R-CNN
# Copyright (c) 2015 Microsoft
# Licensed under The MIT License [see LICENSE for details]
# Written by Ross Girshick
# --------------------------------------------------------

import os
from os.path import join as pjoin
from setuptools import setup
from distutils.extension import Extension
from Cython.Distutils import build_ext
import subprocess
import numpy as np

def find_in_path(name, path):
    "Find a file in a search path"
    # Adapted fom
    # http://code.activestate.com/recipes/52224-find-a-file-given-a-search-path/
    for dir in path.split(os.pathsep):
        binpath = pjoin(dir, name)
        if os.path.exists(binpath):
            return os.path.abspath(binpath)
    return None


def locate_cuda():
    """Locate the CUDA environment on the system

    Returns a dict with keys 'home', 'nvcc', 'include', and 'lib64'
    and v在这里插入代码片alues giving the absolute path to each directory.

    Starts by looking for the CUDAHOME env variable. If not found, everything
    is based on finding 'nvcc' in the PATH.
    """

    # first check if the CUDAHOME env variable is in use
    if 'CUDAHOME' in os.environ:
        home = os.environ['CUDAHOME']
        nvcc = pjoin(home, 'bin', 'nvcc')
    else:
        # otherwise, search the PATH for NVCC
        default_path = pjoin(os.sep, 'usr', 'local', 'cuda', 'bin')
        nvcc = find_in_path('nvcc', os.environ['PATH'] + os.pathsep + default_path)
        if nvcc is None:
            raise EnvironmentError('The nvcc binary could not be '
                'located in your $PATH. Either add it to your path, or set $CUDAHOME')
        home = os.path.dirname(os.path.dirname(nvcc))

    cudaconfig = {'home':home, 'nvcc':nvcc,
                  'include': pjoin(home, 'include'),
                  'lib64': pjoin(home, 'lib64')}
    for k, v in cudaconfig.iteritems():
        if not os.path.exists(v):
            raise EnvironmentError('The CUDA %s path could not be located in %s' % (k, v))

    return cudaconfig
# ONLY CPU
#CUDA = locate_cuda()


# Obtain the numpy include directory.  This logic works across numpy versions.
try:
    numpy_include = np.get_include()
except AttributeError:
    numpy_include = np.get_numpy_include()

def customize_compiler_for_nvcc(self):
    """inject deep into distutils to customize how the dispatch
    to gcc/nvcc works.

    If you subclass UnixCCompiler, it's not trivial to get your subclass
    injected in, and still have the right customizations (i.e.
    distutils.sysconfig.customize_compiler) run on it. So instead of going
    the OO route, I have this. Note, it's kindof like a wierd functional
    subclassing going on."""

    # tell the compiler it can processes .cu
    self.src_extensions.append('.cu')

    # save references to the default compiler_so and _comple methods
    default_compiler_so = self.compiler_so
    super = self._compile

    # now redefine the _compile method. This gets executed for each
    # object but distutils doesn't have the ability to change compilers
    # based on source extension: we add it.
    def _compile(obj, src, ext, cc_args, extra_postargs, pp_opts):
        if os.path.splitext(src)[1] == '.cu':
            # use the cuda for .cu files
            # ONLY CPU
            #self.set_executable('compiler_so', CUDA['nvcc'])
            # use only a subset of the extra_postargs, which are 1-1 translated
            # from the extra_compile_args in the Extension class
            postargs = extra_postargs['nvcc']
        else:
            postargs = extra_postargs['gcc']

        super(obj, src, ext, cc_args, postargs, pp_opts)
        # reset the default compiler_so, which we might have changed for cuda
        self.compiler_so = default_compiler_so

    # inject our redefined _compile method into the class
    self._compile = _compile


# run the customize_compiler
class custom_build_ext(build_ext):
    def build_extensions(self):
        customize_compiler_for_nvcc(self.compiler)
        build_ext.build_extensions(self)


ext_modules = [
    Extension(
        "utils.cython_bbox",
        ["utils/bbox.pyx"],
        extra_compile_args={'gcc': ["-Wno-cpp", "-Wno-unused-function"]},
        include_dirs = [numpy_include]
    ),
    Extension(
        "nms.cpu_nms",
        ["nms/cpu_nms.pyx"],
        extra_compile_args={'gcc': ["-Wno-cpp", "-Wno-unused-function"]},
        include_dirs = [numpy_include]
    ),
    # ONLY CPU
    #Extension('nms.gpu_nms',
    #    ['nms/nms_kernel.cu', 'nms/gpu_nms.pyx'],
    #    library_dirs=[CUDA['lib64']],
    #    libraries=['cudart'],
    #    language='c++',
    #    runtime_library_dirs=[CUDA['lib64']],
        # this syntax is specific to this build system
        # we're only going to use certain compiler args with nvcc and not with
        # gcc the implementation of this trick is in customize_compiler() below
    #    extra_compile_args={'gcc': ["-Wno-unused-function"],
    #                        'nvcc': ['-arch=sm_35',
    #                                 '--ptxas-options=-v',
    #                                 '-c',
    #                                 '--compiler-options',
    #                                 "'-fPIC'"]},
    #    include_dirs = [numpy_include, CUDA['include']]
    #),
]

setup(
    name='fast_rcnn',
    ext_modules=ext_modules,
    # inject our custom trigger
    cmdclass={'build_ext': custom_build_ext},
)
② . 修改person_search/lib/fast_rcnn/nms_wrapper.py文件内容,修改后如下:
# --------------------------------------------------------
# Fast R-CNN
# Copyright (c) 2015 Microsoft
# Licensed under The MIT License [see LICENSE for details]
# Written by Ross Girshick
# --------------------------------------------------------

from fast_rcnn.config import cfg
#from nms.gpu_nms import gpu_nms
from nms.cpu_nms import cpu_nms

def nms(dets, thresh, force_cpu=False):
    """Dispatch to either CPU or GPU NMS implementations."""

    if dets.shape[0] == 0:
        return []
    #if cfg.USE_GPU_NMS and not force_cpu:
    #    return gpu_nms(dets, thresh, device_id=cfg.GPU_ID)
    else:
        return cpu_nms(dets, thresh)
使用cmake生成makefile,编译,安顺序执行
cd caffe
mkdir build
cd build
sudo cmake .. -DUSE_MPI=ON
sudo make
sudo make install
编译lib
cd lib
sudo make
放置模型
在项目根目录下创建utput/psdb_train/resnet50/
将训练好的resnet50_iter_50000.caffemodel放到该路径下
五 . 运行demo
cd tools
python2.7 demo.py --gpu -1
下面是运行demo遇到的问题及解决办法
ImportError: No module named mpi4py
解决办法:安装mpi4py
python2.7 -m ipip install mpi4py
路径错误
解决办法:
将person_search/tools/下的demo.py的某些路径变为绝对路径。
将–gpu默认值改为-1(CPU运行),方便运行命令。
报错找不到caffemodel,明明路径指定对了。
原因:路径太长了,换一个短一点的路径
在这篇文章找到答案:
https://blog.csdn.net/u013541799/article/details/60583262
别忘记把query_img和gallery_imgs的路径改成绝对路径
出现错误 IOError: cannot write mode RGBA as JPEG
原因是jpg图像不支持RGBA图像(A是透明度),将图像存储为 png格式就好了。
下面是我修改后的person_search/tools/demo.py文件:
import _init_paths

import argparse
import time
import os
import sys
import os.path as osp
from glob import glob

import numpy as np
import matplotlib as mpl
import matplotlib.pyplot as plt
import caffe
from mpi4py import MPI

from fast_rcnn.test_probe import demo_exfeat
from fast_rcnn.test_gallery import demo_detect
from fast_rcnn.config import cfg, cfg_from_file, cfg_from_list


def main(args):
    if args.cfg_file is not None:
        cfg_from_file(args.cfg_file)
    if args.set_cfgs is not None:
        cfg_from_list(args.set_cfgs)

    # Setup caffe
    if args.gpu >= 0:
        caffe.mpi_init()
        caffe.set_mode_gpu()
        caffe.set_device(cfg.GPU_ID)
    else:
        caffe.mpi_init()
        caffe.set_mode_cpu()

    # Get query image and roi
    query_img = '/home/pzs/husin/Person-reid/person_search/demo/query.jpg'
    query_roi = [0, 0, 466, 943]  # [x1, y1, x2, y2]

    # Extract feature of the query person
    net = caffe.Net(args.probe_def, '/home/pzs/husin/Person-reid/resnet50_iter_50000.caffemodel', caffe.TEST)
    query_feat = demo_exfeat(net, query_img, query_roi)
    del net  # Necessary to release cuDNN conv static workspace

    # Get gallery images
    gallery_imgs = sorted(glob('/home/pzs/husin/Person-reid/person_search/demo/gallery*.jpg'))

    # Detect and extract feature of persons in each gallery image
    net = caffe.Net(args.gallery_def, '/home/pzs/husin/Person-reid/resnet50_iter_50000.caffemodel', caffe.TEST)

    # Necessary to warm-up the net, otherwise the first image results are wrong
    # Don't know why. Possibly a bug in caffe's memory optimization.
    # Nevertheless, the results are correct after this warm-up.
    demo_detect(net, query_img)

    for gallery_img in gallery_imgs:
        print gallery_img, '...'
        boxes, features = demo_detect(net, gallery_img,
                                      threshold=args.det_thresh)
        if boxes is None:
            print gallery_img, 'no detections'
            continue
        # Compute pairwise cosine similarities,
        #   equals to inner-products, as features are already L2-normed
        similarities = features.dot(query_feat)

        # Visualize the results
        fig, ax = plt.subplots(figsize=(16, 9))
        ax.imshow(plt.imread(gallery_img))
        #husin add
        #plt.show()
        plt.axis('off')
        for box, sim in zip(boxes, similarities):
            x1, y1, x2, y2, _ = box
            ax.add_patch(
                plt.Rectangle((x1, y1), x2 - x1, y2 - y1,
                              fill=False, edgecolor='#4CAF50', linewidth=3.5))
            ax.add_patch(
                plt.Rectangle((x1, y1), x2 - x1, y2 - y1,
                              fill=False, edgecolor='white', linewidth=1))
            ax.text(x1 + 5, y1 - 18, '{:.2f}'.format(sim),
                    bbox=dict(facecolor='#4CAF50', linewidth=0),
                    fontsize=20, color='white')
        plt.tight_layout()
        #fig.savefig(gallery_img.replace('gallery', 'result'))
        fig.savefig('/home/pzs/husin/Person-reid/person_search/demo/result.png')
        plt.show()
        plt.close(fig)
    del net


if __name__ == '__main__':
    parser = argparse.ArgumentParser(description='Person Search Demo')
    parser.add_argument('--gpu',
                        help='GPU id to be used, -1 for CPU. Default: 0',
                        type=int, default=-1)
    parser.add_argument('--gallery_def',
                        help='prototxt file defining the gallery network',
                        default='/home/pzs/husin/Person-reid/person_search/models/psdb/resnet50/eval_gallery.prototxt')
    parser.add_argument('--probe_def',
                        help='prototxt file defining the probe network',
                        default='/home/pzs/husin/Person-reid/person_search/models/psdb/resnet50/eval_probe.prototxt')
    parser.add_argument('--net', dest='caffemodel',
                        help='path to trained caffemodel',
                        default='/home/pzs/husin/Person-reid/person_search/output/psdb_train/resnet50/resnet50_iter_50000.caffemodel')
    parser.add_argument('--det_thresh',
                        help="detection score threshold to be evaluated",
                        type=float, default=0.75)
    parser.add_argument('--cfg', dest='cfg_file',
                        help='optional config file',
                        default='/home/pzs/husin/Person-reid/person_search/experiments/cfgs/resnet50.yml')
    parser.add_argument('--set', dest='set_cfgs',
                        help='set config keys', default=None,
                        nargs=argparse.REMAINDER)
    args = parser.parse_args()
    main(args)
运行结果
一共会输出5张图片,这是第一张:
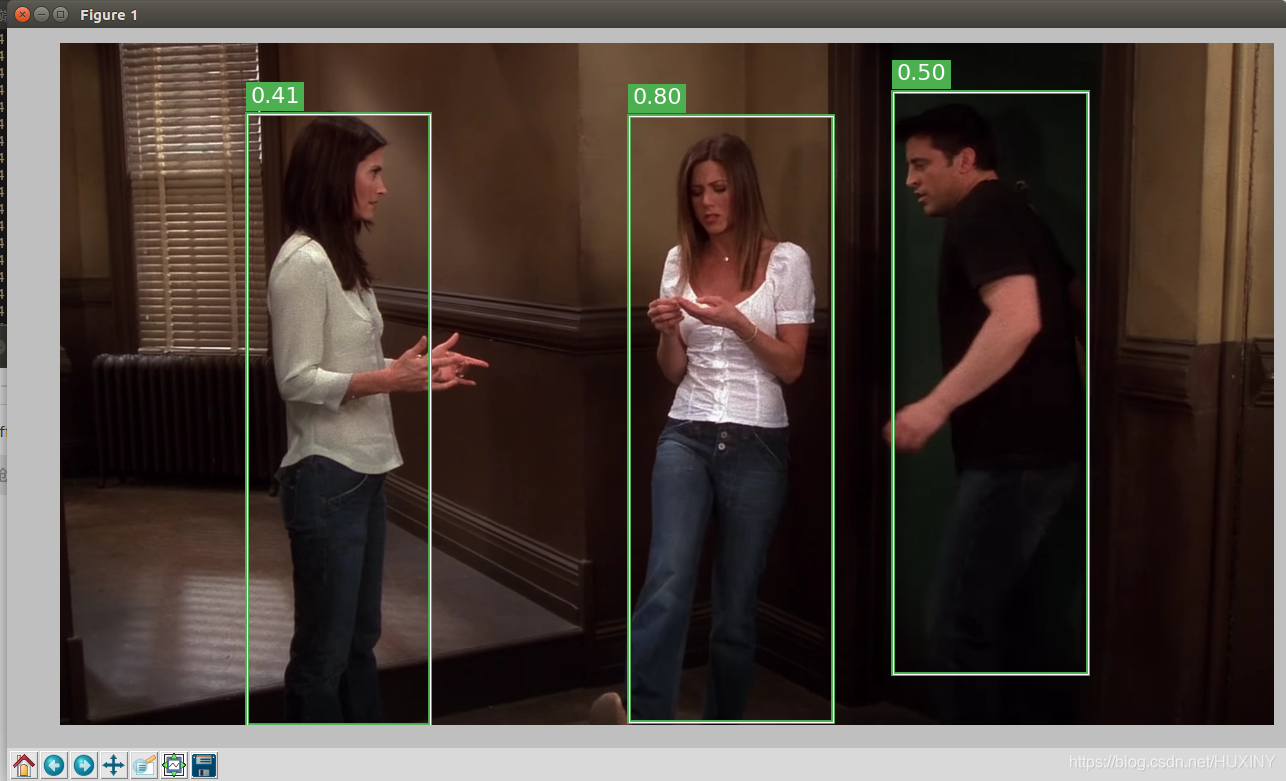
接下来会写一篇关于demo.py代码分析的文章。
学长广告
在这里为自己打个广告
学长亲自接计算机毕业设计:
有意者q746876041