1.为什么要有集群
由于Redis主从复制架构每个数据库都要保存整个集群中的所有数据,容易形成木桶效应,所以Redis3.0之后的版本添加特性就是集群(Cluster)
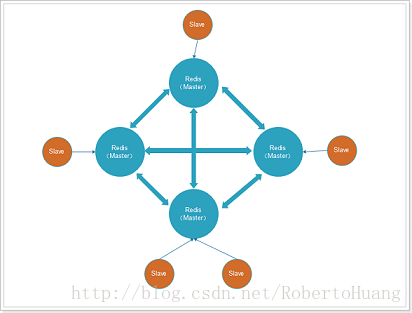
2.Redis集群架构说明

架构细节:
(1)所有的redis节点彼此互联(PING-PONG机制),内部使用二进制协议优化传输速度和带宽.
(2)节点的fail是通过集群中超过半数的master节点检测失效时才生效.
(3)客户端与redis节点直连,不需要中间proxy层.客户端不需要连接集群所有节点,连接集群中任何一个可用节点即可
(4)redis-cluster把所有的物理节点映射到[0-16383]slot上,cluster 负责维护node<->slot<->key
3.Redis Cluster环境搭建
3.1 分别修改配置文件,将端口分别设置为:6379、6380、6381,同时要设置pidfile文件为不同的路径。并且允许集群模式,修改集群配置文件指向地址,并且开启远程访问
修改配置文件
# vim /opt/redis/6379/6379.conf
# 开启守护进程模式
daemonize yes
# 修改启动端口为6379
port 6379
# 修改pidfile指向路径
pidfile /opt/redis/6379/redis_6379.pid
# 开启允许集群
cluster-enabled yes
# 修改集群配置文件指向路径
cluster-config-file nodes-6379.conf
# 注释一下内容开启远程访问
# bind 127.0.0.1
# 关闭保护模式
protected-mode no
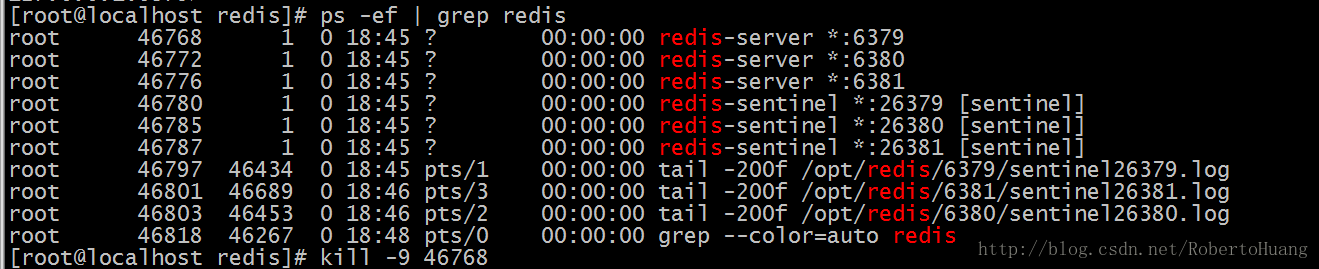
以此类推,修改端口6380及6381配置。3.2 分别启动redis实例
# cd /opt/redis/redis-3.2.8/bin
# ./redis-server /opt/redis/6379/6379.conf
# ./redis-server /opt/redis/6380/6380.conf
# ./redis-server /opt/redis/6381/6381.conf
3.3 查看redis状态

说明redis已经是以集群方式启动了,但是redis之间关系还没确定下来
3.4 因为redis-trib.rb是由ruby语言编写的所以需要安装ruby环境
安装ruby环境
# yum -y install zlib ruby rubygems

自行上传redis-3.2.1.gem然后安装
# gem install -l redis-3.2.1.gem
3.5 建立集群Redis关系
首先,进入redis的安装包路径下
# cd /opt/redis/redis-3.2.8/src

执行命令:
# ./redis-trib.rb create --replicas 0 192.168.29.128:6379 192.168.29.128:6380 192.168.29.128:6381

说明:--replicas 0:指定了从数据的数量为0
注意:这里不能使用127.0.0.1,否则在Jedis客户端使用时无法连接到!
3.6 如果出现如下异常
/usr/local/share/gems/gems/redis-3.2.1/lib/redis/client.rb:113:in `call': ERR Slot 0 is already busy (Redis::CommandError)
        from /usr/local/share/gems/gems/redis-3.2.1/lib/redis.rb:2556:in `block in method_missing'
        from /usr/local/share/gems/gems/redis-3.2.1/lib/redis.rb:37:in `block in synchronize'
        from /usr/share/ruby/monitor.rb:211:in `mon_synchronize'
        from /usr/local/share/gems/gems/redis-3.2.1/lib/redis.rb:37:in `synchronize'
        from /usr/local/share/gems/gems/redis-3.2.1/lib/redis.rb:2555:in `method_missing'
        from ./redis-trib.rb:212:in `flush_node_config'
        from ./redis-trib.rb:776:in `block in flush_nodes_config'
        from ./redis-trib.rb:775:in `each'
        from ./redis-trib.rb:775:in `flush_nodes_config'
        from ./redis-trib.rb:1296:in `create_cluster_cmd'
        from ./redis-trib.rb:1701:in `<main>'
经检查,这是由于上一次配置集群失败时留下的配置信息导致的。 只要把redis.conf中定义的 cluster-config-file 所在的文件删除,重新启动redis-server及运行redis-trib即可。
3.7 建立集群Redis关系正常执行响应如下
>>> Creating cluster
>>> Performing hash slots allocation on 3 nodes...
Using 3 masters:
192.168.29.128:6379
192.168.29.128:6380
192.168.29.128:6381
M: d5d0951bb185a67a44d29dd2142170dbce84d977 192.168.29.128:6379
   slots:0-5460 (5461 slots) master
M: e41fe58ef571836d891656b482307628b3f7ab35 192.168.29.128:6380
   slots:5461-10922 (5462 slots) master
M: ddbc810661f81500059e0b22b1550713a0e3766d 192.168.29.128:6381
   slots:10923-16383 (5461 slots) master
Can I set the above configuration? (type 'yes' to accept): yes
>>> Nodes configuration updated
>>> Assign a different config epoch to each node
>>> Sending CLUSTER MEET messages to join the cluster
Waiting for the cluster to join...
>>> Performing Cluster Check (using node 192.168.29.128:6379)
M: d5d0951bb185a67a44d29dd2142170dbce84d977 192.168.29.128:6379
   slots:0-5460 (5461 slots) master
   0 additional replica(s)
M: ddbc810661f81500059e0b22b1550713a0e3766d 192.168.29.128:6381
   slots:10923-16383 (5461 slots) master
   0 additional replica(s)
M: e41fe58ef571836d891656b482307628b3f7ab35 192.168.29.128:6380
   slots:5461-10922 (5462 slots) master
   0 additional replica(s)
[OK] All nodes agree about slots configuration.
>>> Check for open slots...
>>> Check slots coverage...
[OK] All 16384 slots covered.
成功
3.8 查看集群节点信息

3.9 测试
3.9.1 测试插入数据
因为abc的hash槽信息是在6380上,现在使用redis-cli连接的6379,无法完成set操作,需要客户端跟踪重定向。使用redis-cli -c

3.9.2 重新测试插入数据
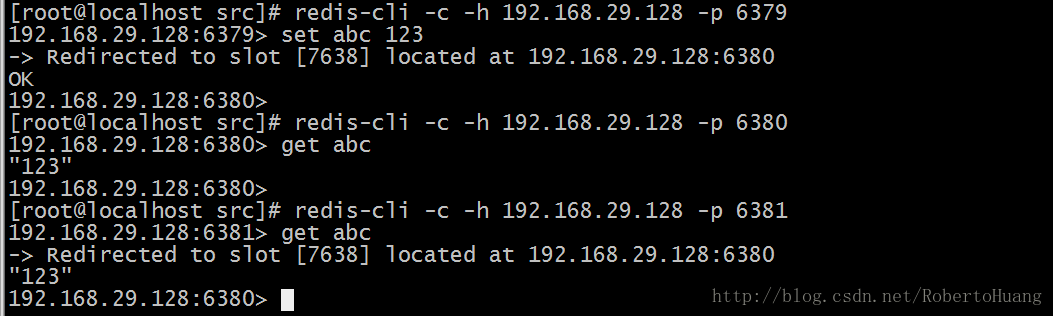
4. 插槽的概念及插槽分配
整个Redis提供了16384个插槽,也就是说集群中的每个节点分得的插槽数总和为16384。./redis-trib.rb 脚本实现了是将16384个插槽平均分配给了N个节点。当我们执行set abc 123命令时,redis是如何将数据保存到集群中的呢?执行步骤:
i.接收命令set abc 123
ii.通过key(abc)计算出插槽值,然后根据插槽值找到对应的节点。abc的插槽值为:7638
iii.重定向到该节点执行命令
注意:如果插槽数有部分是没有指定到节点的,那么这部分插槽所对应的key将不能使用。
5.新增集群节点
5.1 再开启一个实例的端口为6382 配置同上

5.2 执行脚本建立6382节点与集群的关系
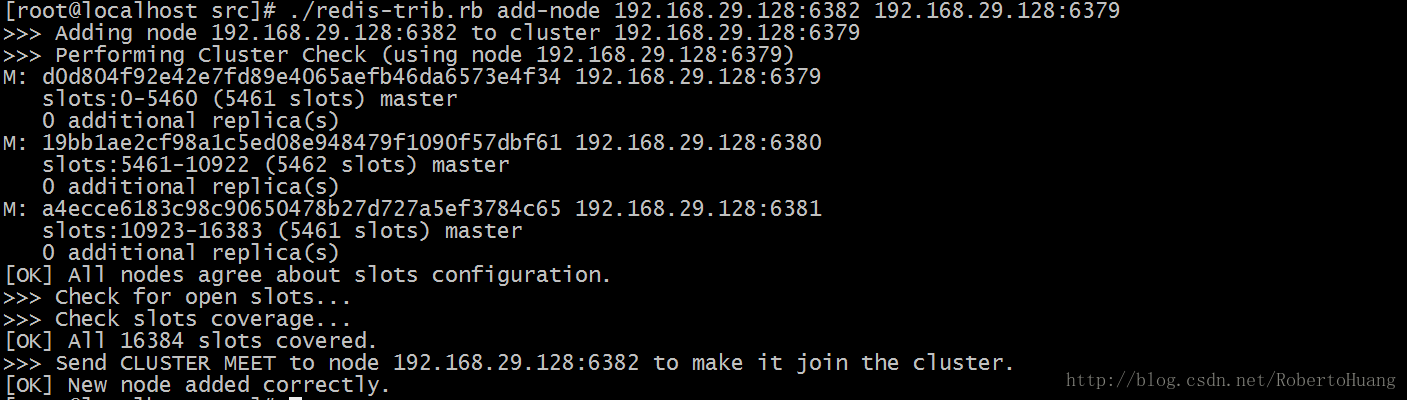
5.3 查看集群状态,发现新增的节点没有插槽

5.4 给6382节点分配插槽
5.5 查看集群节点状态

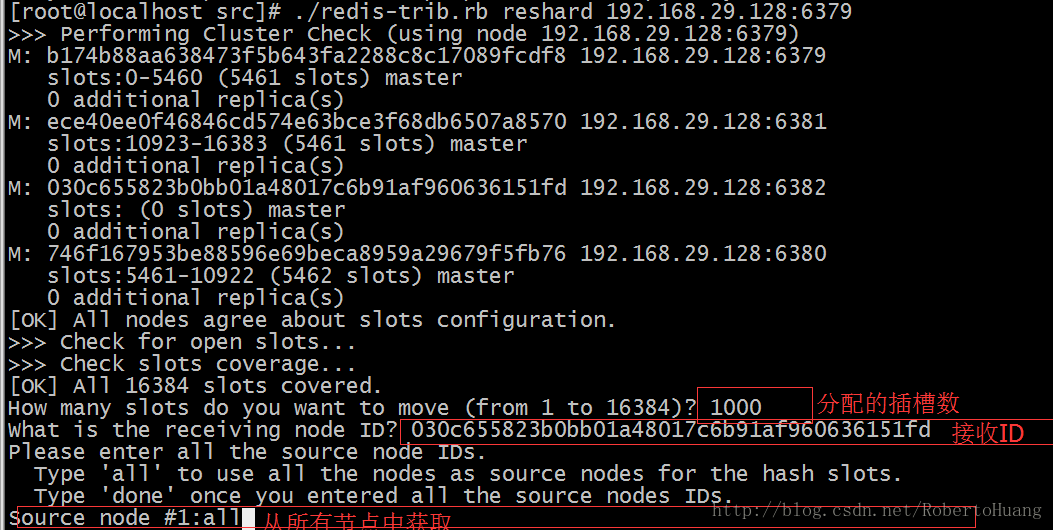
6.删除集群节点
想要删除集群节点中的某一个节点,需要严格执行2步:
6.1.将这个节点上的所有插槽转移到其他节点上
6.1.1执行脚本:./redis-trib.rb reshard 192.168.29.128:6382
6.1.2选择需要转移的插槽的数量,因为6382有100个,所以转移100个
6.1.3输入转移的节点的id,我们转移到6379节点
6.1.4输入插槽来源id,也就是6382的id
6.1.5输入done,开始转移
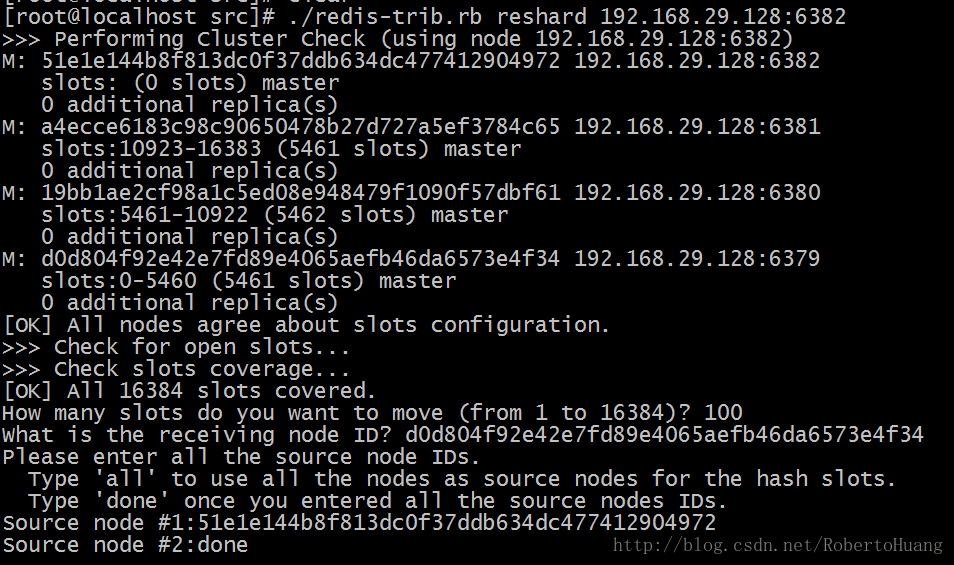
6.1.6查看集群节点信息,可以看到6380节点已经没有插槽了

6.2.删除节点
6.2.1 删除节点

6.2.2 查看集群节点信息

7. Redis Cluster高可用
7.1 假设集群中某一节点宕机 测试数据写入操作


我们尝试执行set命令,结果发现无法执,行集群不可用了?? 这集群也太弱了吧??
7.2 集群中的主从复制架构
7.3 本教程不详细介绍集群中主从复制架构的具体安装,只提一下过程
=========这里插入一句介绍下对每一组的主从搭建============
(下面的6379、6380、6381对应的是每一组主从配置,如6379(Master) 6479(Slave of 6379) 6579(Slave of 6379)
Redis主从复制的功能非常强大,它有以下好处:
1.避免Redis单点故障
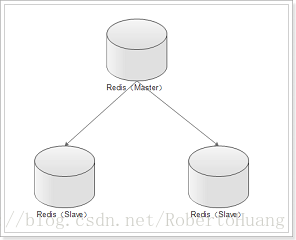
2.构建读写分离架构,满足读多写少的应用场景1.主从架构
1.1 Redis主从架构拓扑图结构
1.2 主从结构搭建
Redis集群不用安装多个Redis,只需复制多个配置文件,修改即可。所以如果要进行主从结构搭建,需先安装单机版Redis。单机版Redis安装可参照:单机版Redis安装教程
1.2.1 在安装好单机版的前提下,复制三份配置文件
进入redis所在目录
# cd /opt/redis/redis-3.2.8

创建6379、6380、6381目录,分别将安装目录下的redis.conf拷贝到这三个目录下。
# mkdir -p /opt/redis/6379 && cp redis.conf /opt/redis/6379/6379.conf
# mkdir -p /opt/redis/6380 && cp redis.conf /opt/redis/6380/6380.conf
# mkdir -p /opt/redis/6381 && cp redis.conf /opt/redis/6381/6381.conf
1.2.2 分别修改配置文件
# vim /opt/redis/6379/6379.conf

# Redis使用后台模式
daemonize yes

# 关闭保护模式
protected-mode no

# 注释以下内容开启远程访问
# bind 127.0.0.1

# 修改启动端口为6379
port 6379

# 修改pidfile指向路径
pidfile /opt/redis/6379/redis_6379.pid

以此类推,修改端口6380及6381配置。
1.2.3 分别启动三个Redis实例
/opt/redis/redis-3.2.8/bin/redis-server /opt/redis/6379/6379.conf
/opt/redis/redis-3.2.8/bin/redis-server /opt/redis/6380/6380.conf
/opt/redis/redis-3.2.8/bin/redis-server /opt/redis/6381/6381.conf
1.2.4 设置主从
在Redis中设置主从有2种方式:
1.在redis.conf中设置slaveof
    a)  slaveof <masterip> <masterport>

2、  使用redis-cli客户端连接到redis服务,执行slaveof命令
    a)  slaveof <masterip> <masterport>

第二种方式在重启后将失去主从复制关系。

我们这里使用第二种方式设置主从:

使用Redis客户端连接上6380端口
# redis-cli -h 192.168.29.128 -p 6380
设置6380端口Redis为6379的从
192.168.29.128:6380> slaveof 192.168.29.128 6379
OK

使用Redis客户端连接上6381端口
# redis-cli -h 192.168.29.128 -p 6381
设置6381端口Redis为6379的从
192.168.29.128:6381> slaveof 192.168.29.128 6379
OK
1.2.5 查看Redis主从关系
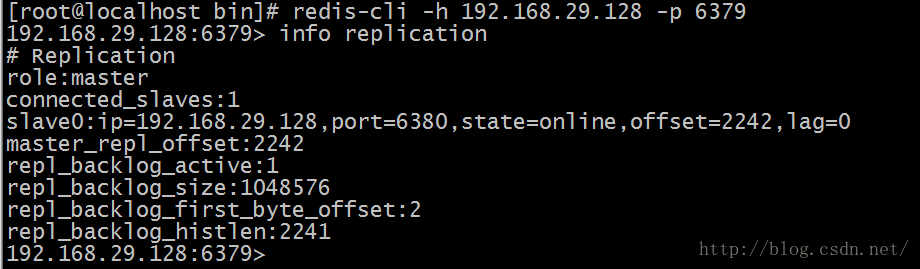
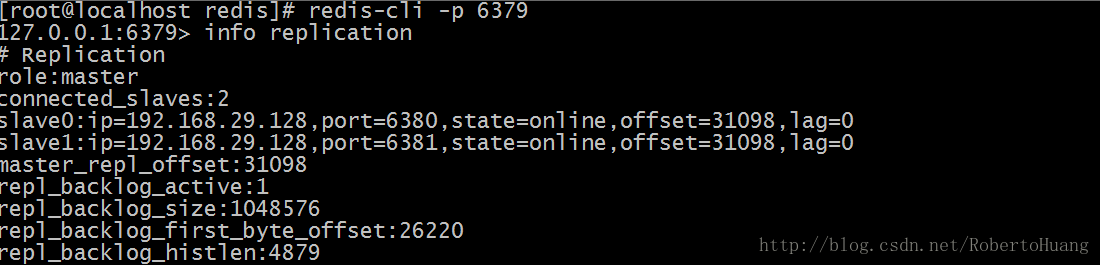
使用Redis客户端连接上6379端口
# redis-cli -h 192.168.29.128 -p 6379

查看Redis主从关系 如下图所示
192.168.29.128:6379> info replication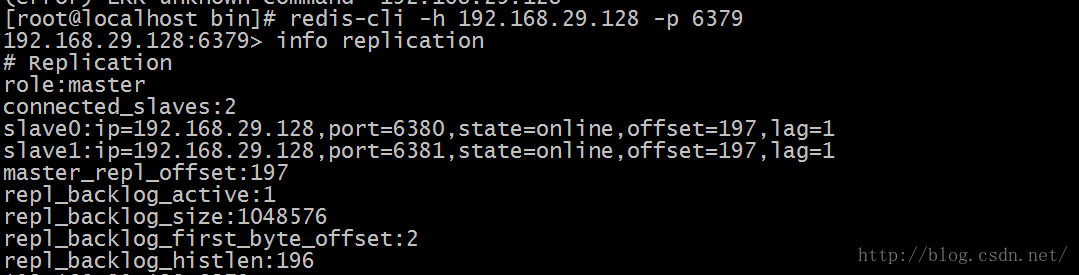
role:角色信息
slaveX:从库信息
connected_slaves:从库数量
1.2.6 测试
在主库写入数据

在从库读取数据

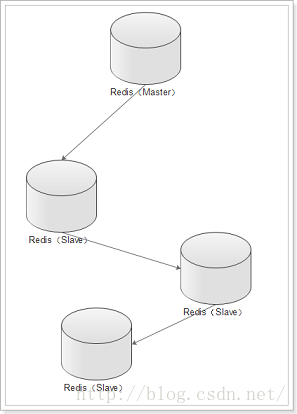
2. 主从从架构
2.1 Redis主从从架构拓扑图结构
2.2 主从从架构搭建
Redis的主从架构的缺点是所有的slave节点数据的复制和同步都由master节点来处理,会照成master节点压力太大,所以我们使用主从从结构来处理
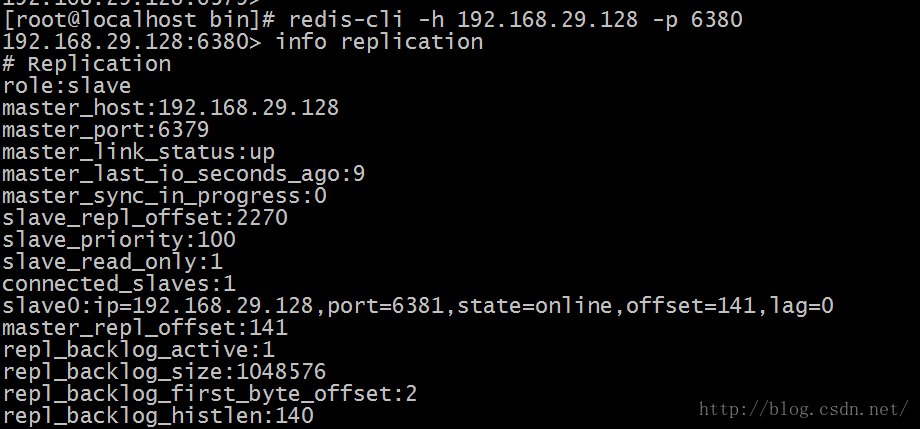
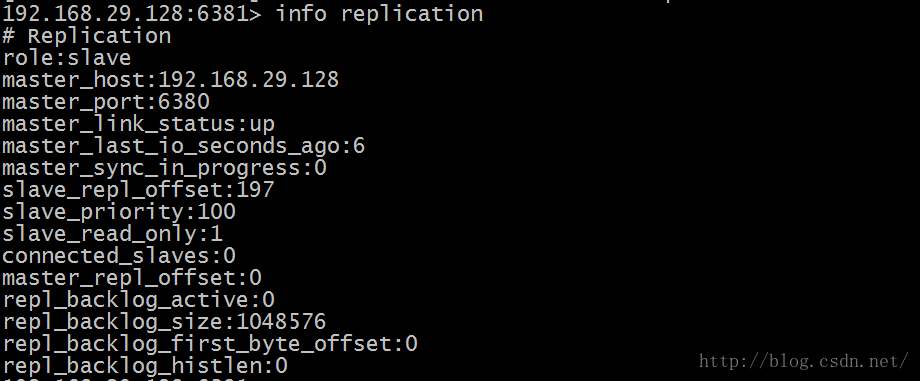
2.2.1 前面步骤同主从架构一致,只是在设置主从结构时,设置6380为6379的从,6381为6380的从
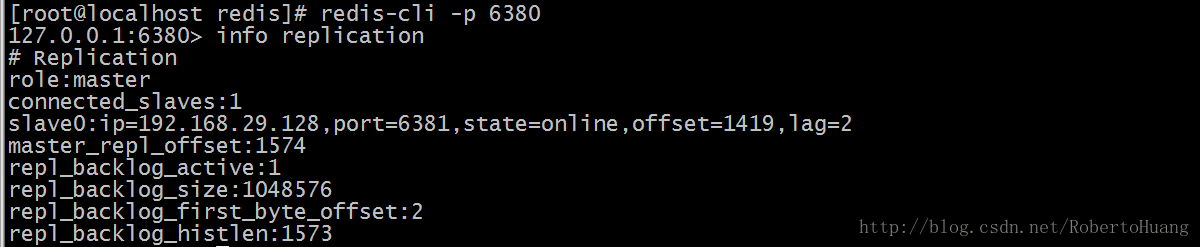
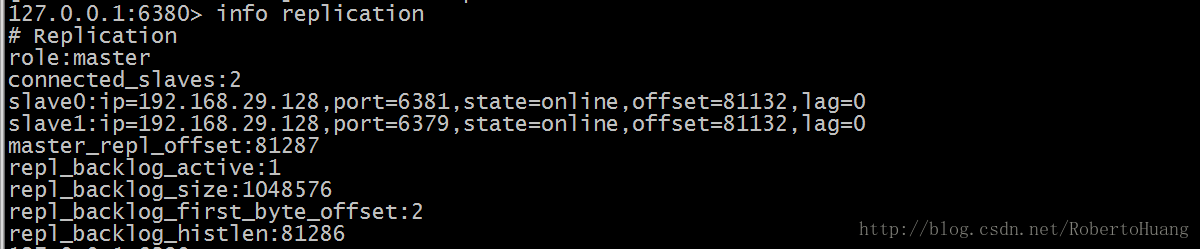
使用Redis客户端连接上6380端口
# redis-cli -h 192.168.29.128 -p 6380
设置6380端口Redis为6379的从
192.168.29.128:6380> slaveof 192.168.29.128 6379
OK

使用Redis客户端连接上6381端口
# redis-cli -h 192.168.29.128 -p 6381
设置6381端口Redis为6380的从
192.168.29.128:6381> slaveof 192.168.29.128 6380
OK
2.2.2 查看主从从架构信息如下:
2.2.3 测试
在主库写入数据

在从库查询数据


3.从库只读
默认情况下redis数据库充当slave角色时是只读的不能进行写操作

可以在配置文件中开启非只读:slave-read-only no
4.主从复制的过程原理
1.当从库和主库建立MS关系后,会向主数据库发送SYNC命令

2.主库接收到SYNC命令后会开始在后台保存快照(RDB持久化过程),并将期间接收到的写命令缓存起来

3.当快照完成后,主Redis会将快照文件和所有缓存的写命令发送给从Redis

4.从Redis接收到后,会载入快照文件并且执行收到的缓存的命令

5.之后,主Redis每当接收到写命令时就会将命令发送从Redis,从而保证数据的一致
5.无磁盘复制
通过前面的复制过程我们了解到,主库接收到SYNC的命令时会执行RDB过程,即使在配置文件中禁用RDB持久化也会生成,那么如果主库所
在的服务器磁盘IO性能较差,那么这个复制过程就会出现瓶颈,庆幸的是,Redis在2.8.18版本开始实现了无磁盘复制功能(不过该功能
还是处于试验阶段)。

原理:Redis在与从数据库进行复制初始化时将不会将快照存储到磁盘,而是直接通过网络发送给从数据库,避免了IO性能差问题。

开启无磁盘复制:repl-diskless-sync yes
注:如果要取消Redis主从关系,可以在对应的从库执行SLAVEOF NO ONE命令,取消主从关系
参考:https://blog.csdn.net/robertohuang/article/details/70766809
============以上是对每一组的主从搭建============
( 上面的6379、6380、6381对应的是每一组主从配置,如6379(Master) 6479(Slave of 6379) 6579(Slave of 6379)。 )
7.3.1 为每个集群节点添加Slave,形成主从复制架构,主从复制架构可参考:主从复制架构,搭建结构如下所示
6379(Master)     6479(Slave of 6379)     6579(Slave of 6379)
6380(Master)     6480(Slave of 6380)     6580(Slave of 6380)
6381(Master)     6481(Slave of 6381)     6581(Slave of 6381)
7.3.2 为每个主从复制架构添加哨兵集群,哨兵模式集群可参考:哨兵模式集群
参考:https://blog.csdn.net/robertohuang/article/details/70768922
============下面是对每一组的哨兵模式集群搭建============
( 下面的6379、6380、6381对应的是每一组主从配置,如6379(Master) 6479(Slave of 6379) 6579(Slave of 6379)。 )
1.为什么要用到哨兵
哨兵(Sentinel)主要是为了解决在主从复制架构中出现宕机的情况,主要分为两种情况:

1.从Redis宕机

这个相对而言比较简单,在Redis中从库重新启动后会自动加入到主从架构中,自动完成同步数据。在Redis2.8版本后,主从断线后恢复
的情况下实现增量复制。

2.主Redis宕机

这个相对而言就会复杂一些,需要以下2步才能完成
i.第一步,在从数据库中执行SLAVEOF NO ONE命令,断开主从关系并且提升为主库继续服务
ii.第二步,将主库重新启动后,执行SLAVEOF命令,将其设置为其他库的从库,这时数据就能更新回来

由于这个手动完成恢复的过程其实是比较麻烦的并且容易出错,所以Redis提供的哨兵(sentinel)的功能来解决
2.什么是哨兵
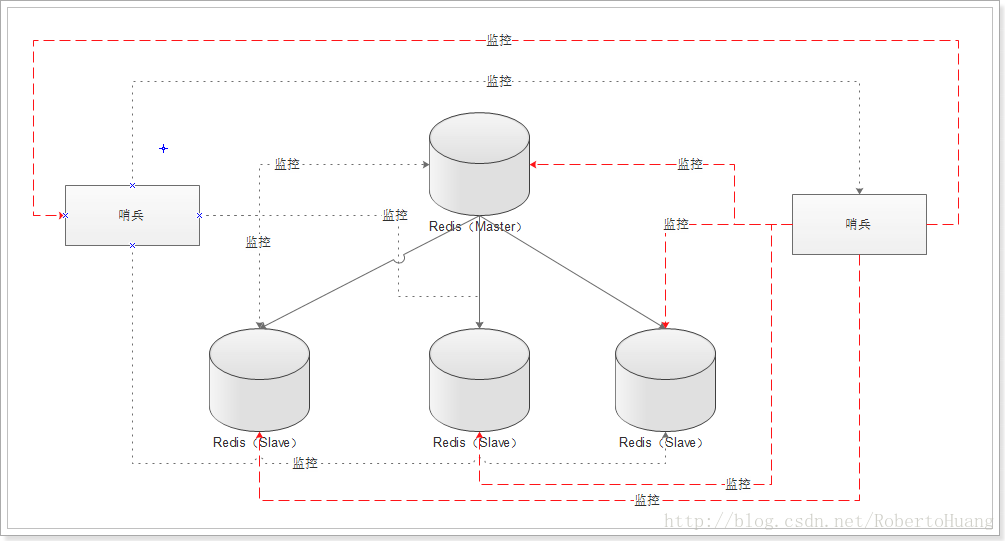
Redis-Sentinel是用于管理Redis集群,该系统执行以下三个任务:

1.监控(Monitoring):Sentinel会不断地检查你的主服务器和从服务器是否运作正常

2.提醒(Notification):当被监控的某个Redis服务器出现问题时,Sentinel可以通过API向管理员或者其他应用程序发送通知

3.自动故障迁移(Automatic failover):当一个主服务器不能正常工作时,Sentinel 会开始一次自动故障迁移操作,它会将失效主
服务器的其中一个从服务器升级为新的主服务器,并让失效主服务器的其他从服务器改为复制新的主服务器;当客户端试图连接失效的主
服务器时,集群也会向客户端返回新主服务器的地址,使得集群可以使用新主服务器代替失效服务器
3.Sentinel集群搭建
3.1 Sentinel集群拓扑图
多个哨兵,不仅同时监控主从数据库,而且哨兵之间互为监控
3.2 在保证Redis主从架构集群可用的前提下,复制三份配置文件
进入redis所在目录
# cd /opt/redis/redis-3.2.8

创建6379、6380、6381目录,分别将安装目录下的sentinel.conf拷贝到这三个目录下
# mkdir -p /opt/redis/6379 && cp sentinel.conf /opt/redis/6379/26379.conf
# mkdir -p /opt/redis/6380 && cp sentinel.conf /opt/redis/6380/26380.conf
# mkdir -p /opt/redis/6381 && cp sentinel.conf /opt/redis/6381/26381.conf
3.3 分别配置哨兵
修改sentinel配置文件
vim /opt/redis/6379/26379.conf

修改内容:
# 添加守护进程模式
daemonize yes

# 添加指明日志文件名
logfile "/opt/redis/6379/sentinel26379.log"

# 修改工作目录
dir "/opt/redis/6379"

# 修改启动端口
port 26379

# 关闭保护模式
protected-mode no

# 修改sentinel monitor
sentinel monitor redis-test-master 192.168.29.128 6379 2

# 将配置文件中mymaster全部替换redis-test-master

依次修改26380,26381配置

说明:
redis-test-master:监控主数据的名称,自定义即可,可以使用大小写字母和“.-_”符号
192.168.29.128:监控的主数据库的IP
6379:监控的主数据库的端口
2:最低通过票数
3.4 启动哨兵进程
redis-sentinel /opt/redis/6379/26379.conf 或者 redis-server /opt/redis/6379/26379.conf --sentinel
redis-sentinel /opt/redis/6380/26380.conf 或者 redis-server /opt/redis/6380/26380.conf --sentinel
redis-sentinel /opt/redis/6380/26380.conf 或者 redis-server /opt/redis/6381/26381.conf --sentinel
3.5 哨兵模式常用命令
1.查看sentinel的基本状态信息
127.0.0.1:26379> INFO

2.列出所有被监视的主服务器,以及这些主服务器的当前状态
127.0.0.1:26379> SENTINEL MASTERS redis-test-master

3.列出给定主服务器的所有从服务器,以及这些从服务器的当前状态
127.0.0.1:26379> SENTINEL SLAVES redis-test-master

4.返回给定名字的主服务器的IP地址和端口号
127.0.0.1:26379> SENTINEL GET-MASTER-ADDR-BY-NAME redis-test-master

5.重置所有名字和给定模式pattern相匹配的主服务器,重置操作清除主服务器目前的所有状态,包括正在执行中的故障转移,并移除目
前已经发现和关联的,主服务器的所有从服务器和Sentinel
127.0.0.1:26379> SENTINEL RESET redis-test-master

6.当主服务器失效时,在不询问其他Sentinel意见的情况下,强制开始一次自动故障迁移,但是它会给其他Sentinel发送一个最新的配
置,其他sentinel会根据这个配置进行更新
127.0.0.1:26379> SENTINEL FAILOVER redis-test-master

7.查看其它哨兵信息
127.0.0.1:26379> SENTINEL sentinels redis-test-master
3.6 查看配置中是否多了如下内容

3.7 Java代码测试哨兵
public class RedisTest {
    public static void main(String[] args) {
        Set<String> sentinels = new HashSet<String>();
        sentinels.add(new HostAndPort("192.168.29.128", 26379).toString());
        sentinels.add(new HostAndPort("192.168.29.128", 26380).toString());
        sentinels.add(new HostAndPort("192.168.29.128", 26381).toString());

        JedisSentinelPool sentinelPool = new JedisSentinelPool("redis-test-master", sentinels);
        System.out.println("Current master: " + sentinelPool.getCurrentHostMaster().toString());

        Jedis master = sentinelPool.getResource();
        master.set("username", "RobertoHuang");
        sentinelPool.returnResource(master);

        Jedis master2 = sentinelPool.getResource();
        String value = master2.get("username");
        System.out.println("username: " + value);
        master2.close();
        sentinelPool.destroy();
    }
}

输出结果:
Current master: 192.168.29.128:6379
username: RobertoHuang
3.8 测试Sentinel是否正常工作
3.8.1 测试集群环境如下
3.8.2 关闭端口为6379的Redis
3.8.3 查看新的集群架构
3.8.4 重新启动端口号为6379的Redis 查看集群架构
该过程是6379Redis宕机->6380切换成Master->6379和6381切换为6380的SLAVE->6379重新启动->6379为6380SLAVE
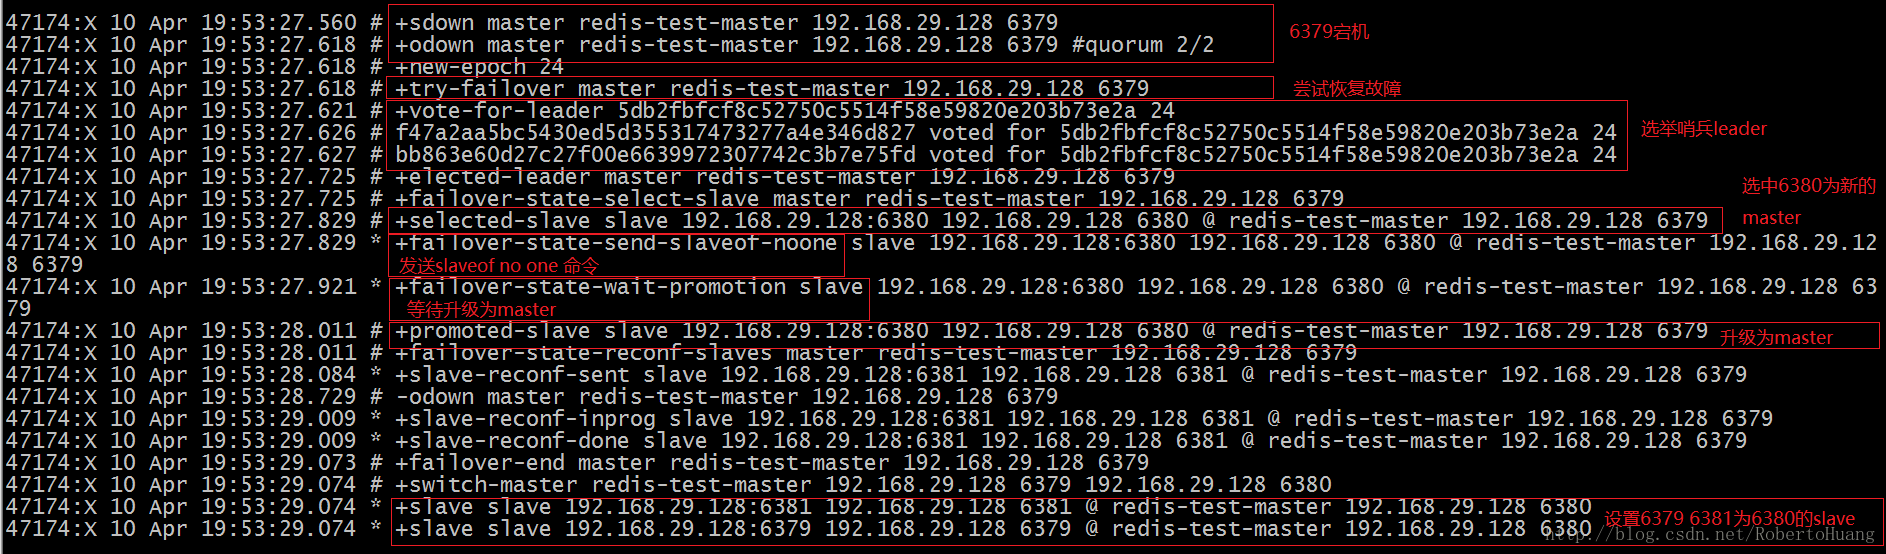
3.8.5 Sentinel日志分析
26379日志
26380日志

26381日志

4.Sentinel原理介绍
首先解释2个名词:SDOWN和ODOWN.
SDOWN:subjectively down,直接翻译的为”主观”失效,即当前sentinel实例认为某个redis服务为”不可用”状态.
ODOWN:objectively down,直接翻译为”客观”失效,即多个sentinel实例都认为master处于”SDOWN”状态,那么此时master将处于ODOWN,ODOWN可以简单理解为master已经被集群确定为”不可用”,将会开启failover
SDOWN与ODOWN转换过程:
i.每个sentinel实例在启动后,都会和已知的slaves/master以及其他sentinels建立TCP连接,并周期性发送PING(默认为1秒),在交互中,如果redis-server无法在”down-after-milliseconds”时间内响应或者响应错误信息,都会被认为此redis-server处于SDOWN状态.
ii.SDOWN的server为master,那么此时sentinel实例将会向其他sentinel间歇性(一秒)发送”is-master-down-by-addr <ip> <port>”指令并获取响应信息,如果足够多的sentinel实例检测到master处于SDOWN,那么此时当前sentinel实例标记master为ODOWN…其他sentinel实例做同样的交互操作.配置项”sentinel monitor <mastername><masterip> <masterport> <quorum>”,如果检测到master处于SDOWN状态的slave个数达到<quorum>,那么此时此sentinel实例将会认为master处于ODOWN.
每个sentinel实例将会间歇性(10秒)向master和slaves发送”INFO”指令,如果master失效且没有新master选出时,每1秒发送一次”INFO”;”INFO”的主要目的就是获取并确认当前集群环境中slaves和master的存活情况.
经过上述过程后,所有的sentinel对master失效达成一致后,开始failover.
Sentinel与slaves”自动发现”机制:
在sentinel的配置文件中,都指定了port,此port就是sentinel实例侦听其他sentinel实例建立链接的端口.在集群稳定后,最终会每个sentinel实例之间都会建立一个tcp链接,此链接中发送”PING”以及类似于”is-master-down-by-addr”指令集,可用用来检测其他sentinel实例的有效性以及”ODOWN”和”failover”过程中信息的交互.在sentinel之间建立连接之前,sentinel将会尽力和配置文件中指定的master建立连接.sentinel与master的连接中的通信主要是基于pub/sub来发布和接收信息,发布的信息内容包括当前sentinel实例的侦听端口.
============上面是对每一组的哨兵模式集群搭建============
( 上面的6379、6380、6381对应的是每一组主从配置,如6379(Master) 6479(Slave of 6379) 6579(Slave of 6379)。 )
7.3.3 创建集群 使用如下命令
./redis-trib.rb create --replicas 2 192.168.29.128:6379 192.168.29.128:6380 192.168.29.128:6381 192.168.29.128:6479 192.168.29.128:6480 192.168.29.128:6481 192.168.29.128:6579 192.168.29.128:6580 192.168.29.128:6581 7.4.4 自行测试高可用Cluster环境
注意在集群环境中:
多键的命令操作(如MGET、MSET),如果每个键都位于同一个节点,则可以正常支持,否则会提示错误。
集群中的节点只能使用0号数据库,如果执行SELECT切换数据库会提示错误。
参考:https://blog.csdn.net/robertohuang/article/details/70833231
===============Redis集群——SpringBoot连接Redis集群(带密码)======================
第一步,新建项目maven项目,添加依赖
<?xml version="1.0" encoding="UTF-8"?>
<project xmlns="http://maven.apache.org/POM/4.0.0"
         xmlns:xsi="http://www.w3.org/2001/XMLSchema-instance"
         xsi:schemaLocation="http://maven.apache.org/POM/4.0.0 http://maven.apache.org/xsd/maven-4.0.0.xsd">
    <modelVersion>4.0.0</modelVersion>

    <groupId>springboot-redis-cluster</groupId>
    <artifactId>redis-cluster</artifactId>
    <version>1.0-SNAPSHOT</version>
    <description>springboot连接redis-cluster集群</description>

    <parent>
        <groupId>org.springframework.boot</groupId>
        <artifactId>spring-boot-starter-parent</artifactId>
        <version>2.0.2.RELEASE</version>
        <relativePath/>
    </parent>

    <dependencies>
        <dependency>
            <groupId>org.mybatis.spring.boot</groupId>
            <artifactId>mybatis-spring-boot-starter</artifactId>
        </dependency>
        <dependency>
            <groupId>org.springframework.boot</groupId>
            <artifactId>spring-boot-starter-web</artifactId>
        </dependency>
        <dependency>
            <groupId>org.springframework.boot</groupId>
            <artifactId>spring-boot-starter-data-redis</artifactId>
        </dependency>
        <dependency>
            <groupId>org.projectlombok</groupId>
            <artifactId>lombok</artifactId>
        </dependency>
        <dependency>
            <groupId>redis.clients</groupId>
            <artifactId>jedis</artifactId>
            <version>2.9.0</version>
        </dependency>
    </dependencies>

    <build>
        <plugins>
            <plugin>
                <groupId>org.springframework.boot</groupId>
                <artifactId>spring-boot-maven-plugin</artifactId>
            </plugin>
        </plugins>
    </build>

</project>第二步,编写配置文件
spring:
  application:
    name: redis-cluster
  redis:
    cluster:
      nodes: 192.168.1.10:7001,192.168.1.10:7004,192.168.1.11:7002,192.168.1.11:7005,192.168.1.12:7003,192.168.1.12:7006
      max-redirects: 6
redis:
  timeout: 10000 #客户端超时时间单位是毫秒 默认是2000
  maxIdle: 300 #最大空闲数
  maxTotal: 1000 #控制一个pool可分配多少个jedis实例,用来替换上面的redis.maxActive,如果是jedis 2.4以后用该属性
  maxWaitMillis: 1000 #最大建立连接等待时间。如果超过此时间将接到异常。设为-1表示无限制。
  minEvictableIdleTimeMillis: 300000 #连接的最小空闲时间 默认1800000毫秒(30分钟)
  numTestsPerEvictionRun: 1024 #每次释放连接的最大数目,默认3
  timeBetweenEvictionRunsMillis: 30000 #逐出扫描的时间间隔(毫秒) 如果为负数,则不运行逐出线程, 默认-1
  testOnBorrow: true #是否在从池中取出连接前进行检验,如果检验失败,则从池中去除连接并尝试取出另一个
  testWhileIdle: true #在空闲时检查有效性, 默认false
  password: 123456 #密码
server:
port: 8080第三步,编写配置类
package com.config;

import org.springframework.beans.factory.annotation.Value;
import org.springframework.context.annotation.Bean;
import org.springframework.context.annotation.Configuration;
import org.springframework.data.redis.connection.RedisClusterConfiguration;
import org.springframework.data.redis.connection.RedisNode;
import org.springframework.data.redis.connection.RedisPassword;
import org.springframework.data.redis.connection.jedis.JedisConnectionFactory;
import org.springframework.data.redis.core.RedisTemplate;
import org.springframework.data.redis.serializer.JdkSerializationRedisSerializer;
import org.springframework.data.redis.serializer.StringRedisSerializer;
import redis.clients.jedis.JedisPoolConfig;

import java.util.HashSet;
import java.util.Set;

/**
 * Created by Administrator on 2019/2/28.
 */
@Configuration
public class RedisClusterConfig {
    @Value("${spring.redis.cluster.nodes}")
    private String clusterNodes;
    @Value("${spring.redis.cluster.max-redirects}")
    private int maxRedirects;
    @Value("${redis.password}")
    private String password;
    @Value("${redis.timeout}")
    private int timeout;
    @Value("${redis.maxIdle}")
    private int maxIdle;
    @Value("${redis.maxTotal}")
    private int maxTotal;
    @Value("${redis.maxWaitMillis}")
    private int maxWaitMillis;
    @Value("${redis.minEvictableIdleTimeMillis}")
    private int minEvictableIdleTimeMillis;
    @Value("${redis.numTestsPerEvictionRun}")
    private int numTestsPerEvictionRun;
    @Value("${redis.timeBetweenEvictionRunsMillis}")
    private int timeBetweenEvictionRunsMillis;
    @Value("${redis.testOnBorrow}")
    private boolean testOnBorrow;
    @Value("${redis.testWhileIdle}")
    private boolean testWhileIdle;
    @Bean
    public JedisPoolConfig getJedisPoolConfig() {
        JedisPoolConfig jedisPoolConfig = new JedisPoolConfig();
        // 最大空闲数
        jedisPoolConfig.setMaxIdle(maxIdle);
        // 连接池的最大数据库连接数
        jedisPoolConfig.setMaxTotal(maxTotal);
        // 最大建立连接等待时间
        jedisPoolConfig.setMaxWaitMillis(maxWaitMillis);
        // 逐出连接的最小空闲时间 默认1800000毫秒(30分钟)
        jedisPoolConfig.setMinEvictableIdleTimeMillis(minEvictableIdleTimeMillis);
        // 每次逐出检查时 逐出的最大数目 如果为负数就是 : 1/abs(n), 默认3
        jedisPoolConfig.setNumTestsPerEvictionRun(numTestsPerEvictionRun);
        // 逐出扫描的时间间隔(毫秒) 如果为负数,则不运行逐出线程, 默认-1
        jedisPoolConfig.setTimeBetweenEvictionRunsMillis(timeBetweenEvictionRunsMillis);
        // 是否在从池中取出连接前进行检验,如果检验失败,则从池中去除连接并尝试取出另一个
        jedisPoolConfig.setTestOnBorrow(testOnBorrow);
        // 在空闲时检查有效性, 默认false
        jedisPoolConfig.setTestWhileIdle(testWhileIdle);
        return jedisPoolConfig;
    }

    /**
     * Redis集群的配置
     * @return RedisClusterConfiguration
     * @throws
     */
    @Bean
    public RedisClusterConfiguration redisClusterConfiguration(){
        RedisClusterConfiguration redisClusterConfiguration = new RedisClusterConfiguration();
        //Set<RedisNode> clusterNodes
        String[] serverArray = clusterNodes.split(",");
        Set<RedisNode> nodes = new HashSet<RedisNode>();
        for(String ipPort:serverArray){
            String[] ipAndPort = ipPort.split(":");
            nodes.add(new RedisNode(ipAndPort[0].trim(),Integer.valueOf(ipAndPort[1])));
        }
        redisClusterConfiguration.setClusterNodes(nodes);
        redisClusterConfiguration.setMaxRedirects(maxRedirects);
        redisClusterConfiguration.setPassword(RedisPassword.of(password));
        return redisClusterConfiguration;
    }

    /**
     * @param
     * @return
     * @Description:redis连接工厂类
     * @date 2018/10/25 19:45
     */
    @Bean
    public JedisConnectionFactory jedisConnectionFactory() {
        //集群模式
        JedisConnectionFactory  factory = new JedisConnectionFactory(redisClusterConfiguration(),getJedisPoolConfig());
        factory.setDatabase(0);
        factory.setTimeout(timeout);
        factory.setUsePool(true);
        return factory;
    }

    /**
     * 实例化 RedisTemplate 对象
     *
     * @return
     */
    @Bean
    public RedisTemplate<String, Object> redisTemplate() {
        RedisTemplate<String, Object> redisTemplate = new RedisTemplate<>();
        initDomainRedisTemplate(redisTemplate);
        return redisTemplate;
    }

    /**
     * 设置数据存入 redis 的序列化方式,并开启事务
     * 使用默认的序列化会导致key乱码
     *
     */
    private void initDomainRedisTemplate(RedisTemplate<String, Object> redisTemplate) {
        //如果不配置Serializer,那么存储的时候缺省使用String,如果用User类型存储,那么会提示错误User can't cast to String!
        redisTemplate.setKeySerializer(new StringRedisSerializer());
        //这个地方有一个问题,这种序列化器会将value序列化成对象存储进redis中,如果
        //你想取出value,然后进行自增的话,这种序列化器是不可以的,因为对象不能自增;
        //需要改成StringRedisSerializer序列化器。
        redisTemplate.setValueSerializer(new JdkSerializationRedisSerializer());
        redisTemplate.setEnableTransactionSupport(false);
        redisTemplate.setConnectionFactory(jedisConnectionFactory());
    }
}第四步,编写Controller
@RestController
public class TestController {

    @Autowired
    private RedisTemplate redisTemplate;

    @GetMapping("/test")
    public void test(){
        System.out.println(redisTemplate.hasKey("name"));
        redisTemplate.opsForValue().set("name","123214");
        String name = (String) redisTemplate.opsForValue().get("name");
        System.out.println(name);
        redisTemplate.opsForValue().set("name2","123214");
        String name2 = (String) redisTemplate.opsForValue().get("name");
        System.out.println(name2);
        redisTemplate.opsForValue().set("name3","123214");
        String name3 = (String) redisTemplate.opsForValue().get("name");
        System.out.println(name3);
        redisTemplate.opsForValue().set("name4","123214");
        String name4 = (String) redisTemplate.opsForValue().get("name");
        System.out.println(name4);
        HashOperations<String,String,String> hashOperations = redisTemplate.opsForHash();
        hashOperations.put("user","test","测试");
        System.out.println(hashOperations.get("user","test"));
    }
}第五步,启动项目测试,控制台打印
true
123214
123214
123214
123214
测试参考1
参考2
可以综合下面的RedisTemplate的配置
SpringBoot RedisTemplate 集群配置使用
一、配置
1、yml配置
spring:
  redis:
    cluster:
      nodes:
        - ip:port #替换为正确的redis集群的IP和端口号
        - ip:port
        - ip:port
        - ip:port
        - ip:port
        - ip:port
      connectionTimeout: 6000
      soTimeout: 6000
      maxAttempts: 5
      password: password #写正确的密码
2、接收配置
import lombok.Data;

@Component
@ConfigurationProperties(prefix = "spring.redis.cluster")
@Data //使用了lombok的标签 如果未引用lombok需写getter 和 setter方法
public class RedisClusterConfigProperties {
    private List<String> nodes;
    private Integer maxAttempts;
    private Integer connectionTimeout;
    private Integer soTimeout;
    private String password;
}
3、集群配置
@Configuration
public class RedisConfig extends CachingConfigurerSupport {

    @Resource
    private RedisClusterConfigProperties clusterProperties;

    @Bean
    public RedisClusterConfiguration getClusterConfig() {
        RedisClusterConfiguration rcc = new RedisClusterConfiguration(clusterProperties.getNodes());
        rcc.setMaxRedirects(clusterProperties.getMaxAttempts());
        rcc.setPassword(RedisPassword.of(clusterProperties.getPassword()));
        return rcc;
    }

    @Bean
    public JedisCluster getJedisCluster() {
        JedisPoolConfig poolConfig = new JedisPoolConfig();
        // 截取集群节点
        String[] cluster = clusterProperties.getNodes().toArray(new String[0]);
        // 创建set集合
        Set<HostAndPort> nodes = new HashSet<HostAndPort>();
        // 循环数组把集群节点添加到set集合中
        for (String node : cluster) {
            String[] host = node.split(":");
            //添加集群节点
            nodes.add(new HostAndPort(host[0], Integer.parseInt(host[1])));
        }
        return new JedisCluster(nodes, clusterProperties.getConnectionTimeout(), clusterProperties.getSoTimeout(), clusterProperties.getMaxAttempts(), clusterProperties.getPassword(), poolConfig);
    }


    @Bean
    public JedisConnectionFactory redisConnectionFactory(RedisClusterConfiguration cluster) {
        return new JedisConnectionFactory(cluster);
    }

    /**
     * RedisTemplate配置
     * key 和 value 都为String类型
     * 都使用Jackson2JsonRedisSerializer进行序列化
     */
    @Bean(name = "redisTemplate1")
    public RedisTemplate<String, String> redisTemplate(RedisConnectionFactory factory) {
        StringRedisTemplate template = new StringRedisTemplate(factory);
        Jackson2JsonRedisSerializer jackson2JsonRedisSerializer = new Jackson2JsonRedisSerializer<>(Object.class);
        ObjectMapper om = new ObjectMapper();
        om.setVisibility(PropertyAccessor.ALL, JsonAutoDetect.Visibility.ANY);
        om.enableDefaultTyping(ObjectMapper.DefaultTyping.NON_FINAL);
        jackson2JsonRedisSerializer.setObjectMapper(om);
        template.setValueSerializer(jackson2JsonRedisSerializer);
        template.afterPropertiesSet();
        return template;
    }

    /**
     * RedisTemplate配置
     * key 为String类型
     * value 为 Object 类型
     * 都使用Jackson2JsonRedisSerializer进行序列化
     */
    @Bean(name = "redisTemplate2")
    public RedisTemplate<String, Object> redisTemplate2(RedisConnectionFactory factory) {
        RedisTemplate<String, Object> template = new RedisTemplate<>();
        RedisSerializer<String> stringSerializer = new StringRedisSerializer();
        Jackson2JsonRedisSerializer jackson2JsonRedisSerializer = new Jackson2JsonRedisSerializer<>(Object.class);
        ObjectMapper om = new ObjectMapper();
        template.setConnectionFactory(factory);
        template.afterPropertiesSet();
        template.setKeySerializer(stringSerializer);
        template.setHashKeySerializer(stringSerializer);
        template.setHashValueSerializer(stringSerializer);
        om.setVisibility(PropertyAccessor.ALL, JsonAutoDetect.Visibility.ANY);
        om.enableDefaultTyping(ObjectMapper.DefaultTyping.NON_FINAL);
        jackson2JsonRedisSerializer.setObjectMapper(om);
        template.setValueSerializer(jackson2JsonRedisSerializer);
        template.afterPropertiesSet();
        return template;
    }
}
RedisTemplate配置说明:
1⃣️、序列化看源代码默认是 JdkSerializationRedisSerializer,这样的话使用redis-client看的话,无法看懂对应的值,为了方便看懂使用jackson2JsonRedisSerializer;
2⃣️、redisTemplate1和redisTemplate2的区别是为了针对不同的业务情况,方便写入不同的value,当然可以配置自己需要的redisTemplate3等等。
二、使用
1、使用redisTemplate1 只是示例几个例子
import lombok.extern.slf4j.Slf4j;

@Component
@Slf4j //使用了lombok的标签 方便写日志
public class RedisStringUtils {

    @Resource(name = "redisTemplate1")
    private RedisTemplate<String, String> redisTemplate;

     public Object getObject(String key) {
        return redisTemplate.opsForValue().get(key);
    }

    public void saveWithExpireTime(String key, String object, long timeout) {
        redisTemplate.opsForValue().set(key, object, timeout, TimeUnit.SECONDS);
    }

    /**
     * List 数据结构
     */
    public List<String> range(String key) {
        try {
            return redisTemplate.opsForList().range(key, 0, -1);
        } catch (Exception e) {
            log.error(e.getMessage(), e);
        }
        return null;
    }

    /**
     * hash 数据结构
     * 如果 field 存在就不在修改
     */
    public void hsetIfAbsent(String key, String field, String value) {
        try {
            redisTemplate.opsForHash().putIfAbsent(key, field, value);
        } catch (Exception e) {
            log.error(e.getMessage(), e);
        }
    }

    public boolean hasKey(String key) {
        return redisTemplate.hasKey(key);
    }

    /**
     * 将一个元素及其 score 值加入到有序集 key 当中
     * O(M*log(N)), N 是有序集的基数, M 为成功添加的新成员的数量
     *
     * @param key    key
     * @param value  member
     * @param source score
     * @return 是否成功
     */
    public Boolean zAdd(String key, String value, double source) {
        try {
            return redisTemplate.opsForZSet().add(key, value, source);
        } catch (Exception e) {
            log.error(e.getMessage(), e);
        }
        return null;
    }
}
2、使用redisTemplate2 区别就是注入了不同
import lombok.extern.slf4j.Slf4j;
@SuppressWarnings({"WeakerAccess", "unused"})
@Component
@Slf4j //使用了lombok的标签 方便写日志
public class RedisUtils {
    @Resource(name = "redisTemplate2")
    private RedisTemplate<String, Object> redisTemplate;
}
链接:https://www.jianshu.com/p/e00e09802d21