是什么
-
Flume是一个分布式、高可靠、高可用的日志采集系统,可实现从不同来源的系统中将大容量的日志数据采集、汇总和搬移到一个集中式的数据存储中。
-
Flume是流式大数据中的数据采集组件,可用于接收日志文件或报文数据。通过配置文件就可以定义各种数据路由方式,基本上不用编码。flume-ng agent命令是其中最主要的命令。
-
Flume的Source、Channel和Sink都支持被配置为一个或多个,以实现数据分层或叠加。Source中的选择器(selector)可实现数据路由;Source中的拦截器(interceptor)可实现数据过滤。
怎么用
- 官网下载最新版本的flume,并解压到/home/hadoop/bigdata/flume目录下
- 添加FLUME的相关配置到路径
	export FLUME_HOME=/home/hadoop/bigdata/flume
	export FLUME_CONF_DIR=$FLUME_HOME/conf
	export PATH=$FLUME_HOME/bin:$PATH
- 在/home/hadoop/bigdata/flume/conf下,把flume-env.sh.template重命名为flume-env.sh,并修改文件的如下两处设定值:
export JAVA_HOME=/usr/local/java/jdk1.8.0_261
FLUME_CLASSPATH="/home/hadoop/bigdata/flume/lib/flume-ng-core-1.9.0.jar"
事实上,笔者只修改了FLUME_CLASSPATH,因为我的hadoop用户.bashrc里面已经有了JAVA_HOME的相关定义了。
-
在控制台输入“flume-ng version”,可看到flume的具体版本
-
模拟具体的应用场景
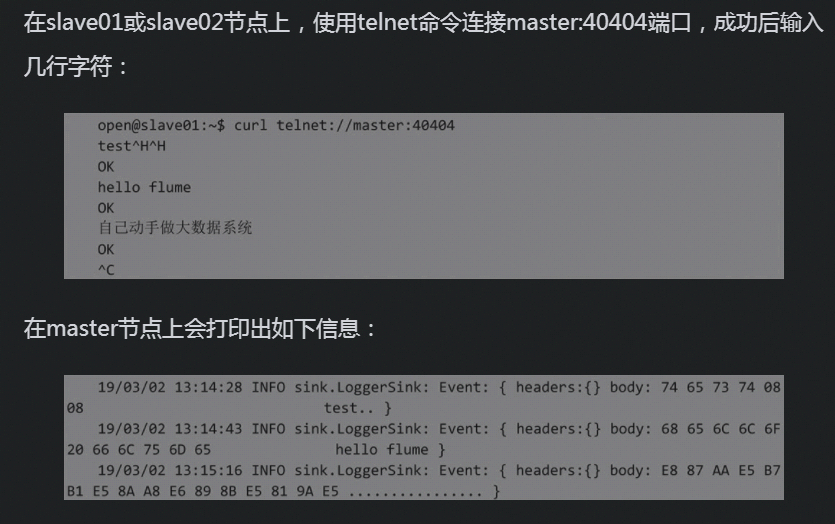
场景一:监听端口并打印收到的数据日志到控制台
#demo.conf: 单节点的Flume配置示例
# 定义Agent的名字是agent1,依次定义它的sources/sinks/channels
agent1.sources = source1
agent1.sinks = sink1
agent1.channels = channel1

# 定义source1的信源类型为netcat,将服务绑定到本机的40404端口
agent1.sources.source1.type = netcat
agent1.sources.source1.bind = 0.0.0.0
agent1.sources.source1.port = 40404

# 定义sink1的类型是logger,即Flume的控制台日志
agent1.sinks.sink1.type = logger

# 定义channel1的类型为把Event放到内存
agent1.channels.channel1.type = memory

# 将Source和Sink绑定到channel1上
agent1.sources.source1.channels = channel1
agent1.sinks.sink1.channel = channel1
运行命令:
flume-ng agent --conf-file=/home/hadoop/demo.conf --name agent1
场景二:监控某nginx日志,同步到另外一个文件目录
# 定义3种组件的名称
a1.sources = r1
a1.sinks = k1
a1.channels = c1

# 配置数据源
a1.sources.r1.type = exec
a1.sources.r1.command = tail -F /data/logs/nginx/xxx.xxxx.com-access.log

# 设定Sink类型为文件类型
a1.sinks.k1.type = file_roll
a1.sinks.k1.sink.directory = /home/hadoop/flume-log/
a1.sinks.k1.sink.pathManager.extension = dat
a1.sinks.k1.sink.pathManager.prefix = 931
a1.sinks.k1.sink.rollInterval = 30

# 设定Channel类型为内存类型
a1.channels.c1.type = memory
a1.channels.c1.capacity = 1000
a1.channels.c1.transactionCapacity = 100

# 把Source和Sink绑定到Channel
a1.sources.r1.channels = c1
a1.sinks.k1.channel = c1
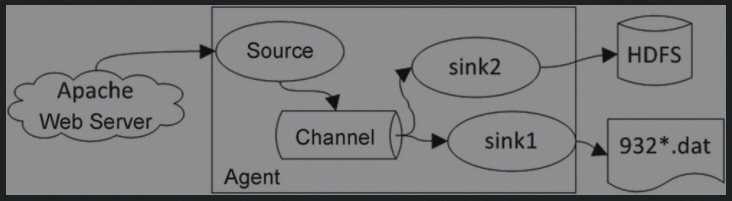
场景三:Sink的多路复用,Flume的Agent支持多个Sink,Sink支持同时把Channel中的数据写入文件和HDFS
# 定义3种组件的名称
a1.sources = r1
a1.sinks = k1 k2
a1.channels = c1

# 配置Event源
a1.sources.r1.type = exec
a1.sources.r1.command = tail -F /data/logs/nginx/xxx.xxxx.com-access.log
a1.sources.r1.interceptors = i1
a1.sources.r1.interceptors.i1.type = timestamp

# 定义文件类型的k1 Sink
a1.sinks.k1.type = file_roll
a1.sinks.k1.sink.directory = /home/hadoop/flume-log/
a1.sinks.k1.sink.pathManager.extension = dat
a1.sinks.k1.sink.pathManager.prefix = 932
a1.sinks.k1.sink.rollInterval = 0

# 定义HDFS类型的k2 Sink
a1.sinks.k2.type = hdfs
a1.sinks.k2.hdfs.path=hdfs://localhost/flume-log/%y-%m-%d
a1.sinks.k2.hdfs.userLocalTimeStamp = false
a1.sinks.k2.hdfs.rollSize = 10240000
a1.sinks.k2.hdfs.fileType = DataStream
a1.sinks.k2.hdfs.batchSize = 100

# 设定Channel类型为内存类型
a1.channels.c1.type = memory
a1.channels.c1.capacity = 1000
a1.channels.c1.transactionCapacity = 100

# 把Source和Sink绑定到Channel
a1.sources.r1.channels = c1
a1.sinks.k1.channel = c1
a1.sinks.k2.channel = c1
场景四:Channel的多路复用,Flume中的Source、Sink和Channel都可以多路复用。下面是一个Channel多路复用的例子

# 定义3种组件的名称
a1.sources = r1
a1.sinks = k1 k2
a1.channels = c1 c2

# 将Event源配置为HTTP报文类型的
a1.sources.r1.type = org.apache.flume.source.http.HTTPSource
a1.sources.r1.host = localhost
a1.sources.r1.port = 50000
a1.sources.r1.selector.type = multiplexing
a1.sources.r1.channels = c1 c2

# 配置多路复用选择器(selector)
a1.sources.r1.selector.header = city
a1.sources.r1.selector.mapping.BJ = c1
a1.sources.r1.selector.mapping.SH = c2
a1.sources.r1.selector.default = c1

# 配置k1 Sink的类型为文件类型
a1.sinks.k1.type = file_roll
a1.sinks.k1.sink.directory = /home/hadoop/flume-log/
a1.sinks.k1.sink.pathManager.extension = dat
a1.sinks.k1.sink.pathManager.prefix = http
a1.sinks.k1.sink.rollInterval = 0
a1.sinks.k1.channel = c1

#配置k2 logger类型
a1.sinks.k2.type = logger
a1.sinks.k2.channel = c2

# 配置c1和c2的类型为内存类型
a1.channels.c1.type = memory
a1.channels.c1.capacity = 1000
a1.channels.c1.transactionCapacity = 100
a1.channels.c2.type = memory
a1.channels.c2.capacity = 1000
a1.channels.c2.transactionCapacity = 100
运行命令:
flume-ng agent --conf /home/hadoop/bigdata/flume/conf/ --f /home/hadoop/934.conf --name a1 -Dflume.root.logger=INFO,console
模拟请求:
curl -X POST -d '[{"headers" :{"city" : "BJ"},"body" :"test from Beijing"}]' http://49.235.66.205:50000
curl -X POST -d '[{"headers" :{"city" : "SH"},"body" :"test from Beijing"}]' http://49.235.66.205:50000
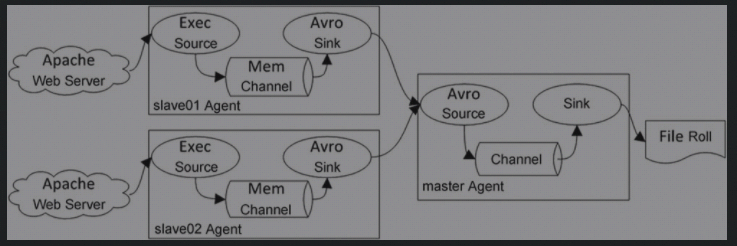
场景五:合并两个网站的日志。Flume Agent也支持多个Source。合并网站日志的数据流图如下图所示,这里分别把slave01和slave02上的Apache日志Event以Avro方式发送到master Agent上,再落地到文件中
slave01:
# Name the components on this agent
a1.sources = r1
a1.sinks = avrosink
a1.channels = c1

# Describe/configure the source
a1.sources.r1.type = exec
a1.sources.r1.command = sudo tail -F /var/log/apache2/access.log

# Describe the avro sink
a1.sinks.avrosink.type = avro
a1.sinks.avrosink.hostname = master
a1.sinks.avrosink.port = 41414

# Use a channel which buffers events in memory
a1.channels.c1.type = memory
a1.channels.c1.capacity = 1000
a1.channels.c1.transactionCapacity = 100

# Bind the source and sink to the channel
a1.sources.r1.channels = c1
a1.sinks.avrosink.channel = c1
slave02:
# Name the components on this agent
a1.sources = r1
a1.sinks = avrosink
a1.channels = c1

# Describe/configure the source
a1.sources.r1.type = exec
a1.sources.r1.command = sudo tail -F /var/log/apache2/access.log

a1.sources.r1.interceptors = i1
a1.sources.r1.interceptors.i1.type = regex_filter
a1.sources.r1.interceptors.i1.regex = .html
a1.sources.r1.interceptors.i1.excludeEvents = false

# Describe the avro sink
a1.sinks.avrosink.type = avro
a1.sinks.avrosink.hostname = master
a1.sinks.avrosink.port = 41414

# Use a channel which buffers events in memory
a1.channels.c1.type = memory
a1.channels.c1.capacity = 1000
a1.channels.c1.transactionCapacity = 100

# Bind the source and sink to the channel
a1.sources.r1.channels = c1
a1.sinks.avrosink.channel = c1
master
# Name the components on this agent
a1.sources = r1
a1.sinks = k1
a1.channels = c1
# Describe/configure the source
a1.sources.r1.type = avro
a1.sources.r1.bind = master
a1.sources.r1.port = 41414
# Describe the sink
a1.sinks.k1.type =file_roll
a1.sinks.k1.sink.directory=/home/hadoop/flume-log/
a1.sinks.k1.sink.pathManager.extension=dat
a1.sinks.k1.sink.pathManager.prefix=avro
a1.sinks.k1.sink.rollInterval=3000
# Use a channel which buffers events in memory
a1.channels.c1.type = memory
a1.channels.c1.capacity = 1000
a1.channels.c1.transactionCapacity = 100
a1.channels.c1.keep-alive = 60

# Bind the source and sink to the channel
a1.sources.r1.channels = c1
a1.sinks.k1.channel = c1