1. Flume 简介
Flume是由Cloudera软件公司提供的一个高可用的,高可靠的,分布式的海量日志采集、聚合和传输的系统,后与2009年被捐赠了apache软件基金会,为hadoop相关组件之一。 Flume 是一个从可以收集例如日志,事件等数据资源,并将这些数量庞大的数据从各项数据资源中集中起来存储的工具/服务。flume具有高可用,分布式,配置工具,其设计的原理也是基于将数据流,如日志数据从各种网站服务器上汇集起来存储到HDFS,HBase等集中存储器中。
2. Flume 架构
Flume1.0x版本中flume只有agent,由3个部分组成:
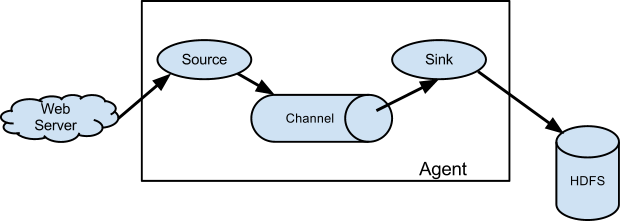
Flume NG采用的是三层架构:Agent层,Collector层和Store层,每一层均可水平拓展。其中Agent包含Source,Channel和 Sink,三者组建了一个Agent。三者的职责如下所示:
- Source:从Client收集数据,传递给Channel。可以接收外部源发送过来的数据。不同的 source,可以接受不同的数据格式。比如有目录池(spooling directory)数据源,可以监控指定文件夹中的新文件变化,如果目录中有文件产生,就会立刻读取其内容。
- Channel:是一个存储地,接收source的输出,直到有sink消费掉channel中的数据Channel中的数据直到进入到下一个channel中或者进入终端才会被删除;当sink写入失败后,可以自动重启,不会造成数据丢失,因此很可靠。
- Sink:从Channel中读取,读取成功后会删除Channel中的信息。
3. Flume NG 常见模式
- Setting multi-agent flow(设置多个agent流)

为了让数据可以流过多个agents或者hops,前面那个agent的sink和当前的hop的source都必须是avro类型并且sink还要指向source的主机名(IP地址)和端口。
这种模式是将多个flume给顺序连接起来了,从最初的source开始到最终sink传送的目的存储系统。此模式不建议桥接过多的flume数量,就像路由器的桥接一样,多了网速会慢,flume过多不仅会影响传输速率,而且一旦传输过程中某个节点flume宕机,会影响整个传输系统。
- Consolidation(结合)
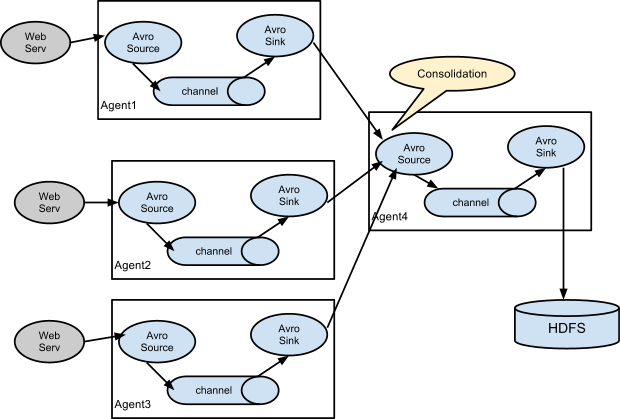
这种模式也是我们日常常见的,也非常实用,日常web应用通常分布在上百个服务器,大者甚至上千个、上万个服务器。产生的日志,处理起来也非常麻烦。用flume的这种组合方式能很好的解决这一问题,每台服务器一个flume采集日志,传送到一个集中收集日志的flume,再由此flume上传到hdfs、hive、hbase、kafka、或者入到数据库,进行日志分析。
- Multiplexing the flow(选择分流)
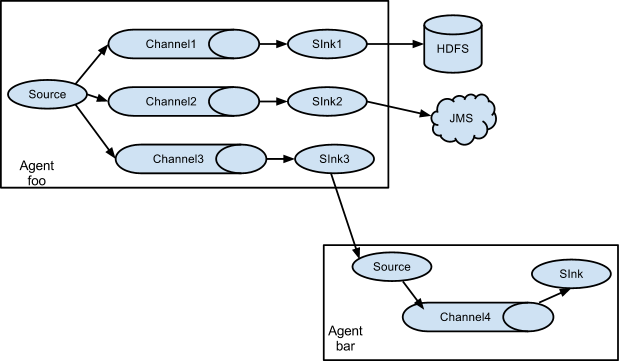
此模式,Flume支持将事件流向一个或者多个目的地。这个可以通过定义一个流的能够复制或者可选路径的多路选择器来将事件导向一个或者多个Channel来实现。这种模式将数据源复制到多个channel中,每个channel都有相同的数据,sink可以选择传送的不同的目的地。
4. Flume安装与配置
1)、官网下载Flume1.8,上传到服务器,解压到指定文件夹;
2)、配置根目录下 conf/flulme-env.sh,JAVA_HOME设置:
mv conf/flume-env.sh cof/flume-env.sh
vim comf/flume-env.sh

# Enviroment variables can be set here.
export JAVA_HOME=/usr/java/jdk1.8.0_191-amd64
3)、配置 flume 环境变量,方便输入指令;
4)、验证是否安装成功 flume-ng version :
[root@node01 conf]# flume-ng version
Flume 1.8.0
Source code repository: https://git-wip-us.apache.org/repos/asf/flume.git
Revision: 2561a23240a7*********************8f443c2080
Compiled by hshreedharan on Mon May 11 11:15:44 PDT 2015
From source with checksum b29e416802c************4233baf43f
5)、安装基于TELNET协议的远程登录客户端程序telnet程序,方便调试:
yum -y install telnet
5. Flume 模式应用
5.1 netcat 类型简单使用
netcat类型:Flume来监听一个指定端口,并将接收到的数据的每一行转换为一个event事件。
1)、创建netcat.logger文件,内容如下:
# example.conf: A single-node Flume configuration

# Name the components on this agent
a1.sources = r1
a1.sinks = k1
a1.channels = c1

# Describe/configure the source
a1.sources.r1.type = netcat
a1.sources.r1.bind = localhost
a1.sources.r1.port = 44444

# Describe the sink
a1.sinks.k1.type = logger

# Use a channel which buffers events in memory
a1.channels.c1.type = memory
a1.channels.c1.capacity = 1000
a1.channels.c1.transactionCapacity = 100

# Bind the source and sink to the channel
a1.sources.r1.channels = c1
a1.sinks.k1.channel = c1
2)、启动Flume agent:
flume-ng agent --conf ./ --conf-file netcat.logger --name a1 -Dflume.root.logger=INFO,console
3)、打开另一个终端,Telnet连接44444端口,并发送数据:
$ telnet localhost 44444
Trying 127.0.0.1...
Connected to localhost.localdomain (127.0.0.1).
Escape character is '^]'.
Hello world! <ENTER>
OK
4)、服务端控制台将会接收到数据。
5.2 exec 类型简单使用
exec 类型:Unix 等操作系统执行命令行 如 tail cat。
1)、创建exec.logger文件,内容如下:
# Name the components on this agent
a1.sources = r1
a1.sinks = k1
a1.channels = c1

# Describe/configure the source
a1.sources.r1.type = exec
a1.sources.r1.command = tail -F /root/flume.log

# Describe the sink
a1.sinks.k1.type = logger

# Use a channel which buffers events in memory
a1.channels.c1.type = memory
a1.channels.c1.capacity = 1000
a1.channels.c1.transactionCapacity = 100

# Bind the source and sink to the channel
a1.sources.r1.channels = c1
a1.sinks.k1.channel = c1
2)、启动Flume agent:
flume-ng agent --conf ./ --conf-file exec.logger --name a1 -Dflume.root.logger=INFO,console
3)、打开另一个终端,echo 指令输入内容追加到上述 /root/flume.log 文件:
$ echo Holle Flume >> /root/flume.log
4)、服务端控制台将会接收到数据。
5.3 avro 类型简单使用
avro 类型:是序列化的一种,实现了RPC(Remote Procedure Call),RPC是一种远程调用协议 。监听AVRO端口来接受来自外部AVRO客户端的事件流。
1)、创建avro.logger文件,内容如下:
a1.sources=r1
a1.channels=c1
a1.sinks=k1

a1.sources.r1.type = avro
a1.sources.r1.bind=192.168.150.101
a1.sources.r1.port=55555

a1.sinks.k1.type=logger

a1.channels.c1.type = memory
a1.channels.c1.capacity=1000
a1.channels.c1.transactionCapacity = 100

a1.sources.r1.channels=c1
a1.sinks.k1.channel=c1
2)、启动Flume agent:
--conf ./ --conf-file avro.logger --name a1 -Dflume.root.logger=INFO,console
3)、其他 flume 节点(可本地,可远程)执行:
flume-ng avro-client --conf ./ -H 192.168.150.101 -p 55555 -F ./logs
注:logs指的是本地文件。
4)、服务端控制台将会接收到数据。
5.4 netcat 类型单一Agent流输出到HDFS
1)、创建netcat_hdfs.logger文件,内容如下:
# a1 which ones we want to activate.
a1.channels = c1
a1.sources = r1
a1.sinks = k1

a1.sources.r1.type = netcat
a1.sources.r1.bind = node01
a1.sources.r1.port = 41414

a1.sinks.k1.type = hdfs
a1.sinks.k1.hdfs.path = hdfs://fzp/myflume/%y-%m-%d
a1.sinks.k1.hdfs.useLocalTimeStamp=true

# Define a memory channel called c1 on a1
a1.channels.c1.type = memory

# Define an Avro source called r1 on a1 and tell it
a1.sources.r1.channels = c1
a1.sinks.k1.channel = c1
2)、启动Flume agent:
flume-ng agent --conf ./ --conf-file netcat_hdfs.logger --name a1 -Dflume.root.logger=INFO,console
3)、打开另一个终端,Telnet连接44444端口,并发送数据:
$ telnet localhost 44444
Trying 127.0.0.1...
Connected to localhost.localdomain (127.0.0.1).
Escape character is '^]'.
Hello world! <ENTER>
OK
4)、数据将会存储到HDFS分布式文件存储系统。
5.5 多个Agent流
1)、在node01节点创建netcat2.logger文件,内容如下:
# Name the components on this agent
 a1.sources = r1
 a1.sinks = k1
 a1.channels = c1

 # Describe/configure the source
 a1.sources.r1.type = netcat
 a1.sources.r1.bind = node01
 a1.sources.r1.port = 44444

 # Describe the sink 输出到node02:60000
 a1.sinks.k1.type = avro
 a1.sinks.k1.hostname = node02
 a1.sinks.k1.port = 60000


 # Use a channel which buffers events in memory
 a1.channels.c1.type = memory
 a1.channels.c1.capacity = 1000
 a1.channels.c1.transactionCapacity = 100

 # Bind the source and sink to the channel
 a1.sources.r1.channels = c1
 a1.sinks.k1.channel = c1
2)、在node02节点创建avro2.logger文件,内容如下:
#flume-ng agent --conf ./ --conf-file avro2 -n a1
a1.sources = r1
a1.sinks = k1
a1.channels = c1

a1.sources.r1.type = avro
a1.sources.r1.bind = node02
a1.sources.r1.port = 60000

a1.sinks.k1.type = logger

# Use a channel which buffers events in memory
a1.channels.c1.type = memory
a1.channels.c1.capacity = 1000
a1.channels.c1.transactionCapacity = 100

# Bind the source and sink to the channel
a1.sources.r1.channels = c1
a1.sinks.k1.channel = c1
3)、先启动 node02 节点的 Flume agent:
--conf ./ --conf-file avro2.logger --name a1 -Dflume.root.logger=INFO,console
4)、打开任意一个终端,Telnet连接44444端口,并发送数据:
$ telnet node01 44444
Trying 192.168.150.101...
Connected to localhost.localdomain (node01).
Escape character is '^]'.
Hello world! <ENTER>
OK
5)、服务端控制台将会接收到数据。