目录
Flume-1.9.0安装、监听端口、监控本地文件并上传HDFS、监控目录新文件并上传HDFS、监控追加文件(断点续传)
Flume结构
Flume的执行过程:Sources——Channel Processor——Interceptors——Channel Selector——Channels——Sink Processor——Sinks
其中,从Soucrce到Channel和从Channel到Sink存在事务(put和take)
Avro串联

为了在多个Agent或跃点之间流动数据,前一个Agent的sink和当前Agent的source必须是avro类型,sink指向source的主机名(或IP地址)和端口。这是其他复杂结构的基础,但不建议连接过多的flume,因为flume数量过多不仅会影响传输速率,而且一旦传输过程中某个节点flume宕机,会影响整个传输系统。
复制和多路复用

Flume支持将事件流多路传输到一个或多个目的地。这是通过定义一个流复用器来实现的,该流复用器可以将事件复制或有选择地路由到一个或多个channel。
上面这个例子可以看到,叫做foo的Agent的source可以将数据流分到三个不同的channel。在选择channel时(Channel Selector)可以是复制(Replicating)或多路复用(Multiplexing)。
对于复制,每个事件都会发送到所有通道。对于多路复用,当事件的属性与预先配置的值匹配时,将事件传递到对应的可用通道。比如下面官方给定例子,如果事件的属性被设置为CZ,则选择c1通道;如果事件的属性被设置为US,则选择c2和c3通道;否则选择c4通道;
a1.sources = r1
a1.channels = c1 c2 c3 c4
a1.sources.r1.selector.type = multiplexing
a1.sources.r1.selector.header = state
a1.sources.r1.selector.mapping.CZ = c1
a1.sources.r1.selector.mapping.US = c2 c3
a1.sources.r1.selector.default = c4
Channel Selector默认选择复制策略(Replicating)
负载均衡和故障转移

Sink Processor共有三种类型,分别是DefaultSinkProcessor、LoadBalancingSinkProcessor和FailoverSinkProcessor。
DefaultSinkProcessor 对 应 的 是 单 个 的 Sink ,LoadBalancingSinkProcessor和FailoverSinkProcessor对应的是Sink Group,LoadBalancingSinkProcessor可以实现负载均衡的功能,FailoverSinkProcessor可以实现故障转移的功能。
聚合

这种模式是非常常见的,也非常实用。日常web应用通常分布在成千上万个服务器,产生的日志非常多,处理起来也非常麻烦。用flume能很好的解决这一问题,每台服务器部署一个flume采集日志,传送到一个集中收集日志的flume,再由此flume上传到hdfs、hive、hbase等,进行日志分析。
事务机制
Flume的事务机制(类似数据库的事务机制):Flume使用两个独立的事务分别负责从Soucrce到Channel,以及从Channel到Sink的事件传递。比如spooling directory source为文件的每一行创建一个事件,一旦事务中所有的事件全部传递到Channel且提交成功,那么Soucrce就将该文件标记为完成。同理,事务以类似的方式处理从Channel到Sink的传递过程,如果因为某种原因使得事件无法记录,那么事务将会回滚。且所有的事件都会保持到Channel中,等待重新传递。
根据Flume的架构原理,Flume是不可能丢失数据的,其内部有完善的事务机制,Source到Channel是事务性的,Channel到Sink是事务性的,因此这两个环节不会出现数据的丢失,唯一可能丢失数据的情况是Channel采用memoryChannel,agent宕机导致数据丢失,或者Channel存储数据已满,导致Source不再写入,未写入的数据丢失。
Flume不会丢失数据,但是有可能造成数据的重复,例如数据已经成功由Sink发出,但是没有接收到响应,Sink会再次发送数据,此时可能会导致数据的重复。
案例一:单数据源多出口
案例分析
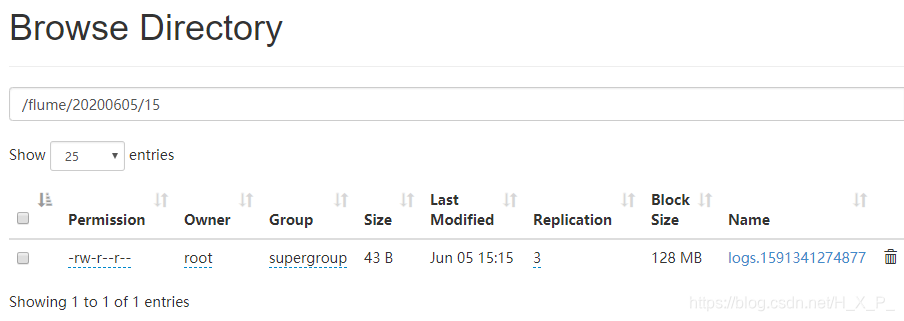
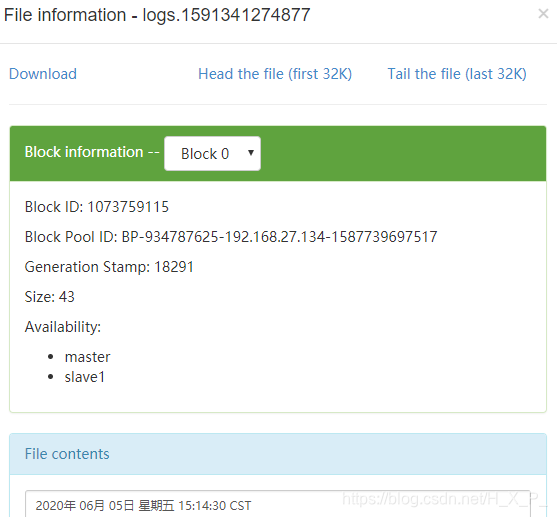
使用Flume1监控文件变动,Flume1将变动内容传递给Flume2,Flume2负责存储到HDFS。同时 Flume1将变动内容传递给Flume3,Flume3负责输出到Local FileSystem。
案例步骤
-
创建一个空文件:touch date.txt
-
启动HDFS和Yarn:start-dfs.sh,start-yarn.sh
-
创建三个配置文件,flume1.conf,flume2.conf,flume3.conf:
第一个Agent的名字叫flume1,有一个source叫r1,有两个channel叫c1和c2,有两个sink叫k1和k2。source的类型是taildir,监控本地文件date.txt。sink的类型是avro,两个sink的端口不一样,对接其它两个Agent。channel的类型是memory。
Sink Processor有三种类型,分别是DefaultSinkProcessor、LoadBalancingSinkProcessor和FailoverSinkProcessor。要将一个数据源的数据发送到不同的地方,一个sink绑定一个channel,就需要有多个channel和sink。# Name the components on this agent a1.sources = r1 a1.channels = c1 c2 a1.sinks = k1 k2 将数据复制给所有channel# 将数据复制给所有channel(默认,可不写) a1.sources.r1.selector.type = replicating # Describe/configure the source a1.sources.r1.type = TAILDIR a1.sources.r1.filegroups = f1 a1.sources.r1.filegroups.f1 = /opt/flume-1.9.0/date.txt a1.sources.r1.positionFile = /opt/flume-1.9.0/file/position.json # Describe the sink a1.sinks.k1.type = avro a1.sinks.k1.hostname = master a1.sinks.k1.port = 44444 a1.sinks.k2.type = avro a1.sinks.k2.hostname = master a1.sinks.k2.port = 55555 # Use a channel which buffers events in memory a1.channels.c1.type = memory a1.channels.c1.capacity = 1000 a1.channels.c1.transactionCapacity = 100 a1.channels.c2.type = memory a1.channels.c2.capacity = 1000 a1.channels.c2.transactionCapacity = 100 # Bind the source and sink to the channel a1.sources.r1.channels = c1 c2 a1.sinks.k1.channel = c1 a1.sinks.k2.channel = c2第二个Agent的source的类型是avro,对接第一个Agent。sink的类型是HDFS。
# Name the components on this agent a2.sources = r1 a2.channels = c1 a2.sinks = k1 # Describe/configure the source a2.sources.r1.type = avro a2.sources.r1.bind = master a2.sources.r1.port = 44444 # Describe the sink a2.sinks.k1.type = hdfs a2.sinks.k1.hdfs.path = hdfs://master:9000/a/%Y%m%d/%H a2.sinks.k1.hdfs.filePrefix = logs a2.sinks.k1.hdfs.round = true a2.sinks.k1.hdfs.roundValue = 1 a2.sinks.k1.hdfs.roundUnit = hour a2.sinks.k1.hdfs.useLocalTimeStamp = true a2.sinks.k1.hdfs.batchSize = 100 a2.sinks.k1.hdfs.fileType = DataStream a2.sinks.k1.hdfs.rollInterval = 30 a2.sinks.k1.hdfs.rollSize = 134217700 a2.sinks.k1.hdfs.rollCount = 0 # Use a channel which buffers events in memory a2.channels.c1.type = memory a2.channels.c1.capacity = 1000 a2.channels.c1.transactionCapacity = 100 # Bind the source and sink to the channel a2.sources.r1.channels = c1 a2.sinks.k1.channel = c1第三个Agent的source的类型也是avro,对接第一个Agent。sink的类型是file_roll。
# Name the components on this agent a3.sources = r1 a3.channels = c1 a3.sinks = k1 # Describe/configure the source a3.sources.r1.type = avro a3.sources.r1.bind = master a3.sources.r1.port = 55555 # Describe the sink a3.sinks.k1.type = file_roll a3.sinks.k1.sink.directory = /opt/flume-1.9.0/file # Use a channel which buffers events in memory a3.channels.c1.type = memory a3.channels.c1.capacity = 1000 a3.channels.c1.transactionCapacity = 100 # Bind the source and sink to the channel a3.sources.r1.channels = c1 a3.sinks.k1.channel = c1 -
分别启动flume2,flume3,flume1。注意1在最后,因为avro source需要作为服务端。
bin/flume-ng agent -c conf -f flume2.conf -n a2 -Dflume.root.logger=INFO,console bin/flume-ng agent -c conf -f flume3.conf -n a3 -Dflume.root.logger=INFO,console bin/flume-ng agent -c conf -f flume1.conf -n a1 -Dflume.root.logger=INFO,console -
输入 date > date.txt 修改文件

案例二:故障转移(Failover)
案例分析
使用Flume1监控一个端口,其sink组中的sink分别对接Flume2和Flume3,采用FailoverSinkProcessor,实现故障转移的功能。
案例步骤
-
创建三个配置文件,flume1.conf,flume2.conf,flume3.conf:
第一个Agent增加了一个Sink Groups的配置,使用failover策略。注意,k2的优先级大于k1,所以k2对应的flume是activated,而k1对应的flume是standby# Name the components on this agent a1.sources = r1 a1.channels = c1 a1.sinks = k1 k2 a1.sinkgroups = g1 # Describe/configure the source a1.sources.r1.type = netcat a1.sources.r1.bind = master a1.sources.r1.bind = 33333 # Describe the sink a1.sinks.k1.type = avro a1.sinks.k1.hostname = master a1.sinks.k1.port = 44444 a1.sinks.k2.type = avro a1.sinks.k2.hostname = master a1.sinks.k2.port = 55555 # Sink groups a1.sinkgroups.g1.sinks = k1 k2 a1.sinkgroups.g1.processor.type = failover a1.sinkgroups.g1.processor.priority.k1 = 50 a1.sinkgroups.g1.processor.priority.k2 = 100 a1.sinkgroups.g1.processor.maxpenalty = 10000 # Use a channel which buffers events in memory a1.channels.c1.type = memory a1.channels.c1.capacity = 1000 a1.channels.c1.transactionCapacity = 100 # Bind the source and sink to the channel a1.sources.r1.channels = c1 a1.sinks.k1.channel = c1 a1.sinks.k2.channel = c1第二个Agent的sink类型是logger
 # Name the components on this agent
 a2.sources = r1
 a2.channels = c1
 a2.sinks = k1

 # Describe/configure the source
 a2.sources.r1.type = avro
 a2.sources.r1.bind = master
 a2.sources.r1.port = 44444

 # Describe the sink
 a2.sinks.k1.type = logger

 # Use a channel which buffers events in memory
 a2.channels.c1.type = memory
 a2.channels.c1.capacity = 1000
 a2.channels.c1.transactionCapacity = 100

 # Bind the source and sink to the channel
 a2.sources.r1.channels = c1
 a2.sinks.k1.channel = c1
第二个和第三个Agent的配置类似,只是端口号不同
# Name the components on this agent a3.sources = r1 a3.channels = c1 a3.sinks = k1 # Describe/configure the source a3.sources.r1.type = avro a3.sources.r1.bind = master a3.sources.r1.port = 55555 # Describe the sink a3.sinks.k1.type = logger # Use a channel which buffers events in memory a3.channels.c1.type = memory a3.channels.c1.capacity = 1000 a3.channels.c1.transactionCapacity = 100 # Bind the source and sink to the channel a3.sources.r1.channels = c1 a3.sinks.k1.channel = c1 -
分别启动flume2,flume3,flume1。
bin/flume-ng agent -c conf -f flume2.conf -n a2 -Dflume.root.logger=INFO,console bin/flume-ng agent -c conf -f flume3.conf -n a3 -Dflume.root.logger=INFO,console bin/flume-ng agent -c conf -f flume1.conf -n a1 -Dflume.root.logger=INFO,console -
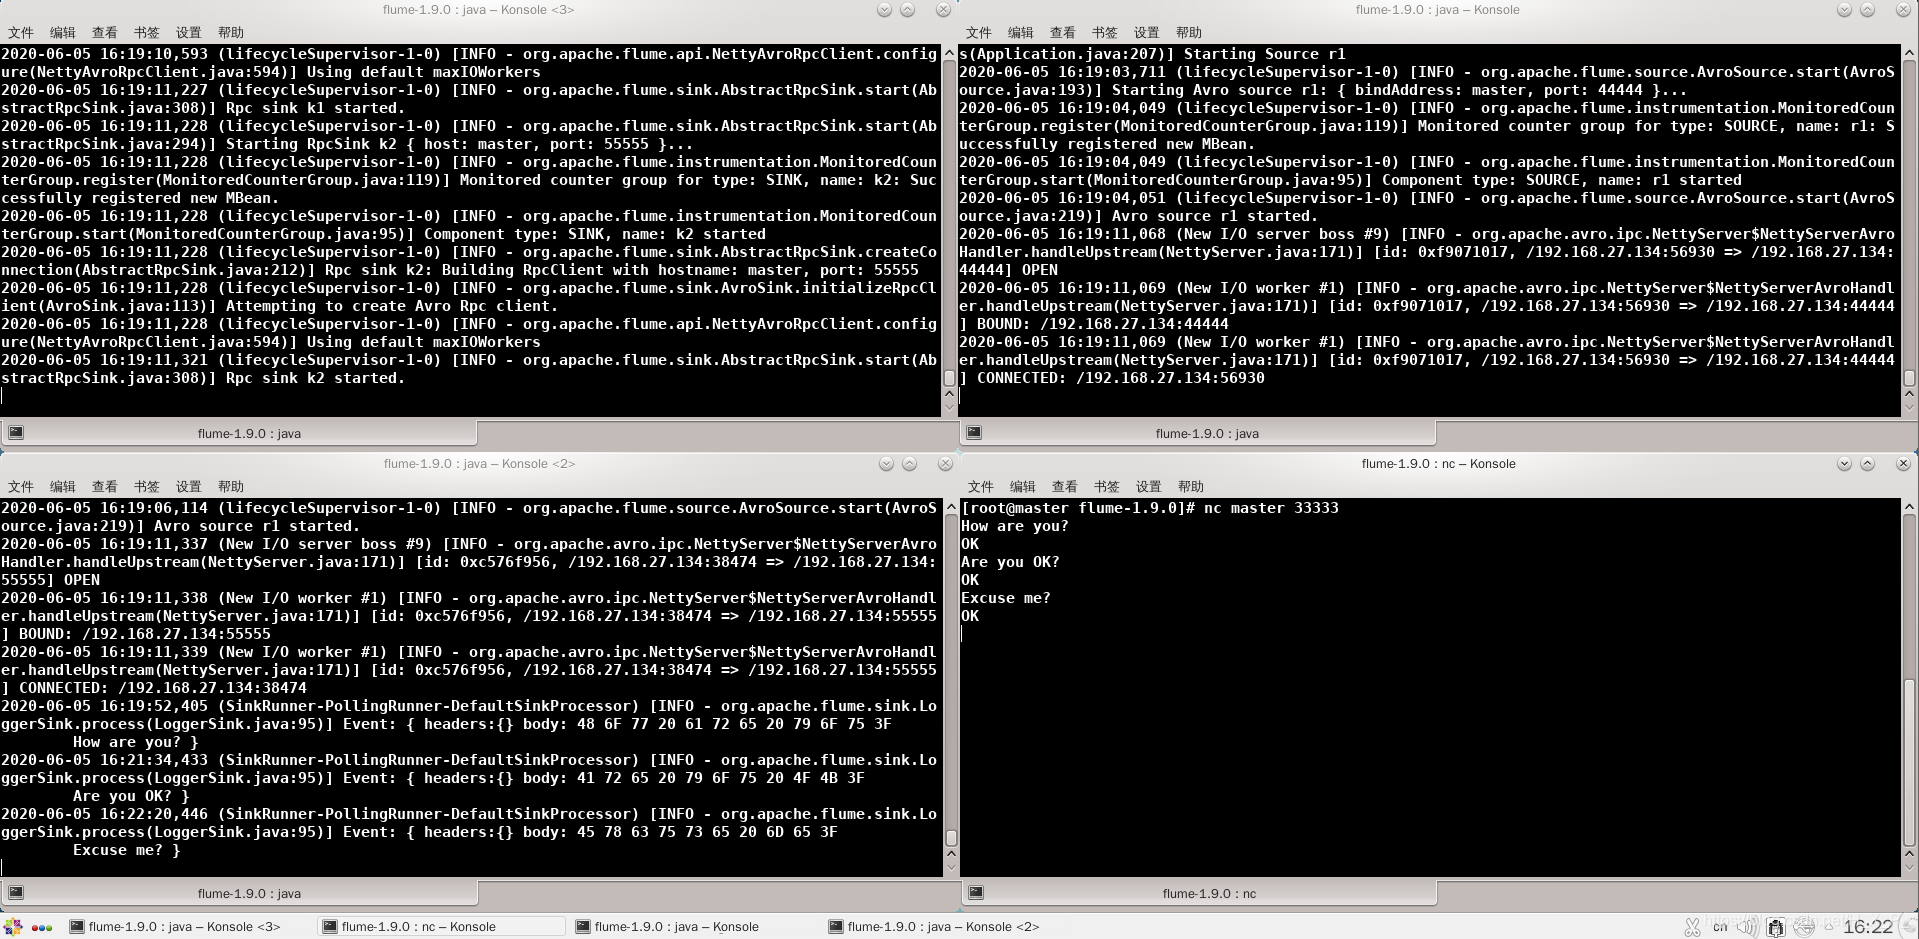
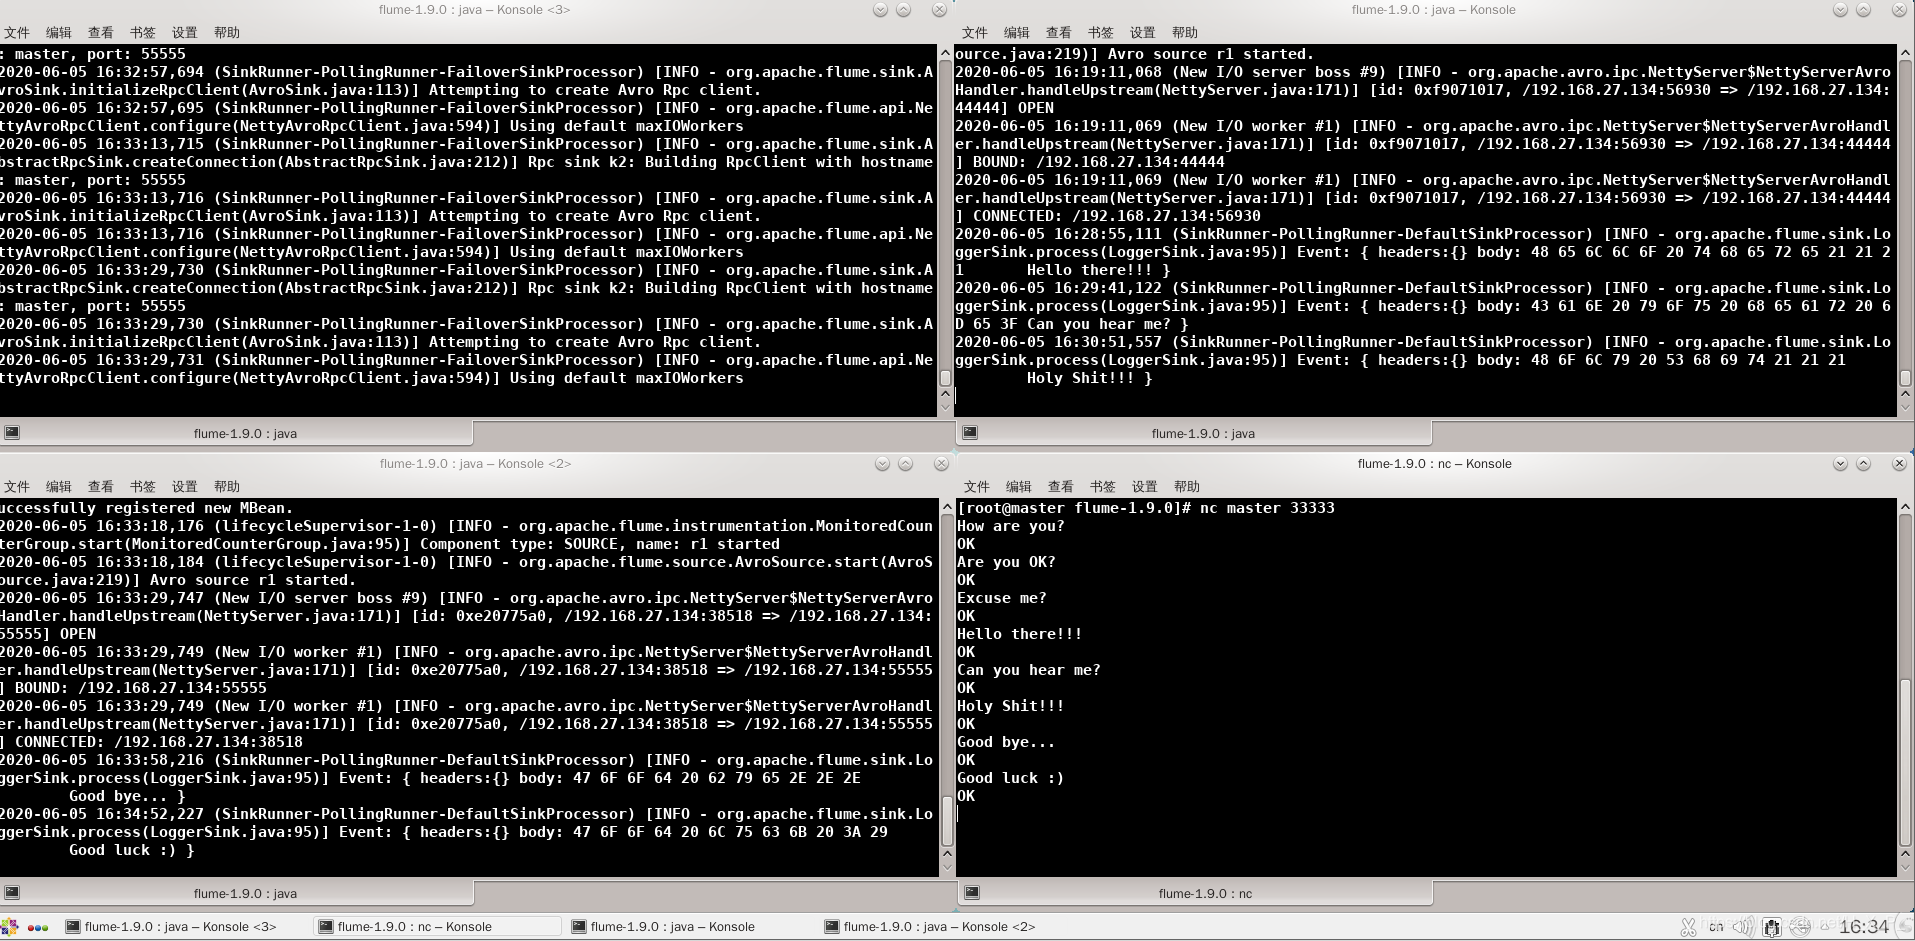
启动新终端,输入nc master 33333,然后输入东西。
左上角是flume1,右上角是flume2,左下角是flume3,右下角是客户端。由于flume3的优先级大于flume2,所以flume3是activated的,flume3能够接收到信息。
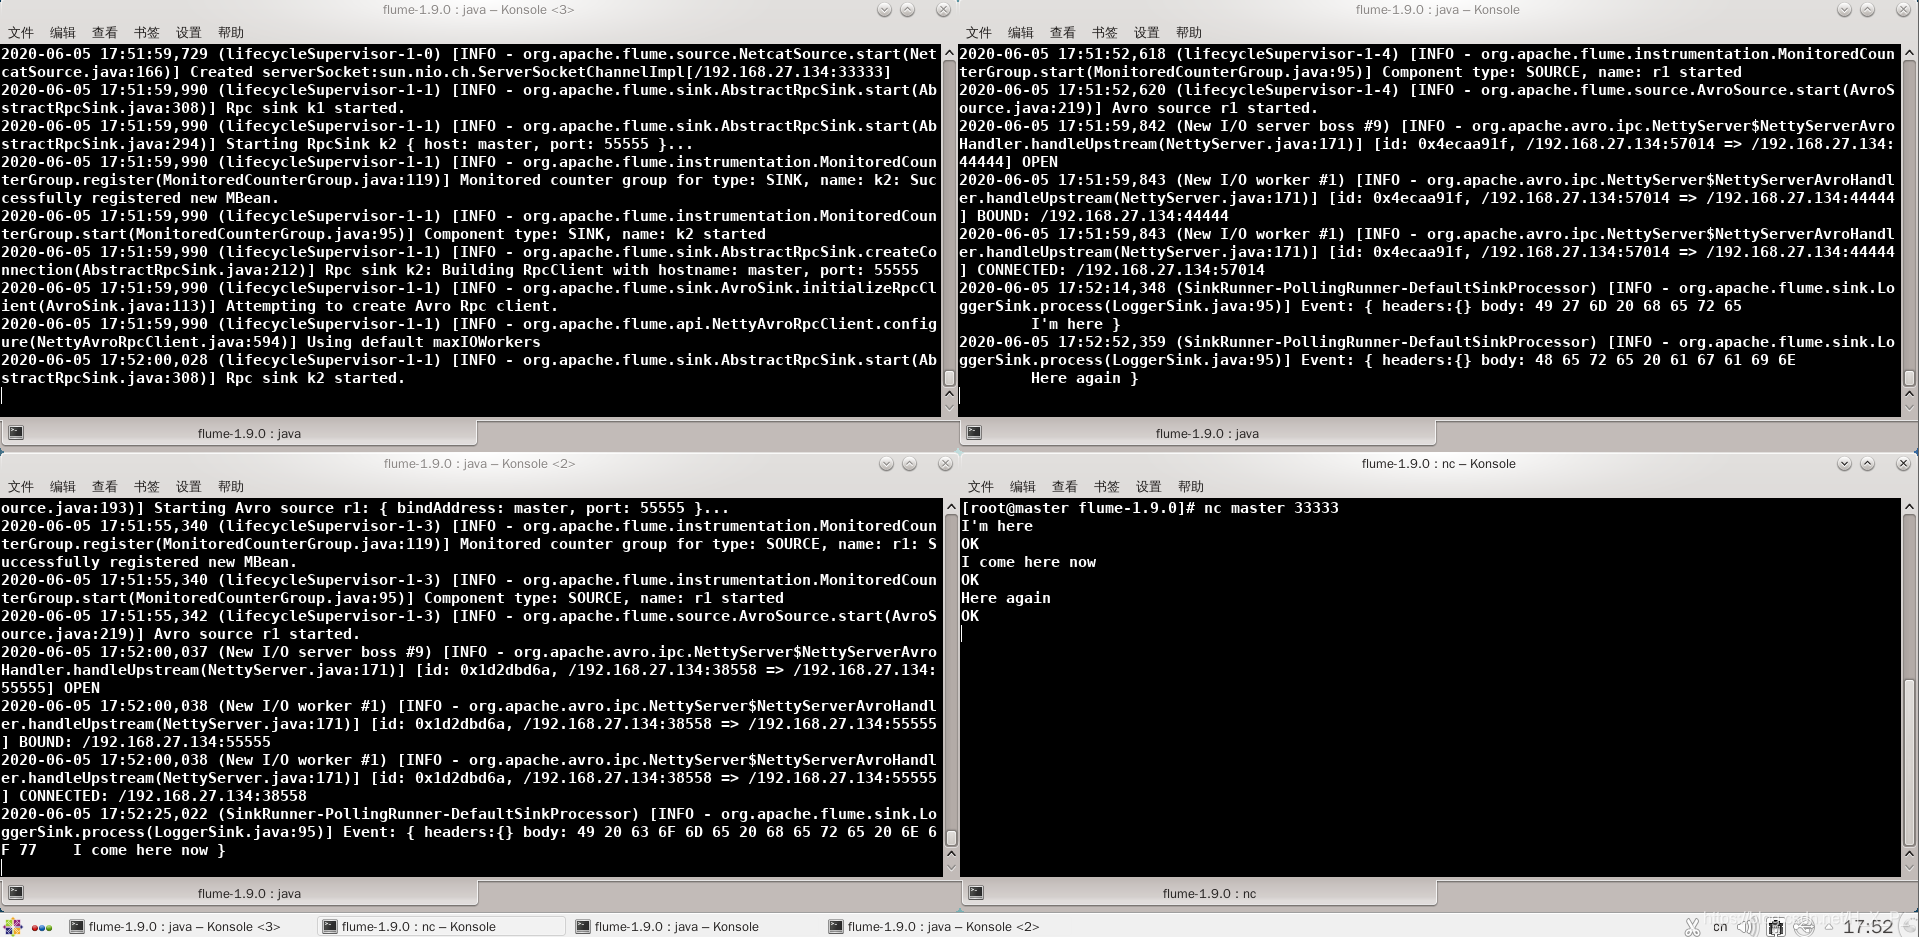
此时,flume3挂了,那么flume2就转正,由standby变为activated,能够接收消息。
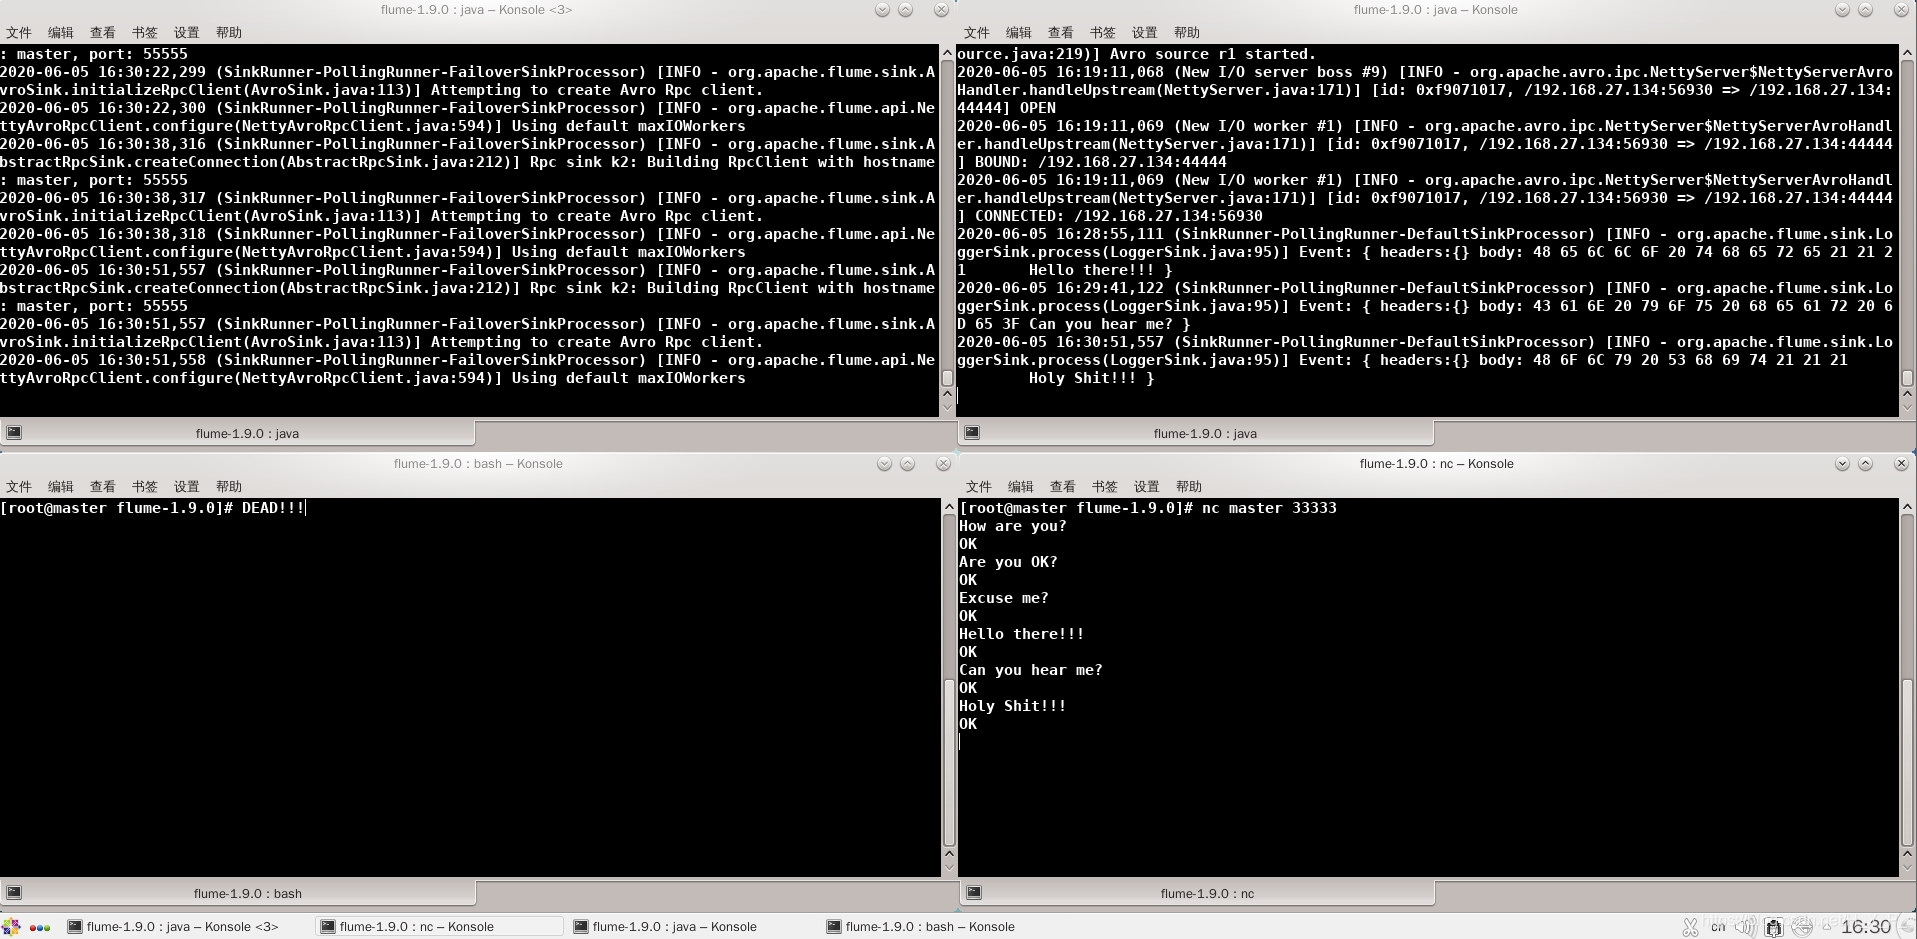
此时,flume3复活了,由于flume3的优先级大于flume2,flume3又可以接收消息了。
案例三:负载均衡
案例步骤
-
创建三个配置文件,flume1.conf,flume2.conf,flume3.conf。其中,flume2.conf和flume3.conf和案例二的flume2、flume3一样。flume1只是Sink Groups的策略改变了。下面是flume1的配置:
# Name the components on this agent a1.sources = r1 a1.channels = c1 a1.sinks = k1 k2 a1.sinkgroups = g1 # Describe/configure the source a1.sources.r1.type = netcat a1.sources.r1.bind = master a1.sources.r1.port = 33333 # Describe the sink a1.sinks.k1.type = avro a1.sinks.k1.hostname = master a1.sinks.k1.port = 44444 a1.sinks.k2.type = avro a1.sinks.k2.hostname = master a1.sinks.k2.port = 55555 # Sink groups a1.sinkgroups.g1.sinks = k1 k2 a1.sinkgroups.g1.processor.type = load_balance a1.sinkgroups.g1.processor.backoff = true a1.sinkgroups.g1.processor.selector = random # Use a channel which buffers events in memory a1.channels.c1.type = memory a1.channels.c1.capacity = 1000 a1.channels.c1.transactionCapacity = 100 # Bind the source and sink to the channel a1.sources.r1.channels = c1 a1.sinks.k1.channel = c1 a1.sinks.k2.channel = c1 -
分别启动flume2,flume3,flume1。启动新终端,输入nc master 33333,然后输入东西。
左上角是flume1,右上角是flume2,左下角是flume3,右下角是客户端。
案例四:聚合
案例分析
slave1上的Flume1监控一个端口的数据,slave2上的Flume2监控本地文件date.txt,Flume1与Flume2将数据发送给master上的Flume3,Flume3将数据打印到控制台。
案例步骤
-
在slave1创建配置文件flume1.conf。source的类型是netcat,监听端口。:sink的类型是avro,与flume3对接。
# Name the components on this agent a1.sources = r1 a1.channels = c1 a1.sinks = k1 # Describe/configure the source a1.sources.r1.type = netcat a1.sources.r1.bind = localhost a1.sources.r1.port = 33333 # Describe the sink a1.sinks.k1.type = avro a1.sinks.k1.hostname = master a1.sinks.k1.port = 44444 # Use a channel which buffers events in memory a1.channels.c1.type = memory a1.channels.c1.capacity = 1000 a1.channels.c1.transactionCapacity = 100 # Bind the source and sink to the channel a1.sources.r1.channels = c1 a1.sinks.k1.channel = c1在slave2创建配置文件flume2.conf。source的类型是exec,监听文件。:sink的类型是avro,与flume3对接。
# Name the components on this agent a2.sources = r1 a2.channels = c1 a2.sinks = k1 # Describe/configure the source a2.sources.r1.type = exec a2.sources.r1.command = tail -F /opt/flume-1.9.0/date.txt # Describe the sink a2.sinks.k1.type = avro a2.sinks.k1.hostname = master a2.sinks.k1.port = 44444 # Use a channel which buffers events in memory a2.channels.c1.type = memory a2.channels.c1.capacity = 1000 a2.channels.c1.transactionCapacity = 100 # Bind the source and sink to the channel a2.sources.r1.channels = c1 a2.sinks.k1.channel = c1在master创建配置文件flume3.conf。source的类型是avro,接收flume1和flume2发来的数据。:sink的类型是logger,将接收到的数据写出到控制台。
# Name the components on this agent a3.sources = r1 a3.channels = c1 a3.sinks = k1 # Describe/configure the source a3.sources.r1.type = avro a3.sources.r1.bind = master a3.sources.r1.port = 44444 # Describe the sink a3.sinks.k1.type = logger # Use a channel which buffers events in memory a3.channels.c1.type = memory a3.channels.c1.capacity = 1000 a3.channels.c1.transactionCapacity = 100 # Bind the source and sink to the channel a3.sources.r1.channels = c1 a3.sinks.k1.channel = c1 -
分别启动flume2,flume3,flume1。
-
在slave1输入nc localhost 33333,然后发数据
-
在slave2输入date > date.txt
-
在master可以看到接收的数据