使用STM32接一个4×4键盘,在串口发送读取到的值。 我使用的是STM32F103RC微控制器,4×4矩阵键盘,如下所示

1、键盘原理简介
下面使用的方法可以普遍使用在任何类型的键盘或微控制器,不仅仅局限于使用连续的IO口
键盘中的键分为行和列,使用这个来找出按下了哪个键。如上图所示,键盘上有16个键,它们分为4行4列。 一行中的所有键都是相互连接的,单个列中的所有键都是相互连接的,如下图所示


每当按下键时,行和列之间的连接就会完成,列引脚将读取0,这将告诉我们行和列都是0(低),我们将知道按下了什么键。假设我按了"5"识别这个数,把第二行拉到低,检查列。 每当按下“5”时,第二列将变0(低),因为第二行和第二列之间已经连通。那么这种组合情况就被定义为“5”,整个键盘4x4组合就有16种情况,就是定义的16个数字或者字符。
2、工程定义
开启调试下载:

开启外部时钟:

选择72MHz

按键的定义,使用PB0-PB7这个8个口,不一定要使用连续的I/O口。按键要看清楚,4个输出,4个输入。

开启USART1 串口:

3、代码编写
创建一个文件,保存keypad.c和keypad.h文件。

添加头自己创建的头文件路径,不然会报错:

printf函数重定向,添加键盘头文件:
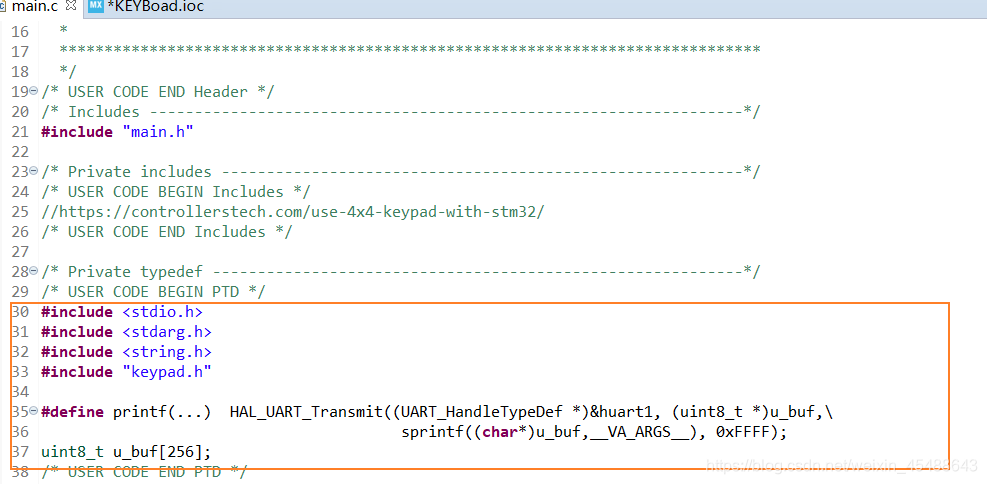
/* USER CODE BEGIN PTD */
#include <stdio.h>
#include <stdarg.h>
#include <string.h>
#include "keypad.h"

#define printf(...)  HAL_UART_Transmit((UART_HandleTypeDef *)&huart1, (uint8_t *)u_buf,\
		                                sprintf((char*)u_buf,__VA_ARGS__), 0xFFFF);
uint8_t u_buf[256];
/* USER CODE END PTD */
keypad.h头文件:
/*
 * keypad.h
 *
 *  Created on: Aug 27, 2020
 *      Author: HUAWEI
 */

#ifndef KEYPAD_KEYPAD_H_
#define KEYPAD_KEYPAD_H_

#define R1_PORT GPIOB
#define R1_PIN GPIO_PIN_7

#define R2_PORT GPIOB
#define R2_PIN GPIO_PIN_6

#define R3_PORT GPIOB
#define R3_PIN GPIO_PIN_5

#define R4_PORT GPIOB
#define R4_PIN GPIO_PIN_4

#define C1_PORT GPIOB
#define C1_PIN GPIO_PIN_3

#define C2_PORT GPIOB
#define C2_PIN GPIO_PIN_2

#define C3_PORT GPIOB
#define C3_PIN GPIO_PIN_1

#define C4_PORT GPIOB
#define C4_PIN GPIO_PIN_0


char read_keypad (void);


#endif /* KEYPAD_KEYPAD_H_ */
keypad.c 文件内容:
/*
 * keypad.c
 *
 *  Created on: Aug 27, 2020
 *      Author: HUAWEI
 */

#include "main.h"
#include "keypad.h"


char read_keypad (void)
{


	/* Make ROW 1 LOW and all other ROWs HIGH */
	HAL_GPIO_WritePin (R1_PORT, R1_PIN, GPIO_PIN_RESET);  //Pull the R1 low
	HAL_GPIO_WritePin (R2_PORT, R2_PIN, GPIO_PIN_SET);  // Pull the R2 High
	HAL_GPIO_WritePin (R3_PORT, R3_PIN, GPIO_PIN_SET);  // Pull the R3 High
	HAL_GPIO_WritePin (R4_PORT, R4_PIN, GPIO_PIN_SET);  // Pull the R4 High

	if (!(HAL_GPIO_ReadPin (C1_PORT, C1_PIN)))   // if the Col 1 is low
	{


		while (!(HAL_GPIO_ReadPin (C1_PORT, C1_PIN)));   // wait till the button is pressed
		return '1';
	}

	if (!(HAL_GPIO_ReadPin (C2_PORT, C2_PIN)))   // if the Col 2 is low
	{


		while (!(HAL_GPIO_ReadPin (C2_PORT, C2_PIN)));   // wait till the button is pressed
		return '2';
	}

	if (!(HAL_GPIO_ReadPin (C3_PORT, C3_PIN)))   // if the Col 3 is low
	{


		while (!(HAL_GPIO_ReadPin (C3_PORT, C3_PIN)));   // wait till the button is pressed
		return '3';
	}

	if (!(HAL_GPIO_ReadPin (C4_PORT, C4_PIN)))   // if the Col 4 is low
	{


		while (!(HAL_GPIO_ReadPin (C4_PORT, C4_PIN)));   // wait till the button is pressed
		return 'A';
	}

	/* Make ROW 2 LOW and all other ROWs HIGH */
	HAL_GPIO_WritePin (R1_PORT, R1_PIN, GPIO_PIN_SET);  //Pull the R1 low
	HAL_GPIO_WritePin (R2_PORT, R2_PIN, GPIO_PIN_RESET);  // Pull the R2 High
	HAL_GPIO_WritePin (R3_PORT, R3_PIN, GPIO_PIN_SET);  // Pull the R3 High
	HAL_GPIO_WritePin (R4_PORT, R4_PIN, GPIO_PIN_SET);  // Pull the R4 High

	if (!(HAL_GPIO_ReadPin (C1_PORT, C1_PIN)))   // if the Col 1 is low
	{


		while (!(HAL_GPIO_ReadPin (C1_PORT, C1_PIN)));   // wait till the button is pressed
		return '4';
	}

	if (!(HAL_GPIO_ReadPin (C2_PORT, C2_PIN)))   // if the Col 2 is low
	{


		while (!(HAL_GPIO_ReadPin (C2_PORT, C2_PIN)));   // wait till the button is pressed
		return '5';
	}

	if (!(HAL_GPIO_ReadPin (C3_PORT, C3_PIN)))   // if the Col 3 is low
	{


		while (!(HAL_GPIO_ReadPin (C3_PORT, C3_PIN)));   // wait till the button is pressed
		return '6';
	}

	if (!(HAL_GPIO_ReadPin (C4_PORT, C4_PIN)))   // if the Col 4 is low
	{


		while (!(HAL_GPIO_ReadPin (C4_PORT, C4_PIN)));   // wait till the button is pressed
		return 'B';
	}


	/* Make ROW 3 LOW and all other ROWs HIGH */
	HAL_GPIO_WritePin (R1_PORT, R1_PIN, GPIO_PIN_SET);  //Pull the R1 low
	HAL_GPIO_WritePin (R2_PORT, R2_PIN, GPIO_PIN_SET);  // Pull the R2 High
	HAL_GPIO_WritePin (R3_PORT, R3_PIN, GPIO_PIN_RESET);  // Pull the R3 High
	HAL_GPIO_WritePin (R4_PORT, R4_PIN, GPIO_PIN_SET);  // Pull the R4 High

	if (!(HAL_GPIO_ReadPin (C1_PORT, C1_PIN)))   // if the Col 1 is low
	{


		while (!(HAL_GPIO_ReadPin (C1_PORT, C1_PIN)));   // wait till the button is pressed
		return '7';
	}

	if (!(HAL_GPIO_ReadPin (C2_PORT, C2_PIN)))   // if the Col 2 is low
	{


		while (!(HAL_GPIO_ReadPin (C2_PORT, C2_PIN)));   // wait till the button is pressed
		return '8';
	}

	if (!(HAL_GPIO_ReadPin (C3_PORT, C3_PIN)))   // if the Col 3 is low
	{


		while (!(HAL_GPIO_ReadPin (C3_PORT, C3_PIN)));   // wait till the button is pressed
		return '9';
	}

	if (!(HAL_GPIO_ReadPin (C4_PORT, C4_PIN)))   // if the Col 4 is low
	{


		while (!(HAL_GPIO_ReadPin (C4_PORT, C4_PIN)));   // wait till the button is pressed
		return 'C';
	}


	/* Make ROW 4 LOW and all other ROWs HIGH */
	HAL_GPIO_WritePin (R1_PORT, R1_PIN, GPIO_PIN_SET);  //Pull the R1 low
	HAL_GPIO_WritePin (R2_PORT, R2_PIN, GPIO_PIN_SET);  // Pull the R2 High
	HAL_GPIO_WritePin (R3_PORT, R3_PIN, GPIO_PIN_SET);  // Pull the R3 High
	HAL_GPIO_WritePin (R4_PORT, R4_PIN, GPIO_PIN_RESET);  // Pull the R4 High

	if (!(HAL_GPIO_ReadPin (C1_PORT, C1_PIN)))   // if the Col 1 is low
	{


		while (!(HAL_GPIO_ReadPin (C1_PORT, C1_PIN)));   // wait till the button is pressed
		return '*';
	}

	if (!(HAL_GPIO_ReadPin (C2_PORT, C2_PIN)))   // if the Col 2 is low
	{


		while (!(HAL_GPIO_ReadPin (C2_PORT, C2_PIN)));   // wait till the button is pressed
		return '0';
	}

	if (!(HAL_GPIO_ReadPin (C3_PORT, C3_PIN)))   // if the Col 3 is low
	{


		while (!(HAL_GPIO_ReadPin (C3_PORT, C3_PIN)));   // wait till the button is pressed
		return '#';
	}

	if (!(HAL_GPIO_ReadPin (C4_PORT, C4_PIN)))   // if the Col 4 is low
	{


		while (!(HAL_GPIO_ReadPin (C4_PORT, C4_PIN)));   // wait till the button is pressed
		return 'D';
	}

}
main.c 添加:
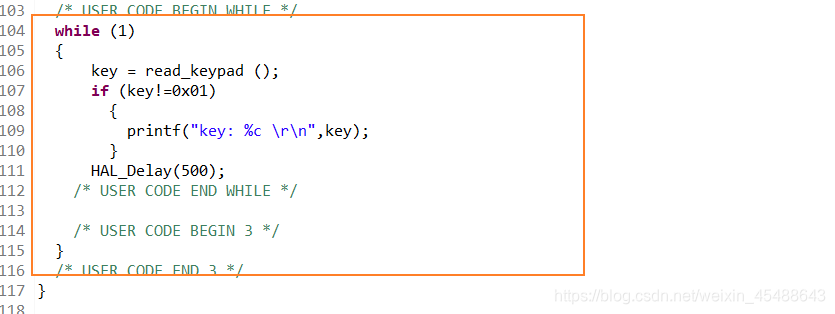
矩阵键盘的使用就到这结束了。