1、使用环境:
window10,6GGPU,NADIA GTX 1660SUPER,CUDA10.0.130,cudnn-10.0
2、使用代码:
官方提供的ocr模型代码
https://github.com/PaddlePaddle/models/tree/develop/PaddleCV/ocr_recognition
3、生成自己的数据集
import random
import os
from PIL import Image, ImageDraw, ImageFont

char_set = "0123456789abcdefghijklmnopqrstuvwxyzABCDEFGHIJKLMNOPQRSTUVWXYZ"
image_size = (128, 32)

"""
基本:
1 图片size
2 字符个数
3 字符区域(重叠、等分)
4 字符位置(固定、随机)
5 字符size(所占区域大小的百分比)
6 字符fonts
7 字符 type (数字、字母、汉字、数学符号)
8 字符颜色
9 背景颜色

高级:
10 字符旋转
11 字符扭曲
12 噪音(点、线段、圈)
"""


def randRGB():
    return random.randint(0, 255), random.randint(0, 255), random.randint(0, 255)


def cha_draw(cha, text_color, font, rotate, size_cha):
    im = Image.new(mode='RGBA', size=(size_cha * 2, size_cha * 2))
    drawer = ImageDraw.Draw(im)
    drawer.text(xy=(0, 0), text=cha, fill=text_color, font=font)  # text 内容,fill 颜色, font 字体(包括大小)
    if rotate:
        max_angle = 40  # to be tuned
        angle = random.randint(-max_angle, max_angle)
        im = im.rotate(angle, Image.BILINEAR, expand=1)
    im = im.crop(im.getbbox())
    return im


def choice_cha(chas):
    x = random.randint(0, len(chas))
    return chas[x - 1]


def captcha_draw(size_im, nb_cha, set_cha, fonts=None, overlap=0.0,
                 rd_bg_color=False, rd_text_color=False, rd_text_pos=False, rd_text_size=False,
                 rotate=False, noise=None, dir_path='', img_num=0, img_now=0):
    """
        overlap: 字符之间区域可重叠百分比, 重叠效果和图片宽度字符宽度有关
        字体大小 目前长宽认为一致!!!
        所有字大小一致
        扭曲暂未实现
        noise 可选:point, line , circle
        fonts 中分中文和英文字体
        label全保存在label.txt 中,文件第i行对应"i.jpg"的图片标签,i从1开始
    """
    rate_cha = 0.8  # rate to be tuned
    width_im, height_im = size_im
    width_cha = int(width_im / max(nb_cha - overlap, 3))  # 字符区域宽度
    #    height_cha = height_im * 1.2  # 字符区域高度
    height_cha = height_im * 0.8  # 字符区域高度
    bg_color = 'white'
    text_color = 'black'
    derx = 0
    dery = 0

    if rd_text_size:
        rate_cha = random.uniform(rate_cha - 0.1, rate_cha + 0.1)  # to be tuned
    size_cha = int(rate_cha * min(width_cha, height_cha) * 2.0)  # 字符大小

    if rd_bg_color:
        bg_color = randRGB()
    im = Image.new(mode='RGB', size=size_im, color=bg_color)  # color 背景颜色,size 图片大小

    drawer = ImageDraw.Draw(im)
    contents = []
    for i in range(nb_cha):
        if rd_text_color:
            text_color = randRGB()
        if rd_text_pos:
            derx = random.randint(0, max(width_cha - size_cha - 5, 0))
            dery = random.randint(0, max(height_cha - size_cha - 5, 0))

        cha = random.choice(set_cha)
        font = ImageFont.truetype(fonts['eng'], size_cha)
        contents.append(cha)
        im_cha = cha_draw(cha, text_color, font, rotate, size_cha)
        im.paste(im_cha, (int(max(i - overlap, 0) * width_cha) + derx + 2, dery + 3), im_cha)  # 字符左上角位置

    if 'point' in noise:
        nb_point = 20
        color_point = randRGB()
        for i in range(nb_point):
            x = random.randint(0, width_im)
            y = random.randint(0, height_im)
            drawer.point(xy=(x, y), fill=color_point)
    if 'line' in noise:
        nb_line = 3
        for i in range(nb_line):
            color_line = randRGB()
            sx = random.randint(0, width_im)
            sy = random.randint(0, height_im)
            ex = random.randint(0, width_im)
            ey = random.randint(0, height_im)
            drawer.line(xy=(sx, sy, ex, ey), fill=color_line)
    if 'circle' in noise:
        nb_circle = 20
        color_circle = randRGB()
        for i in range(nb_circle):
            sx = random.randint(0, width_im - 10)
            sy = random.randint(0, height_im - 10)
            temp = random.randint(1, 5)
            ex = sx + temp
            ey = sy + temp
            drawer.arc((sx, sy, ex, ey), 0, 360, fill=color_circle)

    if os.path.exists(dir_path) == False:  # 如果文件夹不存在,则创建对应的文件夹
        os.mkdir(dir_path)

    img_name = str(img_now) + '_' + ''.join(contents) + '.jpg'
    img_path = os.path.join(dir_path, img_name)
    print(img_path, str(img_now) + '/' + str(img_num))
    im.save(img_path)


def captcha_generator(ctc=False):
    size_im = image_size  # (176, 25)
    set_chas = [char_set]
    if ctc:
        nb_chas = [4, 5, 6, 7, 8]
    else:
        nb_chas = [4, 5, 6]
    # 生成的图片数量
    nb_image = 10000
    font_dir = './fonts/'
    rd_bg_color = False

    overlaps = [0.0, 0.1, 0.2]
    # overlaps = [0.2]
    noises = [[], ['point'], ['line'], ['line', 'point'], ['circle']]
    # noises = [[], ]

    rd_text_poss = [False]  # [True, False]
    rd_text_sizes = [False]  # [True, False]
    rd_text_colors = [True, False]  # false 代表字体颜色全一致,但都是黑色
    # rd_text_colors = [False]  # false 代表字体颜色全一致,但都是黑色
    rotates = [False]  # [True, False]

    font_paths = []
    for dirpath, dirnames, filenames in os.walk(font_dir):
        for filename in filenames:
            filepath = dirpath + os.sep + filename
            font_paths.append({

    'eng': filepath})

        for i in range(nb_image):
            overlap = random.choice(overlaps)
            rd_text_pos = random.choice(rd_text_poss)
            rd_text_size = random.choice(rd_text_sizes)
            rd_text_color = random.choice(rd_text_colors)
            set_cha = random.choice(set_chas)
            noise = random.choice(noises)
            rotate = random.choice(rotates)
            nb_cha = random.choice(nb_chas)
            #            font_path = random.choice(font_paths)
            font_path = font_paths[0]
            if ctc:
                dir_name = 'ctc'
            else:
                dir_name = 'test'

            dir_path = './img_data/' + dir_name + '/'
            captcha_draw(size_im=size_im, nb_cha=nb_cha, set_cha=set_cha,
                         overlap=overlap, rd_text_pos=rd_text_pos, rd_text_size=rd_text_size,
                         rd_text_color=rd_text_color, rd_bg_color=rd_bg_color, noise=noise,
                         rotate=rotate, dir_path=dir_path, fonts=font_path, img_num=nb_image, img_now=i)


# def test():
#     print("test begining ------------------")
#     #    size_im = (100, 30)
#     size_im = (128, 32)
#     set_chas = [
#         "0123456789",
#         "0123456789abcdefghijklmnopqrstuvwxyzABCDEFGHIJKLMNOPQRSTUVWXYZ"
#         "0123456789abcdefghijklmnopqrstuvwxyzABCDEFGHIJKLMNOPQRSTUVWXYZ"
#         "0123456789abcdefghijklmnopqrstuvwxyzABCDEFGHIJKLMNOPQRSTUVWXYZ"
#         "0123456789abcdefghijklmnopqrstuvwxyzABCDEFGHIJKLMNOPQRSTUVWXYZ"
#     ]
#     overlaps = [0.8, 0.4, 0.6, 0.8, 0.4, 0.6, 0.5, 0.0, 0.2]
#     rd_text_poss = [False, True]
#     rd_text_sizes = [False, True]
#     rd_text_colors = [False, True]  # false 代表字体颜色全一致,但都是黑色
#     rd_bg_color = False
#
#     noises = [['point'], ['line'], ['line', 'point']]
#     # noises = []
#     rotates = [False]
#     nb_chas = [4]
#     nb_image = 100  # 1000 * 100
#     #    font_dir = '/usr/share/fonts/truetype/ubuntu-font-family'
#     #    font_dir = 'C:/Windows/Fonts/'
#     font_dir = './fonts/'
#     font_paths = []
#     num_pic = 0
#     dir_folder = 0
#
#     try:
#         for dirpath, dirnames, filenames in os.walk(font_dir):
#             print("test begining ---------0---------")
#             for filename in filenames:
#                 filepath = dirpath + os.sep + filename
#                 font_paths.append({'eng': filepath})
#                 print("font-------", filepath)
#
#             for i in range(nb_image):
#                 print("test begining -----1-------------")
#                 num_pic += 1
#                 overlap = random.choice(overlaps)
#                 rd_text_pos = random.choice(rd_text_poss)
#                 rd_text_size = random.choice(rd_text_sizes)
#                 rd_text_color = random.choice(rd_text_colors)
#                 set_cha = random.choice(set_chas)
#                 noise = random.choice(noises)
#                 rotate = random.choice(rotates)
#                 nb_cha = random.choice(nb_chas)
#                 #                font_path = random.choice(font_paths)
#                 font_path = font_paths[0]
#                 if num_pic % 1001 == 0:
#                     dir_folder += 1
#                 dir_name = 'train_data'
#                 dir_path = './img_data/' + dir_name + '/'
#                 captcha_draw(size_im=size_im, nb_cha=nb_cha, set_cha=set_cha,
#                              overlap=overlap, rd_text_pos=rd_text_pos, rd_text_size=rd_text_size,
#                              rd_text_color=rd_text_color, rd_bg_color=rd_bg_color, noise=noise,
#                              rotate=rotate, dir_path=dir_path, fonts=font_path, img_num=nb_image, img_now=i)
#     except Exception:
#         print("io Exception--- ")


if __name__ == "__main__":
    # test()
    captcha_generator(True)
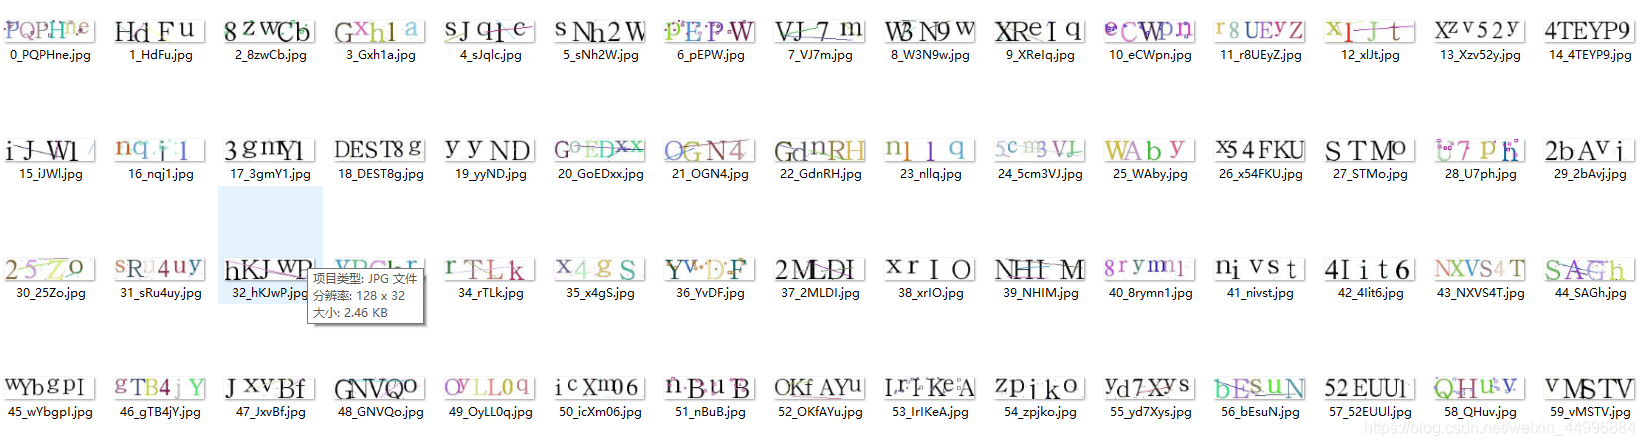
执行上述代码生成训练集和测试集,楼主生成了20000张训练集和2000张测试集。
如图:
4、对生成的图片进行标注
import os
from PIL import Image

dict01 = {

    '0': '90', '1': '91', '2': '92', '3': '93', '4': '94', '5': '95', '6': '58', '7': '59', '8': '60', '9': '61',
          'a': '64',
          'b': '65', 'c': '66', 'd': '67', 'e': '68', 'f': '69', 'g': '70', 'h': '71', 'i': '72', 'j': '73',
          'k': '74',
          'l': '75', 'm': '76', 'n': '77', 'o': '78', 'p': '79', 'q': '80', 'r': '81', 's': '82', 't': '83',
          'u': '84',
          'v': '85', 'w': '86', 'x': '87', 'y': '88', 'z': '89', 'A': '32', 'B': '33', 'C': '34', 'D': '35',
          'E': '36',
          'F': '37', 'G': '38', 'H': '39', 'I': '40', 'J': '41', 'K': '42', 'L': '43', 'M': '44', 'N': '45', 'O': '46',
          'P': '47', 'Q': '48', 'R': '49', 'S': '50', 'T': '51', 'U': '52', 'V': '53', 'W': '54', 'X': '55', 'Y': '56',
          'Z': '57'}
# 图片的路径
src = r"D:\ocr_recognition01\test_data\train_images"
# 生成train.list标注文件
fd = open(r'D:\ocr_recognition01\train_data\train.list', 'a', encoding='utf8')
for dirpath, dirnames, filenames in os.walk(src):
    for filename in filenames:
        if filename.endswith('.jpg'):
            ob = Image.open(os.path.join(src, filename))
            width = str(ob.size[0])
            height = str(ob.size[1])
            fd.write(width + " " + height + " " + filename + " ")
            print(filename)
            # 把文件名字拆分为列表
            list01 = list(filename.split('.')[0].split('_')[1])
            for number, item in enumerate(list01):
                code = dict01[item]
                if number == len(list01) - 1:
                    fd.write(code + '\n')
                else:
                    fd.write(code + ',')

fd.close()
其中:
dict01是楼主自定义的字符编码,楼主最早采用的是ASICC编码,但是发现代码报错,后来改为现在的编码。运行程序,生成的结果如下:
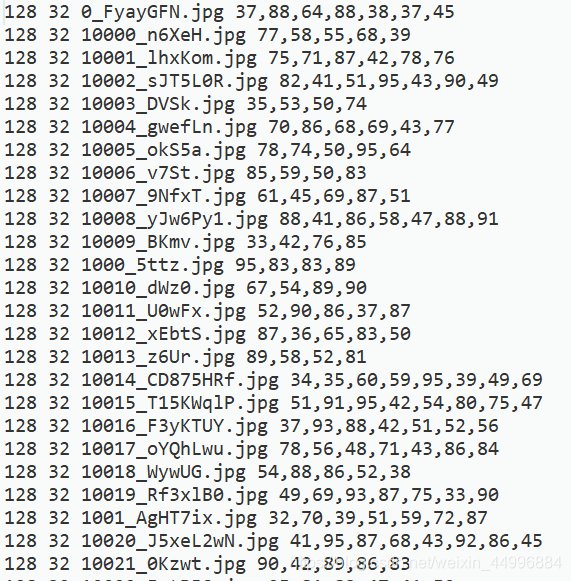
例如:train.list的第一行 128 32 分别代表图片的长和宽,0_FyayGFN.jpg是图片的名字,37,88,64,88,38,37,45分别代表FyayGFN的数字编码。同理生成相应的测试文件。
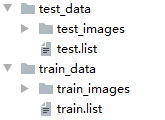
最后生成的文件夹形式:
5、训练
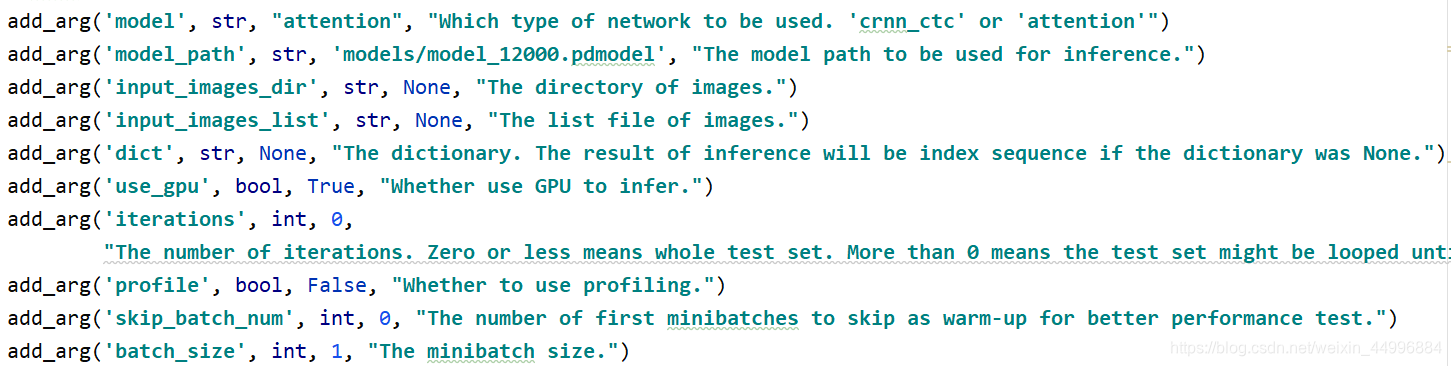
在训练前需要对train.py进行部分的修改,以便适应我们的需求
add_arg('log_period', int, 100, "Log period.")
add_arg('save_model_period', int, 1000, "Save model period. '-1' means never saving the model.")
# add_arg('save_model_period', int, 15000, "Save model period. '-1' means never saving the model.")
add_arg('eval_period', int, 1000, "Evaluate period. '-1' means never evaluating the model.")
# add_arg('eval_period', int, 15000, "Evaluate period. '-1' means never evaluating the model.")
add_arg('save_model_dir', str, "./models", "The directory the model to be saved to.")
add_arg('train_images', str, "train_data/train_images", "The directory of images to be used for training.")
add_arg('train_list', str, "train_data/train.list", "The list file of images to be used for training.")
add_arg('test_images', str, "test_data/test_images", "The directory of images to be used for test.")
add_arg('test_list', str, "test_data/test.list", "The list file of images to be used for training.")
add_arg('model', str, "attention", "Which type of network to be used. 'crnn_ctc' or 'attention'")
楼主修改了其中的参数,例如"log_period":100,使得程序没100步在控制台打印一次信息。同理对保存模型的周期,评估周期都做了相应的改动,以方便快速的看到运行的结果。另外修改了保存模型的路径,训练数据集的路径和测试数据集的路径,以及相应的对应标注的文件路径。程序模型有两种预测模型crnn_ctc和attention,楼主采用的后面的模型。当然train.py还有其他的参数,可以根据自己的需求进行相应的修改。
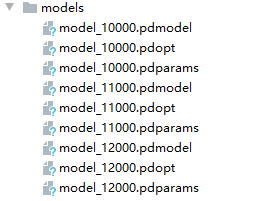
所有的准备工作做完,我们就可以执行python train.py就开始训练模型了,模型会保存到我们之前设置的文件夹下:
6、预测
预测这一步也很重要,怎么知道我们训练的模型的好不好,需要通过预测环节来完成。可以提前准备一些预测评估的数据集,用来验证识别的准确率。
楼主没有怎么训练,大约训练了120000就终止了,如果为了使模型达到更好的性能,可以加大训练的数据集和训练步数。
当然我们可以按照官网指定的预测代码在终端执行。
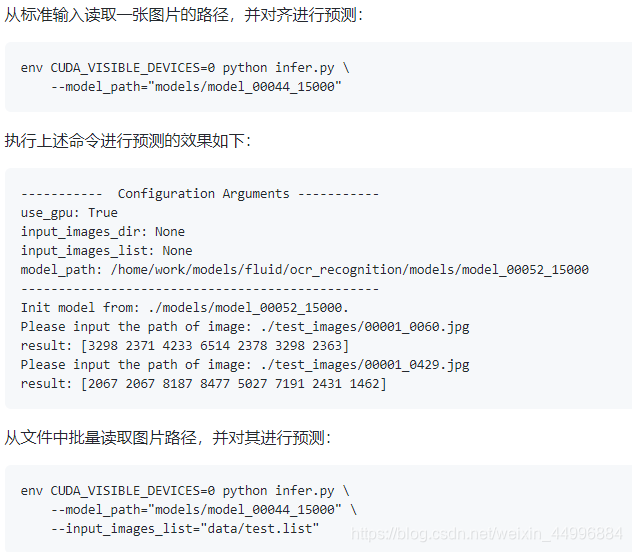
楼主觉得上面太麻烦,然后修改了infer.py中,模型模型路径参数,

这样我们每次就不用指定用哪个模型了。然后直接在pycharm就可以运行:
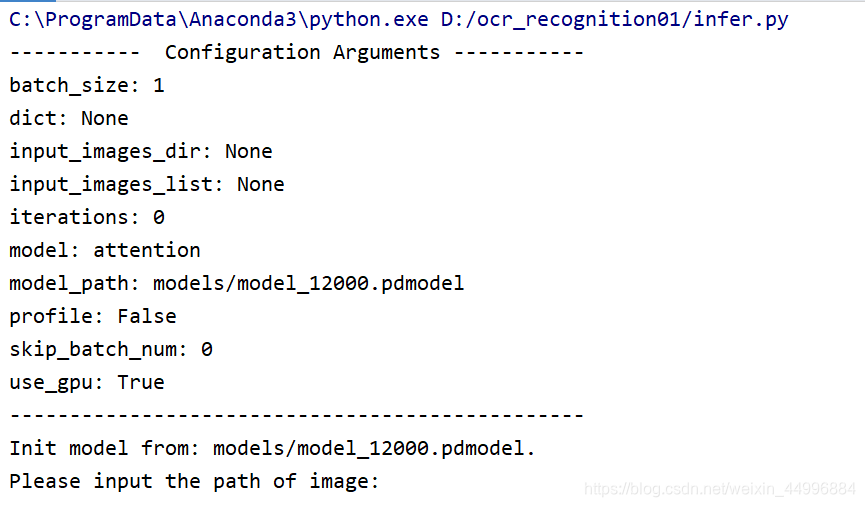
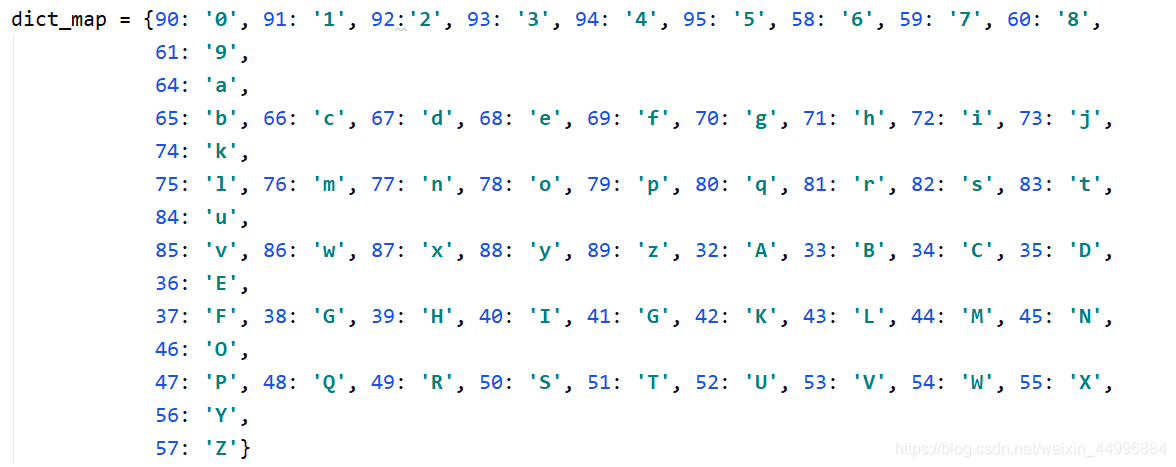
但是原代码中推测出的是数字,这样看着不是很方便,因此楼主修改了infer.py的源代码,指定了dict_map字典,进行了一次反解码。
这样我们再次输入图片路径,我们就可以直接看到推测的结果。

最后测试的模型识别的准确率大概在96%左右。当然如果训练的步数加大,准确率应该还会有所提升。
到此我们的ocr识别就成功了。
7、后记
官网的代码还支持从文件中批量读取图片路径,并对其进行预测:

楼主写了相应的脚本生成test.list,其中test.list存放的就是图片的路径。
import os

src = r'D:\ocr_recognition01\images\test'
fd = open(r'D:\ocr_recognition01\images\test\test.list', 'a', encoding='utf8')
for dirpath, dirnames, filenames in os.walk(src):
    for filename in filenames:
        if filename.endswith('.jpg'):
            fd.write(os.path.join(src, filename) + '\n')

fd.close()
具体的代码可以参考楼主上传到github的代码:
https://github.com/m271019725/ocr_recognition
创作不易,如果对大家有帮助,希望能够支持一下。