在上一篇博客Spring Boot入门(一):使用IDEA创建Spring Boot项目并使用yaml配置文件中,我们新建了一个最原始的Spring Boot项目,并使用了更为流行的yaml配置文件。
但是一般情况下,我们开发的系统应用都会有多套环境, 如dev环境,qa环境,prod环境,
那么如何实现多套环境下的配置管理呢?
其实在Spring Boot下,我们可以使用Profile来实现,以下来讲解具体的实现方式。
1.使用Profile实现多环境配置管理
首先我们按照上篇博客中提到的方法新建2个配置文件:application-dev.yml,application-prod.yml。
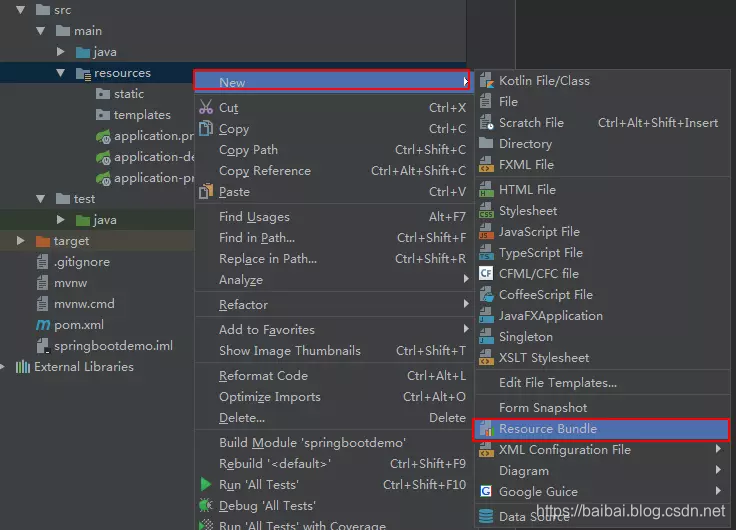
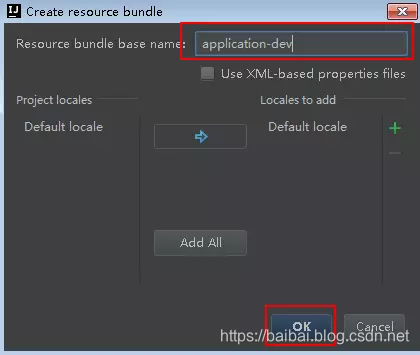
如果有的同学比较喜欢用properties文件,可以用下图中的方式新建:
我们知道,默认情况下,启动的端口号为8080,如果我们希望在dev环境使用端口号8082,在prod环境使用端口号8083,那么可以修改配置文件如下:
application-dev.yml新增如下配置:
server:
  port: 8082
application-prod.yml新增如下配置:
server:
  port: 8083
此时,启动下Spring Boot项目

我们会发现,仍然使用的是默认的端口号8080,那么如何指定使用dev或者prod环境的端口呢?
我们需要在application.yml新增如下配置:
spring:
  profiles:
    active: dev
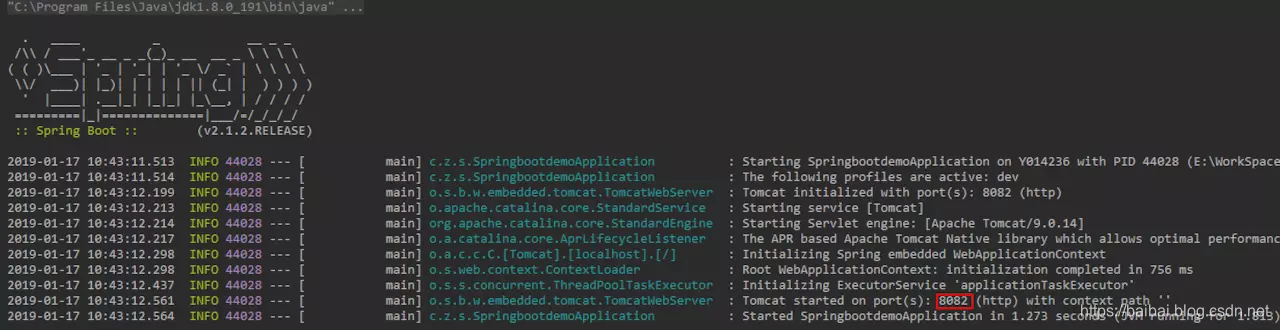
此时,再次启动Spring Boot项目,会发现使用的是端口号8082,也就是application-dev.yml文件中配置的。
如果希望使用prod环境的,可以修改配置为:
spring:
  profiles:
    active: prod
运行结果为:

2.获取配置文件值的两种方式
既然用到了配置文件,而且在平时的开发过程中,经常会将一些可能会修改的值放到配置文件中,那么在Spring Boot中,如何获取配置的文件的值呢?
我们现在就讲解下使用@Value注解或者@ConfigurationProperties注解来获取配置文件值的方法。
2.1方式1:使用@Value注解获取配置文件值
首先在application.yml中添加如下配置:
book:
  author: wangyunfei
  name: spring boot
然后修改Spring Boot项目启动类的代码如下:
package com.zwwhnly.springbootdemo;

import org.springframework.beans.factory.annotation.Value;
import org.springframework.boot.SpringApplication;
import org.springframework.boot.autoconfigure.SpringBootApplication;
import org.springframework.web.bind.annotation.RequestMapping;
import org.springframework.web.bind.annotation.RestController;

@RestController
@SpringBootApplication
public class SpringbootdemoApplication {

    @Value("${book.author}")
    private String bookAuthor;
    @Value("${book.name}")
    private String bookName;

    @RequestMapping("/")
    String index() {
        return "book name is:" + bookName + " and book author is:" + bookAuthor;
    }

    public static void main(String[] args) {
        SpringApplication.run(SpringbootdemoApplication.class, args);
    }
}
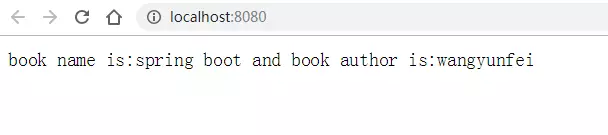
启动项目,在浏览器输入http://localhost:8080/,会看到如下信息:
2.2使用@ConfigurationProperties注解获取配置文件值
在方式1中,我们使用@Value注解来获取配置文件值,但如果多个地方都需要获取的话,就需要在多个地方写注解,造成混乱,不好管理,
其实,Spring Boot还提供了@ConfigurationProperties注解来获取配置文件值,该种方式可把配置文件值和一个Bean自动关联起来,使用起来更加方便,个人建议用这种方式。
在application.yml中添加如下配置:
author:
  name: wangyunfei
  age: 32
新建类AuthorSettings,添加@Component和@ConfigurationProperties注解
package com.zwwhnly.springbootdemo;

import org.springframework.boot.context.properties.ConfigurationProperties;
import org.springframework.stereotype.Component;

@Component
@ConfigurationProperties(prefix = "author")
public class AuthorSettings {
    private String name;
    private Integer age;

    public String getName() {
        return name;
    }

    public void setName(String name) {
        this.name = name;
    }

    public Integer getAge() {
        return age;
    }

    public void setAge(Integer age) {
        this.age = age;
    }
}
然后修改启动类代码如下:
package com.zwwhnly.springbootdemo;

import org.springframework.beans.factory.annotation.Autowired;
import org.springframework.beans.factory.annotation.Value;
import org.springframework.boot.SpringApplication;
import org.springframework.boot.autoconfigure.SpringBootApplication;
import org.springframework.web.bind.annotation.RequestMapping;
import org.springframework.web.bind.annotation.RestController;

@RestController
@SpringBootApplication
public class SpringbootdemoApplication {

    @Value("${book.author}")
    private String bookAuthor;
    @Value("${book.name}")
    private String bookName;

    @Autowired
    private AuthorSettings authorSettings;

    @RequestMapping
    public String hello() {
        return "Hello Spring Boot!";
    }

    @RequestMapping("/")
    public String index() {
        return "book name is:" + bookName + " and book author is:" + bookAuthor;
    }

    @RequestMapping("/indexV2")
    public String indexV2() {
        return "author name is:" + authorSettings.getName() + " and author age is:" + authorSettings.getAge();
    }


    public static void main(String[] args) {
        SpringApplication.run(SpringbootdemoApplication.class, args);
    }
}
启动项目,在浏览器输入http://localhost:8080/indexV2,会看到如下信息:

记得点个赞再走哦~
为了感谢支持我的朋友!整理了一份Java高级架构资料、Spring源码分析、Dubbo、Redis、Netty、zookeeper、Spring cloud、分布式等资料
关注我CSDN号