文章目录
- 零、学习目标
- 一、Spring Boot支持的视图技术
- 二、Thymeleaf基本语法
- 三、Spring Boot整合Thymeleaf
- 1、创建Spring Boot项目ThymeleafDemo
- 2、在全局配置文件里配置Thymeleaf属性
- 3、创建登录控制器LoginController
- 4、创建模板文件,获取控制器传来的动态数据
- 5、启动项目,访问http://localhost:8080/toLoginPage
- 四、Spring Boot集成Bootstrap
- 五、课后作业
零、学习目标
1、了解Spring Boot支持的视图技术
2、掌握Thymeleaf常用标签
3、掌握Thymeleaf标准表达式
4、掌握Thymeleaf基本使用
一、Spring Boot支持的视图技术
- Spring Boot框架为
简化项目的整体开发,对一些常用的视图技术实现了整合支持,并主要推荐整合模板引擎技术来实现前端页面的动态化内容。 - Spring Boot可整合的模板引擎技术
- FreeMarker
- Groory
- Thymeleaf
- Mustache
……
二、Thymeleaf基本语法
- 相关语法 ,请学习《thymeleaf_3.0.5_中文参考手册.pdf》 提取码:fqpu
1、Thymeleaf常用标签
| th:标签 | 说明 |
|---|---|
th:insert |
页面片段包含(类似JSP中的include标签) |
th:replace |
页面片段包含(类似JSP中的include标签) |
th:each |
元素遍历(类似JSP中的c:forEach标签) |
th:if |
条件判断,如果为真 |
th:unless |
条件判断,如果为假 |
th:switch |
条件判断,进行选择性匹配 |
th:case |
条件判断,进行选择性匹配 |
th:object |
变量声明 |
th:with |
变量声明 |
th:attr |
通用属性修改 |
th:attrprepend |
通用属性修改,将计算结果追加前缀到现有属性值 |
th:attrappend |
通用属性修改,将计算结果追加后缀到现有属性值 |
th:value |
属性值修改,指定标签属性值 |
th:href |
用于设定链接地址 |
th:src |
用于设定链接地址 |
th:text |
用于指定标签显示的文本内容 |
th:utext |
用于指定标签显示的文本内容,对特殊标签不转义 |
th:fragment |
声明片段 |
th:remove |
移除片段 |
2、Thymeleaf主要语法
| 说明 | 表达式语法 | 作用 |
|---|---|---|
| 变量表达式 | ${...} |
获取上下文中的变量值 |
| 选择变量表达式 | *{...} |
用于从被选定对象获取属性值 |
| 消息表达式 | #{...} |
用于Thymeleaf模板页面国际化内容的动态替换和展示 |
| 链接URL表达式 | @{...} |
用于页面跳转或者资源的引入 |
| 片段表达式 | ~{...} |
用来标记一个片段模板,并根据需要移动或传递给其他模板 |
3、Thymeleaf内置对象
#ctx:上下文对象#vars:上下文变量#locale:上下文区域设置#request:(仅限Web Context)HttpServletRequest对象#response:(仅限Web Context)HttpServletResponse对象#session:(仅限Web Context)HttpSession对象#servletContext:(仅限Web Context)ServletContext对象
4、Thymeleaf模板基本配置
- 在Spring Boot项目中使用Thymeleaf模板,必须保证引入Thymeleaf依赖
<dependency>
   <groupId>org.springframework.boot</groupId>
   <artifactId>spring-boot-starter-thymeleaf</artifactId>
</dependency>
- 在全局配置文件中配置Thymeleaf模板的一些参数。如设置模板缓存、模板编码、模板样式、指定模板页面存放路径、指定模板页面名称的后缀
spring.thymeleaf.cache = true
spring.thymeleaf.encoding = UTF-8
spring.thymeleaf.mode = HTML5
spring.thymeleaf.prefix = classpath:/templates/
spring.thymeleaf.suffix = .html
- 关于Thymeleaf,可以参看博主两年前编写的《Thymeleaf模板引擎入门》
- 关于Bootstrap,可以参看博主两年前编写的《前端学习笔记:Bootstrap框架入门》
- 下面我们会一起来学习Spring Boot如何整合Thymeleaf与Bootstrap,实现一个简单的登录页面
三、Spring Boot整合Thymeleaf
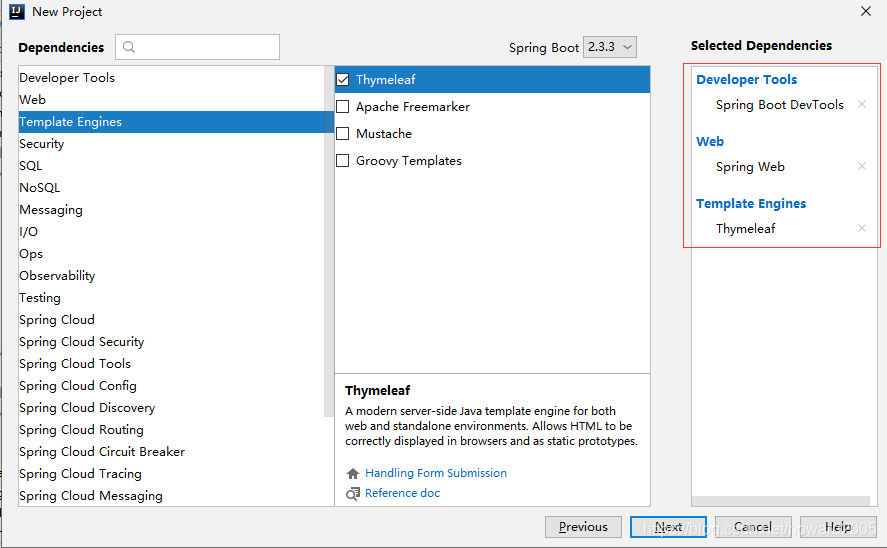
1、创建Spring Boot项目ThymeleafDemo
- 设置项目元数据

- 添加项目依赖
- 设置项目名称与保存位置
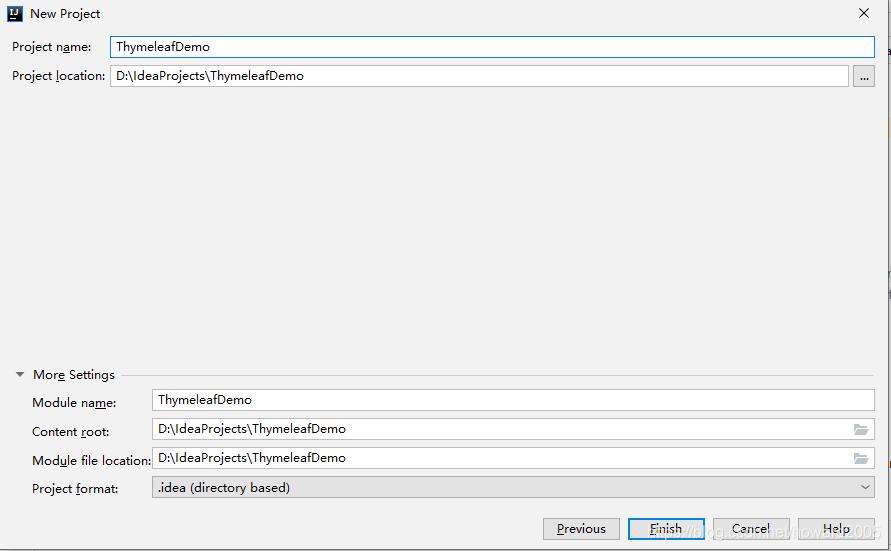
- 完成项目初始化工作
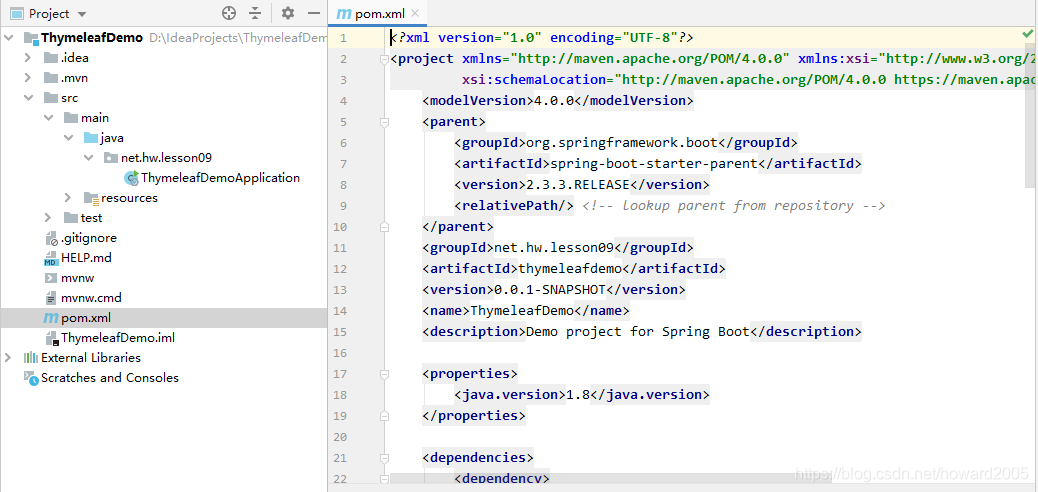
- 查看pom.xml文件
<?xml version="1.0" encoding="UTF-8"?>
<project xmlns="http://maven.apache.org/POM/4.0.0" xmlns:xsi="http://www.w3.org/2001/XMLSchema-instance"
         xsi:schemaLocation="http://maven.apache.org/POM/4.0.0 https://maven.apache.org/xsd/maven-4.0.0.xsd">
    <modelVersion>4.0.0</modelVersion>
    <parent>
        <groupId>org.springframework.boot</groupId>
        <artifactId>spring-boot-starter-parent</artifactId>
        <version>2.3.3.RELEASE</version>
        <relativePath/> <!-- lookup parent from repository -->
    </parent>
    <groupId>net.hw.lesson09</groupId>
    <artifactId>thymeleafdemo</artifactId>
    <version>0.0.1-SNAPSHOT</version>
    <name>ThymeleafDemo</name>
    <description>Demo project for Spring Boot</description>

    <properties>
        <java.version>1.8</java.version>
    </properties>

    <dependencies>
        <dependency>
            <groupId>org.springframework.boot</groupId>
            <artifactId>spring-boot-starter-thymeleaf</artifactId>
        </dependency>
        <dependency>
            <groupId>org.springframework.boot</groupId>
            <artifactId>spring-boot-starter-web</artifactId>
        </dependency>

        <dependency>
            <groupId>org.springframework.boot</groupId>
            <artifactId>spring-boot-devtools</artifactId>
            <scope>runtime</scope>
            <optional>true</optional>
        </dependency>
        <dependency>
            <groupId>org.springframework.boot</groupId>
            <artifactId>spring-boot-starter-test</artifactId>
            <scope>test</scope>
            <exclusions>
                <exclusion>
                    <groupId>org.junit.vintage</groupId>
                    <artifactId>junit-vintage-engine</artifactId>
                </exclusion>
            </exclusions>
        </dependency>
    </dependencies>

    <build>
        <plugins>
            <plugin>
                <groupId>org.springframework.boot</groupId>
                <artifactId>spring-boot-maven-plugin</artifactId>
            </plugin>
        </plugins>
    </build>

</project>
2、在全局配置文件里配置Thymeleaf属性
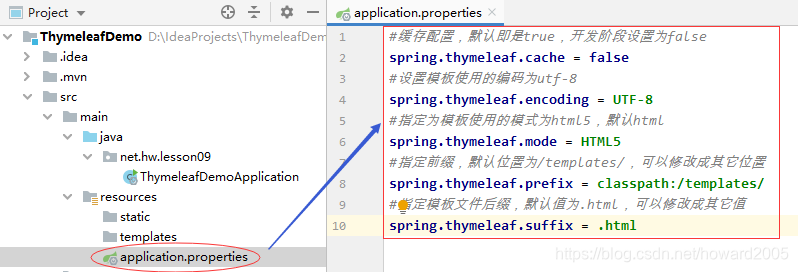
#缓存配置,默认即是true,开发阶段设置为false
spring.thymeleaf.cache = false
#设置模板使用的编码为utf-8
spring.thymeleaf.encoding = UTF-8
#指定为模板使用的模式为html5,默认html
spring.thymeleaf.mode = HTML5
#指定前缀,默认位置为/templates/,可以修改成其它位置
spring.thymeleaf.prefix = classpath:/templates/
#指定模板文件后缀,默认值为.html,可以修改成其它值
spring.thymeleaf.suffix = .html
Thymeleaf页面缓存设置,默认为true,开发中方便调试应设置为false,上线稳定后应保持默认true。
3、创建登录控制器LoginController
- 在net.hw.lesson09包里创建controller子包
- 在controller子包里创建LoginController控制器
- 用于前端模板页面动态数据替换效果的测试

package net.hw.lesson09.controller;

import org.springframework.stereotype.Controller;
import org.springframework.ui.Model;
import org.springframework.web.bind.annotation.GetMapping;

import java.util.Calendar;

/**
 * 功能:登录控制器
 * 作者:华卫
 * 日期:2020年08月14日
 */
@Controller
public class LoginController {
    /**
     * 通过请求“toLoginPage”跳转到templates目录下的
     * login页面,并把当前年份数据保存到模型对象中
     */
    @GetMapping("toLoginPage")
    public String toLoginPage(Model model){
        model.addAttribute("currentYear", Calendar.getInstance().get(Calendar.YEAR));
        return "login"; // 返回逻辑页面视图名称
    }
}
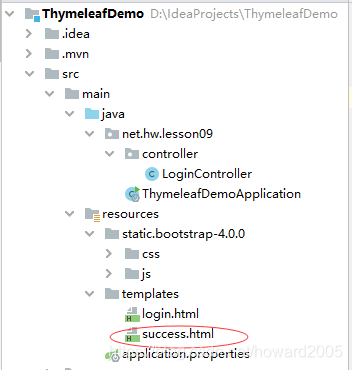
4、创建模板文件,获取控制器传来的动态数据
- 在templates目录下创建模板文件login.html
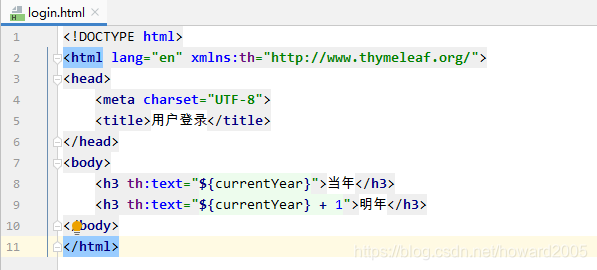
- 在
h3标签中通过th:text引入了后台动态传递过来的当前年份currentYear。
<!DOCTYPE html>
<html lang="en" xmlns:th="http://www.thymeleaf.org/">
<head>
    <meta charset="UTF-8">
    <title>用户登录</title>
</head>
<body>
    <span th:text="${currentYear}">今年</span> -
    <span th:text="${currentYear} + 1">明年</span>
</body>
</html>
- 静态访问模板文件,将显示默认值,而不会显示后台传来的动态数据
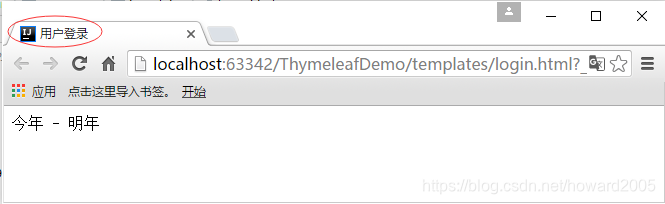
5、启动项目,访问http://localhost:8080/toLoginPage
- 启动项目

- 在浏览器里访问
http://localhost:8080/toLoginPage

四、Spring Boot集成Bootstrap
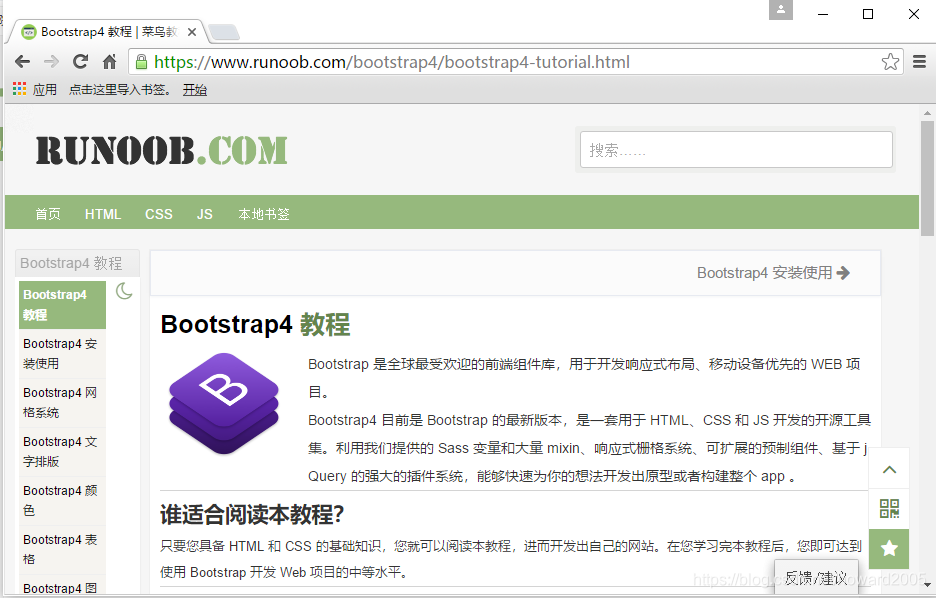
- Bootstrap4教程:https://www.runoob.com/bootstrap4/bootstrap4-tutorial.html
- 注意:Bootstrap3和Bootstrap4两版本有较大差异
(一)集成Bootstrap
1、引用在线文档的方式
- 在模板文件中直接引用以下文件

<!-- 新 Bootstrap4 核心 CSS 文件 -->
<link rel="stylesheet" href="https://cdn.staticfile.org/twitter-bootstrap/4.3.1/css/bootstrap.min.css">
<!-- jQuery文件。务必在bootstrap.min.js 之前引入 -->
<script src="https://cdn.staticfile.org/jquery/3.2.1/jquery.min.js"></script>
<!-- bootstrap.bundle.min.js 用于弹窗、提示、下拉菜单,包含了 popper.min.js -->
<script src="https://cdn.staticfile.org/popper.js/1.15.0/umd/popper.min.js"></script>
<!-- 最新的 Bootstrap4 核心 JavaScript 文件 -->
<script src="https://cdn.staticfile.org/twitter-bootstrap/4.3.1/js/bootstrap.min.js"></script>
2、下载Bootstrap并引用的方式
- Bootstrap压缩包下载链接:https://pan.baidu.com/s/1gWca14KH2OnLjoVzp7BirQ 提取码:li4b

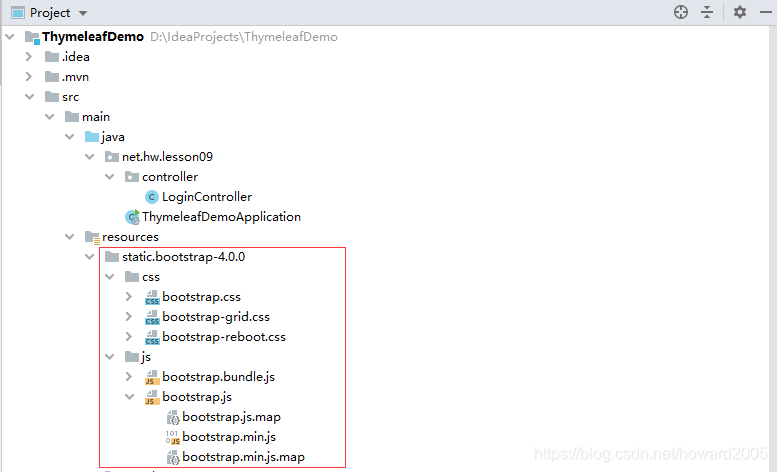
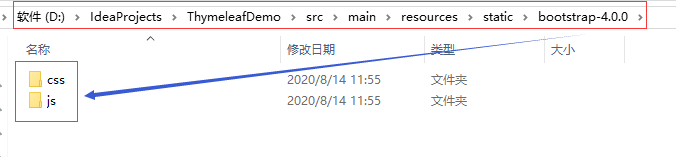
- 解压缩到bootstrap-4.0.0目录
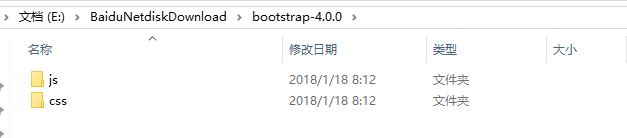
- 将bootstrap-4.0.0目录拷贝项目的static目录
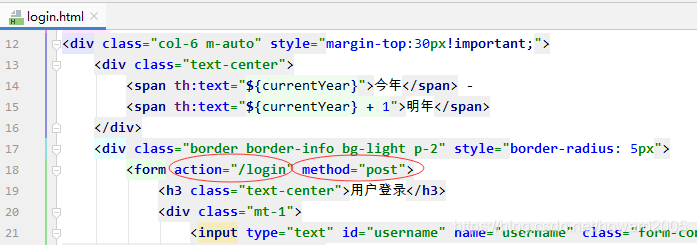
(二)编写登录页面login.html
1、集成Bootstrap

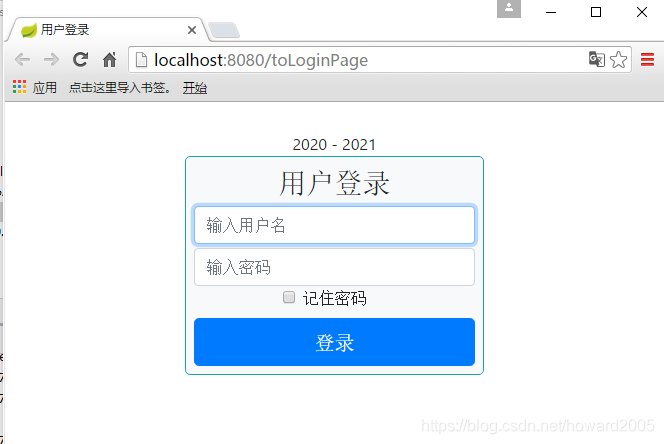
2、编写登录页面
<!DOCTYPE html>
<html lang="en" xmlns:th="http://www.thymeleaf.org/">
<head>
    <meta charset="UTF-8">
    <title>用户登录</title>
    <link th:href="@{/bootstrap-4.0.0/css/bootstrap.css}" rel="stylesheet">
    <javascript th:src="@{/bootstrap-4.0.0/js/jquery-3.4.1.min.js}"></javascript>
    <javascript th:src="@{/bootstrap-4.0.0/js/bootstrap.bundle.js}"></javascript>
    <javascript th:src="@{/bootstrap-4.0.0/js/bootstrap.js}"></javascript>
</head>
<body>
<div class="col-6 m-auto" style="margin-top:30px!important;">
    <div class="text-center">
        <span th:text="${currentYear}">今年</span> -
        <span th:text="${currentYear} + 1">明年</span>
    </div>
    <div class="border border-info bg-light p-2" style="border-radius: 5px">
        <form action="/login" method="post">
            <h3 class="text-center">用户登录</h3>
            <div class="mt-1">
                <input type="text" id="username" name="username" class="form-control" placeholder="输入用户名" autofocus>
            </div>
            <div class="mt-1">
                <input type="password" id="password" name="password" class="form-control" placeholder="输入密码">
            </div>
            <div class="checkbox text-center">
                <label>
                    <input class="form-check-input text-center" type="checkbox">记住密码
                </label>
            </div>
            <div>
                <button class="btn btn-lg btn-primary btn-block" id="login" type="submit">登录</button>
            </div>
        </form>
    </div>
</div>
</body>
</html>
<div class="col-6 m-auto" style="margin-top:30px!important;">分区占窗口一半宽度(水平方向按12个单位平分)、水平居中、顶边距30个像素<div class="border border-info bg-light p-2" style="border-radius: 5px">设置边框(边框色、背景、内边距、圆角)<div class="mt-1">设置上外边距为1个单位<h3 class="text-center">用户登录</h3>设置文本居中显示
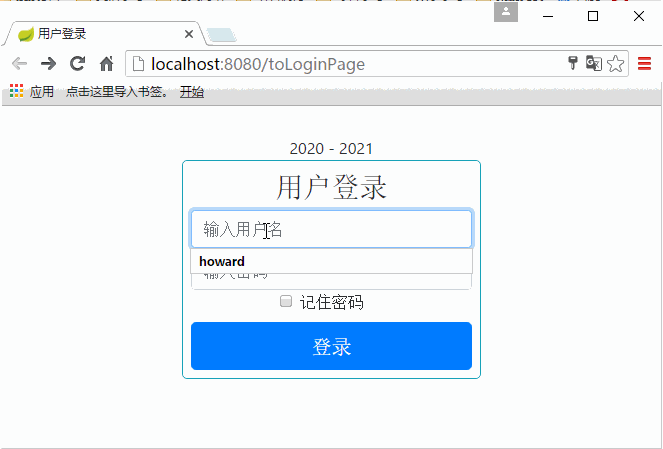
3、启动项目,访问http://localhost:8080/toLoginPage
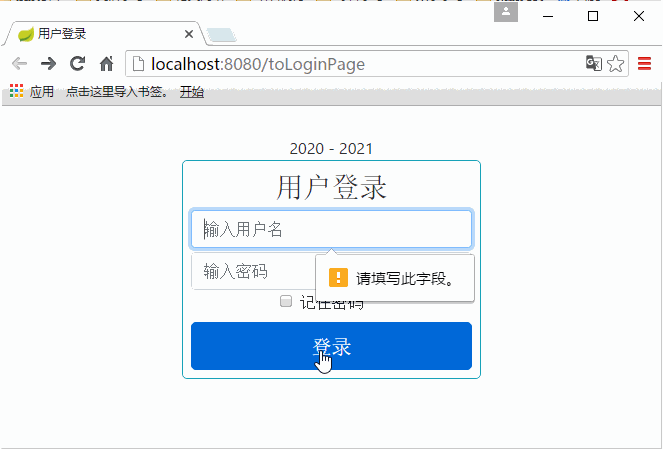
4、用户名和密码非空校验
- 留待大家自行完成
(三)控制器编写登录验证方法
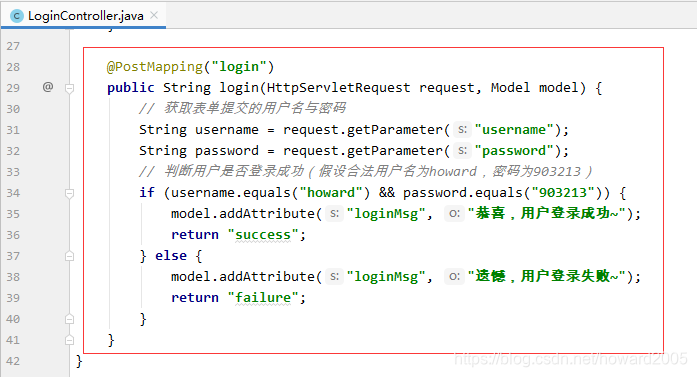
@PostMapping("login")
public String login(HttpServletRequest request, Model model) {
    // 获取表单提交的用户名与密码
    String username = request.getParameter("username");
    String password = request.getParameter("password");
    // 判断用户是否登录成功(假设合法用户名为howard,密码为903213)
    if (username.equals("howard") && password.equals("903213")) {
        model.addAttribute("loginMsg", "恭喜,用户登录成功~");
        return "success";
    } else {
        model.addAttribute("loginMsg", "遗憾,用户登录失败~");
        return "failure";
    }
}
(四)编写登录成功与失败的模板页面
1、编写登录成功页面success.html
<!DOCTYPE html>
<html lang="en" xmlns:th="http://www.thymeleaf.org/">
<head>
    <meta charset="UTF-8">
    <title>登录成功</title>
    <link th:href="@{/bootstrap-4.0.0/css/bootstrap.css}" rel="stylesheet">
    <javascript th:src="@{/bootstrap-4.0.0/js/jquery-3.4.1.min.js}"></javascript>
    <javascript th:src="@{/bootstrap-4.0.0/js/bootstrap.bundle.js}"></javascript>
    <javascript th:src="@{/bootstrap-4.0.0/js/bootstrap.js}"></javascript>
</head>
<body>
<div class="col-6 text-center m-auto border-info border p-3 bg-light" style="margin-top:50px!important;">
    <p th:text="${loginMsg}" class="text-success"></p>
</div>
</body>
</html>
2、编写登录失败页面failure.html

<!DOCTYPE html>
<html lang="en" xmlns:th="http://www.thymeleaf.org/">
<head>
    <meta charset="UTF-8">
    <title>登录失败</title>
    <link th:href="@{/bootstrap-4.0.0/css/bootstrap.css}" rel="stylesheet">
    <javascript th:src="@{/bootstrap-4.0.0/js/jquery-3.4.1.min.js}"></javascript>
    <javascript th:src="@{/bootstrap-4.0.0/js/bootstrap.bundle.js}"></javascript>
    <javascript th:src="@{/bootstrap-4.0.0/js/bootstrap.js}"></javascript>
</head>
<body>
<div class="col-6 text-center m-auto border-warning border p-3 bg-light" style="margin-top:50px!important;">
    <p th:text="${loginMsg}" class="text-danger"></p>
</div>
</body>
</html>
(五)启动项目,测试效果
- 启动项目后,在浏览器里访问
http://localhost:8080/toLoginPage
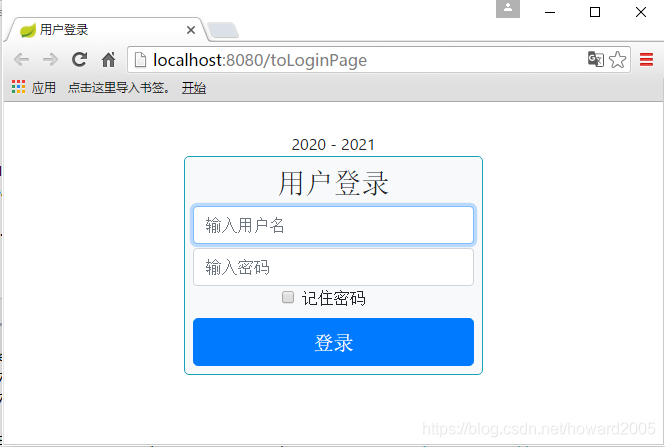
- 输入正确的用户名和密码(howard : 903213)

- 输入其它用户名或密码
五、课后作业
任务:利用MyBatis、JPA或Redis技术,从数据库读取用户信息进行验证用户是否登录成功
- 增加用户表t_user
- 创建用户实体类
- 创建数据访问接口
- 修改控制器login()方法