yarn cluster模式Application提交流程概述
yarn cluster模式Application提交流程如下图所示。
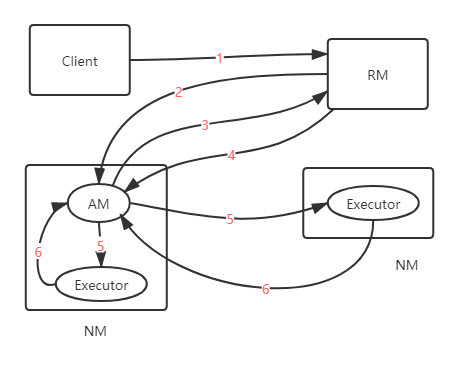
提交流程:
- Client 向ResourceManager申请启动ApplicationMaster。
- ResourceManager随机分配一个Container启动ApplicationMaster。
- ApplicationMaster向ResourceManager申请资源用于启动Executor。
- ResourceManager向ApplicationMaster返回用于启动Executor的资源。
- ApplicationMaster启动Executor。
- Executor反向注册到ApplicationMaster。
当以上步骤完成时,ApplicationMaster运行用户程序代码。此时就可以向Executor提交任务啦。
源码分析
下面通过源代码来分析具体的执行流程,本文中列出的代码为流程中的核心代码,并非全部,首先来分析spark-submit脚本。
if [ -z "${SPARK_HOME}" ]; then
  source "$(dirname "$0")"/find-spark-home
fi

# disable randomized hash for string in Python 3.3+
export PYTHONHASHSEED=0

exec "${SPARK_HOME}"/bin/spark-class org.apache.spark.deploy.SparkSubmit "$@"
显然SparkSubmit是启动Spark应用程序的主入口类。
SparkSubmit.scala main方法
override def main(args: Array[String]): Unit = {
    // Initialize logging if it hasn't been done yet. Keep track of whether logging needs to
    // be reset before the application starts.
    val uninitLog = initializeLogIfNecessary(true, silent = true)

    val appArgs = new SparkSubmitArguments(args)
    if (appArgs.verbose) {
      // scalastyle:off println
      printStream.println(appArgs)
      // scalastyle:on println
    }
    appArgs.action match {
        // 提交任务
      case SparkSubmitAction.SUBMIT => submit(appArgs, uninitLog)
      case SparkSubmitAction.KILL => kill(appArgs)
      case SparkSubmitAction.REQUEST_STATUS => requestStatus(appArgs)
    }
  }
private def submit(args: SparkSubmitArguments, uninitLog: Boolean): Unit = {
    //准备提交环境,childMainClass返回值: YarnClusterApplication
    val (childArgs, childClasspath, sparkConf, childMainClass) = prepareSubmitEnvironment(args)
    def doRunMain(): Unit = {
      if (args.proxyUser != null) {
        val proxyUser = UserGroupInformation.createProxyUser(args.proxyUser,
          UserGroupInformation.getCurrentUser())
        try {
          proxyUser.doAs(new PrivilegedExceptionAction[Unit]() {
            override def run(): Unit = {
              runMain(childArgs, childClasspath, sparkConf, childMainClass, args.verbose)
            }
          })
        } catch {
          case e: Exception =>
            if (e.getStackTrace().length == 0) {
              // scalastyle:off println
              printStream.println(s"ERROR: ${e.getClass().getName()}: ${e.getMessage()}")
              exitFn(1)
            } else {
              throw e
            }
        }
      } else {
        runMain(childArgs, childClasspath, sparkConf, childMainClass, args.verbose)
      }
    }
    if (uninitLog) {
      Logging.uninitialize()
    }
    if (args.isStandaloneCluster && args.useRest) {
      try {
        printStream.println("Running Spark using the REST application submission protocol.")
        doRunMain()
      } catch {
        case e: SubmitRestConnectionException =>
          printWarning(s"Master endpoint ${args.master} was not a REST server. " +
            "Falling back to legacy submission gateway instead.")
          args.useRest = false
          submit(args, false)
      }
    } else {
      // 提交任务
      doRunMain()
    }
  }
prepareSubmitEnvironment方法childMainClass返回值YarnClusterApplication
private def prepareSubmitEnvironment(args: SparkSubmitArguments, uninitLog: Boolean): Unit = {
...

 if (isYarnCluster) {
      // yarn cluster 设置childMainClass
      childMainClass = YARN_CLUSTER_SUBMIT_CLASS
      if (args.isPython) {
        childArgs += ("--primary-py-file", args.primaryResource)
        childArgs += ("--class", "org.apache.spark.deploy.PythonRunner")
      } else if (args.isR) {
        val mainFile = new Path(args.primaryResource).getName
        childArgs += ("--primary-r-file", mainFile)
        childArgs += ("--class", "org.apache.spark.deploy.RRunner")
      } else {
        if (args.primaryResource != SparkLauncher.NO_RESOURCE) {
          childArgs += ("--jar", args.primaryResource)
        }
        childArgs += ("--class", args.mainClass)
      }
      if (args.childArgs != null) {
        args.childArgs.foreach { arg => childArgs += ("--arg", arg) }
      }
    }
    ...
    (childArgs, childClasspath, sparkConf, childMainClass)
    }
submit方法中最终将调用runMain方法
private def runMain(
      childArgs: Seq[String],
      childClasspath: Seq[String],
      sparkConf: SparkConf,
      childMainClass: String,
      verbose: Boolean): Unit = {
....
try {
      // 反射获取childMainClass YarnClusterApplication Class对象
      mainClass = Utils.classForName(childMainClass)
    } catch {
   ...
    }
...
try {
      // 实际调用YarnClusterApplication start方法
      app.start(childArgs.toArray, sparkConf)
    } catch {
        }
    }
}
YarnClusterApplication start 方法
private[spark] class YarnClusterApplication extends SparkApplication {
  override def start(args: Array[String], conf: SparkConf): Unit = {
    conf.remove("spark.jars")
    conf.remove("spark.files")
    new Client(new ClientArguments(args), conf).run()
  }
def run(): Unit = {
// 提交Application
    this.appId = submitApplication()
}
def submitApplication(): ApplicationId = {
    var appId: ApplicationId = null
    try {
      launcherBackend.connect()
      setupCredentials()
      //初始化yarn客户端
      yarnClient.init(hadoopConf)
      //启动yarn客户端
      yarnClient.start()
      // 为ApplicationMaster 创建上下文
      val containerContext = createContainerLaunchContext(newAppResponse)
      val appContext = createApplicationSubmissionContext(newApp, containerContext)

      //提交Application
      yarnClient.submitApplication(appContext)
      appId
    } catch {
     ...
    }
  }
在此方法中会初始化yarn客户端,最终提交ApplicationMaster,那么ApplicationMaster的启动类在哪里获取的呢?答案是createContainerLaunchContext方法。
createContainerLaunchContext方法
private def createContainerLaunchContext(newAppResponse: GetNewApplicationResponse) : ContainerLaunchContext = {
	...
	val amClass =
      if (isClusterMode) {
        Utils.classForName("org.apache.spark.deploy.yarn.ApplicationMaster").getName
      } else {
        Utils.classForName("org.apache.spark.deploy.yarn.ExecutorLauncher").getName
      }
     ...
}
接着再看下ApplicationMaster 的启动类ApplicationMaster
def main(args: Array[String]): Unit = {
    SignalUtils.registerLogger(log)
    val amArgs = new ApplicationMasterArguments(args)
    master = new ApplicationMaster(amArgs)
    // 启动Application Master
    System.exit(master.run())
  }
 final def run(): Int = {
    doAsUser {
      runImpl()
    }
    exitCode
  }
private def runImpl(): Unit = {
    try {
      val appAttemptId = client.getAttemptId()
      ...
      //启动driver的核心代码
      if (isClusterMode) {
        runDriver()
      } else {
        runExecutorLauncher()
      }
    } catch {
      case e: Exception =>
        // catch everything else if not specifically handled
        logError("Uncaught exception: ", e)
        finish(FinalApplicationStatus.FAILED,
          ApplicationMaster.EXIT_UNCAUGHT_EXCEPTION,
          "Uncaught exception: " + e)
    }
  }
runImpl方法中会启动Driver,Driver启动代码如下:
private def runDriver(): Unit = {
    addAmIpFilter(None)
    // 启动driver线程
    userClassThread = startUserApplication()
    // This a bit hacky, but we need to wait until the spark.driver.port property has
    // been set by the Thread executing the user class.
    logInfo("Waiting for spark context initialization...")
    val totalWaitTime = sparkConf.get(AM_MAX_WAIT_TIME)
    try {
      val sc = ThreadUtils.awaitResult(sparkContextPromise.future,
        Duration(totalWaitTime, TimeUnit.MILLISECONDS))
      if (sc != null) {
        rpcEnv = sc.env.rpcEnv
        val driverRef = createSchedulerRef(
          sc.getConf.get("spark.driver.host"),
          sc.getConf.get("spark.driver.port"))
        // executor注册到applicationMaster
        registerAM(sc.getConf, rpcEnv, driverRef, sc.ui.map(_.webUrl))
        registered = true
      } else {
        // Sanity check; should never happen in normal operation, since sc should only be null
        // if the user app did not create a SparkContext.
        throw new IllegalStateException("User did not initialize spark context!")
      }
      // 主线程等待driver线程
      userClassThread.join()
    } catch {
      case e: SparkException if e.getCause().isInstanceOf[TimeoutException] =>
        logError(
          s"SparkContext did not initialize after waiting for $totalWaitTime ms. " +
           "Please check earlier log output for errors. Failing the application.")
        finish(FinalApplicationStatus.FAILED,
          ApplicationMaster.EXIT_SC_NOT_INITED,
          "Timed out waiting for SparkContext.")
    }
ApplicationMaster会启动一个线程运行用户Driver代码,那么ApplicationMaster怎么启动用户Driver代码呢?答案是反射。
ApplicationMaster用户submit时指定的 --class参数获取用户启动类,然后通过反射的方式启动用户Driver代码。
private def startUserApplication(): Thread = {
    logInfo("Starting the user application in a separate Thread")

    var userArgs = args.userArgs
    if (args.primaryPyFile != null && args.primaryPyFile.endsWith(".py")) {
      userArgs = Seq(args.primaryPyFile, "") ++ userArgs
    }
    if (args.primaryRFile != null && args.primaryRFile.endsWith(".R")) {
    }
	//通过反射获取spark-submit时提交的用户类
    val mainMethod = userClassLoader.loadClass(args.userClass)
      .getMethod("main", classOf[Array[String]])
    //创建线程
    val userThread = new Thread {
      override def run() {
        try {
          mainMethod.invoke(null, userArgs.toArray)
          finish(FinalApplicationStatus.SUCCEEDED, ApplicationMaster.EXIT_SUCCESS)
          logDebug("Done running users class")
        } catch {
          case e: InvocationTargetException =>
            e.getCause match {
              case _: InterruptedException =>
              case SparkUserAppException(exitCode) =>
                val msg = s"User application exited with status $exitCode"
                logError(msg)
                finish(FinalApplicationStatus.FAILED, exitCode, msg)
              case cause: Throwable =>
                logError("User class threw exception: " + cause, cause)
                finish(FinalApplicationStatus.FAILED,
                  ApplicationMaster.EXIT_EXCEPTION_USER_CLASS,
                  "User class threw exception: " + StringUtils.stringifyException(cause))
            }
            sparkContextPromise.tryFailure(e.getCause())
        } finally {
          sparkContextPromise.trySuccess(null)
        }
      }
    }
    userThread.setContextClassLoader(userClassLoader)
    userThread.setName("Driver")
    //启动driver线程
    userThread.start()
    userThread
  }
runDriver中registerAM会启动executor并将executor反向注册到ApplicationMaster
private def registerAM(
      _sparkConf: SparkConf,
      _rpcEnv: RpcEnv,
      driverRef: RpcEndpointRef,
      uiAddress: Option[String]) = {
      ...
    allocator = client.register(driverUrl,
      driverRef,
      yarnConf,
      _sparkConf,
      uiAddress,
      historyAddress,
      securityMgr,
      localResources)
    rpcEnv.setupEndpoint("YarnAM", new AMEndpoint(rpcEnv, driverRef))
	// 为executor分配资源,启动executors
    allocator.allocateResources()
    ...
  }
 def allocateResources(): Unit = synchronized {
    updateResourceRequests()

 	...
 	//调用YARN接口,分配container
    val allocateResponse = amClient.allocate(progressIndicator)
    //获取分派container资源状态
    val allocatedContainers = allocateResponse.getAllocatedContainers()

    if (allocatedContainers.size > 0) {
      logDebug(("Allocated containers: %d. Current executor count: %d. " +
        "Launching executor count: %d. Cluster resources: %s.")
        .format(
          allocatedContainers.size,
          numExecutorsRunning.get,
          numExecutorsStarting.get,
          allocateResponse.getAvailableResources))
	  // container分配完毕处理函数:初始化executor,等待分配task
      handleAllocatedContainers(allocatedContainers.asScala)
    }
  }
总结
本文通过走读源代码的方式分析了yarn cluster模式Application的提交流程,如有错误敬请指正。