一、 注册页面初代-表单标签的制作
- 首先创建表单
<form></form> - 各部分输入内容的写法:
a) 用户名:<input type =”text”/>
b) 密码:<input type =”password”/>
c) 确认密码:<input type =”password”>
d) 性别:<input type =”radio” name =sex/>男
<input type =”radio” name= sex />女
e) 头像:<input type =”file”/>
f) 籍贯:
<select name=”province”>
<option>--请选择--</option>
<option>--北京--</option>
<option>--上海--</option>
</select>
g) 自我介绍:
<textarea>
</textarea>
h) 提交按钮:<input type =”submit”>
i) 普通按钮:<input type =”button”>
j) 重置按钮:<input type =”reset”>
k) Get 与 post 提交方式的区别?【默认提交方式为 get】 Get 提交方式,所有的内容显示在地址栏,不够安全,长度有限制。 Post 提交方式,所有的内容不会显示在地址栏,比较安全,长度没有限制。
l) <input type=”hidden” name=””/> 用于用户比较敏感的一些信息。
二、 表单标签属性介绍
- 用户名:
<input type = “text” name=”username” size =”40px” maxlength = “5” readonly=”readonly” value =”zhangsan” placeholder=”请输入用户名”/>
	TIPS:type表示输入的类型,name必须要写,
	value,表示要输入的值,需提交到后台,
	placeholder表示用户一开始输入时所做的提示。
	size表示文本框的长度。
	readonly表示其仅能只读,无法修改。
- 密码:
<input type="password" name ="password" required="required"/><br />
确认密码:<input type="password" name ="repassword" required="required"/><br />
TIPS:当点提交按钮时该部分需要被选中否则无法进行提交。
- 性别:
<input type="radio"  name="sex" value="男" checked="checked"/>男

<input type="radio" name="sex" value="女"  checked="checked"/>女
<br />
TIPS:当类型为按钮时,checked表示该部分点击按钮之后被选中然后进行提交。
value表示需要提交到后台的值。
- 籍贯:
<select name="province" >
		<option>--请选择--</option>
		<option>--北京--</option>
		<option selected="selected">--上海--</option>
		</select>
TIPS:表明点击提交之后会保存下来的部分。
三、 网页注册页面的步骤分析
案例:
<tr>
<form action="#" method="get" name="regForm">
<td height="600px" background="../img/课堂演示图片汇总/regist_bg.jpg">
<!--嵌套一个十行二列的表格-->
<table border="1px" width="750px" height="400px" align="center" cellpadding="0px" cellspacing="0px" bgcolor="white">
<tr height="40px">
<td colspan="2">
<font size="4">会员注册</font> USER REGISTER
</td>
</tr>
<tr>
<td>
用户名
</td>
<td>
<input type="text" name="username" required="required" size="34px"/>
</td>
</tr>
<tr>
<td>
密码
</td>
<td>
<input type="password" name="userpassword" required="required" size="34px"/>
</td>
</tr>
<tr>
<td>确认密码</td>
<td>
<input type="password" name="repassword" required="required" size="34px"/>
</td>
</tr>
<tr>
<td>Email</td>
<td>
<input type="text" name="useremail" size="34px"/>
</td>
</tr>
<tr>
<td>姓名</td>
<td>
<input type="text" name="name" size="34px"/>
</td>
</tr>
<tr>
<td>性别</td>
<td>
<input type="radio" name="sex" value="男"/>男
<input type="radio" name="sex" value="女"/>女
</td>
</tr>
<tr>
<td>生产日期</td>
<td>
<input type="text" name="birthday" size="34px"/>
</td>
</tr>
<tr>
<td>验证码</td>
<td>
<input type="text" name="yzm" />
<img src="../img/课堂演示图片汇总/yanzhengma.png" />
</td>
</tr>
<tr>
<td colspan="2">
<input type="submit" name="regist" value="注册"/>
</td>
</tr>
</table>
</td>
</tr>
</form>
四、 DIV+CSS
DIV它是一个html标签,一个块级元素(单独显示一行)。它单独使用没有任何意义,必须结合CSS来使用。它主要用于页面的布局。
Span它是一个html标签,一个内联元素(显示一行)。它单独使用没有任何意义,必须结合CSS来使用。它主要用于对括起来的内容进行样式的修饰。
案例:
<html>
	<head>
		<meta charset="UTF-8">
		<title>div效果演示</title>
		<style>
			div{
				border: 1px solid red;
				/*width: 400px;
				height: 200px;*/
			}
		</style>
	</head>
	<body>
		<div id="">
			123
		</div>
			12312
	</body>
</html>
<html>
	<head>
		<meta charset="UTF-8">
		<title>span演示</title>
		<style>
			span{
				font-size: 80px;
			}
		</style>
	</head>
	<body>
		<span>
			what are you doing now??
		</span>
		wqwqw
	</body>
</html>
五、 CSS内容介绍
- CSS概述
CSS指层叠样样式表,样式定义如何显示HTML元素,样式通常存储在样式表中,把样式添加到HTML 4.0,是为了解决内容与表现分离的问题,外部样式表可以极大提高工作效率,外部样式表通常存储在CSS文件中,多个样式定义可层叠为一。 - CSS作用
HTML:它是整个网站的骨架。
CSS:它是对整个网站骨架的内容进行美化(修饰) - CSS如何使用?
语法和规范
选择器{
属性名1:属性值1;
属性名2:属性值2;
属性名3:属性值3;
} - CSS选择器
a) id选择器
在head头部输入:
<style>
		#div5{
				font-size: 25px;
				color: pink;
			}
</style>

在body部分:
<body>
		<div>
			输入11
		</div>
		<div id="div5">
			输入22
		</div>
TIPS:注意id最好是唯一的,这样便于区别。 且注意头部需要用#id。
b) 元素选择器
head部分:
<style>
			div{
				font-size: 25px;
				color: pink;
			}
		</style>
body部分:
			<div>
输出11
			</div>
			<div>
输出22
			</div>
			<div>
输出33
</div>
TIPS:此时所有的元素的大小属性均相同
c) 类选择器
head部分:
<style>
			.div2{
				font-size: 25px;
				color: pink;
			}
	</style>
body部分:
<div>
输出11
				</div>
				<div class="div2">
输出22
				</div>
				<div>
输出33
				</div>
				<div class="div2">
输出44
</div>
		TIPS:输出的部分仅为相同class部分。
		注意三种选择器写法,头部的style中每个属性需要打 ;
		引号。其次注意三种选择器的写法 。
d) 层级选择器
案例:head部分
				<style>
			div p{
				font-size:25px;
				color: blue;
			}
		</style>
		body部分:
				<div>
				帅小伙11
				</div>
				<div>
				<p>帅小伙22</p>
				</div>
				<div>
				帅小伙33
</div>
TIPS:注意段落`<p></p>`一定要在div{}下面进行。
e) 属性选择器
案例:head部分
			<style>
			input[type='text']{
				background-color: pink ;
			}
			input[type='password']{
				background-color:pink ;
			}
</style>
		body部分:
用户名:<input type="text" name="username" /><br />
密码:<input type="password" name="userpassword" />
TIPS:此处利用type类型可以进行背景框的修饰。
- CSS三种引入方式
一、 内部引入方式
<style type="text/css">
			div{
				font-size: 25px;
				color: pink;
				}
			</style>
TIPS:直接在头部引入<style>并且在其中进行属性修改
二、 行内引入方式
<div style="font-size: 20px;color: blue;">
what are you doing now
		</div>
TIPS:此时进行就近原则,如果在头部也有对属性进行修饰,则执行<div>
内部的属性值。
三、 外部引入方式
新建一个CSS文件,删掉HTML文件中的div的内容,并且在HTML中建立相关联系。
<link rel="stylesheet" href="style.css" type="text/css"/>
TIPS:在herf写入需要建立的CSS文件名。rel是一个表单属性。type可以不写。
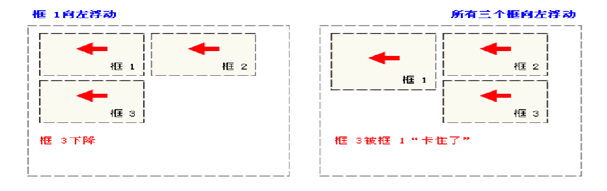
- CSS的浮动
浮动框可以向左或者向右移动,直到它的外边缘碰到包含框或另一个浮动框的边框为止。由于浮动框不在文档的普通流中,所以文档的普通流中的块框表现得就像浮动框不存在一样。
框向右移动需要碰到边框的最右边,下边框会网上顶。

全部向左顶时

若边框距离超过整个页面宽度,则往下移动,但是如果下边框有部分多出则会出现卡住的现象。
案例:body部分:
<body>
		<div id="one">

		</div>
		<div id="two">

		</div>
		<div id="three">

		</div>
		<div id="clear">

		</div>
	</body>
		head部分:
<style>
		#one{
			border: 1px solid red;
			width: 300px;
			height: 150px;
			float: left;
			clear: all;
		}
		#two{
			border: 1px solid yellow;
			width: 300px;
			height: 150px;
			float: left;
		}
		#three{
			border: 1px solid blue;
			width: 300px;
			height: 150px;
			float: left;
		}
		#clear{
			clear: both;
		}
	</style>
效果展示:
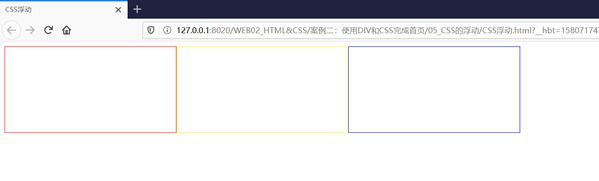 效果演示图
效果演示图