一步一个脚印,从BIO到NIO
上次写了一篇BIO笔记 (查看),聊了BIO。这次接着聊NIO。
NIO三大元素
Channel 通道
个人感觉,通道有点类似于BIO的Stream。只不过stream只是单向的要么input,要么output。而Channel则是双向的并且支持非阻塞。具体实现包括 FileChannel,DatagramChannel,SocketChannel,ServerSocketChannel等。本文重点用到后面两个。
Buffer 缓存
用于保存数据的缓存,包括以下现实: ByteBuffer, CharBuffer, DoubleBuffer, FloatBuffer, IntBuffer, LongBuffer, ShortBuffer。具有非常灵添的操作。
Selector 多路复用器
可以通过多路复用器来管理多个通道,以及获取通道触发事件。
通道 通过注册的方式,添加侦听事件,通过select()方法获取可用的事件(比如可连接,可读,可写等操作)。
一步一个脚印,实例演示
1:实现多人聊天的工具,包括服务端,客户端。
引用上一篇的 Soket IO的通信工具的代码,如下:
服务端
import java.io.BufferedReader;
import java.io.IOException;
import java.io.InputStreamReader;
import java.io.PrintWriter;
import java.net.ServerSocket;
import java.net.Socket;

public class ServerMain {

    public static void main(String[] args) throws IOException {
        ServerSocket ss = new ServerSocket(4700);
        Socket socket = ss.accept();
        PrintWriter os=new PrintWriter(socket.getOutputStream());
        BufferedReader br =new BufferedReader(new InputStreamReader(System.in) );
        BufferedReader is =new BufferedReader(new InputStreamReader(socket.getInputStream()) );
        new Thread( ()->{
            while (true) {
                try {
                    System.out.println( is.readLine());
                } catch (IOException e) {
                    e.printStackTrace();
                }
            }
        }).start();
        while (true) {
            String str=br.readLine();
            os.println(str);
            os.flush();
        }
    }
}
客户端
import java.io.BufferedReader;
import java.io.IOException;
import java.io.InputStreamReader;
import java.io.PrintWriter;
import java.net.ServerSocket;
import java.net.Socket;

public class ClientMain {

    public static   void main (String[] args) throws IOException {

        Socket socket =new Socket("127.0.0.1",4700);
        PrintWriter os=new PrintWriter(socket.getOutputStream());
        BufferedReader br =new BufferedReader(new InputStreamReader(System.in) );
        BufferedReader is =new BufferedReader(new InputStreamReader(socket.getInputStream()) );

        new Thread( ()->{
            while (true) {
                try {
                    System.out.println( is.readLine());
                } catch (IOException e) {
                    e.printStackTrace();
                }
            }
        }).start();


        while (true) {
            String str=br.readLine();
            os.println(str);
            os.flush();
        }
    }
}
分码分析:
1:上面实例的服务端与客户端都是使用的BIO实现的。
2 :客户端与服务端是一对一的。
3:服务端在 Socket socket = ss.accept(); 的时候产生blocking,等待连接客户端连接。
4:服务端、客户端 在is.readLine() 的时候产生blocking。
总结:
聊天工具那肯定是要支持多个客户端的,不然跟服务端聊天多没意思。
服务端可以只有一个,必须支持同时响应多个人,那就必须是非blocking的。
使用NIO改造 :
服务端
import sun.nio.ch.ThreadPool;

import java.io.IOException;
import java.net.InetSocketAddress;
import java.nio.ByteBuffer;
import java.nio.channels.ServerSocketChannel;
import java.nio.channels.SocketChannel;
import java.util.HashMap;
import java.util.Map;
import java.util.Queue;
import java.util.concurrent.ArrayBlockingQueue;

public class ServerMain {

    static volatile HashMap<String, SocketChannel> clients = new HashMap<>();
    static Queue<Msg> queue = new ArrayBlockingQueue<Msg>(1000);
    static ByteBuffer bfWrite = ByteBuffer.allocate(4000);
    static ByteBuffer bfRead = ByteBuffer.allocate(4000);


    public static void main(String[] args) throws IOException {


        new Thread(() -> {
            try {
                connect();
            } catch (IOException e) {
                e.printStackTrace();
            } catch (InterruptedException e) {
                e.printStackTrace();
            }
        }, "connection").start();

        new Thread(() -> {
            try {
                read();
            } catch (IOException e) {
                e.printStackTrace();
            } catch (InterruptedException e) {
                e.printStackTrace();
            }
        }, "read").start();


        new Thread(() -> {
            try {
                trans();
            } catch (IOException e) {
                e.printStackTrace();
            } catch (InterruptedException e) {
                e.printStackTrace();
            }
        }, "trans").start();

    }

    public static void connect() throws IOException, InterruptedException {
        System.out.println("--------链接监听开始-------");
        ServerSocketChannel channel = ServerSocketChannel.open();
        //侦听   127.0.0.1 :11111
        channel.bind(new InetSocketAddress("127.0.0.1", 11111));
        //设置为 非阻塞
        channel.configureBlocking(false);

        //循环执行
        while (true) {
            //等待连接,非阻塞,如果没有连接,clien=null;
            SocketChannel client = channel.accept();
            //连接不为空时
            if (client != null) {
                //连接设置 非阻塞
                client.configureBlocking(false);
                //把链接添加到 链接列表
                synchronized (clients) {
                    clients.put(String.valueOf(client.socket().getPort()), client);
                }
                System.out.println("添加链接:" + client.socket().getPort());
            }
            Thread.sleep(500);
        }
    }

    //读取
    public static void read() throws IOException, InterruptedException {
        System.out.println("--------信息监听开始-------");

        while (true) {
            synchronized (clients) {
                for (Map.Entry<String, SocketChannel> it : clients.entrySet()) {

                    //断开连接的去掉
                    SocketChannel sc=it.getValue();
                    if (sc.isConnected() == false) {
                        clients.remove(it.getKey());
                        System.out.println("删除连接:" + sc);
                        continue;
                    }

                    //尝试读取数据
                    if (sc.read(bfRead) > 0) {
                        bfRead.flip();
                        byte[] arr = new byte[bfRead.limit()];
                        bfRead.get(arr);
                        String str = new String(arr);
                        String [] msgArr =str.split(":");

                        if (msgArr == null || msgArr.length < 2) {
                            System.out.println("忽略信息:" + str);
                        }
                        else
                        {
                            Msg msg= new Msg( String.valueOf(sc.socket().getPort()),msgArr[0],msgArr[1]);
                            queue.add(msg);
                        }
                        bfRead.clear();
                    }
                }
            }
            java.lang.Thread.sleep(500);
        }
    }

    //信息转发
    public static void trans() throws IOException, InterruptedException {
        System.out.println("--------信息转发开始-------");
        while (true) {
            Msg msg = queue.poll();

            if (msg != null) {
                SocketChannel c = clients.get(msg.to);
                bfWrite.clear();
                bfWrite.put( String.format("%s:%s",msg.from,msg.msg) .getBytes());
                bfWrite.flip();
                c.write(bfWrite);
            }
            Thread.sleep(500);
        }

    }

    public static class Msg {
        public String to;
        public String from;
        public String msg;
        public Msg( String from,String to, String msg) {
            this.to = to;
            this.from = from;
            this.msg = msg;
        }
        public String getTo() {
            return to;
        }
        public void setTo(String to) {
            this.to = to;
        }
        public String getFrom() {
            return from;
        }
        public void setFrom(String from) {
            this.from = from;
        }
        public String getMsg() {
            return msg;
        }
        public void setMsg(String msg) {
            this.msg = msg;
        }
    }
}
客户端
import java.io.BufferedReader;
import java.io.IOException;
import java.io.InputStreamReader;
import java.net.InetSocketAddress;
import java.nio.ByteBuffer;
import java.nio.channels.SocketChannel;

public class ClientMain {

    static SocketChannel sc;
    static ByteBuffer bfWrite = ByteBuffer.allocate(4000);
    static ByteBuffer bfRead = ByteBuffer.allocate(4000);

    public static void main(String[] args) throws IOException, InterruptedException {

        sc = SocketChannel.open();
        sc.configureBlocking(false); //设置为非阻塞
        sc.connect(new InetSocketAddress("127.0.01", 11111));
        BufferedReader br = new BufferedReader(new InputStreamReader(System.in));

        try {
            if (sc.finishConnect()) {
                //启动读线程
                new Thread(() -> {
                    try {
                        read();
                    } catch (InterruptedException e) {
                        e.printStackTrace();
                    } catch (IOException e) {
                        e.printStackTrace();
                    }
                }, "readThread").start();
                //写入
                while (true) {
                    String msg = br.readLine();
                    bfWrite.clear();
                    bfWrite.put(msg.getBytes());
                    bfWrite.flip();
                    System.out.println("发送信息:" + msg);
                    sc.write(bfWrite);
                    Thread.sleep(200);
                }
            }
        } finally {
            sc.finishConnect();
        }
    }


    public static void read() throws InterruptedException, IOException {
        while (true) {
            if (sc.read(bfRead) > 0) {
                bfRead.flip();
                byte[] arr = new byte[bfRead.limit()];
                bfRead.get(arr);
                String str = new String(arr);
                String[] msgArr = str.split(":");
                //不符合格式的数据
                if (msgArr == null || msgArr.length < 2) {

                    continue;
                }
                System.out.println(String.format("来自%s的信息:%s", msgArr[0], msgArr[1]));
                bfRead.clear();
            }
            Thread.sleep(500);
        }

    }

}
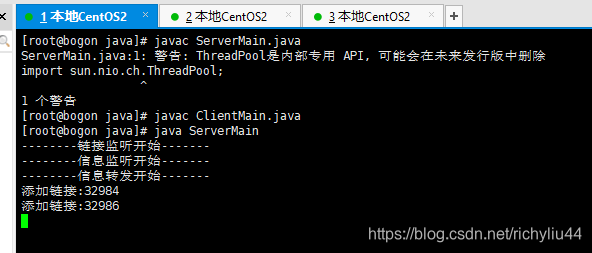
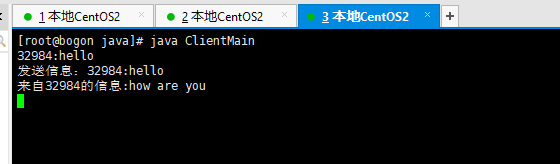
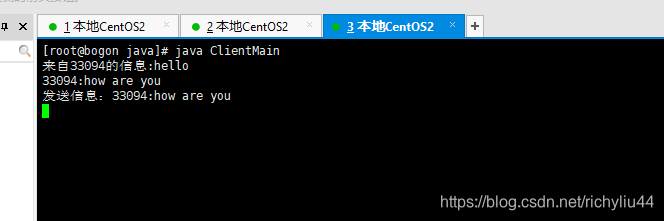
把它放到服务器上。并运行起来,开启一个服务器实例,开启两个客户端实例。运行效果如下:
服务器:
客户端1:

额户端2:
代码分析:
服务端
1:使用了NIO 的channel,并设置为 非阻塞。
 ServerSocketChannel channel = ServerSocketChannel.open();
        //侦听   127.0.0.1 :11111
        channel.bind(new InetSocketAddress("127.0.0.1", 11111));
        //设置为 非阻塞
        channel.configureBlocking(false);
2:因为是非阻塞的,资源的调用需要考虑多线程。多处引入synchronize
static volatile HashMap<String, SocketChannel> clients = new HashMap<>();
3:服务端包括分为三个线程,分别是,连接,读取信息,转发信息。
连接:如果有新的连接进来,则把连接放入clients。
读取:循环尝试去读取各个连接的数据,如有数据则写入转发队列。
转发:循环读取队列的数据,根据 消息to 找到目标连接,并把数据发送。
4:代码优化,为了更好的应对业务,引入队列、消息封装等。
客户端
1:同样使用了NIO 的channel,并设置为 非阻塞。
  sc = SocketChannel.open();
  sc.configureBlocking(false); //设置为非阻塞
  sc.connect(new InetSocketAddress("127.0.01", 11111));
总结:
1:聊天的功能基本能实现。
2:但是能效方面偏低,比如服务器的信息读取。假如说有10000个连接,那就得遍历10000次。如果能做到哪个连接有信息就读哪个连接,做到目标精确就好了。
引入多路复用器 selector
服务端
import java.io.IOException;
import java.net.InetSocketAddress;
import java.nio.ByteBuffer;
import java.nio.channels.SelectionKey;
import java.nio.channels.Selector;
import java.nio.channels.ServerSocketChannel;
import java.nio.channels.SocketChannel;
import java.util.HashMap;
import java.util.Iterator;
import java.util.Map;
import java.util.Queue;
import java.util.concurrent.ArrayBlockingQueue;

public class ServerMain2 {

    static volatile HashMap<String, SocketChannel> clients = new HashMap<>();
    static Queue<Msg> queue = new ArrayBlockingQueue<Msg>(1000);
    static Selector selector;

    public static void main(String[] args) throws IOException, InterruptedException {
        selector = Selector.open();
        Selector selector = Selector.open();
        ServerSocketChannel channel = ServerSocketChannel.open();
        //侦听   127.0.0.1 :11111
        channel.bind(new InetSocketAddress("127.0.0.1", 11111));
        //设置为 非阻塞
        channel.configureBlocking(false);
        //通道注册到selector, 类型为连接
        channel.register(selector, SelectionKey.OP_ACCEPT);

        new Thread(()->{
            try {
                trans();
            } catch (IOException e) {
                e.printStackTrace();
            } catch (InterruptedException e) {
                e.printStackTrace();
            }

        },"trans").start();

        while (true) {
            if (selector.select(1000) == 0) {
                continue;
            }
            Iterator<SelectionKey> iter = selector.selectedKeys().iterator();
            while (iter.hasNext()) {
                SelectionKey key = iter.next();
                iter.remove();

                if (key.isAcceptable()) {
                    handleAccept(key);
                }
                if (key.isReadable()) {
                    handleRead(key);
                }
            }
            Thread.sleep(500);
        }
    }

    public static void handleAccept(SelectionKey key) throws IOException {

        System.out.println("-------handleAccept---------");
        ServerSocketChannel ssChannel = (ServerSocketChannel) key.channel();
        SocketChannel sc = ssChannel.accept();
        sc.configureBlocking(false);
        sc.register(key.selector(), SelectionKey.OP_READ, ByteBuffer.allocateDirect(4000));


        //把链接添加到 链接列表
        synchronized (clients) {
            clients.put(String.valueOf(sc.socket().getPort()), sc);
        }
        System.out.println("添加链接:" + sc.socket().getPort());

    }

    public static void handleRead(SelectionKey key) throws IOException {

        System.out.println("-------handleRead---------");
        SocketChannel sc = (SocketChannel) key.channel();
        ByteBuffer buf = (ByteBuffer) key.attachment();
        long bytesRead = sc.read(buf);
        while (bytesRead > 0) {
            buf.flip();
            while (buf.hasRemaining()) {
                byte[] arr = new byte[buf.limit()];
                buf.get(arr);
                String str = new String(arr);
                String[] msgArr = str.split(":");
                if (msgArr == null || msgArr.length < 2) {
                    System.out.println("忽略信息:" + str);
                } else {
                    Msg msg = new Msg(String.valueOf(sc.socket().getPort()), msgArr[0], msgArr[1]);
                    queue.add(msg);
                }
            }
            System.out.println();
            buf.clear();
            bytesRead = sc.read(buf);
        }
        if (bytesRead == -1) {
            sc.close();
        }
    }
    //信息转发
    public static void trans() throws IOException, InterruptedException {
        ByteBuffer bfWrite =ByteBuffer.allocate(4000);

        while (true) {
            Msg msg = queue.poll();

            if (msg != null) {
                SocketChannel c = clients.get(msg.to);
                bfWrite.clear();
                bfWrite.put(String.format("%s:%s", msg.from, msg.msg).getBytes());
                bfWrite.flip();
                c.write(bfWrite);
            }
            Thread.sleep(500);
        }

    }

    public static class Msg {
        public String to;
        public String from;
        public String msg;

        public Msg(String from, String to, String msg) {
            this.to = to;
            this.from = from;
            this.msg = msg;
        }
        public String getTo() {
            return to;
        }
        public void setTo(String to) {
            this.to = to;
        }
        public String getFrom() {
            return from;
        }
        public void setFrom(String from) {
            this.from = from;
        }
        public String getMsg() {
            return msg;
        }
        public void setMsg(String msg) {
            this.msg = msg;
        }
    }
}
代码分析:
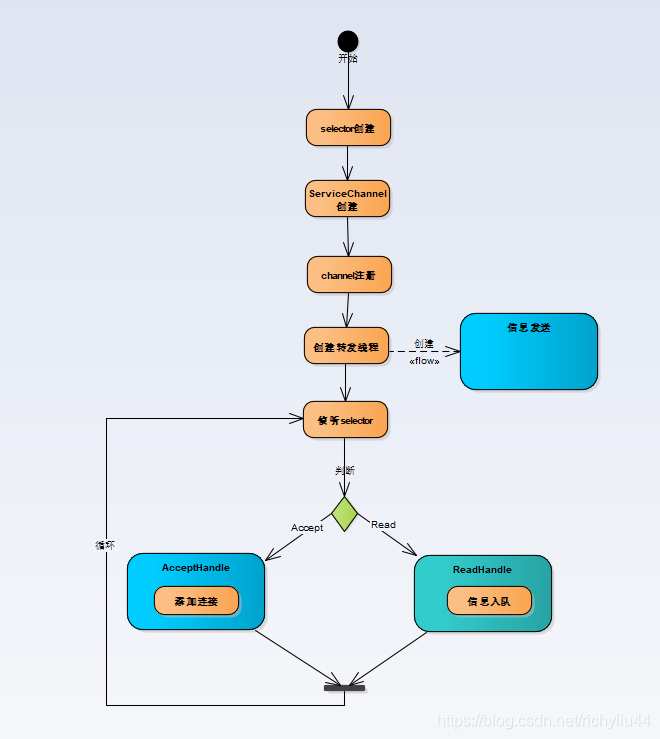
大概流程如下图所示:
相对之前的版本,做了以下调整。
1:使用多路复用器。
selector = Selector.open();
2:通道注册到多路复用器
        ServerSocketChannel channel = ServerSocketChannel.open();
        //侦听   127.0.0.1 :11111
        channel.bind(new InetSocketAddress("127.0.0.1", 11111));
        //设置为 非阻塞
        channel.configureBlocking(false);
        //通道注册到selector, 类型为连接
        channel.register(selector, SelectionKey.OP_ACCEPT);
3:侦听 连接以及可读事件。取代了原先开始两个线程(连接线程,读取线程)遍历的方式。
while (true) {
            if (selector.select(1000) == 0) {
                continue;
            }
            Iterator<SelectionKey> iter = selector.selectedKeys().iterator();
            while (iter.hasNext()) {
                SelectionKey key = iter.next();
                iter.remove();
                if (key.isAcceptable()) {
                    handleAccept(key);
                }
               else  if (key.isReadable()) {
                    handleRead(key);
                }
            }
            Thread.sleep(500);
        }
演示效果:
服务端:

客户端1:
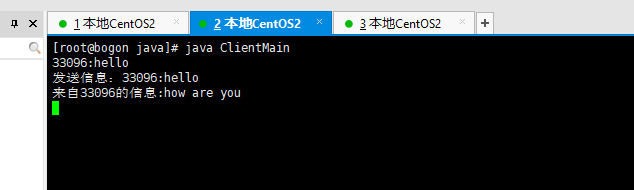
客户端2:
总结:
1:NIO的三大要素在本例子已经使用到了。
2:再次总结一下使用的好处。
1):channel ,支持not blocking。SeverSocketChanel 支持一个通道连接多个客户端。
2):Buffer,可以定义固定的一块内存,支持clear, flip等操作。可以重复利用,减少GC。
3):selector, 管理channel,侦听channel的事件。减少白忙添,增加能效。从以前的循环尝试读数据,到有数据才去读。同样连接也是。减少用户态/核生态的切换。
写在最后。
感觉NIO有点复杂,代码量有点多。。是不是应该有更好的封装呢?
未完,待续。。。。