1.kubernetses的网络模型
k8s网络模型设计基础原则:每个Pod都拥有一个独立的 IP地址,而且 假定所有 Pod 都在一个可以直接连通的、扁平的网络空间中 。 所以不管它们是否运行在同 一 个 Node (宿主机)中,都要求它们可以直接通过对方的 IP 进行访问。设计这个原则的原因 是,用户不需要额外考虑如何建立 Pod 之间的连接,也不需要考虑将容器端口映射到主机端口等问题。
Kubernetes 采用的是基于扁平地址空间的、非NAT的网络模型,每个Pod有自己唯一的IP地址。Kubernetes使用了一种“IP-per-pod”网络模型:为每一个Pod分配了一个IP地址,Pod内部的容器共享Pod的网络空间,即它们共享Pod的网卡和IP
NAT:解释由于 Kubemetes 的网络模型假设 Pod 之间访问时使用的是对方 Pod 的实际地址,所以一个
Pod 内部的应用程序看到的自己的 IP 地址和端口与集群内其他 Pod 看到的一样。它们都是 Pod 实际分配的IP地址 (从dockerO上分配的)。将IP地址和端口在Pod内部和外部都保持一致, 我们可以不使用 NAT 来进行转换,地址空间也自然是平的
k8s对Pods之间如何进行组网通信提出了要求,k8s对集群的网络有以下要求:
- 所有的Pods之间可以在不使用NAT网络地址转换的情况下相互通信
- 所有的Nodes之间可以在不使用NAT网络地址转换的情况下相互通信
- 每个Pod自己看到的自己的ip和其他Pod看到的一致
鉴于上面这些要求,我们需要解决四个不同的网络问题::
- Docker容器和Docker容器之间的网络
- Pod与Pod之间的网络
- Pod与Service之间的网络
- Internet与Service之间的网络
2.docker网络基础
Docker 使用到的与Linux网络有关的主要技术包括:网络命名空间(network namespace)、Veth设备对、网桥(bridge)、iptables和路由。
2.1. Network Namespace 网络命名空间
network namespace是namespace隔离中的一种,主要提供关于网络资源的隔离,包括网络设备、网络协议栈、ip路由表、iptables等等。通过对网络资源的隔离,就能在一个宿主机上虚拟出多个不同的网络环境,给外部用户一种透明的感觉,用户仿佛在与一个独立的网络实体进行通信。Docker正是利用了网络的命名空间特性,实现了不同容器之间的网络隔离。
由于网络命名空间代表的是一个独立的协议栈,所以它们之间是相互隔离的,彼此无法通信,在协议栈内部都看不到对方。为了让不同网络命名空间彼此通信,通常的做法是创建一个Veth设备对,一端放在新的namespace中(通常命名为eth0),另一端放在原先的namespace中连接物理网络设备,再通过把多个设备接入网桥或者进行路由转发,来实现通信的目的。
所有的网络设备(物理的或虚拟接口、桥等在内核里都叫做Net Device),且都只能属于一个命名空间。
下面是一些简单的network namespace相关的命令操作。(接下来的实验需要用到)
创建一个命名空间:
ip netns add <name>
在/var/run/netns 目录下可以看到创建出来的命名空间:
ls /var/run/netns
在命名空间中执行命令:
ip netns exec <name> <command>
通过bash命令进入内部的shell界面:
ip netns exec <name> bash2.2 Veth 设备对
Veth设备即Virtual Ethernet Device(虚拟以太网设备),引入Veth设备对是为了在不同的网络命名空间之间通信。Veth设备对的重要作用就是打通互相看不到的协议栈之间的壁垒,它就像一条管子,一端连接着这个网络命名空间的协议栈,一端连接着另一个网络命名空间的协议栈。所以如果两个命名空间之间通信,就必须有一个Veth设备对。利用它可以直接将两个网络命名空间连接起来。由于要连接两个网络命名空间, 所以Veth设备都是成对出现的,很像一对网卡,。面参考 veth man-page ,给出了 veth 的官方解释:
The veth devices are virtual Ethernet devices. They can act as tunnels between network namespaces to create a bridge to a physical network device in another namespace, but can also be used as standalone network devices. veth devices are always created in interconnected(互相连接的) pairs. A pair can be created using the command:
// 创建veth设备对
# ip link add veth0 type veth peer name veth1
p1-name and p2-name are the names assigned to the two connected end points. Packets transmitted on one device in the pair are immediately received on the other device.
veth device pairs are useful for combining the network facilities of the kernel together in interesting ways. A particularly interesting use case is to place one end of a veth pair in one network namespace and the other end in another network namespace, thus allowing communication between network namespaces. To do this, one first creates the veth device as above and then moves one side of the pair to the other namespace:
// 将veth设备对的一端(即<p2-name>)移至<p2-namespace>命名空间中
# ip link set <p2-name> netns <p2-namespace>
接下来进行实验,注意,下面的操作需要在root用户下进行。
#创建两个网络namespace
root@ubuntu:~# ip netns add ns1
root@ubuntu:~# ip netns add ns2

#可以看到,在/var/run/netns 目录下已经出现了刚刚创建的两个namespace
root@ubuntu:~# ls /var/run/netns/
ns1  ns2

#创建一对Veth
root@ubuntu:~# ip link add veth0 type veth peer name veth1

#分别将两个Veth移到namespace中
root@ubuntu:~# ip link set veth0 netns ns1
root@ubuntu:~# ip link set veth1 netns ns2

#在ns1的namespace中查看网络设备,发现 veth0
root@ubuntu:~# ip netns exec ns1 ip link
1: lo: <LOOPBACK> mtu 65536 qdisc noop state DOWN mode DEFAULT group default qlen 1
    link/loopback 00:00:00:00:00:00 brd 00:00:00:00:00:00
4: veth0@if3: <BROADCAST,MULTICAST> mtu 1500 qdisc noop state DOWN mode DEFAULT group default qlen 1000
    link/ether e2:42:ce:d6:d9:13 brd ff:ff:ff:ff:ff:ff

#在ns1的namespace中查看网络设备,发现 veth1
root@ubuntu:~# ip netns exec ns2 ip link
1: lo: <LOOPBACK> mtu 65536 qdisc noop state DOWN mode DEFAULT group default qlen 1
    link/loopback 00:00:00:00:00:00 brd 00:00:00:00:00:00
3: veth1@if4: <BROADCAST,MULTICAST> mtu 1500 qdisc noop state DOWN mode DEFAULT group default qlen 1000
    link/ether fa:55:90:67:19:dc brd ff:ff:ff:ff:ff:ff
可以看到,在ns1和ns2这两个命名空间中,除了LOOPBACK的设备以外,就只看到了一个网络设备,也就是veth。当请求发送到这个虚拟网络设备时,会原封不动的从另外一个network namespace的网络接口中出来。如下图所示:
#配置每个veth的网络和namespace的路由
root@ubuntu:~# ip netns exec ns1 ifconfig veth0 172.18.0.2/24 up
root@ubuntu:~# ip netns exec ns2 ifconfig veth1 172.18.0.3/24 up
root@ubuntu:~# ip netns exec ns1 route add default dev veth0
root@ubuntu:~# ip netns exec ns2 route add default dev veth1

#通过veth一端出去的包,可以从另一端直接接收到
root@ubuntu:~# ip netns exec ns1 ping -c 1 172.18.0.3
PING 172.18.0.3 (172.18.0.3) 56(84) bytes of data.
64 bytes from 172.18.0.3: icmp_seq=1 ttl=64 time=0.049 ms

--- 172.18.0.3 ping statistics ---
1 packets transmitted, 1 received, 0% packet loss, time 0ms
rtt min/avg/max/mdev = 0.049/0.049/0.049/0.000 ms
在Docker内部,Veth设备对也是联通容器与宿主机的主要网络设备,没有他是不行的。
2.3 网桥
什么是 Bridge ?
An ethernet bridge is a device commonly used to connect different networks of ethernets together, so that these ethernets will appear as one ethernet to the participants. Each of the ethernets being connected corresponds to one physical interface in the bridge. These individual ethernets are bundled into one bigger ('logical') ethernet, this bigger ethernet corresponds to the bridge network interface.
网桥是一个二层的虚拟网络设备,简单的理解,相当于现实世界的交换机,把若干个网络接口“连接”起来,以使得网络接口之间的报文能够相互转发。网桥能够解析收发的报文,读取目标MAC地址信息,根据已经记录的MAC表,来决定向哪个目标网络接口进行转发。
Linux 网桥的实现
Linux内核是通过一个虚拟的网桥设备(Net Device)来实现桥接的。这个虚拟设备可以绑定若干个以太网接口设备,从而将它们桥接起来。如下图所示,这种Net Device网桥和普通的设备不同,最明显的一个特性是它还可以有一个IP地址。
上图中,网桥设备br0绑定了eth0和eth1。对于网络协议栈的上层来说,只看得到br0就行。因为桥接是在数据链路层实现的,上层不需要关心桥接的细节,所以协议栈上层需要发送的报文被送到br0,网桥设备来判断报文该被转发到eth0还是eth1,或者两者皆转发;反过来,从eth0或从eth1接收到的报文被提交给网桥,在这里会判断报文应该被转发、丢弃还是被提交到协议栈上层。
实验
为了继续实验,这里先简单了解一下 brctl 命令。(参考:brctl man-page)
brctl is used to set up, maintain, and inspect the ethernet bridge configuration in the Linux kernel.
创建、删除网桥
# brctl addbr <name>
The command brctl addbr <name> creates a new instance of the ethernet bridge. The network interface corresponding to the bridge will be called <name>.
# brctl delbr <name>
The command brctl delbr <name> deletes the instance <name> of the ethernet bridge. The network interface corresponding to the bridge must be down before it can be deleted!
# brctl show
The command brctl show shows all current instances of the ethernet bridge.
向网桥中挂载/卸载设备
# brctl addif <brname> <ifname>
The command brctl addif <brname> <ifname> will make the interface <ifname> a port of the bridge <brname>. This means that all frames received on <ifname> will be processed as if destined for the bridge. Also, when sending frames on <brname>, <ifname> will be considered as a potential output interface.
# brctl delif <brname> <ifname>
The command brctl delif <brname> <ifname> will detach the interface <ifname> from the bridge <brname>.
# brctl show <brname>
The command brctl show <brname> will show some information on the bridge and its attached ports.
下面进行实验
#创建Veth设备对并将一端移入namespace
root@ubuntu:~# ip netns add ns1
Cannot not create namespace file "/var/run/netns/ns1": File exists
root@ubuntu:~# ip link add veth0 type veth peer name veth1
root@ubuntu:~# ip link set veth1 netns ns1

#创建网桥
root@ubuntu:~# brctl addbr br0

#挂载网络设备
root@ubuntu:~# brctl addif br0 veth0
root@ubuntu:~# brctl addif br0 eth0 // 不知道为什么,挂载了这个设备后,Xshell就不能连接虚拟机了
现在来看一下网桥 br0 上挂载的设备
root@ubuntu:~# brctl show
bridge name	bridge id		STP enabled	interfaces
br0		8000.e24b8d8900b0	no		veth0
                                      eth0
如下图所示:
#启动虚拟网络设备,并设置它在network namespace中的IP地址
root@ubuntu:~# ip link set veth0 up
root@ubuntu:~# ip link set br0 up
root@ubuntu:~# ip netns exec ns1 ifconfig veth1 172.18.0.2/24 up

#分别设置ns1网络空间的路由和宿主机上的路由
#default 代表0.0.0.0/0,即在network namespace中所有流量都经过veth1的网络设备流出
root@ubuntu:~# ip netns exec ns1 route add default dev veth1

#在宿主机上将172.18.0.0/24 的网段请求路由到 br0 的网桥
root@ubuntu:~# route add -net 172.18.0.0/24 dev br0
宿主机与network namespace的通信验证如下:(192.168.179.144是我的虚拟机ip地址)
2.4 ipatbles和Netfilter【挂节点技术】
如果我们希望在数据的处理过程中对关心的数据进行一些操作,则该怎么做呢?Linux提供了一套机制来为用户实现自定义的数据包处理过程。
在Linux网络协议栈中有一组回调函数挂接点,通过这些挂接点挂接的钩子函数可以在Linux网络栈处理数据包的过程中对数据包进行一些操作,例如过滤、修改、丢弃等。整个挂接点技术叫作Netfilter和iptables。
Netfilter负责在内核中执行各种挂接的规则,运行在内核模式中;而iptables是在用户模式下运行的进程,负责协助和维护内核中Netfilter的各种规则表。二者互相配合来实现整个Linux网络协议栈中灵活的数据包处理机制。在容器的虚拟化技术中,经常会用到两种策略MASQUERADE 和 DNAT ,用于容器和宿主机外部的网络通信。
MASQUERADE
iptables 中的 MASQUERADE 策略可以将请求包中的源地址转换成一个网络设备中的地址。 在namespace中请求宿主机外部地址时,将namespace中的源地址转换成宿主机的地址作为源地址,就可以在namespace中访问宿主机外的网络了。
// 查看内核参数 net.ipv4.conf.all.forwarding,值为1表示打开这一策略
$ sysctl net.ipv4.conf.all.forwarding
net.ipv4.conf.all.forwarding = 1
// 对 Namespace 中发出的包添加网络地址转换
$ sudo iptables -t nat -A POSTROUTING -s 172 . 18.0.0/24 -o ethO -j MASQUERADE
DNAT
iptables 中的 DNAT 策略也是做网络地址的转换,不过它是负责转换目标地址(MASQUERADE 策略负责转换源地址),用于将内部网络地址的端口映射到外部去。比如,namespace 中如果需要提供服务给宿主机之外的应用去请求,外部应用是没办法直接路由到 172.18.0.2 这个地址的,这时候就可以用到 DNAT 策略。
通过如下命令,则可以把宿主机上80端口的TCP请求转发到namespace中的172.18.0.2:80,从而实现外部应用的调用。
// 将到宿主机上 80 端口的请求转发到 Namespace IP上
$ sudo iptables -t nat -A PREROUTING -p tcp -m tcp --dport 80 -j DNAT --to-destination 172.18.0.2:80
(注:关于netfilter和iptables的了解不深,有需要再深入)
Netfilter 可以挂接的规则有5个点
2.4.1 规则表Table
这些挂接点的规则也分不同的类型(规则表Table),我们可以在不同类型的Table中加入我们的规则,目前支持的Table类型有:
RAW、MANGLE、NAT、FILTER
上述四个Tbale链的优先级RAW最高、MANGLE、NAT、FILTER最低
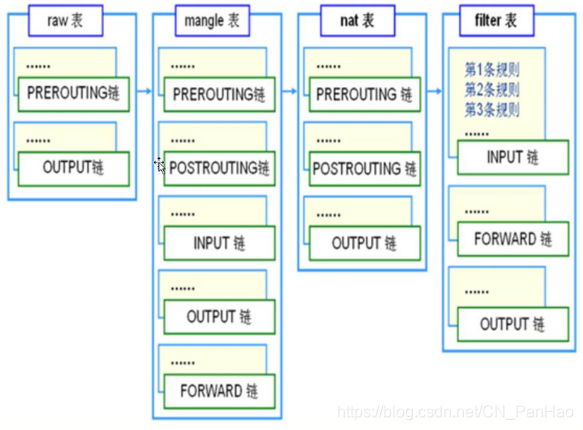
linux iptables防火墙 默认规则表链结构
它会依次调用挂节点上所有的挂钩函数,直到数据包的处理结果明确的接收或者拒绝
2.4.2 处理规则
每个规则的特性都分为以下几个部分:
- 表类型(准备干什么事情)
- 什么挂接点(什么时候起作用)
- 匹配的参数是什么(针对什么样的数据包)
- 匹配后有什么动作(匹配到的具体操作是什么)
1.匹配参数
2.匹配后的动作
2.4.3 iptables命令
2.5 路由
Linux系统包含一个完整的路由功能。路由功能由IP层维护的一张路由表来实现。当主机收到数据报文时,它用此表来决策接下来应该做什么操作。当从网络侧接收到数据报文时,IP层首先会检查报文的IP地址是否与主机自身的地址相同。如果数据报文中的IP地址是主机自身的地址,那么报文将被发送到传输层相应的协议中。如果报文中的IP地址不是主机自身的地址,并且主机配置了路由功能,那么报文将被转发,否则,报文将被丢弃。
路由表中的数据一般是以条目形式存在的。一个典型的路由表条目通常包含以下主要的条目项。
- 目的IP地址:此字段表示目标的IP地址。这个IP地址可以是某主机的地址,也可以是一个网络地址。
- 下一个路由器的IP地址:这里采用“下一个”的说法,是因为下一个路由器并不总是最终的目的路由器,它很可能是一个中间路由器。
- 标志:这个字段提供了另一组重要信息,例如,目的IP地址是一个主机地址还是一个网络地址。此外,从标志中可以得知下一个路由器是一个真实路由器还是一个直接相连的接口。
- 网络接口规范:为一些数据报文的网络接口规范,该规范将与报文一起被转发。
2.5.1 路由表
通过 route 命令查看 Linux 内核的路由表:
netstat -rn 查看路由表的工具
[root@VM_139_74_centos ~]# route
Kernel IP routing table
Destination     Gateway         Genmask         Flags Metric Ref    Use Iface
default         gateway         0.0.0.0         UG    0      0        0 eth0
10.0.0.10       10.139.128.1    255.255.255.255 UGH   0      0        0 eth0
10.139.128.0    0.0.0.0         255.255.224.0   U     0      0        0 eth0
link-local      0.0.0.0         255.255.0.0     U     1002   0        0 eth0
172.17.0.0      0.0.0.0         255.255.0.0     U     0      0        0 docker0
172.18.0.0      0.0.0.0         255.255.0.0     U     0      0        0 br-0ab63c131848
172.19.0.0      0.0.0.0         255.255.0.0     U     0      0        0 br-bccbfb788da0
172.20.0.0      0.0.0.0         255.255.0.0     U     0      0        0 br-7485db25f958
[root@VM_139_74_centos ~]# route -n
Kernel IP routing table
Destination     Gateway         Genmask         Flags Metric Ref    Use Iface
0.0.0.0         10.139.128.1    0.0.0.0         UG    0      0        0 eth0
10.0.0.10       10.139.128.1    255.255.255.255 UGH   0      0        0 eth0
10.139.128.0    0.0.0.0         255.255.224.0   U     0      0        0 eth0
169.254.0.0     0.0.0.0         255.255.0.0     U     1002   0        0 eth0
172.17.0.0      0.0.0.0         255.255.0.0     U     0      0        0 docker0
172.18.0.0      0.0.0.0         255.255.0.0     U     0      0        0 br-0ab63c131848
172.19.0.0      0.0.0.0         255.255.0.0     U     0      0        0 br-bccbfb788da0
172.20.0.0      0.0.0.0         255.255.0.0     U     0      0        0 br-7485db25f958
各列字段说明:
| 列 | 含义 |
|---|---|
| Destination | 目标网络或目标主机。Destination 为 default(0.0.0.0)时,表示这个是默认网关,所有数据都发到这个网关(这里是 10.139.128.1) |
| Gateway | 网关地址,0.0.0.0 表示当前记录对应的 Destination 跟本机在同一个网段,通信时不需要经过网关 |
| Genmask | Destination 字段的网络掩码,Destination 是主机时需要设置为 255.255.255.255,是默认路由时会设置为 0.0.0.0 |
| Flags | 标记,含义参考表格后面的解释 |
| Metric | 路由距离,到达指定网络所需的中转数,是大型局域网和广域网设置所必需的 (不在Linux内核中使用。) |
| Ref | 路由项引用次数 (不在Linux内核中使用。) |
| Use | 此路由项被路由软件查找的次数 |
| Iface | 网卡名字,例如 eth0 |
Flags 含义:
- U 路由是活动的
- H 目标是个主机
- G 需要经过网关
- R 恢复动态路由产生的表项
- D 由路由的后台程序动态地安装
- M 由路由的后台程序修改
- ! 拒绝路由
Linux 内核的路由种类
主机路由
路由表中指向单个 IP 地址或主机名的路由记录,其 Flags 字段为 H。下面示例中,对于 10.0.0.10 这个主机,通过网关 10.139.128.1 网关路由:
[root@VM_139_74_centos ~]# route -n
Kernel IP routing table
Destination     Gateway         Genmask         Flags Metric Ref    Use Iface
10.0.0.10       10.139.128.1    255.255.255.255 UGH   0      0        0 eth0
...
网络路由
主机可以到达的网络。下面示例中,对于 10.0.0.0/24 这个网络,通过网关 10.139.128.1 网关路由:
[root@VM_139_74_centos ~]# route -n
Kernel IP routing table
Destination     Gateway         Genmask         Flags Metric Ref    Use Iface
10.0.0.0        10.139.128.1    255.255.255.0   UG    0      0        0 eth0
默认路由
当目标主机的 IP 地址或网络不在路由表中时,数据包就被发送到默认路由(默认网关)上。默认路由的 Destination 是 default 或 0.0.0.0。
[root@VM_139_74_centos ~]# route
Kernel IP routing table
Destination     Gateway         Genmask         Flags Metric Ref    Use Iface
default         gateway         0.0.0.0         UG    0      0        0 eth0
route 命令
route 命令可以显示或设置 Linux 内核中的路由表,主要是静态路由。
对于局域网中的 Linux 主机,要想访问 Internet,需要将局域网的网关 IP 地址设置为这个主机的默认路由。在命令行中通过 route 命令添加的路由在网卡重启或机器重启后失效。可以在 /etc/rc.local 中添加 route 命令来保证路由设置永久有效。
选项:
-A:设置地址类型-C:打印 Linux 内核的路由缓存-v:显示详细信息-n:不执行 DNS 反向查找,直接显示数字形式的 IP 地址-e:netstat 格式显示路由表-net:到一个网络的路由表-host:到一个主机的路由表
参数:
- add:增加路由记录
- del:删除路由记录
- target:目的网络或目的主机
- gw:设置默认网关
- mss:设置TCP的最大区块长度(MSS),单位MB
- window:指定通过路由表的TCP连接的TCP窗口大小
- dev:路由记录所表示的网络接口
添加路由 add
可以添加一条可用路由,或添加一条要屏蔽的路由。
添加路由
添加主机路由
添加主机路由时,需要指定网络 ID 和主机 ID,此时需要设置 netmask 255.255.255.255:
[root@VM_139_74_centos ~]# route add -net 10.0.0.10 netmask 255.255.255.255 gw 10.139.128.1 dev eth0
[root@VM_139_74_centos ~]# route -n
Kernel IP routing table
Destination     Gateway         Genmask         Flags Metric Ref    Use Iface
10.0.0.10       10.139.128.1    255.255.255.255 UGH   0      0        0 eth0
...
添加网络路由
添加网络路由时,只需指定网络 ID,通过 netmask 设置掩码长度:
[root@VM_139_74_centos ~]# route add -net 10.0.0.0 netmask 255.255.255.0 gw 10.139.128.1 dev eth0
[root@VM_139_74_centos ~]# route -n
Kernel IP routing table
Destination     Gateway         Genmask         Flags Metric Ref    Use Iface
10.0.0.0        10.139.128.1    255.255.255.0   UG    0      0        0 eth0
...
添加添加同一个局域网的主机
不指定 gw 选项时,添加的路由记录不使用网关:
[root@VM_139_74_centos ~]# route add -net 224.0.0.0 netmask 240.0.0.0 dev eth0
[root@VM_139_74_centos ~]# route -n
Kernel IP routing table
Destination     Gateway         Genmask         Flags Metric Ref    Use Iface
224.0.0.0       0.0.0.0         240.0.0.0       U     0      0        0 eth0
...
屏蔽路由
[root@VM_139_74_centos ~]# route add -net 224.0.0.0 netmask 240.0.0.0 reject
[root@VM_139_74_centos ~]# route -n
Kernel IP routing table
Destination     Gateway         Genmask         Flags Metric Ref    Use Iface
224.0.0.0       -               240.0.0.0       !     0      -        0 -
...
删除路由记录
跟添加路由类似,可以删除一条可用路由,或删除一条屏蔽的路由。
删除可用路由
route del -net 224.0.0.0 netmask 240.0.0.0删除屏蔽的路由
route del -net 224.0.0.0 netmask 240.0.0.0 reject删除和添加设置默认网关
添加或删除默认网关时,Linux 会自动检查网关的可用性:
[root@VM_139_74_centos ~]# route add default gw 192.168.1.1
SIOCADDRT: Network is unreachable
[root@VM_139_74_centos ~]# route del default gw 192.168.1.1
SIOCDELRT: No such process
推荐一个写的不错的博客