这里只讲解Seata的安装与配置,由于Seata在1.0.0版本之后配置有很大改变,有很多坑,所以在此说明一下
Windows与Linux版本的下载地址:https://seata.io/zh-cn/blog/download.html
本案例源码下载:https://download.csdn.net/download/weixin_44790046/12553839
一、Windows安装配置Seata
下载完成后解压即可
1、修改seata-server-1.2.0\seata\conf\file.conf文件
#修改内容如下
## transaction log store, only used in seata-server
store {
  ## store mode: file、db
  mode = "db"		#!!!!!!!!!这里改为db

  ## file store property
  file {
    ## store location dir
    dir = "sessionStore"
    # branch session size , if exceeded first try compress lockkey, still exceeded throws exceptions
    maxBranchSessionSize = 16384
    # globe session size , if exceeded throws exceptions
    maxGlobalSessionSize = 512
    # file buffer size , if exceeded allocate new buffer
    fileWriteBufferCacheSize = 16384
    # when recover batch read size
    sessionReloadReadSize = 100
    # async, sync
    flushDiskMode = async
  }

  ## database store property
  db {
    ## the implement of javax.sql.DataSource, such as DruidDataSource(druid)/BasicDataSource(dbcp) etc.
    datasource = "druid"
    ## mysql/oracle/postgresql/h2/oceanbase etc.
    dbType = "mysql"
    driverClassName = "com.mysql.jdbc.Driver"
    url = "jdbc:mysql://192.168.200.131:3306/seata"	#!!!!!!!!!你的msyql
    user = "root"	#!!!!!!!!!用户名
    password = "362623"	#!!!!!!!!!密码
    minConn = 5
    maxConn = 30
    globalTable = "global_table"
    branchTable = "branch_table"
    lockTable = "lock_table"
    queryLimit = 100
    maxWait = 5000
  }
}
1、修改seata-server-1.2.0\seata\conf\registry.conf文件
#修改内容如下
registry {
  # file 、nacos 、eureka、redis、zk、consul、etcd3、sofa
  type = "nacos"		#!!!!!!!!!改为nacos

  nacos {
    application = "seata-server"
    serverAddr = "192.168.200.199"		#!!!!!!!!!注册中心地址
    namespace = ""
    cluster = "default"
    username = "nacos"		#!!!!!!!!!用户名
    password = "nacos"		#!!!!!!!!!密码
  }
  eureka {
    serviceUrl = "http://localhost:8761/eureka"
    application = "default"
    weight = "1"
  }
  redis {
    serverAddr = "localhost:6379"
    db = 0
    password = ""
    cluster = "default"
    timeout = 0
  }
  zk {
    cluster = "default"
    serverAddr = "127.0.0.1:2181"
    sessionTimeout = 6000
    connectTimeout = 2000
    username = ""
    password = ""
  }
  consul {
    cluster = "default"
    serverAddr = "127.0.0.1:8500"
  }
  etcd3 {
    cluster = "default"
    serverAddr = "http://localhost:2379"
  }
  sofa {
    serverAddr = "127.0.0.1:9603"
    application = "default"
    region = "DEFAULT_ZONE"
    datacenter = "DefaultDataCenter"
    cluster = "default"
    group = "SEATA_GROUP"
    addressWaitTime = "3000"
  }
  file {
    name = "file.conf"
  }
}

config {
  # file、nacos 、apollo、zk、consul、etcd3
  type = "nacos"		#!!!!!!!!!改为nacos

  nacos {
    serverAddr = "192.168.200.199"		#!!!!!!!!!配置中心地址
    namespace = ""
    group = "SEATA_GROUP"
    username = "nacos"		#!!!!!!!!!用户名
    password = "nacos"		#!!!!!!!!!密码
  }
  consul {
    serverAddr = "127.0.0.1:8500"
  }
  apollo {
    appId = "seata-server"
    apolloMeta = "http://192.168.1.204:8801"
    namespace = "application"
  }
  zk {
    serverAddr = "127.0.0.1:2181"
    sessionTimeout = 6000
    connectTimeout = 2000
    username = ""
    password = ""
  }
  etcd3 {
    serverAddr = "http://localhost:2379"
  }
  file {
    name = "file.conf"
  }
}
3、首先启动Nacos服务,然后再启动Seata,查看nacos服务注册中心是否注册上了Seata

二、搭建Seata运行环境
1、在你的mysql数据库中创建名为seata的库,并创建以下数据表
-- -------------------------------- The script used when storeMode is 'db' --------------------------------
-- the table to store GlobalSession data
CREATE TABLE IF NOT EXISTS `global_table`
(
    `xid`                       VARCHAR(128) NOT NULL,
    `transaction_id`            BIGINT,
    `status`                    TINYINT      NOT NULL,
    `application_id`            VARCHAR(32),
    `transaction_service_group` VARCHAR(32),
    `transaction_name`          VARCHAR(128),
    `timeout`                   INT,
    `begin_time`                BIGINT,
    `application_data`          VARCHAR(2000),
    `gmt_create`                DATETIME,
    `gmt_modified`              DATETIME,
    PRIMARY KEY (`xid`),
    KEY `idx_gmt_modified_status` (`gmt_modified`, `status`),
    KEY `idx_transaction_id` (`transaction_id`)
) ENGINE = InnoDB
  DEFAULT CHARSET = utf8;

-- the table to store BranchSession data
CREATE TABLE IF NOT EXISTS `branch_table`
(
    `branch_id`         BIGINT       NOT NULL,
    `xid`               VARCHAR(128) NOT NULL,
    `transaction_id`    BIGINT,
    `resource_group_id` VARCHAR(32),
    `resource_id`       VARCHAR(256),
    `branch_type`       VARCHAR(8),
    `status`            TINYINT,
    `client_id`         VARCHAR(64),
    `application_data`  VARCHAR(2000),
    `gmt_create`        DATETIME(6),
    `gmt_modified`      DATETIME(6),
    PRIMARY KEY (`branch_id`),
    KEY `idx_xid` (`xid`)
) ENGINE = InnoDB
  DEFAULT CHARSET = utf8;

-- the table to store lock data
CREATE TABLE IF NOT EXISTS `lock_table`
(
    `row_key`        VARCHAR(128) NOT NULL,
    `xid`            VARCHAR(96),
    `transaction_id` BIGINT,
    `branch_id`      BIGINT       NOT NULL,
    `resource_id`    VARCHAR(256),
    `table_name`     VARCHAR(32),
    `pk`             VARCHAR(36),
    `gmt_create`     DATETIME,
    `gmt_modified`   DATETIME,
    PRIMARY KEY (`row_key`),
    KEY `idx_branch_id` (`branch_id`)
) ENGINE = InnoDB
  DEFAULT CHARSET = utf8;
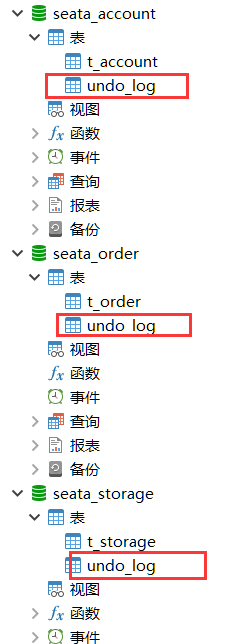
2、要在参与全局事务的每个数据库中都加入undo_log这张表
-- for AT mode you must to init this sql for you business database. the seata server not need it.
CREATE TABLE IF NOT EXISTS `undo_log`
(
    `id`            BIGINT(20)   NOT NULL AUTO_INCREMENT COMMENT 'increment id',
    `branch_id`     BIGINT(20)   NOT NULL COMMENT 'branch transaction id',
    `xid`           VARCHAR(100) NOT NULL COMMENT 'global transaction id',
    `context`       VARCHAR(128) NOT NULL COMMENT 'undo_log context,such as serialization',
    `rollback_info` LONGBLOB     NOT NULL COMMENT 'rollback info',
    `log_status`    INT(11)      NOT NULL COMMENT '0:normal status,1:defense status',
    `log_created`   DATETIME     NOT NULL COMMENT 'create datetime',
    `log_modified`  DATETIME     NOT NULL COMMENT 'modify datetime',
    PRIMARY KEY (`id`),
    UNIQUE KEY `ux_undo_log` (`xid`, `branch_id`)
) ENGINE = InnoDB
  AUTO_INCREMENT = 1
  DEFAULT CHARSET = utf8 COMMENT ='AT transaction mode undo table';
如我测试用例使用的3个数据库
3、从官方github仓库拿到参考配置做修改 https://github.com/seata/seata/tree/develop/script/client/spring
加到你项目的application.yml中。
seata:
  enabled: true
  application-id: applicationName
  tx-service-group: my_test_tx_group
  enable-auto-data-source-proxy: true
  config:
    type: nacos
    nacos:
      namespace:
      serverAddr: 127.0.0.1:8848
      group: SEATA_GROUP
      userName: "nacos"
      password: "nacos"
  registry:
    type: nacos
    nacos:
      application: seata-server
      server-addr: 127.0.0.1:8848
      namespace:
      userName: "nacos"
      password: "nacos"
4、由于Seata1.2.0支持从Nacos读取配置,所以我们还需要一个bootstrap.yml读取配置信息
#Nacos同springcloud-config-样, 在项目初始化时,要保证先从配置中心进行配置拉取,拉取配置之后,才能保证项目的正常启动。
#springboot中配置文件的加载是存在优先级顺序的,bootstrap优先级高于application

#当前服务端口号
server:
  port: 2002

spring:
  application:
    name: seata-storage-service #当前服务名称
  main:
    allow-bean-definition-overriding: true
  cloud:
    loadbalancer:
      retry:
        enabled: false
    nacos:
      discovery:
        server-addr: 192.168.200.199 #通过虚拟IP访问Nginx主服务器,然后反向代理到其中一台nacos注册中心
      config:
        server-addr: 192.168.200.199 #通过虚拟IP访问Nginx主服务器,然后反向代理到其中一台nacos配置中心

#设置feign客户端超时时间(OpenFeign默认支持ribbon)
ribbon:
  ReadTimeout: 5000 #指的是建立连接所用的时间,适用于网络状况正常的情况下,两端连接所用的时间
  connectTimeout: 5000  #指的是建立连接后从服务器读取到可用资源所用的时间
5、项目pom文件
 <dependencies>
        <!-- nacos 作为服务注册中心 -->
        <dependency>
            <groupId>com.alibaba.cloud</groupId>
            <artifactId>spring-cloud-starter-alibaba-nacos-discovery</artifactId>
        </dependency>

        <!-- nacos 作为配置中心 -->
        <dependency>
            <groupId>com.alibaba.cloud</groupId>
            <artifactId>spring-cloud-starter-alibaba-nacos-config</artifactId>
        </dependency>

        <!--SpringCloud集成OpenFeign服务调用-->
        <dependency>
            <groupId>org.springframework.cloud</groupId>
            <artifactId>spring-cloud-starter-openfeign</artifactId>
        </dependency>

        <!--SpringCloudAlibaba的seata分布式事务管理-->
        <dependency>
            <groupId>com.alibaba.cloud</groupId>
            <artifactId>spring-cloud-alibaba-seata</artifactId>
            <exclusions>
                <exclusion>
                    <groupId>io.seata</groupId>
                    <artifactId>seata-spring-boot-starter</artifactId>
                </exclusion>
            </exclusions>
        </dependency>
        <!--指定与安装的seata版本一致,重要!-->
        <dependency>
            <groupId>io.seata</groupId>
            <artifactId>seata-spring-boot-starter</artifactId>
            <version>1.2.0</version>
        </dependency>

        <!-- SpringBoot框架集成web项目起步依赖 -->
        <dependency>
            <groupId>org.springframework.boot</groupId>
            <artifactId>spring-boot-starter-web</artifactId>
        </dependency>

        <!-- SpringBoot健康监控功能起步依赖  -->
        <dependency>
            <groupId>org.springframework.boot</groupId>
            <artifactId>spring-boot-starter-actuator</artifactId>
        </dependency>

        <!--mybatis集成SpringBoot起步依赖-->
        <dependency>
            <groupId>org.mybatis.spring.boot</groupId>
            <artifactId>mybatis-spring-boot-starter</artifactId>
        </dependency>

        <!--阿里Druid连接池集成SpringBoot起步依赖-->
        <dependency>
            <groupId>com.alibaba</groupId>
            <artifactId>druid</artifactId>
            <version>1.1.22</version>
        </dependency>

        <!--MySQL驱动依赖-->
        <dependency>
            <groupId>mysql</groupId>
            <artifactId>mysql-connector-java</artifactId>
            <version>5.1.48</version>
        </dependency>

        <!--热部署依赖-->
        <dependency>
            <groupId>org.springframework.boot</groupId>
            <artifactId>spring-boot-devtools</artifactId>
            <scope>runtime</scope>
            <optional>true</optional>
        </dependency>

        <!--提供一系列方便生成get、set方法等的注解依赖-->
        <dependency>
            <groupId>org.projectlombok</groupId>
            <artifactId>lombok</artifactId>
            <optional>true</optional>
            <scope>provided</scope>
        </dependency>

        <!-- SpringBoot单元测试依赖 -->
        <dependency>
            <groupId>org.springframework.boot</groupId>
            <artifactId>spring-boot-starter-test</artifactId>
            <scope>test</scope>
        </dependency>
    </dependencies>
</project>
6、将Seata项目克隆或下载到本地 https://github.com/seata/seata
克隆完成后进入\seata\script\config-center目录修改config.txt为以下内容。
service.vgroupMapping.my_test_tx_group=default
store.mode=db
store.db.datasource=druid
store.db.dbType=mysql
store.db.driverClassName=com.mysql.jdbc.Driver
store.db.url=jdbc:mysql://192.168.200.131:3306/seata?useUnicode=true	#!!!!!!!!MySQL的URL
store.db.user=username	#!!!!!!!!!用户名
store.db.password=password	#!!!!!!!!!密码
store.db.minConn=5
store.db.maxConn=30
store.db.globalTable=global_table
store.db.branchTable=branch_table
store.db.queryLimit=100
store.db.lockTable=lock_table
store.db.maxWait=5000
运行仓库中提供的nacos脚本,将以上信息提交到nacos控制台,如果有需要更改,可直接通过控制台更改

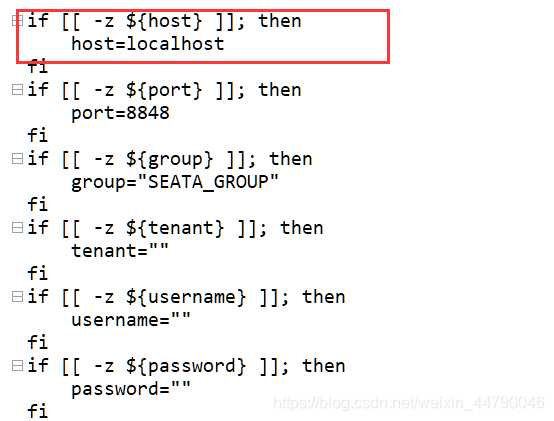
注意:
如果你的nacos地址不是本机,需要修改脚本nacos-config.sh,他是默认使用本机nacos的,修改地方如下
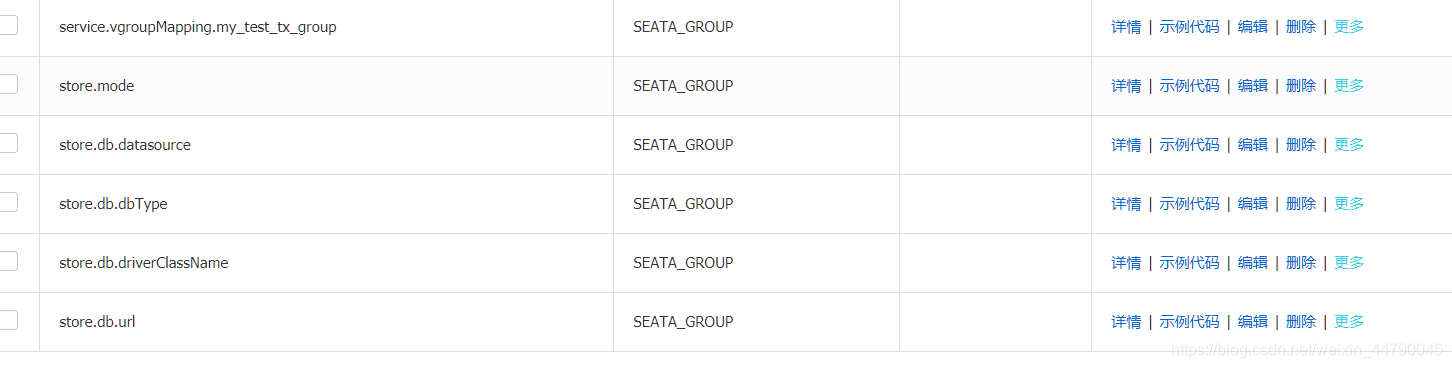
导入完成后,nacos注册中心中,配置列表如下即可
三、测试事务是否成功
主要业务逻辑,使用Seata的全局事务只需要在方法上加
@GlobalTransactional注解即可,使用很简单,但是配置很繁琐,还很容易错
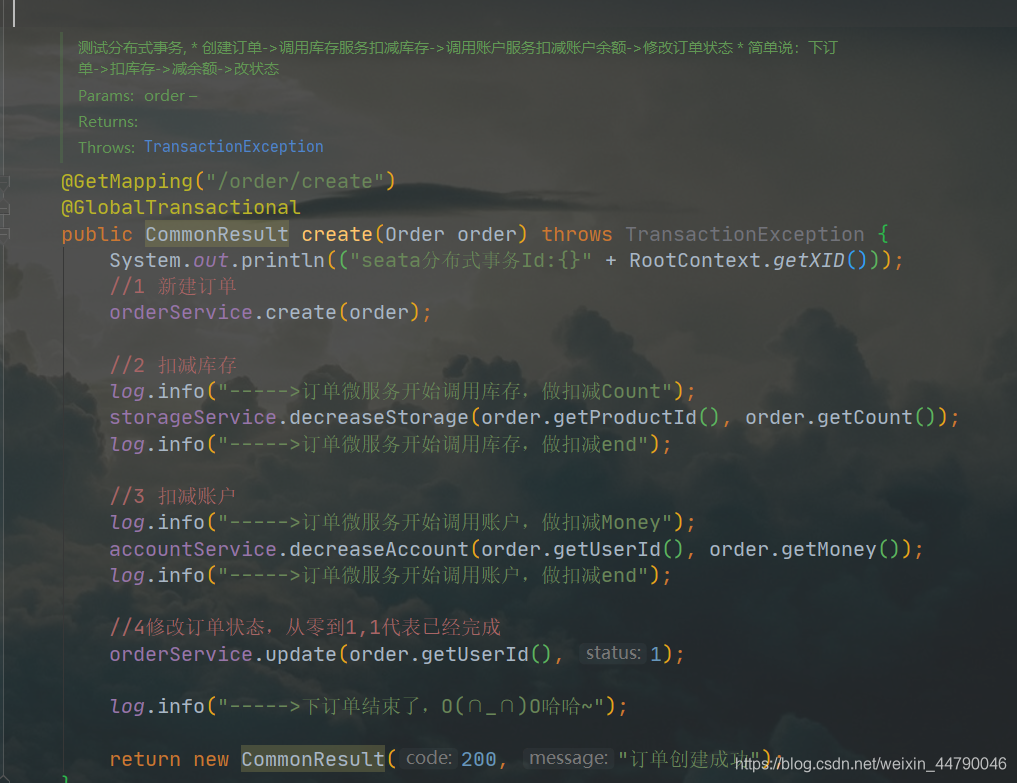
刚进入事务还没以有执行业务代码时,
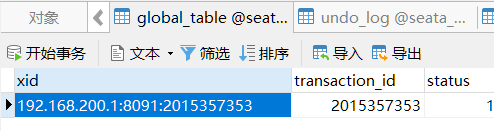
生成了一个全局唯一的Xid
global_table数据表里也多了一条记录
创建订单的微服务执行
首先订单数据库的undo_log表生成一条记录,同时branch_table表中也会添加一行当前服务的记录
订单表生成记录
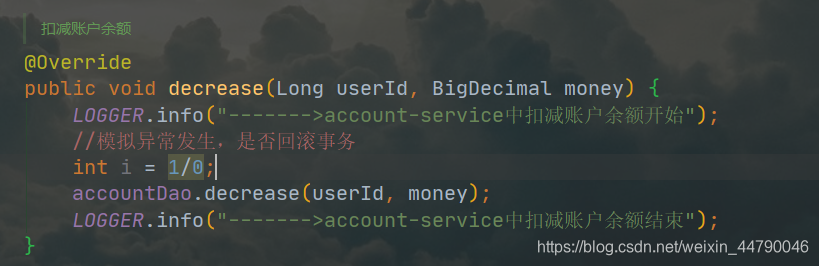
执行到下面扣减余额时发生异常,事务就会回滚


四、搭建高可用的Seata
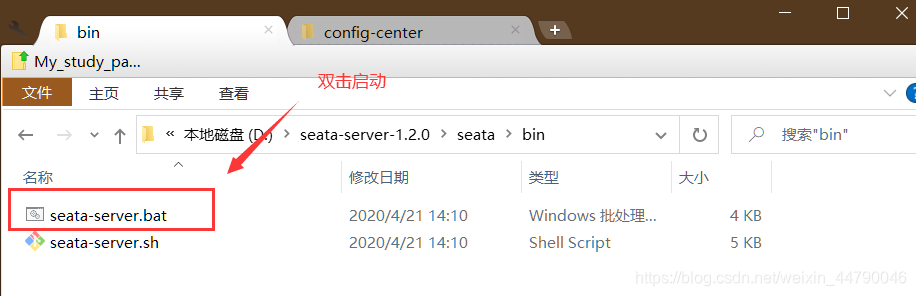
启动另一个Seata
seata-server.bat -p 8092


五、常见问题解析
1.xid未传递
- 一般常见于springcloud的用户,请注意是否只引入了seata-all或者seata-spring-boot-starter.如果是,请换为本文介绍给springcloud的依赖即可.
- 如果是自己实现了WebMvcConfigurer,那么请参考com.alibaba.cloud.seata.web.SeataHandlerInterceptorConfiguration#addInterceptors把xid传递拦截器加入到你的拦截链路中
2.数据源未代理
一般分为2种情况
- 数据源自己创建后,代理数据源的beanname为DataSourceProxy而不是dataSource,导致sqlsessionfactory注入的并不是被代理后的.
- 如果是已经开启了自动代理的用户,请确认是否手写了sqlsessionfactory此时注入的DataSource并未显示是DataSourceproxy代理的情况,请进行调整,保证注入是代理的数据源.
3.事务分组配置出错导致无法找到tc
一般由于对事务分组的理解出现偏差导致的,请仔细阅读官网的参数配置中的介绍.
TM端: seata.tx-service-group=自定分组名, seata.service.vgroup-mapping(配置中心中是叫:service.vgroupMapping).自定分组名=服务端注册中心配置的cluster/application的值
拿nacos举例子
比如我Seata的registry.conf配置文件中nacos的cluster
  nacos {
    application = "seata-server"
    serverAddr = "localhost"
    namespace = ""
    cluster = "testCluster"
    username = "nacos"
    password = "nacos"
  }
application配置文件中设置的事务分组为
seata:
  tx-service-group: test
那么nacos中需要配置的事务分组的key、value为
service.vgroupMapping.test=testCluster
4.Global lock acquire failed
一般这种情况也是分为两种
- 常见的就是并没有对select语句进行forupdate,如果你不开启forupdate,seata默认是遇到并发性竞争锁并不会去尝试重试,导致拿不到lock当前事务进行回滚.不影响一致性,如果你想没forupdate也开启竞争锁client.rm.lock.retryPolicyBranchRollbackOnConflict设置为false(有死锁风险)
- 还有一种就是由于大并发下对同一个数据并发操作时,前一个事务还未提交,后续的事务一直在等待,而seata默认的超时周期为300ms,此时超时后就会抛出Globallock acquire failed,当前事务进行回滚,如果你想保住竞争锁的周期足够长,请更改client.rm.lock.retryTimes和client.rm.lock.retryInterval来保证周期的合理性.
5.Could not found global transaction xid
-
一般出现这个提示与服务重试及超时有关,比如A->B此时A调B超时,A默认是重试的,B等于被调了2遍,第二次被调用的B进行了响应,A发起者接收到结果后进行了提交/回滚,这次超时的B因为网络问题现在才被调用,他也收到了一样的全局事务id,进行业务处理,直到注册分支,此时全局事务已经被提交/回滚,导致当前超时的分支事务B无法注册上.
-
这种问题一般保证你的业务不会去超时重试,如果你需要,请确认全局事务状态,做好幂等,反正已经做过的处理重复操作.
六、分布式事务的执行流程

- TM开启分布式事务(TM向TC注册全局事务记录)
- 换业务场景,编排数据库,服务等事务内资源(RM向TC汇报资源准备状态)
- TM结束分布式事务,事务一阶段结束(TM通知TC提交/回滚分布式事务)
- TC汇总事务信息,决定分布式事务是提交还是回滚
- TC通知所有RM提交/回滚资源,事务二阶段结束。
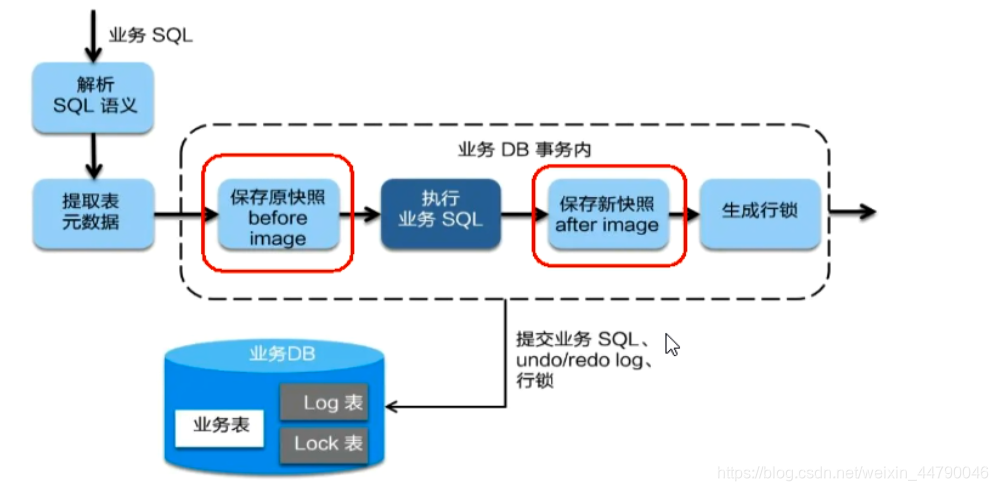
七、AT模式如何做到对业务的无侵入
在一阶段, Seata 会拦截“业务SQL”
-
1解析SQL语义,找到“业务SQL"要更新的业务数据,在业务数据被更新前,将其保存成"before image"
-
2执行“业务SQL"更新业务数据,在业务数据更新之后, 3其保存成"after image” ,最后生成行锁。
以上操作全部在一个数据库事务内完成,这样保证了一阶段操作的原子性。
如果以上不出现异常就会进行二阶段提交
- 二阶段如是顺利提交的话,
“业务SQL"在一阶段已经提交至数据库,所以Seata框架只需将一阶段保存的快照数据和行锁删掉, 完成数据清理即可。
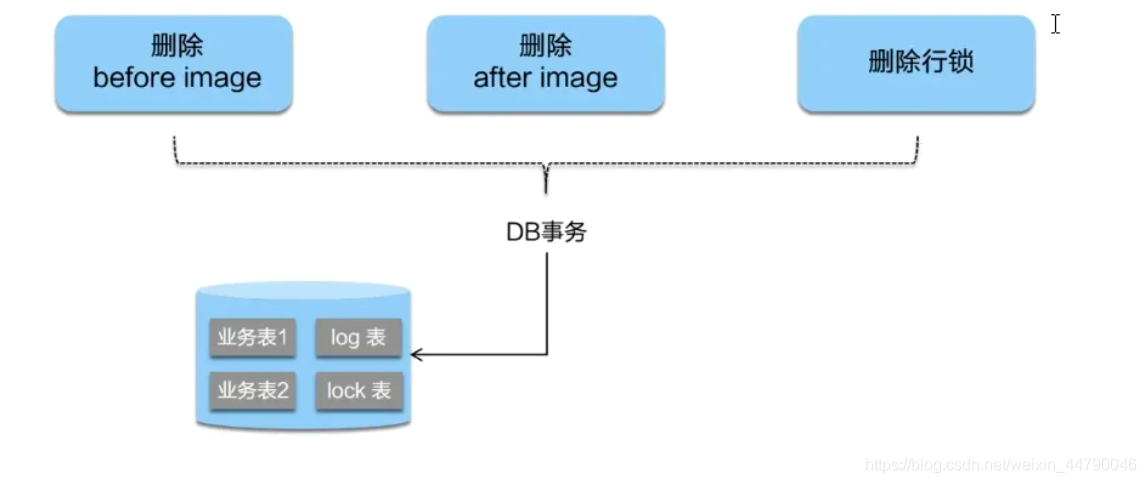
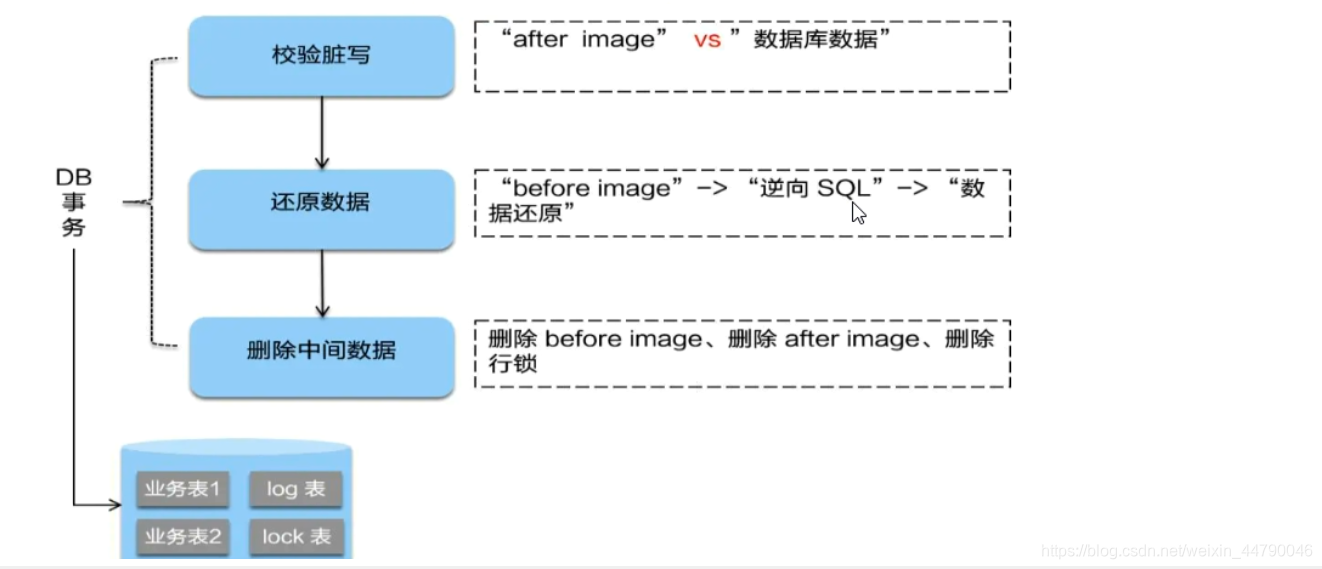
出现异常则进行第三阶段回滚
- 二阶段如果是回滚的话,Seata就需要回滚一阶段已经执行的“业务SQL" ,还原业务数据。
- 回滚方式便是用"before image"还原业务数据;但在还原前要首先要校验脏写,对比”数据库当前业务数据”和” after image”
- 如果两份数据完全一致就说明没有脏写, 可以还原业务数据,如果不一致就说明有脏写,出现脏写就需要转人工处理。