PIL(Python Image Library)是python的第三方图像处理库,但是由于其强大的功能与众多的使用人数,几乎已经被认为是python官方图像处理库了。其官方主页为:PIL。 PIL历史悠久,原来是只支持python2.x的版本的,后来出现了移植到python3的库pillow,pillow号称是friendly fork for PIL,其功能和PIL差不多,但是支持python3。本
PIL可以做很多和图像处理相关的事情:
图像归档(Image Archives)。PIL非常适合于图像归档以及图像的批处理任务。你可以使用PIL创建缩略图,转换图像格式,打印图像等等。
图像展示(Image Display)。PIL较新的版本支持包括Tk PhotoImage,BitmapImage还有Windows DIB等接口。PIL支持众多的GUI框架接口,可以用于图像展示。
图像处理(Image Processing)。PIL包括了基础的图像处理函数,包括对点的处理,使用众多的卷积核(convolution kernels)做过滤(filter),还有颜色空间的转换。PIL库同样支持图像的大小转换,图像旋转,以及任意的仿射变换。PIL还有一些直方图的方法,允许你展示图像的一些统计特性。这个可以用来实现图像的自动对比度增强,还有全局的统计分析等
环境:WINDOWS
编程工具:pycharm
所需组件: PIL ,Baidu-Api(人脸识别模块)
(1)准备组件
A.查看当前版本
pip --version

B.升级pip版本
python -m pip install --index-url https://pypi.douban.com/simple --upgrade pip
C. 安装baidu-api

D.在pycharm界面setting设置安装pillow模块(pil至python3.0版本都已经归并为pillow)
(2)代码编写
import PIL
import time
import base64
import tkinter as tk
from PIL import Image
from PIL import ImageTk
from aip import AipFace
from tkinter.filedialog import askopenfilename
# 配置百度aip参数
APP_ID = '15768642'
API_KEY = 'xhiiGmGPRCRj10XIqVlVeCky'
SECRET_KEY = 'ZDMMAO7StwTKzW8BspVQxvoGtdgSW4yI'
a_face = AipFace(APP_ID, API_KEY, SECRET_KEY)
image_type = 'BASE64'
options = {'face_field': 'age,gender,beauty'}
def get_file_content(file_path):
"""获取文件内容"""
with open(file_path, 'rb') as fr:
content = base64.b64encode(fr.read())
return content.decode('utf8')
def face_score(file_path):
"""脸部识别分数"""
result = a_face.detect(get_file_content(file_path), image_type, options)
print(result)
age = result['result']['face_list'][0]['age']
beauty = result['result']['face_list'][0]['beauty']
gender = result['result']['face_list'][0]['gender']['type']
return age, beauty, gender
class ScoreSystem():
"""打分系统类"""
root = tk.Tk()
# 修改程序框的大小
root.geometry('800x500')
# 添加程序框标题
root.title('颜值打分系统')
# 修改背景色
canvas = tk.Canvas(root,
width=800, # 指定Canvas组件的宽度
height=500, # 指定Canvas组件的高度
bg='#E6E8FA') # 指定Canvas组件的背景色
canvas.pack()
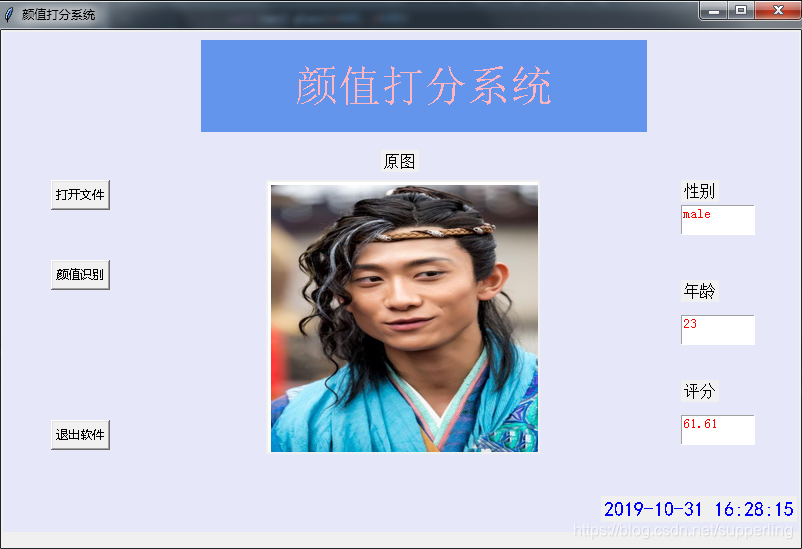
def start_interface(self):
"""主运行函数"""
self.title()
self.time_component()
# 打开本地文件
tk.Button(self.root, text='打开文件', command=self.show_original_pic).place(x=50, y=150)
# 进行颜值评分
tk.Button(self.root, text='颜值识别', command=self.open_files2).place(x=50, y=230)
# 退出系统
tk.Button(self.root, text='退出软件', command=self.quit).place(x=50, y=390)
# 显示图框标题
tk.Label(self.root, text='原图', font=10).place(x=380, y=120)
# 修改图片大小
self.label_img_original = tk.Label(self.root)
# 设置显示图框背景
self.cv_orinial = tk.Canvas(self.root, bg='white', width=270, height=270)
# 设置显示图框边框
self.cv_orinial.create_rectangle(8, 8, 260, 260, width=1, outline='red')
# 设置位置
self.cv_orinial.place(x=265, y=150)
# 显示图片位置
self.label_img_original.place(x=265, y=150)
# 设置评分标签
tk.Label(self.root, text='性别', font=10).place(x=680, y=150)
self.text1 = tk.Text(self.root, width=10, height=2)
tk.Label(self.root, text='年龄', font=10).place(x=680, y=250)
self.text2 = tk.Text(self.root, width=10, height=2)
tk.Label(self.root, text='评分', font=10).place(x=680, y=350)
self.text3 = tk.Text(self.root, width=10, height=2)
# 填装文字
self.text1.place(x=680, y=175)
self.text2.place(x=680, y=285)
self.text3.place(x=680, y=385)
# 开启循环
self.root.mainloop()
def show_original_pic(self):
"""放入文件"""
self.path_ = askopenfilename(title='选择文件')
# 处理文件
img = Image.open(fr'{self.path_}')
img = img.resize((270, 270), PIL.Image.ANTIALIAS) # 调整图片大小至270*270
# 生成tkinter图片对象
img_png_original = ImageTk.PhotoImage(img)
# 设置图片对象
self.label_img_original.config(image=img_png_original)
self.label_img_original.image = img_png_original
self.cv_orinial.create_image(5, 5, anchor='nw', image=img_png_original)
def open_files2(self):
# 获取百度API接口获得的年龄、分数、性别
age, score, gender = face_score(self.path_)
# 清楚text文本框内容并进行插入
self.text1.delete(1.0, tk.END)
self.text1.tag_config('red', foreground='RED')
self.text1.insert(tk.END, gender, 'red')
self.text2.delete(1.0, tk.END)
self.text2.tag_config('red', foreground='RED')
self.text2.insert(tk.END, age, 'red')
self.text3.delete(1.0, tk.END)
self.text3.tag_config('red', foreground='RED')
self.text3.insert(tk.END, score, 'red')
def quit(self):
"""退出"""
self.root.quit()
def get_time(self, lb):
"""获取时间"""
time_str = time.strftime("%Y-%m-%d %H:%M:%S") # 获取当前的时间并转化为字符串
lb.configure(text=time_str) # 重新设置标签文本
self.root.after(1000, self.get_time, lb) # 每隔1s调用函数 get_time自身获取时间
def time_component(self):
"""时间组件"""
lb = tk.Label(self.root, text='', fg='blue', font=("黑体", 15))
lb.place(relx=0.75, rely=0.90)
self.get_time(lb)
def title(self):
"""标题设计"""
lb = tk.Label(self.root, text='颜值打分系统',
bg='#6495ED',
fg='lightpink', font=('宋体', 32),
width=20,
height=2,
# relief=tk.SUNKEN
)
lb.place(x=200, y=10)
score_system = ScoreSystem()
score_system.start_interface()
运行结果: