前言
上篇博文已经给大家介绍过自定义标签的开发步骤和优点,这篇博文主要给大家介绍一下数据标签
select
标签详解
首先要了解select标签的内容:
<select>
<option value="1">1</option>
<option value="2">2</option>
<option value="3">3</option>
<option value="4">4</option>
</select>
这里可以看到,select标签的原始标签的代码是比较多的,我们可以自定义一个select标签使用
- 首先就是标签助手类:
package com.xiaoyang;

import java.io.IOException;
import java.lang.reflect.InvocationTargetException;
import java.util.List;

import javax.servlet.jsp.JspException;
import javax.servlet.jsp.JspWriter;
import javax.servlet.jsp.tagext.BodyTagSupport;

import org.apache.commons.beanutils.BeanUtils;

public class SelectTag extends BodyTagSupport {

	private String headValue = "-1";// 头value
	private String headText = "---请选择---";// 头文本

	private String valueProperty;// java对象的属性名
	private String textProperty;// java对象的属性名
	private List<Object> items;// 数据源
	private String select;// 判断默认选中的id

	public String getHeadValue() {
		return headValue;
	}

	public void setHeadValue(String headValue) {
		this.headValue = headValue;
	}

	public String getHeadText() {
		return headText;
	}

	public void setHeadText(String headText) {
		this.headText = headText;
	}

	public String getValueProperty() {
		return valueProperty;
	}

	public void setValueProperty(String valueProperty) {
		this.valueProperty = valueProperty;
	}

	public String getTextProperty() {
		return textProperty;
	}

	public void setTextProperty(String textProperty) {
		this.textProperty = textProperty;
	}

	public List<Object> getItems() {
		return items;
	}

	public void setItems(List<Object> items) {
		this.items = items;
	}

	public String getSelect() {
		return select;
	}

	public void setSelect(String select) {
		this.select = select;
	}

	@Override
	public int doStartTag() throws JspException {
		JspWriter out = pageContext.getOut();
		try {
			out.print(toHtml());
		} catch (IOException | IllegalAccessException | InvocationTargetException | NoSuchMethodException e) {
			// TODO Auto-generated catch block
			e.printStackTrace();
		}
		return super.doStartTag();
	}

	public String toHtml() throws IllegalAccessException, InvocationTargetException, NoSuchMethodException {
		// 利用stringbuffer拼接标签
		StringBuffer sb = new StringBuffer();
		sb.append("<select>");
		sb.append("<option value='" + this.headValue + "'>" + this.headText + "</option>");
		if (items != null && items.size() > 0) {
			for (Object object : items) {
				// 利用反射获取到页面传过来的属性名对应的属性值
				String deptId = BeanUtils.getProperty(object, valueProperty);
				String deptName = BeanUtils.getProperty(object, textProperty);
				if (deptId.equals(select)) {
					sb.append("<option selected value='" + deptId + "'>" + deptName + "</option>");
				}else {
					sb.append("<option value='" + deptId + "'>" + deptName + "</option>");
				}
			}
		}
		sb.append("</select>");
		return sb.toString();
	}
}
- 然后是tld文件配置:
	<tag>
		<name>select</name>
		<tag-class>com.xiaoyang.SelectTag</tag-class>
		<body-content>JSP</body-content>
		<attribute>
			<name>headValue</name>
			<required>true</required>
			<rtexprvalue>false</rtexprvalue>
		</attribute>
		<attribute>
			<name>headText</name>
			<required>true</required>
			<rtexprvalue>false</rtexprvalue>
		</attribute>
		<attribute>
			<name>valueProperty</name>
			<required>true</required>
			<rtexprvalue>false</rtexprvalue>
		</attribute>
		<attribute>
			<name>textProperty</name>
			<required>true</required>
			<rtexprvalue>false</rtexprvalue>
		</attribute>
		<attribute>
			<name>items</name>
			<required>true</required>
			<rtexprvalue>true</rtexprvalue>
		</attribute>
			<attribute>
			<name>select</name>
			<required>true</required>
			<rtexprvalue>false</rtexprvalue>
		</attribute>
	</tag>
3.最后就是页面引用了:
这里由于是select标签,我用到了一个实体类去绑定数据到下拉框,所以在页面应用时:
List<Dept> deptLs = new ArrayList<Dept>();
	Dept d = new Dept("1", "aaa");
	Dept d1 = new Dept("2", "bbb");
	Dept d2 = new Dept("3", "ccc");
	deptLs.add(d);
	deptLs.add(d1);
	deptLs.add(d2);
	request.setAttribute("Dept", deptLs);
<x:select select="1" items="${Dept }" headValue="-1" valueProperty="deptId" textProperty="deptName" headText="---请选择----"></x:select>
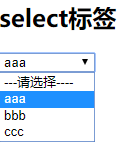
最后的到结果:
尾言
开发自定义标签的目的就是给我们带来更方便的操作,减少多余的代码,今天就到这了,溜了溜了…