最近在做一些练习的demo,所以好久没有更新博客了。这一篇来记录一下在SpringBoot中整合SpringSecurity技术,并实现通过数据库的方式来认证用户。
提前声明一下,这一篇没有授权相关代码配置,只有认证哦.
文章目录
maven依赖准备
这里直接上pom.xml文件:
<?xml version="1.0" encoding="UTF-8"?>
<project xmlns="http://maven.apache.org/POM/4.0.0" xmlns:xsi="http://www.w3.org/2001/XMLSchema-instance"
         xsi:schemaLocation="http://maven.apache.org/POM/4.0.0 https://maven.apache.org/xsd/maven-4.0.0.xsd">
    <modelVersion>4.0.0</modelVersion>
    <parent>
        <groupId>org.springframework.boot</groupId>
        <artifactId>spring-boot-starter-parent</artifactId>
        <version>2.2.7.RELEASE</version>
        <relativePath/> <!-- lookup parent from repository -->
    </parent>
    <groupId>com.example</groupId>
    <artifactId>springboot_springsecurity</artifactId>
    <version>0.0.1-SNAPSHOT</version>
    <name>springboot_springsecurity</name>
    <description>Demo project for Spring Boot</description>

    <properties>
        <java.version>1.8</java.version>
    </properties>

    <dependencies>
        <dependency>
            <groupId>org.springframework.boot</groupId>
            <artifactId>spring-boot-starter-jdbc</artifactId>
        </dependency>
        <dependency>
            <groupId>org.springframework.boot</groupId>
            <artifactId>spring-boot-starter-security</artifactId>
        </dependency>
        <dependency>
            <groupId>org.springframework.boot</groupId>
            <artifactId>spring-boot-starter-thymeleaf</artifactId>
        </dependency>
        <dependency>
            <groupId>org.springframework.boot</groupId>
            <artifactId>spring-boot-starter-web</artifactId>
        </dependency>
        <dependency>
            <groupId>org.mybatis.spring.boot</groupId>
            <artifactId>mybatis-spring-boot-starter</artifactId>
            <version>2.1.2</version>
        </dependency>

        <dependency>
            <groupId>org.springframework.boot</groupId>
            <artifactId>spring-boot-devtools</artifactId>
            <scope>runtime</scope>
            <optional>true</optional>
        </dependency>
        <dependency>
            <groupId>mysql</groupId>
            <artifactId>mysql-connector-java</artifactId>
            <scope>runtime</scope>
        </dependency>
        <dependency>
            <groupId>org.springframework.boot</groupId>
            <artifactId>spring-boot-starter-test</artifactId>
            <scope>test</scope>
            <exclusions>
                <exclusion>
                    <groupId>org.junit.vintage</groupId>
                    <artifactId>junit-vintage-engine</artifactId>
                </exclusion>
            </exclusions>
        </dependency>
        <dependency>
            <groupId>org.springframework.security</groupId>
            <artifactId>spring-security-test</artifactId>
            <scope>test</scope>
        </dependency>
    </dependencies>

    <build>
        <plugins>
            <plugin>
                <groupId>org.apache.maven.plugins</groupId>
                <artifactId>maven-compiler-plugin</artifactId>
                <configuration>
                    <source>1.8</source>
                    <target>1.8</target>
                    <encoding>UTF-8</encoding>
                </configuration>
            </plugin>
            <plugin>
                <groupId>org.springframework.boot</groupId>
                <artifactId>spring-boot-maven-plugin</artifactId>
            </plugin>
        </plugins>
    </build>

</project>
数据库准备(建表语句省略)
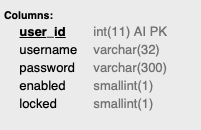
数据库设计,权限认证无非就是用户和角色,一个用户可以拥有多个角色,一个角色可以属于多个用户。所以它们是典型的多对多关系。数据库表可以这样子
-
有一张用户表
users(user_id,username,password,enabled,locked):
-
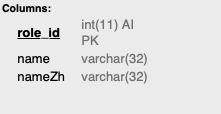
角色表
roles():
-
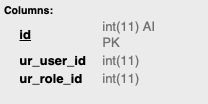
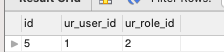
它们的关联表
user_role(id,ur_user_id,ur_role_id),后面两个字段记得设置相关联的外键:
对应的实体类对象准备:
- 角色对象(
Role):
public class Role {
    private Integer role_id;
    private String name;
    private String nameZH;

    public String getNameZH() {
        return nameZH;
    }

    public void setNameZH(String nameZH) {
        this.nameZH = nameZH;
    }

    @Override
    public String toString() {
        return "Role{" +
                "role_id=" + role_id +
                ", name='" + name + '\'' +
                ", nameZH='" + nameZH + '\'' +
                '}';
    }

    public Integer getRole_id() {
        return role_id;
    }

    public void setRole_id(Integer role_id) {
        this.role_id = role_id;
    }

    public String getName() {
        return name;
    }

    public void setName(String name) {
        this.name = name;
    }
}
- 用户对象(
User)里面除了要有数据库中的字段,还需要有一个List集合来存放该用户的角色信息,同时还需要实现UserDetails接口,这个接口是SpringSecurity内部用来存放认证对象的规范:
public class User implements UserDetails {
    private Integer user_id;
    private String username;
    private String password;
    private List<Role> roleList;
    private Boolean enabled;
    private Boolean locked;

    @Override
    public Collection<? extends GrantedAuthority> getAuthorities() {
        ArrayList<SimpleGrantedAuthority> authorities = new ArrayList<>();

        //SimpleGrantedAuthority其实是封装角色信息
        for (Role role : roleList) {
            authorities.add(new SimpleGrantedAuthority("ROLE_"+role.getName()));
        }

        return authorities;
    }

    @Override
    public String getUsername() {
        return username;
    }

    @Override
    public String getPassword() {
        return password;
    }

    //是否未过期,为了方便直接true
    @Override
    public boolean isAccountNonExpired() {
        return true;
    }

    //是否没有被锁定
    @Override
    public boolean isAccountNonLocked() {
        return !locked;
    }

    //密码是否未过期,同理
    @Override
    public boolean isCredentialsNonExpired() {
        return true;
    }

    //是否可用
    @Override
    public boolean isEnabled() {
        return enabled;
    }

    public Integer getUser_id() {
        return user_id;
    }

    public void setUser_id(Integer user_id) {
        this.user_id = user_id;
    }

    public void setUsername(String username) {
        this.username = username;
    }

    public void setPassword(String password) {
        this.password = password;
    }

    public List<Role> getRoleList() {
        return roleList;
    }

    public void setRoleList(List<Role> roleList) {
        this.roleList = roleList;
    }

    public Boolean getEnabled() {
        return enabled;
    }

    public void setEnabled(Boolean enabled) {
        this.enabled = enabled;
    }

    public Boolean getLocked() {
        return locked;
    }

    public void setLocked(Boolean locked) {
        this.locked = locked;
    }

    @Override
    public String toString() {
        return "User{" +
                "user_id=" + user_id +
                ", username='" + username + '\'' +
                ", password='" + password + '\'' +
                ", roleList=" + roleList +
                ", enabled=" + enabled +
                ", locked=" + locked +
                '}';
    }
}
一些方法说明写在注释里了,同时刚刚数据库表中,有两个字段(enabled,locked)作用出来了,因为UserDetails接口有这两个属性,而Security底层会调用这些属性来判断该用户是否可用。为了方便,我们统统设置成可用。
mapper层代码
接下来还是按照以前的三层架构进行开发,首先mapper层代码,这里选用的持久化技术为myBatis,因为涉及到多对多关系的封装,所以我们采用基于xml的方式.
UserMapper.java(添加方法后面会用到,所以先写上):
@Mapper
public interface UserMapper {

    //根据username查找
    public User loadUserByUsername(String username);

    //添加用户
    public Integer addUser(User user);
}
RoleMapper.java:
@Mapper
public interface RoleMapper {
    //根据id查找角色
    public Role getRoleByRole_id(Integer role_id);
}
UserMapper.xml:
<?xml version="1.0" encoding="UTF-8" ?>
<!DOCTYPE mapper
        PUBLIC "-//mybatis.org//DTD Mapper 3.0//EN"
        "http://mybatis.org/dtd/mybatis-3-mapper.dtd">
<mapper namespace="com.example.springboot_springsecurity.mapper.UserMapper">

    <resultMap id="userMapper" type="com.example.springboot_springsecurity.entity.User">
        <id property="user_id" column="user_id"></id>
        <result property="username" column="username"></result>
        <result property="password" column="password"></result>
        <result property="enabled" column="enabled"></result>
        <result property="locked" column="locked"></result>
        <collection property="roleList" javaType="ArrayList" ofType="com.example.springboot_springsecurity.entity.Role" select="com.example.springboot_springsecurity.mapper.RoleMapper.getRoleByRole_id" column="role_id"></collection>
    </resultMap>

    <select id="loadUserByUsername" parameterType="String" resultMap="userMapper">
        select * from users inner join user_role on user_id = ur_user_id inner join roles on role_id = ur_role_id where username = #{username}
    </select>

    <insert id="addUser" parameterType="com.example.springboot_springsecurity.entity.User">
        insert into users(username,password) values (#{username},#{password})
    </insert>
</mapper>
RoleMapper.xml:
<?xml version="1.0" encoding="UTF-8" ?>
<!DOCTYPE mapper
        PUBLIC "-//mybatis.org//DTD Mapper 3.0//EN"
        "http://mybatis.org/dtd/mybatis-3-mapper.dtd">
<mapper namespace="com.example.springboot_springsecurity.mapper.RoleMapper">

    <select id="getRoleByRole_id" parameterType="Integer" resultType="com.example.springboot_springsecurity.entity.Role">
        select * from roles where role_id = #{role_id};
    </select>
</mapper>
其中UserMapper.xml中有一个collection的使用,用来封装集合的,这个要注意。
Service
到了Service层代码,这里只用到一个UserService类,在此之前需要实现UserDetailsService接口,原理大家伙应该在很多博客上看过了,简单来说就是基于数据库认证时,底层会调用这个接口的方法进行认证判断,我们只需要实现这个接口的方法,里面编写相应的代码即可.扩展性杠杠滴:
UserService:
@Service
public class UserService implements UserDetailsService {

    @Autowired
    private UserMapper userMapper;

    @Override
    public UserDetails loadUserByUsername(String s) throws UsernameNotFoundException {

        User user = userMapper.loadUserByUsername(s);

        if (user == null)
            throw new UsernameNotFoundException("用户名密码错误!");

        return user;
    }
}
可以看到,loadUserByUsername这个方法是我们需要实现的,里面逻辑也很简单,调用我们编写的mapper类,进行查找,如果没找到就报错,找到了就返回给Security,剩下的就不用我们操心了。
Controller
Controller层代码就简单了,就返回一个字符串即可:
@RestController
public class UserController {

    @PostMapping("/demo")
    public String demo(){
        return "hello,world!";
    }
}
Security的配置类(不使用加密方式):
先介绍数据库密码不使用加密的方式,编写一个SpringSecurityConfig配置类,继承WebSecurityConfigurerAdapter它。
@EnableWebSecurity
public class SpringSecurityConfig extends WebSecurityConfigurerAdapter {

    @Autowired
    UserService userService;

    @Override
    protected void configure(AuthenticationManagerBuilder auth) throws Exception {
		//使用数据库认证,参数为一个UserService类型的对象
        auth.userDetailsService(userService);
        super.configure(auth);
    }

    @Override
    protected void configure(HttpSecurity http) throws Exception {

        http.rememberMe();
		//登录成功后访问这个路径,就是刚刚controller的路径
        http.formLogin().successForwardUrl("/demo");

        super.configure(http);
    }

    @Bean
    NoOpPasswordEncoder noOpPasswordEncoder(){
        return (NoOpPasswordEncoder) NoOpPasswordEncoder.getInstance();
    }
}
其中NoOpPasswordEncoder代表就是不使用加密密码.
接下来手动在数据库中插入一个user记录:

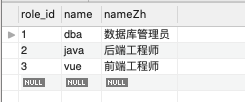
同时也插入一些角色记录:
最后在关联表插入它们的关联记录:
写到这里才发现,其实只记录认证的话,角色是用不到的…但是写也写了,就当温故知新吧!
接着开始测试,可以看到插入的用户记录为用户名:leslie,密码:123,在浏览器访问http://localhost:8080/demo
,我们这里就不定制登录页,用默认生成的:

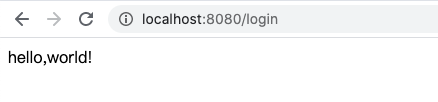
访问成功
Security的配置类(使用加密方式):
现实开发中,出于安全性考虑,密码通常需要使用加密的方式保存,即用户在浏览器输入密码后,程序会自动加密密码并保存到数据库中,一般是通过加盐(规则)的方式。这样就算有人直接窃取的数据库的信息也不知道用户的密码是什么。Security为我们提供了一个类BCryptPasswordEncoder,通过这个类可以对明文密码进行动态加盐加密,这里为了方便,直接在测试类中编写代码,并添加用户到数据库中:
    @Autowired
    private UserMapper userMapper;

    @Autowired
    private RoleMapper roleMapper;

    @Test
    void contextLoads() {
        User user = new User();
        user.setUsername("lau");
        user.setPassword(new BCryptPasswordEncoder().encode("123"));

        userMapper.addUser(user);
    }
接下来打开数据库可视工具,可以看到添加成功了,并且密码是加密过后的(明文123):

同时在关联表给他一个角色信息:

接着需要在配置类中改动一下代码,其实就是刚刚的:
    @Bean
    NoOpPasswordEncoder noOpPasswordEncoder(){
        return (NoOpPasswordEncoder) NoOpPasswordEncoder.getInstance();
    }
换成这个即可:
    @Bean
    PasswordEncoder passwordEncoder(){
        return new BCryptPasswordEncoder();
    }
最后重启服务器,还是在浏览器中输入测试:


成功~,后面一种加密方式用的较为多。 感谢你的观看.