这是一篇caffe训练分类模型步骤说明博客、本次步骤不涉及caffe的编译讲解
本篇博客以某项比赛数据、ResNet-50模型为例,讲解了生成自己的train.txt和val.txt文本文件、制作LMDB数据集、生成均值文件、网络训练、网络测试以及使用pycaffe接口进行测试的详细流程。
数据集来源:某项比赛
模型:ResNet-50
系统:Linux-Ubuntu
caffe制作LMDB数据集及求均值文件
数据集分为train和val数据集,训练集180000张图片左右,验证集20000张图片左右,总共涉及对45种类型的分类,包括干旱地、棒球场等。
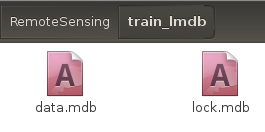
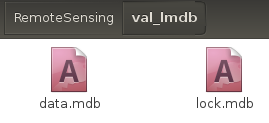
在用caffe进行网络模型训练前,最好先生成LMDB格式数据集,这会提高caffe读取数据的效率。当完成这部分工作后,会有两个文件夹和一个文件:训练集train_lmdb文件夹、验证集val_lmdb文件夹和binaryproto均值文件。
制作步骤分别为:生成train.txt和val.txt、制作LMDB数据集、生成均值文件
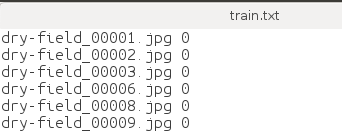
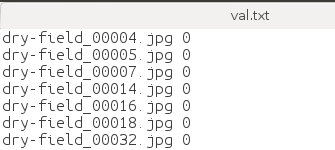
生成train.txt和val.txt
首先需要生成具有训练集和验证集图片名称和对应标签信息的txt文件,即train.txt和val.txt文本文件。
- python脚本如下:
import os
up_dir = 'E:/xxx/'
train_dirname = 'E:/xxx/val'
id_path = "E:/xxx/ClsName2id.txt"

class_name_list = os.listdir(train_dirname)
train_txt = open(os.path.join(up_dir, 'val.txt'), 'w')   #修改val.txt为train.txt即可
id_txt = open(id_path, 'r', encoding='UTF-8')
for line in id_txt:
    for class_name in class_name_list:
        if line.split(':')[0] == class_name:
            print(class_name)
            image_list = os.listdir(os.path.join(train_dirname, class_name))
            for image in image_list:
                train_txt.write(image)
                train_txt.write(' ')
                train_txt.write(str(int(line.split(':')[2])-1))
                train_txt.write('\n')

train_txt.close()
行数即为你训练集或验证集的图片数量
列有两列,第一列是图片名称,第二列是图片对应的标签。
在这里要特别注意一点,图片的标签值一定要从0开始,否则精度会下降很多。trust me, 我做过相应的实验,有时间会把实验结果放上来。
制作LMDB数据集
我使用的是caffe下的create_imagenet.sh文件,文件可以在caffe/examples/imagenet下找到。

打开后如下:
需要修改的地方以及怎样修改,我在相应行用中文进行了注释,按照说明进行修改即可,主要是路径和名称问题。
#!/usr/bin/env sh
    # Create the imagenet lmdb inputs
    # N.B. set the path to the imagenet train + val data dirsset -e

    EXAMPLE=/home1/xxx/RemoteSensing              # 生成的lmdb文件存放路径
    DATA=/home1/xxx/RemoteSensing		          # train.txt和val.txt所在路径
    TOOLS=/home1/xxx/caffeMS/build/tools		  # 改成自己的caffe路径

    TRAIN_DATA_ROOT=/home1/xxx/RemoteSensing/train/	         # 训练原始图片路径
    VAL_DATA_ROOT=/home1/xxx/RemoteSensing/val/              # 验证原始图片路径

    rm -rf $EXAMPLE/train_lmdb
    rm -rf $EXAMPLE/val_lmdb

    # Set RESIZE=true to resize the images to 256x256. Leave as false if images have
    # already been resized using another tool.
    RESIZE=true                                              # 设为ture,会进行resize
    if $RESIZE; then
       RESIZE_HEIGHT=256
       RESIZE_WIDTH=256
    else
       RESIZE_HEIGHT=0
       RESIZE_WIDTH=0
     fi

    if [ ! -d "$TRAIN_DATA_ROOT" ]; then
       echo "Error: TRAIN_DATA_ROOT is not a path to a directory: $TRAIN_DATA_ROOT"
       echo "Set the TRAIN_DATA_ROOT variable in create_imagenet.sh to the path" \
            "where the ImageNet training data is stored."
       exit 1
    fi

    if [ ! -d "$VAL_DATA_ROOT" ]; then
       echo "Error: VAL_DATA_ROOT is not a path to a directory: $VAL_DATA_ROOT"
       echo "Set the VAL_DATA_ROOT variable in create_imagenet.sh to the path" \
            "where the ImageNet validation data is stored."
    	   exit 1
    	fi

    	echo "Creating train lmdb..."

    GLOG_logtostderr=1 $TOOLS/convert_imageset \
         --resize_height=$RESIZE_HEIGHT \
         --resize_width=$RESIZE_WIDTH \
         --shuffle \
         $TRAIN_DATA_ROOT \
         $DATA/train.txt \                            # 训练文本名字
         $EXAMPLE/train_lmdb            			  # lmdb训练数据集数据集名字

    echo "Creating val lmdb..."

    GLOG_logtostderr=1 $TOOLS/convert_imageset \
         --resize_height=$RESIZE_HEIGHT \
         --resize_width=$RESIZE_WIDTH \
         --shuffle \
         $VAL_DATA_ROOT \
         $DATA/val.txt \					   # 测试文本名字
         $EXAMPLE/val_lmdb				       # lmdb验证集数据集名字

    echo "Done."
成功后,会生成两个文件夹train_lmdb和val_lmdb,这两个文件夹就是我们LMDB格式数据集。
生成binaryproto均值文件
生成均值文件使用的是make_imagenet_mean.sh,和create_imagenet.sh文件一样,也可以在caffe/examples/imagenet路径下找到。
主要是对train_lmdb。
	#!/usr/bin/env sh
    # Compute the mean image from the imagenet training lmdb
    # N.B. this is available in data/ilsvrc12

    EXAMPLE=/home1/xxx/RemoteSensing         # train_lmdb文件夹所在路径
    DATA=/home1/xxx/RemoteSensing            # 生成的binaryproto路径
    TOOLS=/home1/xxx/caffeMS/build/tools     # 设置为自己的caffe路径

    rm -f $DATA/rs_imagenet_mean.binaryproto

    $TOOLS/compute_image_mean $EXAMPLE/train_lmdb \
      $DATA/rs_imagenet_mean.binaryproto    # 均值文件名字

    echo "Done."
caffe训练网络模型
进行模型训练需要train_val.prototxt、solver.prototxt以及train_model.sh三个文件。
train_val.prototxt
train_val.prototxt中定义了网络模型的结构、数据输入部分和loss部分。
我所使用的是ResNet-50网络模型。
因为模型有两千多行,在这里我只放出开头读入数据部分和结尾训练loss部分,当然这两部分也是一般我们需要修改的地方。
开头输入数据部分:
 name: "ResNet-50"
    layer {
      name: "data"
      type: "Data"
      top: "data"
      top: "label"
      include {
        phase: TRAIN                                 # 训练时输入数据设置
      }
      transform_param {
        crop_size: 224                          	 # 从原始图片中随机裁剪出224x224大小的图片区域
        mirror: true                                 # 镜像设为true,提高样本数量
        mean_file: "/home1/xxx/RemoteSensing/rs_imagenet_mean.binaryproto"    # 均值文件所在路径
      }
      data_param {
        source: "/home1/xxx/RemoteSensing/train_lmdb/"  			# train_ldmb路径
        batch_size: 25 #*iter_size							    	# batch_size,根据你显卡内存大小进行选择
        backend: LMDB											    # 数据来源要改成LMDB
      }
    }
    layer {
      name: "data"
      type: "Data"
      top: "data"
      top: "label"
      include {
        phase: TEST						   			  # 测试时输入数据设置
      }
      transform_param {
        crop_size: 224                                # 测试时从中心裁剪出224x224大小区域进行测试
        mirror: false								  # 镜像设为flase
        mean_file: "/home1/xxx/RemoteSensing/rs_imagenet_mean.binaryproto"   # 均值文件所在路径
      }
      data_param {
        source: "/home1/xxx/RemoteSensing/val_lmdb/"			    # val_lmdb路径
        batch_size: 10     #not *iter_size						    # batch_size,根据你显卡内存大小进行选择
        backend: LMDB 												# 数据来源要改成LMDB
      }
    }
结尾loss部分:
 layer {
      name: "loss1/loss1"
      type: "SoftmaxWithLoss"					   # 采用SoftmaxWithLoss
      bottom: "my-classifier"
      bottom: "label"
      top: "loss1/loss1"
      loss_weight: 0.3                             # 训练输出的loss所占的权重
    }
    layer {
      name: "test/loss"
      type: "SoftmaxWithLoss"					  # 采用SoftmaxWithLoss
      bottom: "my-classifier"
      bottom: "label"
      top: "test/loss"
      include {
        phase: TEST								  # 验证时的loss参与训练权重参数的更新
      }
    }
    layer {
      name: "accuracy"
      type: "Accuracy"							 # 测试时的精度输出
      bottom: "my-classifier"
      bottom: "label"
      top: "accuracy"
      include {
        phase: TEST
      }
    }
solver.prototxt
solver.prototxt中定义了loss优化器、模型保存路径、最大迭代次数、基础学习率、学习率衰减策略、模型运算是GPU还是CPU等超参数。
 # the definition of neural network model
    net: "train_val.prototxt"              						 # 网络结构路径
    # test_iter is related to batch_size in test layer, test_iter * batch_size = the number of test data
    test_iter: 2000												 # 测试次数
    # carry out test once every 5 training iterations
    test_interval: 50											 # 每多少次进行一次测试
    # exclude test phase when test_initialization = false
    # test_initialization: false
    # display information once every 10 training iterations
    display: 10													 # 训练多少次显示一次
    average_loss: 40
    # the initial learning rate
    base_lr: 0.0000001										     # 基础学习率
    lr_policy: "poly"											 # 学习率更新策略
    stepsize: 1000										    	 # 每1000次学习率更新一次
    gamma: 0.96													 # 学习率更新的超参
    # The max number of iterations
    max_iter: 50000											     # 最大迭代次数
    power: 1.0													 # 学习率更新超参
    momentum: 0.9										      	 # 动量设置
    # weight decay item, in case of overfitting
    weight_decay: 0.0002										 # 正则化设置
    # save once every 50 training iterations
    snapshot: 400												 # 训练多少次保存一次模型
    # save path
    snapshot_prefix: "snapshot/resnet_50_ft"	 			     # 训练模型保存路径
    solver_mode: GPU											 # 采用GPU训练,也可改为CPU
train_model.sh
train_model.sh是命令文件,其中会设置预训练模型路径、solver.prototxt路径、log日志保存路径等参数。
#!/usr/bin/env sh
TOOLS=/home1/xxx/caffeMS/build/tools
GLOG_logtostderr=0 GLOG_log_dir=./ft_log/ $TOOLS/caffe train --solver=solver.prototxt --weights=/home1/jsk/RemoteSensing/ResNet/ResNet-50/snapshot/resnet_50__iter_100000.caffemodel -gpu 0  #加入 -gpu 选项
TOOLS改为自己的caffe路径
GLOG_log_dir改为自己要保存的日志文件路径
–solver表示solver.prototxt文件路径
–weights表示预训练模型所在路径
-gpu 0表示采用编号为0的显卡进行训练
进行网络模型训练
打开linux终端命令窗口:
输入
sudo sh train_model.sh
网络模型训练就开始了,出现如下图所示,表示你前期工作没有错误。

日志文件被保存在,我的就是./ft_log/下
打开后,内容如图:

训练模型保存在,我的是snapshot路径下
进行网络模型测试
网络模型测试,可以使用caffe自带的test工具,或者使用matcaffe或pycaffe接口进行模型测试。
下面我将讲解caffe自带的test工具和利用pycaffe进行模型测试两种方法
caffe自带的test工具
创建一个脚本命令文件,test_model.sh,内容如下:
/home1/xxx/caffeMS/build/tools/caffe test --model=/home1/xxx/RemoteSensing/ResNet/ResNet-50/train_val.prototxt --weights=/home1/xxx/RemoteSensing/ResNet/ResNet-50/snapshot/resnet_50__iter_100000.caffemodel --iterations 2000 -gpu 0
打开linux终端命令窗口:
sudo sh test_model.sh
即可
结果如下图所示:

pycaffe接口
代码如下:
#!/usr/bin/python
    #coding:utf-8
    import sys
    #caffe_root='/home1/xxx/caffeMS/' #修改成你的Caffe项目路径
    #sys.path.append(caffe_root+'python')
    import caffe
    sys.path.insert(0,'/home1/xxx/caffeMS/python')
    caffe.set_mode_gpu() #设置为GPU运行
    import os
    import numpy as np

    # 修改成你的deploy.prototxt文件路径
    model_def = '/home1/xxx/RemoteSensing/ResNet/ResNet-50/deploy.prototxt'
    model_weights = '/home1/xxx/RemoteSensing/ResNet/ResNet-50/snapshot/resnet_50__iter_100000.caffemodel'
    # 修改成你的caffemodel文件的路径

    net = caffe.Net(model_def,      # defines the structure of the model
                    model_weights,  # contains the trained weights
                    caffe.TEST)     # use test mode (e.g., don't perform dropout)

    #这是一个由mean.binaryproto文件生成mean.npy文件的函数
    def convert_mean(binMean,npyMean):
        blob = caffe.proto.caffe_pb2.BlobProto()
        bin_mean = open(binMean, 'rb' ).read()
        blob.ParseFromString(bin_mean)
        arr = np.array( caffe.io.blobproto_to_array(blob) )
        npy_mean = arr[0]
        np.save(npyMean, npy_mean )
    binMean='/home1/xxx/RemoteSensing/rs_imagenet_mean.binaryproto'
    #修改成你的mean.binaryproto文件的路径
    npyMean='rs_imagenet_mean.npy'
    #你想把生成的mean.npy文件放在哪个路径下
    convert_mean(binMean,npyMean)

    transformer = caffe.io.Transformer({'data': net.blobs['data'].data.shape})
    transformer.set_transpose('data', (2,0,1))  # 通道变换,例如从(530,800,3) 变成 (3,530,800)
    transformer.set_mean('data', np.load(npyMean).mean(1).mean(1))
     #如果你在训练模型的时候没有对输入做mean操作,那么这边也不需要
    transformer.set_raw_scale('data', 255)  # rescale from [0, 1] to [0, 255]
    transformer.set_channel_swap('data', (2, 1, 0))  # swap channels from RGB to BGR

    with open('/home1/xxx/RemoteSensing/val.txt') as image_list:
    # 修改成你要测试的txt文件的路径,这个txt文件的内容一般是:每行表示图像的路径,
    #然后空格,然后是标签,也就是说每行都是两列
        with open('rs_prediction_resize_center.txt','w') as result:
    # 如果你想把预测的结果写到一个txt文件中,那么把这个路径修改成你想保存这个txt文件的路径
            count_right=0
            count_all=0
            while 1:
                list_name=image_list.readline()
                if list_name == '\n' or list_name == '': #如果txt文件都读完了则跳出循环
                    break
                image_type=list_name[0:-3].split('.')[-1]
                if image_type == 'gif': #这里我对gif个数的图像直接跳过
                    continue
                #print('image_type' + image_type)
                #print '*******'+ list_name.split(' ')[1]
                img_name = list_name.split(' ')[0]
                image = caffe.io.load_image(os.path.join('/home1/xxx/RemoteSensing/val_resize/',img_name))
                # 这里要添加你的图像所在的路径,根据你的list_name灵活调整,总之就是图像路径
                #imshow(image)
                output_prob = np.zeros((1, 45))
                image_shape = np.array(image.shape)
                crop_dims = (224,224)
                crop_dims = np.array(crop_dims)
                range_ = image_shape[0] - crop_dims[0]
                #for k in range(0, range_ + 1, crop_dims[0]/4) + range(range_, 1, -crop_dims[0]/4):
                    #for m in range(0, range_ + 1, crop_dims[1]/4) + range(range_, 1, -crop_dims[1]/4):
                        #crop_img = image[m:m+crop_dims[0],k:k+crop_dims[1],:]

                        #transformed_image = transformer.preprocess('data', crop_img)

                # 用转换后的图像代替net.blob中的data
                        #net.blobs['data'].data[...] = transformed_image
                        #net.blobs['data'].reshape(1, 3, 224, 224)
                ### perform classification
                        #output = net.forward()

            # 读取预测结果和真实label
                        #output_prob += net.blobs['prob'].data[0]

                crop_img = image[(image_shape[0]-crop_dims[0]) / 2:(image_shape[0]-crop_dims[0]) / 2 + crop_dims[0],(image_shape[1]-crop_dims[1]) / 2:(image_shape[1]-crop_dims[1]) / 2 + crop_dims[1],:]

                transformed_image = transformer.preprocess('data', crop_img)

                # 用转换后的图像代替net.blob中的data
                net.blobs['data'].data[...] = transformed_image
                net.blobs['data'].reshape(1, 3, 224, 224)
                ### perform classification
                output = net.forward()

            # 读取预测结果和真实label
                output_prob += net.blobs['prob'].data[0]
                true_label = int(list_name.split(' ')[1])
        # 如果预测结果和真实label一样,则count_right+1
                if(output_prob.argmax()==true_label):
                    count_right=count_right+1
                count_all=count_all+1

        # 保存预测结果,这个可选
                result.writelines(list_name.split(' ')[0] + ' ' + str(int(list_name.split(' ')[1])) +' '+str(output_prob.argmax())+'\n')
        #可以每预测完100个样本就打印一些,这样好知道预测的进度,尤其是要预测几万或更多样本的时候,否则你还以为代码卡死了
                if(count_all%100==0):
                    #print(list_name.split('\n')[0])
                    print(count_all)

           # 打印总的预测结果
            print('Accuracy: '+ str(float(count_right)/float(count_all)))
            print('count_all: ' + str(count_all))
            print('count_right: ' + str(count_right))
            print('count_wrong: ' + str(count_all-count_right))
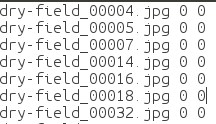
其可以生成一个预测文件,有三列
第一列是图片名称
第二列是是图片的真实标签(groundtruth)
第三列是图片的预测值
同时打印出模型预测的精度:

至此,我们已完成在caffe下从制作数据集到网络训练再到测试的全部过程。
希望能帮助到各位。谢谢。
2019.7.10