知识导航:
- 路由重要知识点
- 手写一个路由
知识点(建议最后看,放到是为了方便复习)
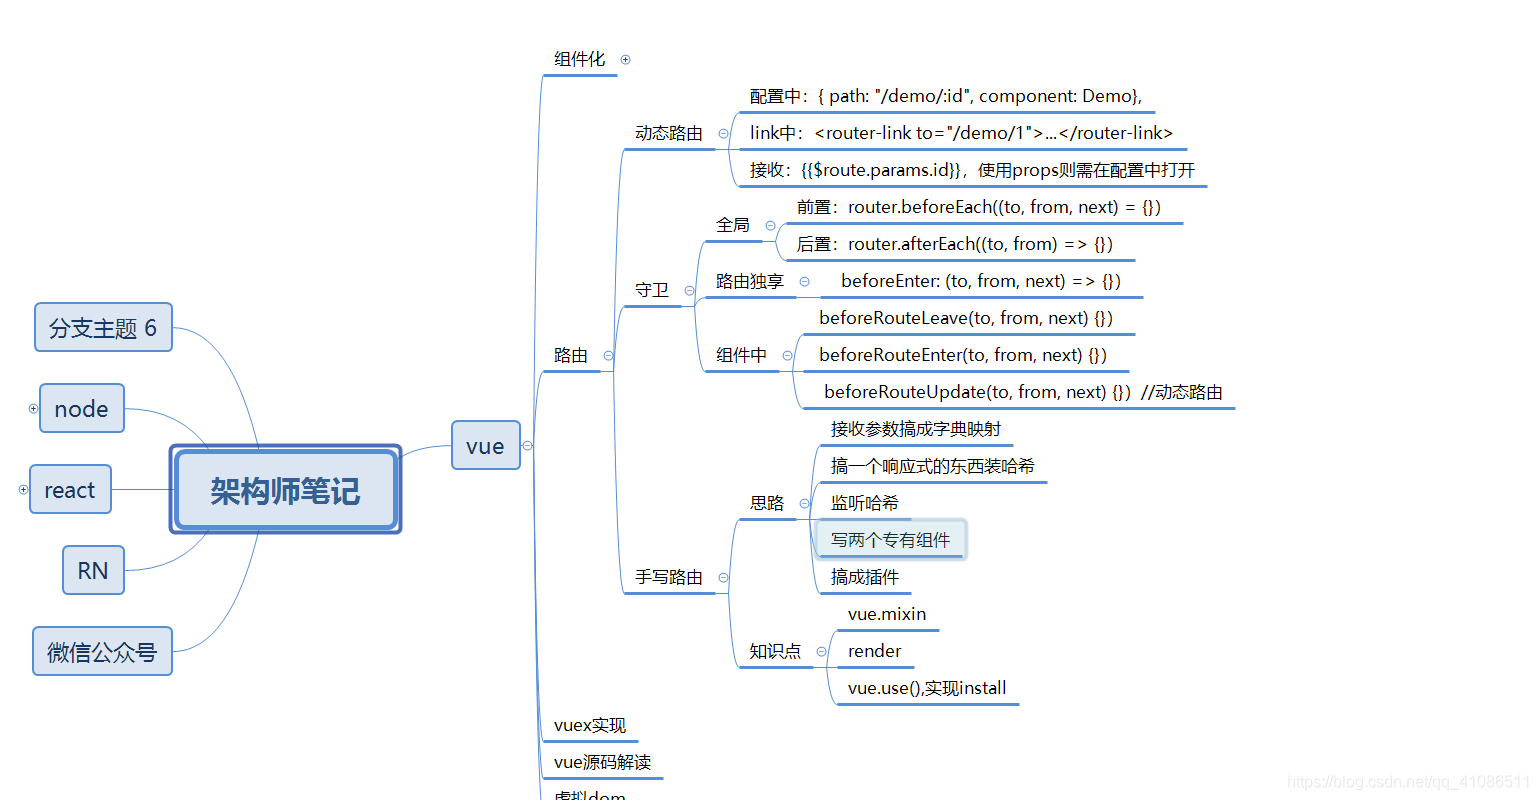
1. 路由重要知识点
vue-router对于写过vue的人想必是很熟悉了,所以这里忽略它的一些基本用法了。
1.1 动态路由
所谓动态路由就是类似那种restful接口对接形式,即以/demo/:id,即可匹配到demo路由同时可在demo路由下的组件中拿到传过来的id值。
示例:
路由配置中:
{
path: "/",
component: Home,
children: [
{ path: "", name: "home", component: List },
{ path: "/demo/:id", component: Demo},
]
}
发出链接组件中的router-link
<router-link to="/demo/1">...</router-link>

接收组件
{{$route.params.id}}
或者
将路由routes配置中更改为{ path: "/demo/:id", component: Demo,props:true}
这时候接收组件便可以通过props来接收参数了,例如{ props: ['id'] }
1.2 路由守卫
1.2.1 全局守卫
就是一些钩子,通过运行这些钩子的执行时期来做一些我们想要的控制。即每次发生路由的跳转变化执行一下我们所设置的某些逻辑
1.2.1.1 前置钩子(即前置守卫)
//to:即要进入的路由
//from:即要离开的路由
//next:它是一个函数,即可控制是否能够进入下个路由
//它的参数形式(1)next(); //默认路由(2)next(false); //阻止路由跳转(3)next({path:'/'}); //阻止默认路由,跳转到指定路径
router.beforeEach((to, from, next) = {
    if (to.path == "/login") {
        next();
    } else {
        next("/login")
    }
})
1.2.1.1 后置钩子(即后置守卫)
后置钩子用法和前置钩子基本一样,只不过它所接受的函数参数中没有了next
router.afterEach((to, from) => {
  //逻辑代码
})
1.2.2 路由独享
使用和全局类似。
示例:
        //登录模块
        path: '/login',
        component:Login,
        beforeEnter: (to, from, next) => {
            if (to.meta.needLogin && !$store.state.isLogin) {
        }
1.2.3 组件内的守卫
直接放进组件中的路由钩子。
即:(说明放在代码中)
export default {
  //出去时触发
  beforeRouteLeave(to, from, next) {
    next();
  },
 //进来时触发
  beforeRouteEnter(to, from, next) {
    next();
  },
   //它的场景是那种动态路由,如此组件匹配的是/demo/:id,即虽路由发生了变化但还是进到当前组件
  beforeRouteUpdate(to, from, next) {
    next();
  },
  data: {},
  method: {}
};
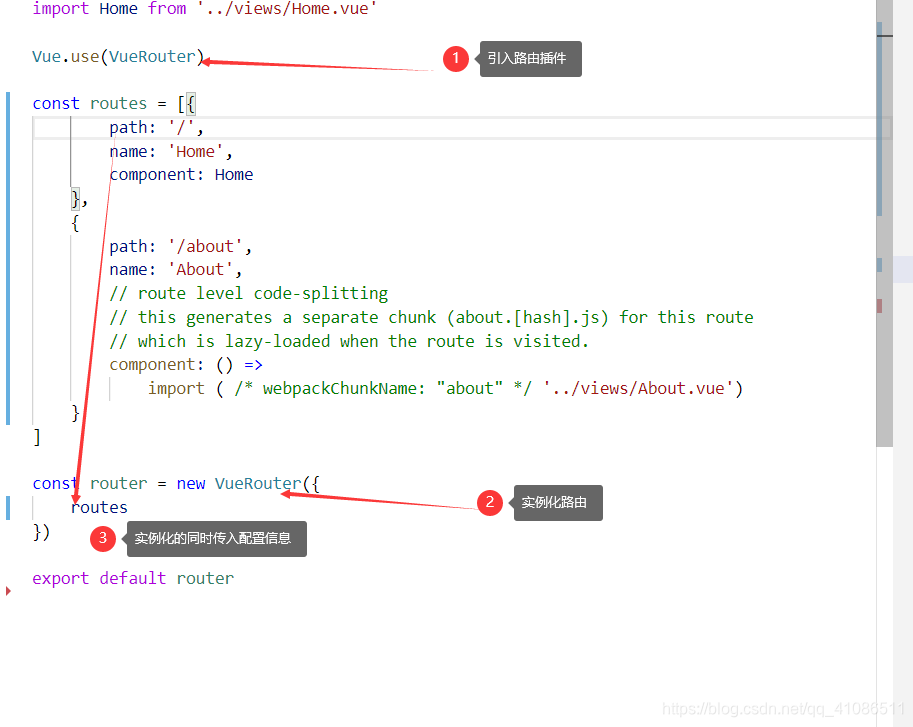
2. 手写一个路由插件
思路:回想我们在使用路由的时候进行了哪些配置。(ps只是基础实现功能)
观察
路由配置js文件中:
入口main.js文件:
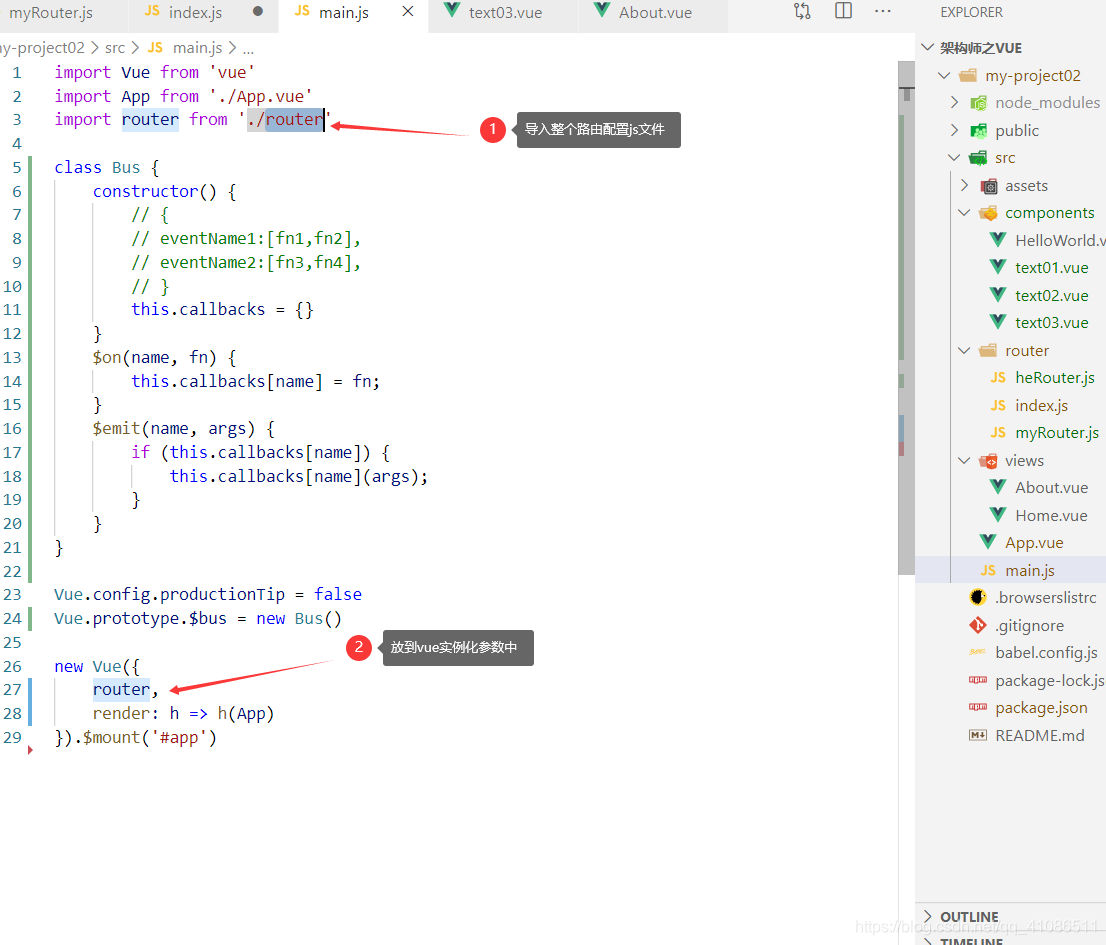
通过观察可以知道我们接下来要做什么了。
- 写一个路由类
- 构造函数需要接受传过来的参数
- 要有一个path和组件信息字典即需要把参数整成{path:组件名}
- 需要有个响应式的东西用于存放url中的哈希值
- 需要监听url中哈希值的变化
- 需要做两个组件,router-link和 router-view
- 需要把它做成插件
1.开始
current用于存放哈希值借用vue的响应式数据,map用于存放path和组件信息的映射
class MyRouter {
    constructor(routes) {
        this.$routes = routes;
        this.map = {};
        this.app = new Vue({
            data: {
                current: '/'
            }
        })

    }
2.接下来先把它整成一个组件吧
首先我们要理解在路由配置js文件中Vue.use()。它的作用是安装插件,如果插件是一个对象则该对象必须提供install方法。如果插件是一个方法,那么这个方法便会被做为install方法。并且在调用install方法时,Vue会作为参数传进去。
即我们想要把上面写的东西搞成一个组件,就得实现一个install方法。
下面我们用了一下混入,即Vue.mixin({})。简单说一下它,它的作用是全局注册一个混入,即它会影响注册之后创建的每一个vue实例。既然可以影响每个vue实例,那我们可以搞一个vue的钩子。控制vue实例在它的生命周期中做些我们让它做的事情
MyRouter.install = function(_vue) {
    Vue = _vue;
    Vue.mixin({
        beforeCreate() {
        //判当前vue实例化是的初始选项是否有router,有就调用router的初始化方法
            if (this.$options.router) {
                this.$options.router.init();
            }
        }
    })
}
3.实现init方法
init() {
        // 初始化要做的事情:
        // 1.进行哈希值的监听
      	this.addEvent();
        // 2.做好字典映射
        this.creatMap(this.$routes);
        // 3.整好路由的两个专有组件
        this.creatCom();
    }
4.实现监听addEvent
  addEvent() {
  			哈希值给到current,current是响应式的即哈希值一变,所有的用到current的地方便 跟着变化
        window.addEventListener("hashchange", function() {
            // 哈希值一改变对应的current便需要改变,注意这里的this指向为window
            this.app.current = window.location.hash.slice(1) || "/";
        }.bind(this));
        window.addEventListener('load', function() {
            this.app.current = window.location.hash.slice(1) || "/";
        }.bind(this));

    }
5.实现path与组件信息的映射creatMap(routes);
   creatMap(routes) {
        routes.routes.forEach(item => {
            this.map[item.path] = item;
        });

    }
6.创键两个专有组件creatCom()
creatCom() {

        Vue.component("router-link", {


            props: {
                to: String
            },
            //就是渲染一个a标签
            render(h) {
                return h("a", {
                    attrs: {
                        href: "#" + this.to
                    }
                }, this.$slots.default)
            },
        });

        Vue.component("router-view", {
        //将组件渲染成真正的DOM视图
            render: (h) => {
                return h(this.map[this.app.current].component)
            }
        })
    }
测试:引用我们写的路由

效果:


路由完整代码:
// 思路
// 1.接收一个map的配置信息
// 2.监听哈希值的变化
// 3.哈希值一旦法师变化,重新渲染页面
let Vue;
class MyRouter {
    constructor(routes) {
        this.$routes = routes;
        this.map = {};
        this.app = new Vue({
            data: {
                current: '/'
            }
        })

    }
    init() {
        // 初始化要做的事情:
        // 1.进行哈希值的监听
        // 2.做好字典
        // 3.整好路由的两个专有组件
        this.addEvent();
        this.creatMap(this.$routes);
        this.creatCom();
    }
    addEvent() {
        window.addEventListener("hashchange", function() {
            // 哈希值一改变对应的current便需要改变,注意这里的this指向为window
            this.app.current = window.location.hash.slice(1) || "/";
        }.bind(this));
        window.addEventListener('load', function() {
            this.app.current = window.location.hash.slice(1) || "/";
        }.bind(this));

    }


    creatMap(routes) {
        routes.routes.forEach(item => {
            this.map[item.path] = item;
        });

    }
    creatCom() {

        Vue.component("router-link", {


            props: {
                to: String
            },
            render(h) {
                return h("a", {
                    attrs: {
                        href: "#" + this.to
                    }
                }, this.$slots.default)
            },
        });
        Vue.component("router-view", {
            render: (h) => {
                return h(this.map[this.app.current].component)
            }
        })
    }
}


// 写成一个插件
// 即实现一个install方法

MyRouter.install = function(_vue) {
    Vue = _vue;
    Vue.mixin({
        beforeCreate() {
            if (this.$options.router) {
                this.$options.router.init();
            }
        }
    })
}

export default MyRouter