1.1 介绍
Swagger是一个简单又强大的能为你的Restful风格的Api生成文档工具。在项目中集成这个工具,根据我们自己的配置信息能够自动为我们生成一个api文档展示页,可以在浏览器中直接访问查看项目中的接口信息,同时也可以测试每个api接口。Swagger生成的api文档是实时更新的,你写的api接口有任何的改动都会在文档中及时的表现出来。
1.2 项目环境
Spring提供了一个与Swagger的集成工具包springfox,让我们的Spring项目能够更好的与Swagger融合。详情可访问springfox托管在Github上的demo内容。地址:http://springfox.github.io/springfox/
1.3 Swagger配置步骤
1) 第一步,在项目的公共模块pom.xml文件下,引用相关的外部依赖包。如下:
<!-- Swagger2 api文档生成工具依赖包 -->
<dependency>
<groupId>io.springfox</groupId>
<artifactId>springfox-swagger2</artifactId>
<version>2.6.1</version>
</dependency>
<dependency>
<groupId>io.springfox</groupId>
<artifactId>springfox-swagger-ui</artifactId>
<version>2.6.1</version>
</dependency>
<dependency>
<groupId>com.fasterxml.jackson.core</groupId>
<artifactId>jackson-annotations</artifactId>
<version>2.8.5</version>
</dependency>
<dependency>
<groupId>com.fasterxml.jackson.core</groupId>
<artifactId>jackson-databind</artifactId>
<version>2.8.5</version>
</dependency>
<dependency>
<groupId>com.fasterxml.jackson.core</groupId>
<artifactId>jackson-core</artifactId>
<version>2.8.5</version>
</dependency>
<dependency>
<groupId>org.slf4j</groupId>
<artifactId>log4j-over-slf4j</artifactId>
</dependency>
<!-- end -->
2) 第二步,自定义配置类实现。
Swagger会根据这个配置类的具体实现来生成我们相应的api文档。通过@ComponentScan注解可以指定扫描的包下的RESTful API接口。regex("/api/v1/.*") 可以根据不同ContentPath 版本接口进行分类。可创建多个Docket实例。
@Configuration
@EnableWebMvc
@EnableSwagger2
@ComponentScan(basePackages ={"com.coracle.jomoo.rest"})
public class SwaggerConfig {
@Bean
public Docket api() {
return new Docket(DocumentationType.SWAGGER_2)
.groupName("api")
.genericModelSubstitutes(DeferredResult.class)
.useDefaultResponseMessages(false)
.forCodeGeneration(false)
.pathMapping("/")
.select()
.paths(or(regex("/api/v1/.*")))
.build()
.apiInfo(apiInfo());
}
private ApiInfoapiInfo() {
ApiInfoapiInfo = new ApiInfo("JOMOO INTERFACE API",
"JoMoo Interface's REST API, for system administrator",
"1.0",
"NO terms of service",
"[email protected]",
"The Apache License, Version 2.0",
"http://www.apache.org/licenses/LICENSE-2.0.html"
);
return apiInfo;
}
}
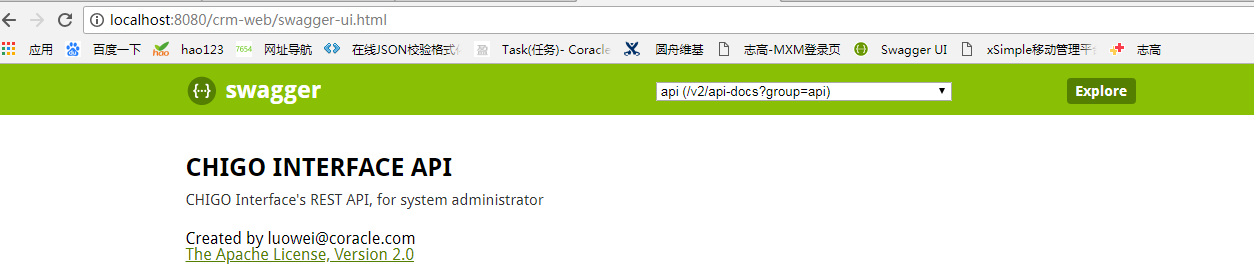
3. 通过访问http://localhost:8080/mxm/swagger-ui.html生成在线接口测试地址。
3) 第三步,API接口注解
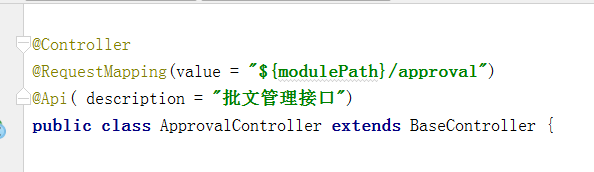
a.类注解
b.方法注解
@ApiOperation(value = "批文列表查询接口",
        notes = "批文列表查询接口",
        position = 0)
@ApiResponses(value = {@ApiResponse(code = 100, message = "批文列表查询接口异常"),
        @ApiResponse(code = 200, message = "批文列表查询接口成功")})
@ResponseBody
@RequestMapping(value = "/list", method = RequestMethod.POST)
public CommonDTO<List<TDocLandInfos>> approvalList(@RequestBody TDocLandInfosParam tDocLandInfosParam, HttpServletRequest request, HttpServletResponse response) throws Exception{
    Page page = new Page(request,response);
    try {
        return listDTO;
    }catch (Exception e){
    }
    return listDTO;
}}
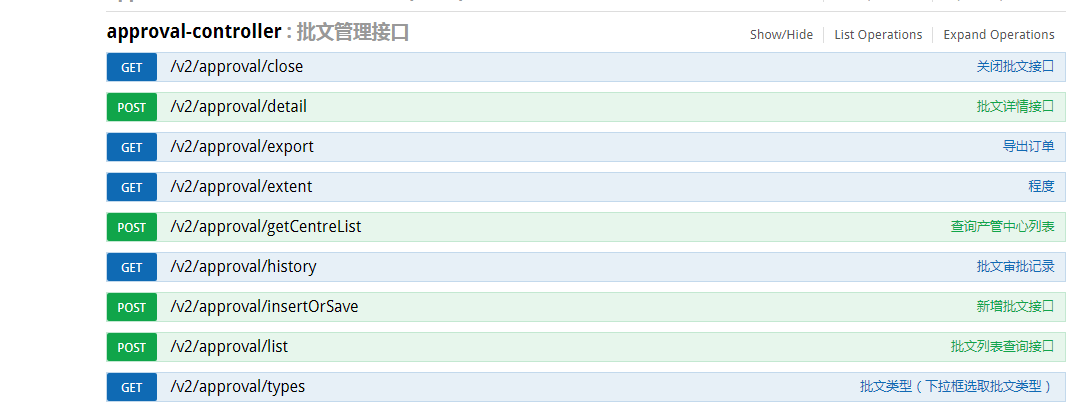
springfox默认会将所有的接口都给你生成文档,不管你有没有使用注解@ApiOperation这个注解注释接口方法,并且如果你没有为你的接口指定访问方式,他也会为这个接口生成所有访问方式的文档, 下面会有结构展示图.
c.参数注解
@ApiModel(value = "productlistparam")
@JsonSerialize(include = JsonSerialize.Inclusion.NON_NULL)
public class ProductListParamextends CommonParam{
@ApiModelProperty(value = " 产品分类ID", required = false )
private Long categoryId;
@ApiModelProperty(value = "产品分类关键字", required = false )
private String keyword;
@ApiModelProperty(value = "产品分类维度", required = false )
private List<String>keys;
@ApiModelProperty(value = "发布时间段", required = false )
private Integer type;
//get/set.....
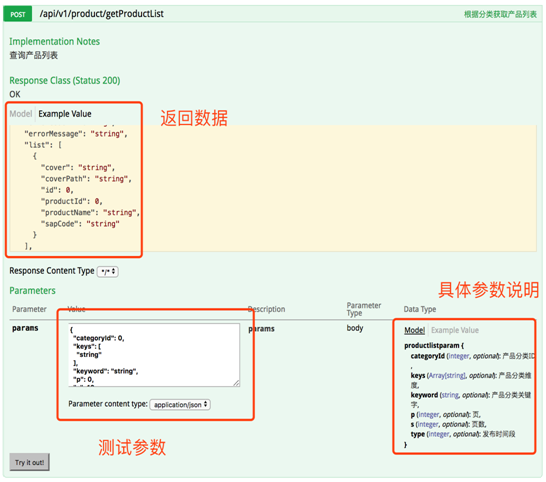
}
定义好接收参数的实体类,通过@ApiModelProperty注解对每个参数描述,并根据实际参数是否为必填项,最终生成文档。如下图: