文章目录
一、登录流程分析

二、界面简化
打开src\views\login\index.vue将 template 改为:
<template>
  <div class="login-container">
    <el-form
      ref="loginForm"
      :model="loginForm"
      :rules="loginRules"
      class="login-form"
      autocomplete="on"
      label-position="left"
    >
      <div class="title-container">
        <h3 class="title">小慕读书</h3>
      </div>
      <el-form-item prop="username">
        <span class="svg-container">
          <svg-icon icon-class="user" />
        </span>
        <el-input
          ref="username"
          v-model="loginForm.username"
          placeholder="Username"
          name="username"
          type="text"
          tabindex="1"
          autocomplete="on"
        ></el-input>
      </el-form-item>
      <el-tooltip v-model="capsTooltip" content="Caps lock is On" placement="right" manual>
        <el-form-item prop="password">
          <span class="svg-container">
            <svg-icon icon-class="password" />
          </span>
          <el-input
            :key="passwordType"
            ref="password"
            v-model="loginForm.password"
            :type="passwordType"
            placeholder="Password"
            name="password"
            tabindex="2"
            autocomplete="on"
            @keyup.native="checkCapslock"
            @blur="capsTooltip = false"
            @keyup.enter.native="handleLogin"
          />
          <span class="show-pwd" @click="showPwd">
            <svg-icon :icon-class="passwordType === 'password' ? 'eye' : 'eye-open'" />
          </span>
        </el-form-item>
      </el-tooltip>
      <el-button
        :loading="loading"
        type="primary"
        style="width:100%;margin-bottom:30px;"
        @click.native.prevent="handleLogin"
      >
        登录
      </el-button>
    </el-form>
  </div>
</template>
- 所做更改如下:
- 修改标题为小慕读书
- 删掉第三方登录相关内容
- 英文改为中文
三、逻辑简化
- 删除
SocialSign组件引用 - 删除
src/views/login/components目录 - 删除
afterQRScan - 删除
created和destroyed
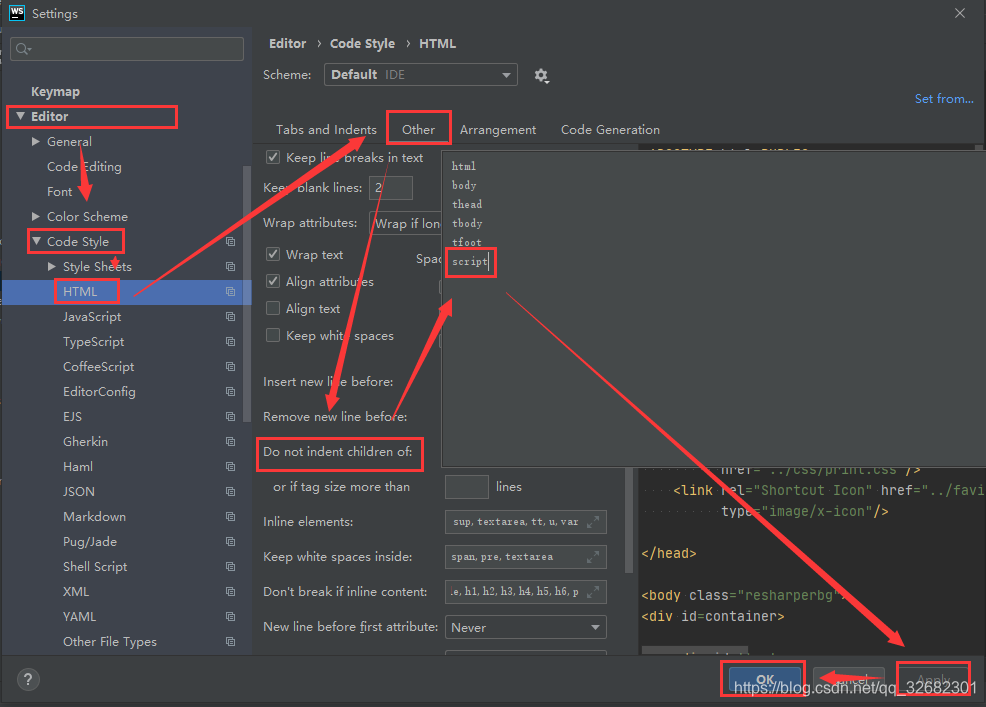
开发过程中可能会碰到 ·script· 标签中源码的
eslint关于indent的报错,解决方法如下:
通过ctrl + alt + L格式化代码后,script可能会出现indent的警告,解决方案有两种:
- 关闭
eslint中的ndent检查;- 修改
webstorm中indent设置:
Webstorm=>Preferences=>Editor=>Code Style=>HTML=>Other- 在
do not indent of children中增加script即可
四、路由处理实例
1.创建组件
创建组件 src/views/book/create.vue,内容暂时随便写点
2.配置路由
修改 src/router/index.js 的 asyncRoutes:
export const asyncRoutes = [
  {
    path: '/book',	// 访问路径
    component: Layout,	// 内容所在容器,或父组件
    redirect: '/book/create',	// 重定向路径到子组件
    meta: { title: '图书管理', icon: 'documentation', roles: ['admin'] },
    children: [	// 这里才是真正的内容
      {
        path: '/book/create',	// 访问路径
        component: () => import('@/views/book/create'),	// 引入组件
        name: 'book',	// 有name属性才会有标签显示
        meta: { title: '添加图书', icon: 'edit', roles: ['admin'] }
      }
    ]
  },
  // ...
]
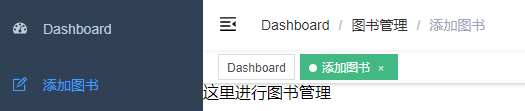
roles用于权限控制,只有指定人员可以访问- 测试
- 使用
editor登录平台,无法看到"添加图书"功能 - 使用
admin登录平台,可以看到"添加图书"功能
- 使用
affix:true:标签固定,写在路由的meta里
五、预备知识
(一)路由和权限校验
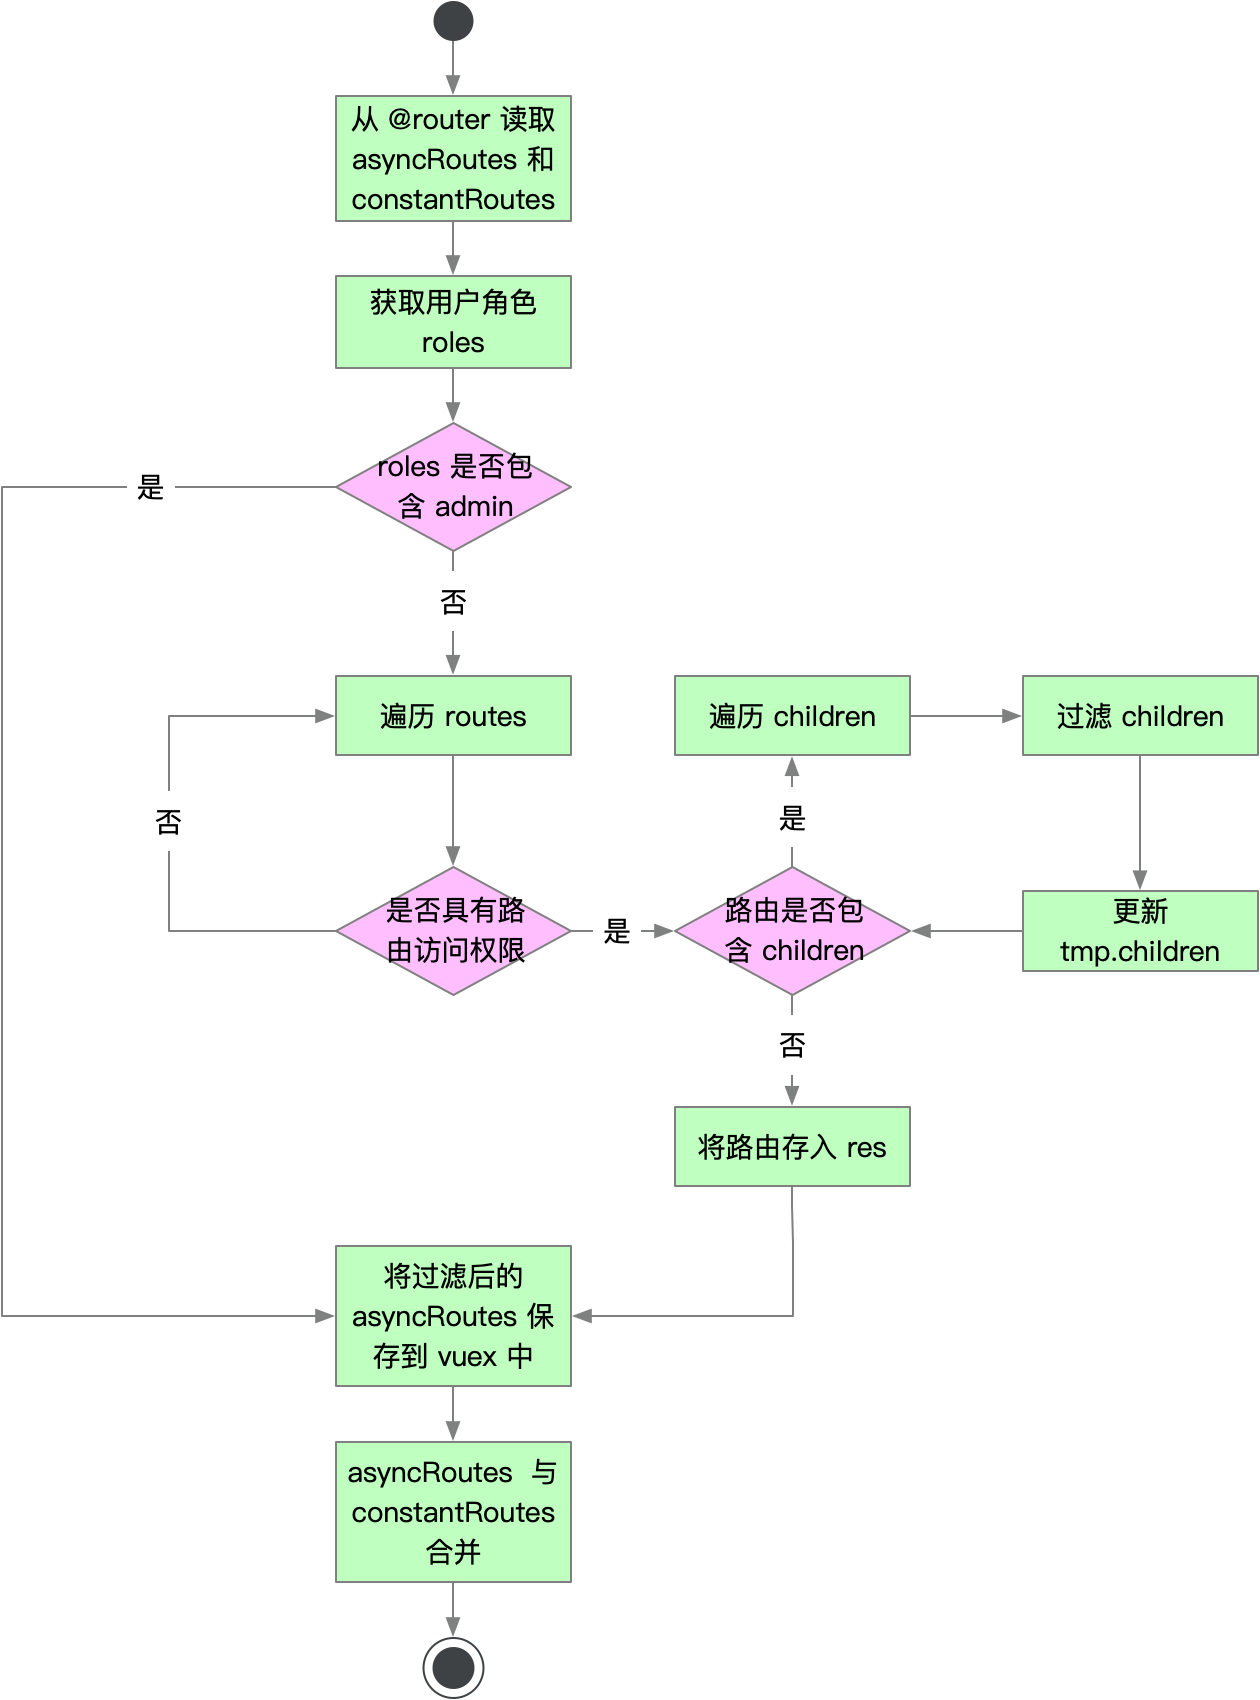
1.路由处理逻辑分析
(1)路由逻辑图
路由处理逻辑图如下:
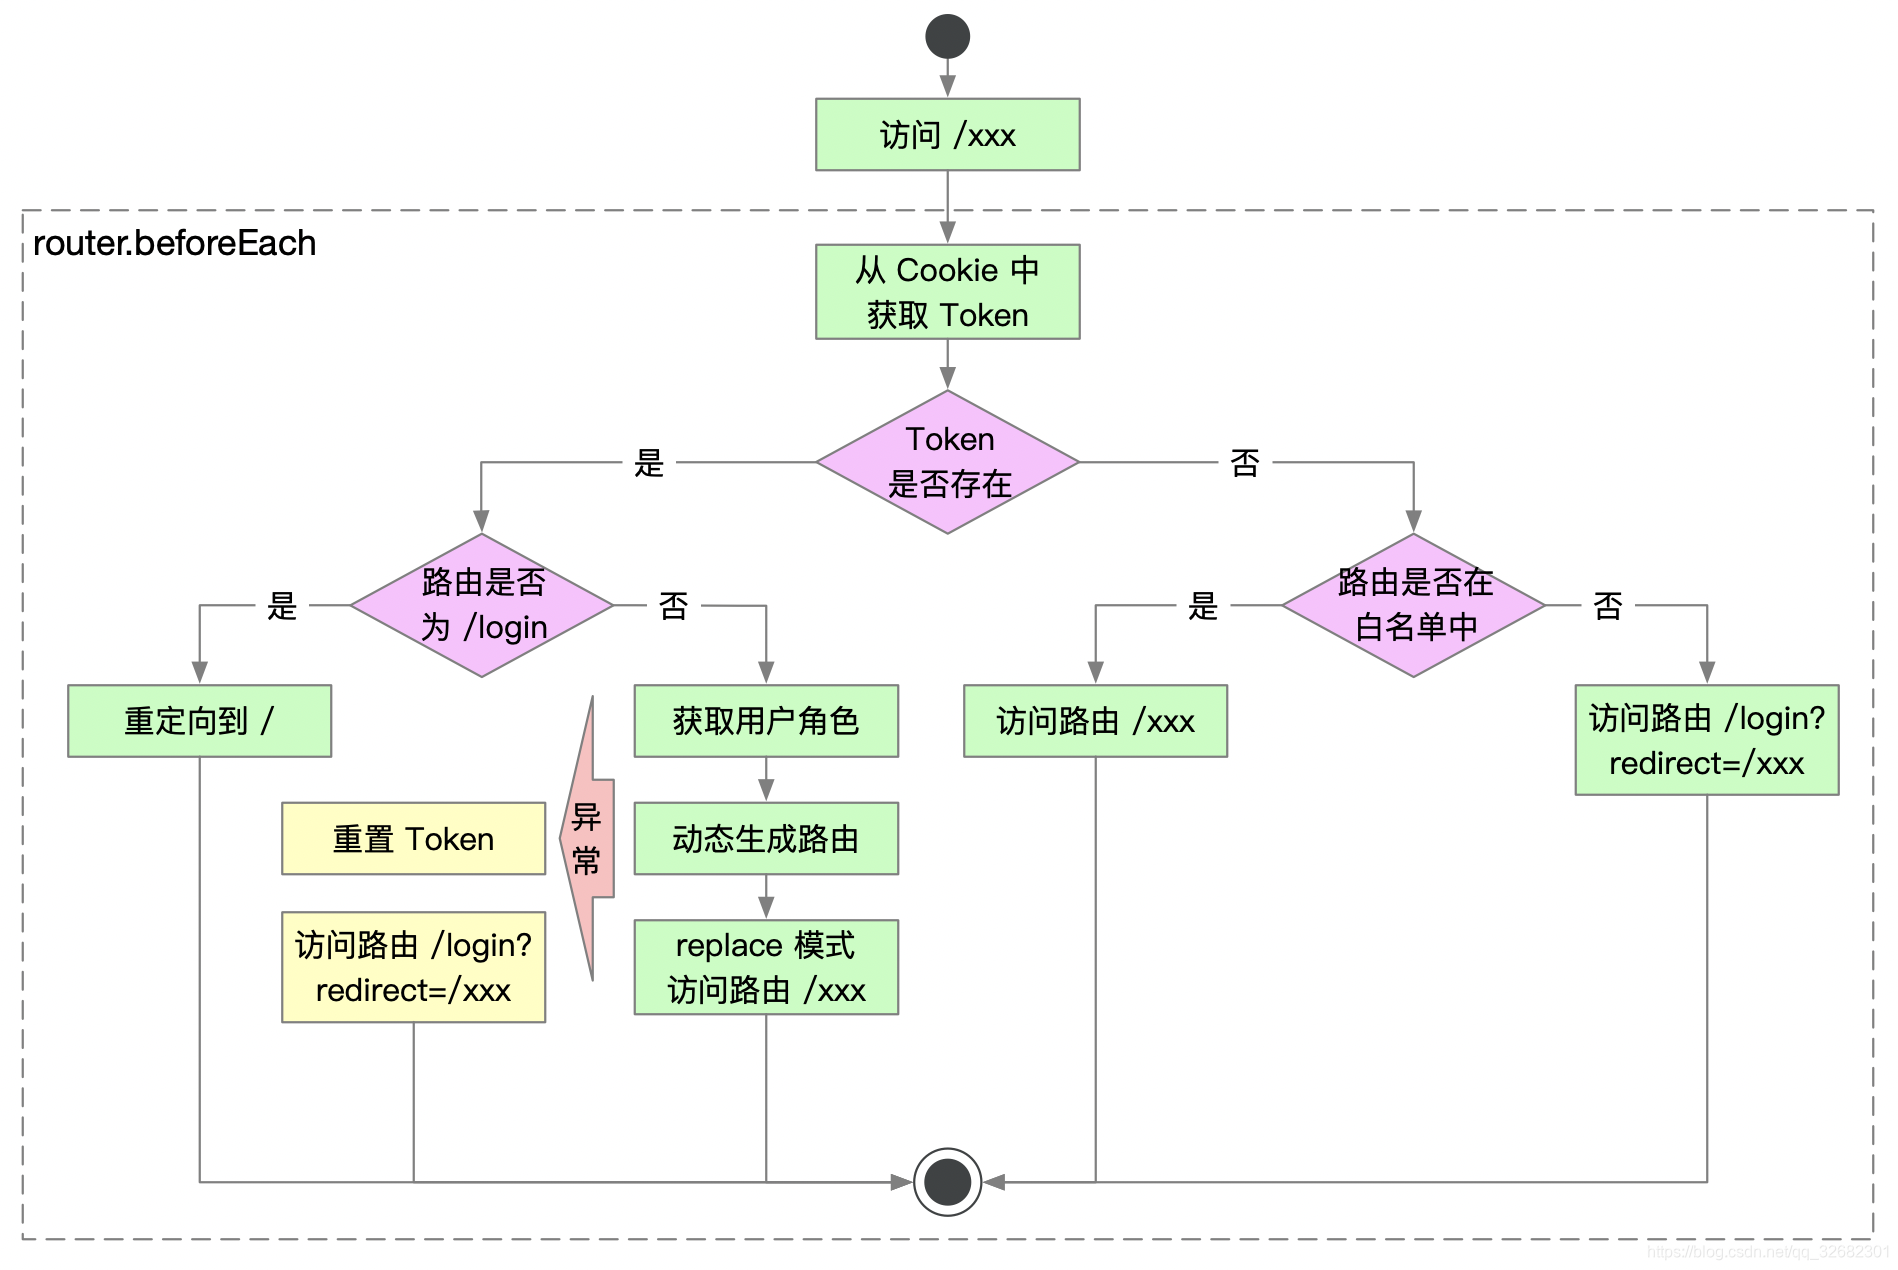
(2)路由场景分析
中后台路由常见的常见如下:
- 已获取
Token:- 访问
/login:重定向到/ - 访问
/login?redirect=/xxx:重定向到/xxx - 访问
/login以外的路由:直接访问/xxx
- 访问
- 未获取
Token:- 访问
/login:直接访问/login - 访问
/login以外的路由:如访问/dashboard,实际访问路径为/login?redirect=%2Fdashboard,登录后会直接重定向/dashboard
- 访问
(3)路由逻辑源码
- 第一步,
main.js中加载了全局路由守卫
import './permission' // permission control
- 第二步,
permission定义了全局路由守卫
const whiteList = ['/login', '/auth-redirect'] // no redirect whitelist
router.beforeEach(async(to, from, next) => {
  // 启动进度条
  NProgress.start()

  // 修改页面标题
  document.title = getPageTitle(to.meta.title)

  // 从 Cookie 获取 Token
  const hasToken = getToken()

  // 判断 Token 是否存在
  if (hasToken) {
    // 如果当前路径为 login 则直接重定向至首页
    if (to.path === '/login') {
      next({ path: '/' })
      NProgress.done()
    } else {
      // 判断用户的角色是否存在
      const hasRoles = store.getters.roles && store.getters.roles.length > 0
      // 如果用户角色存在,则直接访问
      if (hasRoles) {
        next()
      } else {
        try {
          // 异步获取用户的角色
          const { roles } = await store.dispatch('user/getInfo')
          // 根据用户角色,动态生成路由
          const accessRoutes = await store.dispatch('permission/generateRoutes', roles)
          // 调用 router.addRoutes 动态添加路由
          router.addRoutes(accessRoutes)
          // 使用 replace 访问路由,不会在 history 中留下记录
          next({ ...to, replace: true })
        } catch (error) {
          // 移除 Token 数据
          await store.dispatch('user/resetToken')
          // 显示错误提示
          Message.error(error || 'Has Error')
          // 重定向至登录页面
          next(`/login?redirect=${to.path}`)
          NProgress.done()
        }
      }
    }
  } else {
    // 如果访问的 URL 在白名单中,则直接访问
    if (whiteList.indexOf(to.path) !== -1) {
      next()
    } else {
      // 如果访问的 URL 不在白名单中,则直接重定向到登录页面,并将访问的 URL 添加到 redirect 参数中
      next(`/login?redirect=${to.path}`)
      NProgress.done()
    }
  }
})

router.afterEach(() => {
  // 停止进度条
  NProgress.done()
})
whiteList是白名单NProgress.start()是启动(显示)进度条;NProgress.done()是完成进度条,两个必须成对出现,或说可以没有头,但必须有尾,否则进度条永远停不下来。NProgress.configure({ showSpinner: false }),使用showSpinner控制右侧的环形进度条是否显示
(4)路由和权限校验流程:
- ①
const hasToken=getToken(),从 Cookie 获取 Token - ② 如果当前路径为 login 则直接重定向至首页,进度条完成(这时会带着path: '/'重新走一遍这个流程)
if (to.path === '/login') {next({ path: '/' });NProgress.done()} - ③ 由于在路由中定义了
'/'重定向到/dashboard,然后继续流程 - ④ 页面是定了,接下来就是定
roles - ⑤ 判断用户的角色是否存在
const hasRoles = store.getters.roles && store.getters.roles.length > 0 - ⑥ 存在,直接进入页面
if (hasRoles) {next()} - ⑦ 接下来判断用户角色,进行页面的选择性加载(管理员/用户)
- ⑧ 异步获取用户的角色
const { roles } = await store.dispatch('user/getInfo') - ⑨
user/getInfo对应的是src/store/modules/user.js的getInfo()方法 - ⑩ 根据用户角色,动态生成路由
const accessRoutes = await store.dispatch('permission/generateRoutes', roles)(在五(一)2节详细理解) - ⑪ 调用
router.addRoutes动态添加路由router.addRoutes(accessRoutes)(将新的路由表accessRoutes和之前的路由表合并)
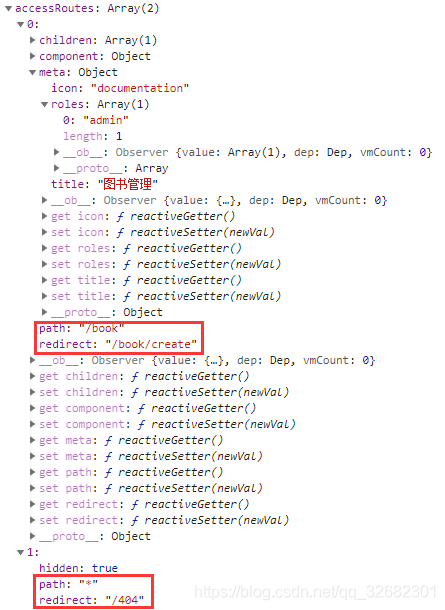
- 可以看到,动态生成的路由
accessRoutes是两个数组类型的,一个是图书管理的路由,另一个是404的路由
- 可以看到,动态生成的路由
- ⑫
src/router/index.js的constantRoutes不受用户角色的限制,而asyncRoutes是需要根据用户角色动态加载的 - ⑬ 最后根据路由表生成左侧的菜单栏
- ⑭ 使用
replace访问路由,不会在history中留下记录,也就是说当登录进去之后,再次回退并不会退到登陆页面,因为history中没有登陆页面的记录next({ ...to, replace: true }) - ⑮ 如果过程中出现异常所要做的操作:
- 第一步:移除
Token数据await store.dispatch('user/resetToken');resetToken在src/store/modules/user.js
resetToken({ commit }) {
  return new Promise(resolve => {
    commit('SET_TOKEN', '')
    commit('SET_ROLES', [])
    removeToken()
    resolve()
  })
},
完成token和roles置空
removeToken()是在src/utils/auth.js
export function removeToken() {
  return Cookies.remove(TokenKey)
}
将Cookies当中的token移除
- 第二步,显示错误提示:
Message.error(error || 'Has Error') - 第三步,重定向至登录页面:
next(`/login?redirect=${to.path}`),然后停止进度条
2.动态路由分析
(1)动态路由流程图
动态路由生成逻辑如下图:
(2)动态路由源码分析
生成动态路由的源码位于 src/store/modules/permission.js 中的 generateRoutes 方法,源码如下:
import { asyncRoutes, constantRoutes } from '@/router'

generateRoutes({ commit }, roles) {
  // 返回 Promise 对象
  return new Promise(resolve => {
    let accessedRoutes
    if (roles.includes('admin')) {
      // 如果角色中包含 admin,则直接跳过判断,直接将 asyncRoutes 全部返回
      accessedRoutes = asyncRoutes || []
    } else {
      // 如果角色中没有包含 admin,则调用 filterAsyncRoutes 过滤路由
      accessedRoutes = filterAsyncRoutes(asyncRoutes, roles)
    }
    // 将路由保存到 vuex 中
    commit('SET_ROUTES', accessedRoutes)
    resolve(accessedRoutes)
  })
}
SET_ROUTES 方法源码如下:
SET_ROUTES: (state, routes) => {
  // 将 routes 保存到 state 中的 addRoutes
  state.addRoutes = routes
  // 将 routes 集成到 src/router/index.js 的 constantRoutes 中
  state.routes = constantRoutes.concat(routes)
}
路由过滤的方法 filterAsyncRoutes 源码如下:
/**
 * @params routes - 异步加载的路由
 * @params roles - 用户的角色,数组形式
 */
export function filterAsyncRoutes(routes, roles) {
  const res = []
  // 遍历全部路由
  routes.forEach(route => {
    // 对路由进行浅拷贝,注意 children 不会拷贝,因为不需要对 children 进行判断,所以可以使用浅拷贝
    const tmp = { ...route }
    // 检查用户角色是否具备访问路由的权限
    if (hasPermission(roles, tmp)) {
      // 当路由具有访问权限时,判断路由是否具备 children 属性
      if (tmp.children) {
        // 当路由包含 children 时,对 children 迭代调用 filterAsyncRoutes 方法
        tmp.children = filterAsyncRoutes(tmp.children, roles)
      }
      // 当路由具有访问权限时,将 tmp 保存到 res 中
      res.push(tmp)
    }
  })

  return res
}
检查权限方法 hasPermission 源码如下:
function hasPermission(roles, route) {
  // 检查路由是否包含 meta 和 meta.roles 属性
  if (route.meta && route.meta.roles) {
    // 判断 route.meta.roles 中是否包含用户角色 roles 中的任何一个权限,如果包含则返回 true,否则为 false
    return roles.some(role => route.meta.roles.includes(role))
  } else {
    // 如果路由没有 meta 或 meta.roles 属性,则视为该路由不需要进行权限控制,所有用户对该路由都具有访问权限
    return true
  }
}
3.总结
(1)关于路由处理
vue-element-admin对所有访问的路由进行拦截;- 访问路由时会从
Cookie中获取Token,判断Token是否存在:- 如果
Token存在,将根据用户角色生成动态路由,然后访问路由,生成对应的页面组件。这里有一个特例,即用户访问/login时会重定向至 / 路由; - 如果
Token不存在,则会判断路由是否在白名单中,如果在白名单中将直接访问,否则说明该路由需要登录才能访问,此时会将路由生成一个redirect参数传入login组件,实际访问的路由为:/login?redirect=/xxx。
- 如果
(1)关于动态路由和权限校验
vue-element-admin将路由分为:constantRoutes和asyncRoutes- 用户登录系统时,会动态生成路由,其中
constantRoutes必然包含,asyncRoutes会进行过滤; asyncRoutes过滤的逻辑是看路由下是否包含meta和meta.roles属性,如果没有该属性,所以这是一个通用路由,不需要进行权限校验;如果包含roles属性则会判断用户的角色是否命中路由中的任意一个权限,如果命中,则将路由保存下来,如果未命中,则直接将该路由舍弃;asyncRoutes处理完毕后,会和constantRoutes合并为一个新的路由对象,并保存到vuex的permission/routes中;- 用户登录系统后,侧边栏会从
vuex中获取state.permission.routes,根据该路由动态渲染用户菜单。
拓展:
(二)侧边栏
1.源码位置
sidebar引用自layout组件,layout组件位于src/layout/index.vuesidebar组件源码位于src/layout/components/Sidebar/index.vue
2.el-menu 用法解析
侧边栏的核心是将根据权限过滤后的 router 和 el-menu 组件进行映射,所以熟悉 el-menu 是理解 sidebar 的起点
<template>
  <el-row class="tac">
    <el-col :span="12">
      <el-menu
        default-active="1-1"
        background-color="#545c64"
        text-color="#fff"
        active-text-color="#ffd04b"
        mode="vertical"
        unique-opened
        :collapse="isCollapse"
        :collapse-transition="false"
        class="el-menu-vertical-demo"
        @open="handleOpen"
        @close="handleClose"
        @select="handleSelect"
      >
        <el-submenu index="1">
          <template slot="title">
            <i class="el-icon-location"></i>
            <span>导航一</span>
          </template>
          <el-menu-item-group>
            <template slot="title">分组一</template>
            <el-menu-item index="1-1">选项1</el-menu-item>
            <el-menu-item index="1-2">选项2</el-menu-item>
          </el-menu-item-group>
          <el-menu-item-group title="分组2">
            <el-menu-item index="1-3">选项3</el-menu-item>
          </el-menu-item-group>
          <el-submenu index="1-4">
            <template slot="title">选项4</template>
            <el-menu-item index="1-4-1">选项1</el-menu-item>
          </el-submenu>
        </el-submenu>
        <el-submenu index="2">
          <template slot="title">
            <i class="el-icon-menu"></i>
            <span slot="title">导航二</span>
          </template>
          <el-menu-item index="2-1">选项2-1</el-menu-item>
        </el-submenu>
        <el-menu-item index="3" disabled>
          <i class="el-icon-document"></i>
          <span slot="title">导航三</span>
        </el-menu-item>
        <el-menu-item index="4">
          <i class="el-icon-setting"></i>
          <span slot="title">导航四</span>
        </el-menu-item>
      </el-menu>
    </el-col>
    <el-col>
      <el-button @click="isCollapse = !isCollapse">折叠</el-button>
    </el-col>
  </el-row>
</template>

<script>
export default {
  data() {
    return {
      isCollapse: false
    }
  },
  methods: {
    handleSelect(key, keyPath) {
      console.log('handleSelect', key, keyPath)
    },
    handleOpen(key, keyPath) {
      console.log('handleOpen', key, keyPath)
    },
    handleClose(key, keyPath) {
      console.log('handleClose', key, keyPath)
    }
  }
}
</script>
(1)el-menu
el-menu 表示菜单容器组件:
default-active:激活的菜单,注意如果存在子菜单,需要填入子菜单 IDunique-opened:是否保持一个菜单打开mode:枚举值,分为vertical和horizontal两种collapse:是否水平折叠收起菜单(仅在mode为vertical时可用)collapse-transition:是否显示折叠动画@select:点击菜单事件,keyPath代表菜单的访问路径,如:1-4-1 菜单的点击日志为:
handleSelect 1-4-1 (3) ["1", "1-4", "1-4-1"]
获取 keyPath:我们可以获取 1-4-1 菜单的所有父级菜单的 ID
@open:父菜单打开时触发事件@close:父菜单关闭时触发事件
(2)el-submenu
子菜单容器,el-submenu 与 el-menu 不同,el-menu 表示整个菜单,而 el-submenu 表示一个具体菜单,只是该菜单还包含了子菜单
el-submenu 可以通过定制 slot 的 title 来自定义菜单样式:
<el-submenu index="1">
    <template slot="title">
      <i class="el-icon-location"></i>
      <span>导航一</span>
    </template>
</el-submenu>
el-submenu 容器内 default 的 slot 用来存放子菜单,可以包含三种子菜单组件:
el-menu-item-group:菜单分组,为一组菜单添加一个标题,el-menu-item-group容器内容需要存放el-menu-item组件,支持通过title的slot来定制标题样式el-submenu:el-submenu支持循环嵌套el-submenu,这使得超过两级子组件得以实现el-menu-item:子菜单组件
3.sidebar 源码分析
sidebar 源码如下:
<template>
  <div :class="{'has-logo':showLogo}">
    <logo v-if="showLogo" :collapse="isCollapse" />
    <el-scrollbar wrap-class="scrollbar-wrapper">
      <el-menu
        :default-active="activeMenu"
        :collapse="isCollapse"
        :background-color="variables.menuBg"
        :text-color="variables.menuText"
        :unique-opened="false"
        :active-text-color="variables.menuActiveText"
        :collapse-transition="false"
        mode="vertical"
      >
        <sidebar-item v-for="route in permission_routes" :key="route.path" :item="route" :base-path="route.path" />
      </el-menu>
    </el-scrollbar>
  </div>
</template>

<script>
import { mapGetters } from 'vuex'
import Logo from './Logo'
import SidebarItem from './SidebarItem'
import variables from '@/styles/variables.scss'

export default {
  components: { SidebarItem, Logo },
  computed: {
    ...mapGetters([
      'permission_routes',
      'sidebar'
    ]),
    activeMenu() {
      const route = this.$route
      const { meta, path } = route
      if (meta.activeMenu) {
        return meta.activeMenu
      }
      return path
    },
    showLogo() {
      return this.$store.state.settings.sidebarLogo
    },
    variables() {
      return variables
    },
    isCollapse() {
      return !this.sidebar.opened
    }
  }
}
</script>
activeMenu:通过meta.activeMenu属性,指定路由对应的高亮菜单,meta.activeMenu 需要提供一个合法的路由,否则将不能生效isCollapse:NavBar中点击按钮,会修改Cookie中的sidebarStatus,从vuex取值时会将sidebarStatus转为Boolean,并判断默认是否需要收缩左侧菜单栏showLogo:判断settings.js中的配置项是否需要展示Logovariables:从@/styles/variables.scss中获取scss对象,从而获取样式
查看sidebar源码中应用的一些技巧
sidebar 中通过v-for循环遍历 sidebar-item 实现子菜单:
<sidebar-item v-for="route in permission_routes" :key="route.path" :item="route" :base-path="route.path" />
- 这里的
permission_routes是state.permission.routes是经过权限判断后的总路由表 - 下面我们来分析
sidebar-item组件
4.sidebar-item 源码分析
src/layout/components/Sidebar/SidebarItem.vue
sidebar-item 组件源码如下:
<template>
<div v-if="!item.hidden" class="menu-wrapper">
<template v-if="hasOneShowingChild(item.children,item) && (!onlyOneChild.children||onlyOneChild.noShowingChildren)&&!item.alwaysShow">
<app-link v-if="onlyOneChild.meta" :to="resolvePath(onlyOneChild.path)">
<el-menu-item :index="resolvePath(onlyOneChild.path)" :class="{'submenu-title-noDropdown':!isNest}">
<item :icon="onlyOneChild.meta.icon||(item.meta&&item.meta.icon)" :title="onlyOneChild.meta.title" />
</el-menu-item>
</app-link>
</template>
<el-submenu v-else ref="subMenu" :index="resolvePath(item.path)" popper-append-to-body>
<template slot="title">
<item v-if="item.meta" :icon="item.meta && item.meta.icon" :title="item.meta.title" />
</template>
<sidebar-item
v-for="child in item.children"
:key="child.path"
:is-nest="true"
:item="child"
:base-path="resolvePath(child.path)"
class="nest-menu"
/>
</el-submenu>
</div>
</template>
<script>
import path from 'path'
import { isExternal } from '@/utils/validate'
import Item from './Item'
import AppLink from './Link'
import FixiOSBug from './FixiOSBug'
export default {
name: 'SidebarItem',
components: { Item, AppLink },
mixins: [FixiOSBug],
props: {
// route object
item: {
type: Object,
required: true
},
isNest: {
type: Boolean,
default: false
},
basePath: {
type: String,
default: ''
}
},
data() {
// To fix https://github.com/PanJiaChen/vue-admin-template/issues/237
// TODO: refactor with render function
this.onlyOneChild = null
return {}
},
methods: {
hasOneShowingChild(children = [], parent) {
const showingChildren = children.filter(item => {
if (item.hidden) {
return false
} else {
// Temp set(will be used if only has one showing child)
this.onlyOneChild = item
return true
}
})
// When there is only one child router, the child router is displayed by default
if (showingChildren.length === 1) {
return true
}
// Show parent if there are no child router to display
if (showingChildren.length === 0) {
this.onlyOneChild = { ... parent, path: '', noShowingChildren: true }
return true
}
return false
},
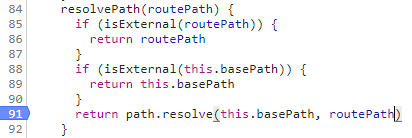
resolvePath(routePath) {
if (isExternal(routePath)) {
return routePath
}
if (isExternal(this.basePath)) {
return this.basePath
}
return path.resolve(this.basePath, routePath)
}
}
}
</script>
(1)side-item props 分析
side-item 的 props 如下:
item:路由对象basePath:路由路径
(2)sidebar-item 展示逻辑分析
sidebar-item 最重要是展示逻辑,主要分为以下几步:
- 通过
item.hidden控制菜单是否展示(hidden属性在配置路由时设置,不需要在sidebar显示的都设为true)
- 接下来的两个元素(
template和el-submenu)是互斥的,只能有一个显示

- 通过
hasOneShowingChild(item.children,item) && (!onlyOneChild.children||onlyOneChild.noShowingChildren)&&!item.alwaysShow逻辑判断template菜单是否展示,template代表单一菜单;hasOneShowingChild:判断是否只有一个需要展示的子路由!onlyOneChild.children||onlyOneChild.noShowingChildren:判断需要展示的子菜单,是否包含children属性,如果包含,则说明子菜单可能存在孙子菜单,此时则需要再判断noShowingChildren属性!item.alwaysShow:判断路由中是否存在alwaysShow属性,如果存在,则返回 false,不展示template菜单,也就说只要配置了alwaysShow属性就会直接进入el-submenu组件
- 在
el-submenu中以迭代的方式又定义了一个sidebar-item
(2)hasOneShowingChild 方法源码详解
参数:
children:router 对象的 children 属性
item:router 对象
hasOneShowingChild(children = [], parent) {
  const showingChildren = children.filter(item => {
    // 如果 children 中的路由包含 hidden 属性,则返回 false,舍弃这一项
    if (item.hidden) {
      return false
    } else {
      // 将子路由赋值给 onlyOneChild,用于只包含一个路由时展示
      this.onlyOneChild = item
      return true
    }
  })

  // 如果过滤后,只包含展示一个路由,则返回 true
  if (showingChildren.length === 1) {
    return true
  }

  // 如果没有子路由需要展示,则将 onlyOneChild 的 path 设置空路由,并添加 noShowingChildren 属性,表示虽然有子路由,但是不需要展示子路由,直接展示父组件
  if (showingChildren.length === 0) {
    this.onlyOneChild = { ...parent, path: '', noShowingChildren: true }
    return true
  }

  // 返回 false,表示不需要展示子路由,或者超过一个需要展示的子路由
  return false
}
如果展示 template 组件,首先会展示 app-link 组件,然后是 el-menu-item,最里面嵌套的是 item 组件:
item 组件需要路由 meta 中包含 title 和 icon 属性,否则将渲染内容为空的 vnode 对象
<app-link v-if="onlyOneChild.meta" :to="resolvePath(onlyOneChild.path)">
  <el-menu-item :index="resolvePath(onlyOneChild.path)" :class="{'submenu-title-noDropdown':!isNest}">
      <item :icon="onlyOneChild.meta.icon||(item.meta&&item.meta.icon)" :title="onlyOneChild.meta.title" />
  </el-menu-item>
</app-link>
如果 template 菜单不展示,则展示 el-submenu 菜单,el-submenu 逻辑中采用了嵌套组件的做法,将 sidebar-item 嵌套在 el-submenu 中:
<el-submenu v-else ref="subMenu" :index="resolvePath(item.path)" popper-append-to-body>
  <template slot="title">
    <item v-if="item.meta" :icon="item.meta && item.meta.icon" :title="item.meta.title" />
  </template>
  <sidebar-item
    v-for="child in item.children"
    :key="child.path"
    :is-nest="true"
    :item="child"
    :base-path="resolvePath(child.path)"
    class="nest-menu"
  />
</el-submenu>
el-submenu 中的 sidebar-item 有两点区别:
- 第一是传入
is-nest参数 - 第二是传入
base-path参数
测试:多级菜单加载
- 测试用路由:
export const asyncRoutes = [
  {
    path: '/book',	// 访问路径
    component: Layout,	// 内容所在容器,或父组件
    redirect: '/book/create',	// 重定向路径到子组件
    meta: { title: '图书管理', icon: 'documentation', roles: ['admin','editor'] },
    children: [	// 这里才是真正的内容
      {
        path: '/book/create',	// 访问路径
        component: () => import('@/views/book/create'),	// 引入组件
        // name: 'book',
        meta: { title: '添加图书', icon: 'edit', roles: ['admin'] },
        children: [	// 这里才是真正的内容
          {
            path: '/book/create/x',	// 访问路径
            component: () => import('@/views/book/create'),	// 引入组件
            // name: 'book',
            meta: { title: '添加图书', icon: 'edit', roles: ['admin'] }
          },
          {
            path: '/book/list/x',	// 访问路径
            component: () => import('@/views/book/create'),	// 引入组件
            // name: 'book',
            meta: { title: '图书列表', icon: 'edit', roles: ['editor'] }
          }
        ]
      },
      {
        path: '/book/list',	// 访问路径
        component: () => import('@/views/book/create'),	// 引入组件
        // name: 'book',
        meta: { title: '图书列表', icon: 'edit', roles: ['editor'] }
      }
    ]
  },
  // 404 page must be placed at the end !!!
  { path: '*', redirect: '/404', hidden: true }
]
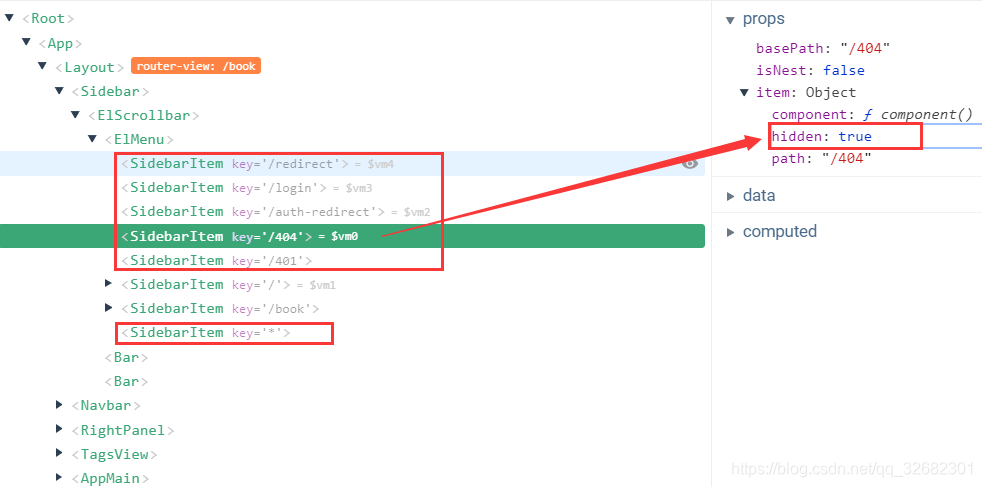
- 断点打在如下位置时
resolvePath(routePath)中的routePath内容:- 第1次:
routePath = "dashboard"时this.basePath = "/" - 第2次:
routePath = "dashboard"时this.basePath = "/" - 第3次:
routePath = "/book"时this.basePath = "/book" - 第4次:
routePath = "/book/create"时this.basePath = "/book" - 第5次:
routePath = "/book/list"时this.basePath = "/book" - 第6次:
routePath = "/book/create"时this.basePath = "/book/create" - 第7次:
routePath = "/book/create/x"时this.basePath = "/book/create" - 第8次:
routePath = "/book/list/x"时this.basePath = "/book/create" - 第9次:
routePath = ""时this.basePath = "/book/create/x" - 第10次:
routePath = ""时this.basePath = "/book/create/x" - 第11次:
routePath = ""时this.basePath = "/book/list/x" - 第12次:
routePath = ""时this.basePath = "/book/list/x" - 第13次:
routePath = ""时this.basePath = "/book/list" - 第14次:
routePath = ""时this.basePath = "/book/list" - 第15次:
routePath = "dashboard"时this.basePath = "/" - 第16次:
routePath = "dashboard"时this.basePath = "/"
这个过程也正验证了多级菜单的加载过程
- 第1次:
5.app-link 源码分析
app-link 是一个动态组件,通过解析 to 参数,如果包含 http 前缀则变成一个 a 标签,否则变成一个 router-link 组件
<template>
  <!-- eslint-disable vue/require-component-is -->
  <component v-bind="linkProps(to)">
    <slot />
  </component>
</template>

<script>
import { isExternal } from '@/utils/validate'

export default {
  props: {
    to: {
      type: String,
      required: true
    }
  },
  methods: {
    linkProps(url) {
      if (isExternal(url)) {
        return {
          is: 'a',
          href: url,
          target: '_blank',
          rel: 'noopener'
        }
      }
      return {
        is: 'router-link',
        to: url
      }
    }
  }
}
</script>
isExternal 函数通过一个正则表达式匹配 http 链接:
export function isExternal(path) {
  return /^(https?:|mailto:|tel:)/.test(path)
}
6.item 组件源码分析
item 组件通过定义 render 函数完成组件渲染
<script>
export default {
  name: 'MenuItem',
  functional: true,
  props: {
    icon: {
      type: String,
      default: ''
    },
    title: {
      type: String,
      default: ''
    }
  },
  render(h, context) {
    const { icon, title } = context.props
    const vnodes = []

    if (icon) {
      vnodes.push(<svg-icon icon-class={icon}/>)
    }

    if (title) {
      vnodes.push(<span slot='title'>{(title)}</span>)
    }
    return vnodes
  }
}
</script>
- 如果
item取不到meta中的icon会取父路由的icon
7.总结
sidebar:sidebar 主要包含 el-menu 容器组件,el-menu 中遍历 vuex 中的 routes,生成 sidebar-item 组件。sidebar 主要配置项如下:
activeMenu:根据当前路由的meta.activeMenu属性控制侧边栏中高亮菜单isCollapse:根据Cookie的sidebarStatus控制侧边栏是否折叠variables:通过@/styles/variables.scss填充el-menu的基本样式sidebar-item:sidebar-item分为两部分:
第一部分是当只需要展示一个children或者没有children时进行展示,展示的组件包括:app-link:动态组件,path为链接时,显示为a标签,path为路由时,显示为router-link组件el-menu-item:菜单项,当sidebar-item为非 nest 组件时,el-menu-item会增加submenu-title-noDropdown的class- item:
el-menu-item里的内容,主要是icon和title,当title为空时,整个菜单项将不会展示
第二部分是当children超过两项时进行展示,展示的组件包括: el-submenu:子菜单组件容器,用于嵌套子菜单组件sidebar-item:el-submenu迭代嵌套了 sidebar-item 组件,在 sidebar-item 组件中有两点变化:
设置is-nest属性为true
根据child.path生成了base-path属性传入sidebar-item组件
拓展:
(三)重定向
1.登录重定向
login.vue 中对 $route 进行监听:
watch: {
  $route: {
    handler: function(route) {
      const query = route.query
      if (query) {
        this.redirect = query.redirect
        this.otherQuery = this.getOtherQuery(query)
      }
    },
    immediate: true
  }
}
this.getOtherQuery(query) 的用途是获取除 redirect 外的其他查询条件,登录成功后:
handleLogin() {
  this.$refs.loginForm.validate(valid => {
    if (valid) {
      this.loading = true
      this.$store.dispatch('user/login', this.loginForm)
        .then(() => {
          // 优先跳转重定向的地址,否则回到根页面
          this.$router.push({path: this.redirect || '/', query: this.otherQuery})
          this.loading = false
        })
        .catch(() => {
          this.loading = false
        })
    } else {
      console.log('error submit!!')
      return false
    }
  })
}
完成重定向的代码为:
this.$router.push({ path: this.redirect || '/', query: this.otherQuery })
2.重定向组件
vue-element-admin 提供了专门的重定向组件,源码如下:
<script>
export default {
  created() {
    const { params, query } = this.$route
    const { path } = params
    this.$router.replace({ path: '/' + path, query })
  },
  render: function(h) {
    return h() // avoid warning message
  }
}
</script>
重定向组件配置了动态路由:
{
    path: '/redirect',
    component: Layout,
    hidden: true,
    children: [
      {
        path: '/redirect/:path*',
        component: () => import('@/views/redirect/index')
      }
    ]
}
这里有一个细节:path: '/redirect/:path*'表示匹配零个或多个路由,比如路由为 /redirect时,仍然能匹配到 redirect 组件。如果将路由改为:path: '/redirect/:path'
此时路由 /redirect 将只能匹配到 Layout 组件,而无法匹配到 redirect 组件
(四)面包屑导航
1.el-breadcrumb-item
el-breadcrumb:面包屑导航容器,separator控制面包屑导航文本中分割线el-breadcrumb-item:面包屑子项目,可以使用to属性切换路由,slot中可以包含a标签来跳转到外链
<el-breadcrumb separator="/">
  <el-breadcrumb-item :to="{ path: '/' }">首页</el-breadcrumb-item>
  <el-breadcrumb-item><a href="/">活动管理</a></el-breadcrumb-item>
  <el-breadcrumb-item>活动列表</el-breadcrumb-item>
  <el-breadcrumb-item>活动详情</el-breadcrumb-item>
</el-breadcrumb>
使用 to 属性和 a 标签切换路由区别是:to 属性切换路由是动态替换 App.vue 中的路由内容,而 a 标签切换路由会刷新页面。
我们通过 Network 中查看请求可以论证这一点,使用 to 属性不会发送网络请求。
2.路由与面包屑导航映射
面包屑导航最大的难度在于如何将路由与面包屑导航进行映射,下面我们一起看看 vue-element-admin 如何实现:
(1)生成面包屑导航
getBreadcrumb() {
  let matched = this.$route.matched.filter(item => item.meta && item.meta.title)
  const first = matched[0]

  if (!this.isDashboard(first)) {
    matched = [{ path: '/dashboard', meta: { title: 'Dashboard' }}].concat(matched)
  }

  this.levelList = matched.filter(item => item.meta && item.meta.title && item.meta.breadcrumb !== false)
}
面包屑导航实现的逻辑如下:
- 获取
this.$route.matched,并过滤其中不包含item.meta.title的项,生成新的面包屑导航数组matched - 判断
matched第一项是否为dashboard,如果不是,则添加dashboard为面包屑导航第一项 - 再次过滤
matched中item.meta.title为空的项和item.meta.breadcrumb为false的项 - 这里的关键是
this.$route.matched属性,它是一个数组,记录了路由的匹配过程,这就是面包屑导航实现的基础
isDashboard 实现如下:
isDashboard(route) {
  const name = route && route.name
  if (!name) {
    return false
  }
  return name.trim().toLocaleLowerCase() === 'Dashboard'.toLocaleLowerCase()
}
(2)渲染面包屑导航
面包屑导航模板源码:
<el-breadcrumb class="app-breadcrumb" separator="/">
    <transition-group name="breadcrumb">
      <el-breadcrumb-item v-for="(item,index) in levelList" :key="item.path">
        <span v-if="item.redirect==='noRedirect'||index==levelList.length-1" class="no-redirect">{{ item.meta.title }}</span>
        <a v-else @click.prevent="handleLink(item)">{{ item.meta.title }}</a>
      </el-breadcrumb-item>
    </transition-group>
</el-breadcrumb>
el-breadcrumb-item 内做了一个判断,如果是最后一个元素或者路由的 redirect 属性指定为 noRedirect则不会生成链接,否则将使用 a 标签生成链接,但是这里使用了 @click.prevent 阻止了默认 a 标签事件触发,而使用自定义的 handleLink 方法处理路由跳转,handleLink 方法源码如下:
handleLink(item) {
  const { redirect, path } = item
  if (redirect) {
    this.$router.push(redirect)
    return
  }
  this.$router.push(this.pathCompile(path))
}
这里的 pathCompile 用于解决动态路由的匹配问题
