睿智的目标检测27——Pytorch搭建Faster R-CNN目标检测平台
学习前言
好的pytorch版本也应该有个faster rcnn。

什么是FasterRCNN目标检测算法
Faster-RCNN是一个非常有效的目标检测算法,虽然是一个比较早的论文, 但它至今仍是许多目标检测算法的基础。
Faster-RCNN作为一种two-stage的算法,与one-stage的算法相比,two-stage的算法更加复杂且速度较慢,但是检测精度会更高。
事实上也确实是这样,Faster-RCNN的检测效果非常不错,但是检测速度与训练速度有待提高。
源码下载
https://github.com/bubbliiiing/faster-rcnn-pytorch
喜欢的可以点个star噢。
Faster-RCNN实现思路
一、预测部分
1、主干网络介绍
Faster-RCNN可以采用多种的主干特征提取网络,常用的有VGG,Resnet,Xception等等,本文以Resnet网络为例子来给大家演示一下。
Faster-Rcnn对输入进来的图片尺寸没有固定,但是一般会把输入进来的图片短边固定成600,如输入一张1200x1800的图片,会把图片不失真的resize到600x900上。
ResNet50有两个基本的块,分别名为Conv Block和Identity Block,其中Conv Block输入和输出的维度是不一样的,所以不能连续串联,它的作用是改变网络的维度;Identity Block输入维度和输出维度相同,可以串联,用于加深网络的。
Conv Block的结构如下:

Identity Block的结构如下:

这两个都是残差网络结构。
Faster-RCNN的主干特征提取网络部分只包含了长宽压缩了四次的内容,第五次压缩后的内容在ROI中使用。即Faster-RCNN在主干特征提取网络所用的网络层如图所示。
以输入的图片为600x600为例,shape变化如下:
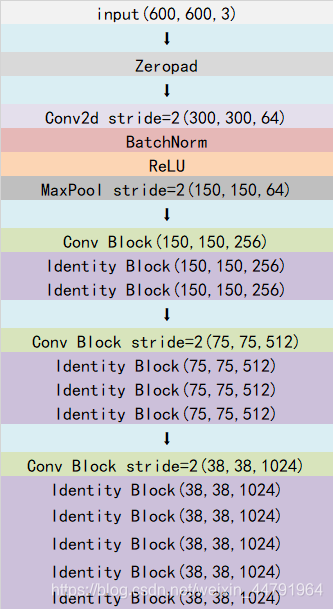
最后一层的输出就是公用特征层。
在代码里里面,我们使用resnet50()函数来获得resnet50的公用特征层。
其中features部分为公用特征层,classifier部分为第二阶段用到的分类器。
def resnet50():
    model = ResNet(Bottleneck, [3, 4, 6, 3])
    # 获取特征提取部分
    features = list([model.conv1, model.bn1, model.relu, model.maxpool, model.layer1, model.layer2, model.layer3])
    # 获取分类部分
    classifier = list([model.layer4, model.avgpool])
    features = nn.Sequential(*features)
    classifier = nn.Sequential(*classifier)
    return features,classifier
全部实现代码为:
from __future__ import absolute_import
from __future__ import division
from __future__ import print_function

import torch
import torch.nn as nn
import torch.nn.functional as F
from torch.autograd import Variable
import math
import torch.utils.model_zoo as model_zoo
import pdb


model_urls = {
'resnet18': 'https://s3.amazonaws.com/pytorch/models/resnet18-5c106cde.pth',
'resnet34': 'https://s3.amazonaws.com/pytorch/models/resnet34-333f7ec4.pth',
'resnet50': 'https://s3.amazonaws.com/pytorch/models/resnet50-19c8e357.pth',
'resnet101': 'https://s3.amazonaws.com/pytorch/models/resnet101-5d3b4d8f.pth',
'resnet152': 'https://s3.amazonaws.com/pytorch/models/resnet152-b121ed2d.pth',
}


class Bottleneck(nn.Module):
    expansion = 4

    def __init__(self, inplanes, planes, stride=1, downsample=None):
        super(Bottleneck, self).__init__()
        self.conv1 = nn.Conv2d(inplanes, planes, kernel_size=1, stride=stride, bias=False) # change
        self.bn1 = nn.BatchNorm2d(planes)
        self.conv2 = nn.Conv2d(planes, planes, kernel_size=3, stride=1, # change
                    padding=1, bias=False)
        self.bn2 = nn.BatchNorm2d(planes)
        self.conv3 = nn.Conv2d(planes, planes * 4, kernel_size=1, bias=False)
        self.bn3 = nn.BatchNorm2d(planes * 4)
        self.relu = nn.ReLU(inplace=True)
        self.downsample = downsample
        self.stride = stride

    def forward(self, x):
        residual = x

        out = self.conv1(x)
        out = self.bn1(out)
        out = self.relu(out)

        out = self.conv2(out)
        out = self.bn2(out)
        out = self.relu(out)

        out = self.conv3(out)
        out = self.bn3(out)

        if self.downsample is not None:
            residual = self.downsample(x)

        out += residual
        out = self.relu(out)

        return out


class ResNet(nn.Module):
    def __init__(self, block, layers, num_classes=1000):
        self.inplanes = 64
        super(ResNet, self).__init__()
        self.conv1 = nn.Conv2d(3, 64, kernel_size=7, stride=2, padding=3,
                    bias=False)
        self.bn1 = nn.BatchNorm2d(64)
        self.relu = nn.ReLU(inplace=True)
        self.maxpool = nn.MaxPool2d(kernel_size=3, stride=2, padding=0, ceil_mode=True) # change
        self.layer1 = self._make_layer(block, 64, layers[0])
        self.layer2 = self._make_layer(block, 128, layers[1], stride=2)
        self.layer3 = self._make_layer(block, 256, layers[2], stride=2)
        self.layer4 = self._make_layer(block, 512, layers[3], stride=2)

        self.avgpool = nn.AvgPool2d(7)
        self.fc = nn.Linear(512 * block.expansion, num_classes)

        for m in self.modules():
            if isinstance(m, nn.Conv2d):
                n = m.kernel_size[0] * m.kernel_size[1] * m.out_channels
                m.weight.data.normal_(0, math.sqrt(2. / n))
            elif isinstance(m, nn.BatchNorm2d):
                m.weight.data.fill_(1)
                m.bias.data.zero_()

    def _make_layer(self, block, planes, blocks, stride=1):
        downsample = None
        if stride != 1 or self.inplanes != planes * block.expansion:
            downsample = nn.Sequential(
                nn.Conv2d(self.inplanes, planes * block.expansion,
                    kernel_size=1, stride=stride, bias=False),
            nn.BatchNorm2d(planes * block.expansion),
        )

        layers = []
        layers.append(block(self.inplanes, planes, stride, downsample))
        self.inplanes = planes * block.expansion
        for i in range(1, blocks):
            layers.append(block(self.inplanes, planes))

        return nn.Sequential(*layers)

    def forward(self, x):
        x = self.conv1(x)
        x = self.bn1(x)
        x = self.relu(x)
        x = self.maxpool(x)

        x = self.layer1(x)
        x = self.layer2(x)
        x = self.layer3(x)
        x = self.layer4(x)

        x = self.avgpool(x)
        x = x.view(x.size(0), -1)
        x = self.fc(x)

        return x

def resnet50():
    model = ResNet(Bottleneck, [3, 4, 6, 3])
    # 获取特征提取部分
    features = list([model.conv1, model.bn1, model.relu, model.maxpool, model.layer1, model.layer2, model.layer3])
    # 获取分类部分
    classifier = list([model.layer4, model.avgpool])
    features = nn.Sequential(*features)
    classifier = nn.Sequential(*classifier)
    return features,classifier
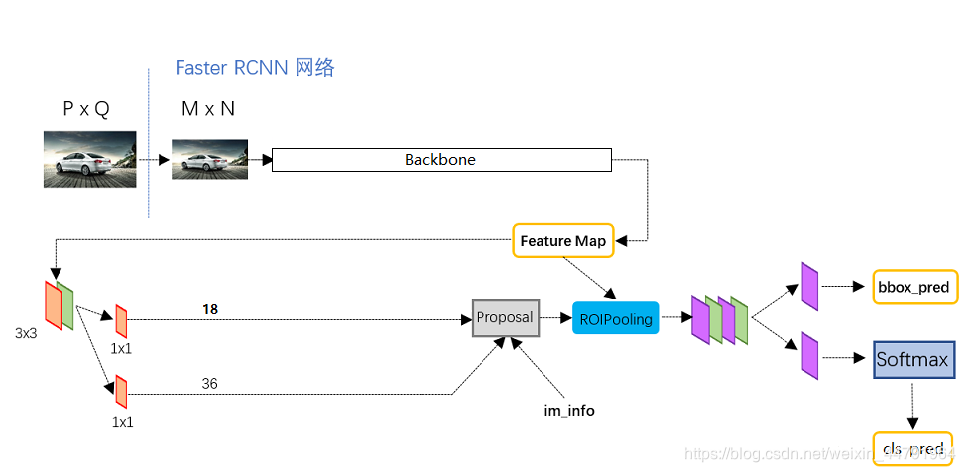
2、获得Proposal建议框
获得的公用特征层在图像中就是Feature Map,其有两个应用,一个是和ROIPooling结合使用、另一个是进行一次3x3的卷积后,进行一个18通道的1x1卷积,还有一个36通道的1x1卷积。
在Faster-RCNN中,num_priors也就是先验框的数量就是9,所以两个1x1卷积的结果实际上也就是:
9 x 4的卷积 用于预测 公用特征层上 每一个网格点上 每一个先验框的变化情况。(为什么说是变化情况呢,这是因为Faster-RCNN的预测结果需要结合先验框获得预测框,预测结果就是先验框的变化情况。)
9 x 2的卷积 用于预测 公用特征层上 每一个网格点上 每一个预测框内部是否包含了物体,序号为1的内容为包含物体的概率。
当我们输入的图片的shape是600x600x3的时候,公用特征层的shape就是38x38x1024,相当于把输入进来的图像分割成38x38的网格,然后每个网格存在9个先验框,这些先验框有不同的大小,在图像上密密麻麻。
9 x 4的卷积的结果会对这些先验框进行调整,获得一个新的框。
9 x 2的卷积会判断上述获得的新框是否包含物体。
到这里我们可以获得了一些有用的框,这些框会利用9 x 2的卷积判断是否存在物体。
到此位置还只是粗略的一个框的获取,也就是一个建议框。然后我们会在建议框里面继续找东西。
实现代码为:
class RegionProposalNetwork(nn.Module):
    def __init__(
            self, in_channels=512, mid_channels=512, ratios=[0.5, 1, 2],
            anchor_scales=[8, 16, 32], feat_stride=16,
            mode = "training",
    ):
        super(RegionProposalNetwork, self).__init__()
        self.anchor_base = generate_anchor_base(anchor_scales=anchor_scales, ratios=ratios)
        # 步长,压缩的倍数
        self.feat_stride = feat_stride
        self.proposal_layer = ProposalCreator(mode)
        # 每一个网格上默认先验框的数量
        n_anchor = self.anchor_base.shape[0]
        # 先进行一个3x3的卷积
        self.conv1 = nn.Conv2d(in_channels, mid_channels, 3, 1, 1)
        # 分类预测先验框内部是否包含物体
        self.score = nn.Conv2d(mid_channels, n_anchor * 2, 1, 1, 0)
        # 回归预测对先验框进行调整
        self.loc = nn.Conv2d(mid_channels, n_anchor * 4, 1, 1, 0)
        normal_init(self.conv1, 0, 0.01)
        normal_init(self.score, 0, 0.01)
        normal_init(self.loc, 0, 0.01)

    def forward(self, x, img_size, scale=1.):
        n, _, hh, ww = x.shape
        # 对共享特征层进行一个3x3的卷积
        h = F.relu(self.conv1(x))
        # 回归预测
        rpn_locs = self.loc(h)
        rpn_locs = rpn_locs.permute(0, 2, 3, 1).contiguous().view(n, -1, 4)
        # 分类预测
        rpn_scores = self.score(h)
        rpn_scores = rpn_scores.permute(0, 2, 3, 1).contiguous().view(n, -1, 2)
        # 进行softmax
        rpn_softmax_scores = F.softmax(rpn_scores, dim=-1)
        rpn_fg_scores = rpn_softmax_scores[:, :, 1].contiguous()
        rpn_fg_scores = rpn_fg_scores.view(n, -1)
        rpn_scores = rpn_scores.view(n, -1, 2)
3、Proposal建议框的解码
通过第二步我们获得了38x38x9个先验框的预测结果。预测结果包含两部分。
9 x 4的卷积 用于预测 公用特征层上 每一个网格点上 每一个先验框的变化情况。**
9 x 2的卷积 用于预测 公用特征层上 每一个网格点上 每一个预测框内部是否包含了物体。
相当于就是将整个图像分成38x38个网格;然后从每个网格中心建立9个先验框,一共38x38x9个,12996个先验框。
当输入图像shape不同时,先验框的数量也会发生改变。
先验框虽然可以代表一定的框的位置信息与框的大小信息,但是其是有限的,无法表示任意情况,因此还需要调整。
9 x 4中的9表示了这个网格点所包含的先验框数量,其中的4表示了框的中心与长宽的调整情况。
实现代码如下:
class ProposalCreator():
    def __init__(self,
                 mode,
                 nms_thresh=0.7,
                 n_train_pre_nms=3000,
                 n_train_post_nms=300,
                 n_test_pre_nms=3000,
                 n_test_post_nms=300,
                 min_size=16
                 ):
        self.mode = mode
        self.nms_thresh = nms_thresh
        self.n_train_pre_nms = n_train_pre_nms
        self.n_train_post_nms = n_train_post_nms
        self.n_test_pre_nms = n_test_pre_nms
        self.n_test_post_nms = n_test_post_nms
        self.min_size = min_size

    def __call__(self, loc, score,
                 anchor, img_size, scale=1.):
        if self.mode == "training":
            n_pre_nms = self.n_train_pre_nms
            n_post_nms = self.n_train_post_nms
        else:
            n_pre_nms = self.n_test_pre_nms
            n_post_nms = self.n_test_post_nms
        # 将RPN网络预测结果转化成建议框
        roi = loc2bbox(anchor, loc)

        # 利用slice进行分割,防止建议框超出图像边缘
        roi[:, slice(0, 4, 2)] = np.clip(roi[:, slice(0, 4, 2)], 0, img_size[1])
        roi[:, slice(1, 4, 2)] = np.clip(roi[:, slice(1, 4, 2)], 0, img_size[0])

        # 宽高的最小值不可以小于16
        min_size = self.min_size * scale
        # 计算高宽
        ws = roi[:, 2] - roi[:, 0]
        hs = roi[:, 3] - roi[:, 1]
        # 防止建议框过小
        keep = np.where((hs >= min_size) & (ws >= min_size))[0]
        roi = roi[keep, :]
        score = score[keep]
        # 取出成绩最好的一些建议框
        order = score.ravel().argsort()[::-1]
        if n_pre_nms > 0:
            order = order[:n_pre_nms]
        roi = roi[order, :]
        roi = nms(roi,self.nms_thresh)
        roi = torch.Tensor(roi)
        roi = roi[:n_post_nms]
        return roi

def loc2bbox(src_bbox, loc):
    if src_bbox.shape[0] == 0:
        return np.zeros((0, 4), dtype=loc.dtype)

    src_bbox = src_bbox.astype(src_bbox.dtype, copy=False)
    src_width = src_bbox[:, 2] - src_bbox[:, 0]
    src_height = src_bbox[:, 3] - src_bbox[:, 1]
    src_ctr_x = src_bbox[:, 0] + 0.5 * src_width
    src_ctr_y = src_bbox[:, 1] + 0.5 * src_height

    dx = loc[:, 0::4]
    dy = loc[:, 1::4]
    dw = loc[:, 2::4]
    dh = loc[:, 3::4]

    ctr_x = dx * src_width[:, np.newaxis] + src_ctr_x[:, np.newaxis]
    ctr_y = dy * src_height[:, np.newaxis] + src_ctr_y[:, np.newaxis]
    w = np.exp(dw) * src_width[:, np.newaxis]
    h = np.exp(dh) * src_height[:, np.newaxis]

    dst_bbox = np.zeros(loc.shape, dtype=loc.dtype)
    dst_bbox[:, 0::4] = ctr_x - 0.5 * w
    dst_bbox[:, 1::4] = ctr_y - 0.5 * h
    dst_bbox[:, 2::4] = ctr_x + 0.5 * w
    dst_bbox[:, 3::4] = ctr_y + 0.5 * h

    return dst_bbox
4、对Proposal建议框加以利用(RoiPoolingConv)
让我们对建议框有一个整体的理解:
事实上建议框就是对图片哪一个区域有物体存在进行初步筛选。
通过主干特征提取网络,我们可以获得一个公用特征层,当输入图片为600x600x3的时候,它的shape是38x38x1024,然后建议框会对这个公用特征层进行截取。
其实公用特征层里面的38x38对应着图片里的38x38个区域,38x38中的每一个点相当于这个区域内部所有特征的浓缩。
建议框会对这38x38个区域进行截取,也就是认为这些区域里存在目标,然后将截取的结果进行resize,resize到14x14x1024的大小。
然后再对每个建议框再进行Resnet原有的第五次压缩。压缩完后进行一个平均池化,再进行一个Flatten,最后分别进行一个num_classes的全连接和(num_classes)x4全连接。
num_classes的全连接用于对最后获得的框进行分类,(num_classes)x4全连接用于对相应的建议框进行调整。
通过这些操作,我们可以获得所有建议框的调整情况,和这个建议框调整后框内物体的类别。
事实上,在上一步获得的建议框就是ROI的先验框。
对Proposal建议框加以利用的过程与shape变化如图所示:

建议框调整后的结果就是最终的预测结果了,可以在图上进行绘画了。
class Resnet50RoIHead(nn.Module):
    def __init__(self, n_class, roi_size, spatial_scale,
                 classifier):
        # n_class includes the background
        super(Resnet50RoIHead, self).__init__()
        # 获得用于分类的层
        self.classifier = classifier
        self.cls_loc = nn.Linear(2048, n_class * 4)
        self.score = nn.Linear(2048, n_class)

        normal_init(self.cls_loc, 0, 0.001)
        normal_init(self.score, 0, 0.01)
        # 分多少个类,包括背景
        self.n_class = n_class
        # 以VGG为backbone时,roi_size为7
        self.roi_size = roi_size
        self.spatial_scale = spatial_scale
        self.roi = RoIPooling2D(self.roi_size, self.roi_size, self.spatial_scale)

    def forward(self, x, rois, roi_indices):
        roi_indices = torch.Tensor(roi_indices).cuda().float()
        rois = torch.Tensor(rois).cuda().float()
        indices_and_rois = torch.cat([roi_indices[:, None], rois], dim=1)

        xy_indices_and_rois = indices_and_rois[:, [0, 1, 2, 3, 4]]
        indices_and_rois =  xy_indices_and_rois.contiguous()
        # 利用建议框对公用特征层进行截取
        pool = self.roi(x, indices_and_rois)
        fc7 = self.classifier(pool)
        fc7 = fc7.view(fc7.size(0), -1)
        roi_cls_locs = self.cls_loc(fc7)
        roi_scores = self.score(fc7)
        return roi_cls_locs, roi_scores
5、在原图上进行绘制
在第四步的结尾,我们对建议框进行再一次进行解码后,我们可以获得预测框在原图上的位置,而且这些预测框都是经过筛选的。这些筛选后的框可以直接绘制在图片上,就可以获得结果了。
6、整体的执行流程

几个小tip:
1、共包含了两次解码过程。
2、先进行粗略的筛选再细调。
3、第一次获得的建议框解码后的结果是对共享特征层featuremap进行截取。
二、训练部分
Faster-RCNN的训练过程和它的预测过程一样,分为两部分,首先要训练获得建议框网络,然后再训练后面利用ROI获得预测结果的网络。
1、建议框网络的训练
公用特征层如果要获得建议框的预测结果,需要再进行一次3x3的卷积后,进行一个2通道的1x1卷积,还有一个36通道的1x1卷积。
在Faster-RCNN中,num_priors也就是先验框的数量就是9,所以两个1x1卷积的结果实际上也就是:
9 x 4的卷积 用于预测 公用特征层上 每一个网格点上 每一个先验框的变化情况。(为什么说是变化情况呢,这是因为Faster-RCNN的预测结果需要结合先验框获得预测框,预测结果就是先验框的变化情况。)
9 x 2的卷积 用于预测 公用特征层上 每一个网格点上 每一个预测框内部是否包含了物体。
也就是说,我们直接利用Faster-RCNN建议框网络预测到的结果,并不是建议框在图片上的真实位置,需要解码才能得到真实位置。
而在训练的时候,我们需要计算loss函数,这个loss函数是相对于Faster-RCNN建议框网络的预测结果的。我们需要把图片输入到当前的Faster-RCNN建议框的网络中,得到建议框的结果;同时还需要进行编码,这个编码是把真实框的位置信息格式转化为Faster-RCNN建议框预测结果的格式信息。
也就是,我们需要找到 每一张用于训练的图片的每一个真实框对应的先验框,并求出如果想要得到这样一个真实框,我们的建议框预测结果应该是怎么样的。
从建议框预测结果获得真实框的过程被称作解码,而从真实框获得建议框预测结果的过程就是编码的过程。
因此我们只需要将解码过程逆过来就是编码过程了。
实现代码如下:
class AnchorTargetCreator(object):
    def __init__(self,
                 n_sample=256,
                 pos_iou_thresh=0.7, neg_iou_thresh=0.3,
                 pos_ratio=0.5):
        self.n_sample = n_sample
        self.pos_iou_thresh = pos_iou_thresh
        self.neg_iou_thresh = neg_iou_thresh
        self.pos_ratio = pos_ratio

    def __call__(self, bbox, anchor, img_size):
        argmax_ious, label = self._create_label(anchor, bbox)
        # 利用先验框和其对应的真实框进行编码
        loc = bbox2loc(anchor, bbox[argmax_ious])

        return loc, label

    def _create_label(self, anchor, bbox):
        # 1是正样本,0是负样本,-1忽略
        label = np.empty((len(anchor),), dtype=np.int32)
        label.fill(-1)

        # argmax_ious为每个先验框对应的最大的真实框的序号
        # max_ious为每个真实框对应的最大的真实框的iou
        # gt_argmax_ious为每一个真实框对应的最大的先验框的序号
        argmax_ious, max_ious, gt_argmax_ious = \
            self._calc_ious(anchor, bbox)

        # 如果小于门限函数则设置为负样本
        label[max_ious < self.neg_iou_thresh] = 0

        # 每个真实框至少对应一个先验框
        label[gt_argmax_ious] = 1

        # 如果大于门限函数则设置为正样本
        label[max_ious >= self.pos_iou_thresh] = 1

        # 判断正样本数量是否大于128,如果大于的话则去掉一些
        n_pos = int(self.pos_ratio * self.n_sample)
        pos_index = np.where(label == 1)[0]
        if len(pos_index) > n_pos:
            disable_index = np.random.choice(
                pos_index, size=(len(pos_index) - n_pos), replace=False)
            label[disable_index] = -1

        # 平衡正负样本,保持总数量为256
        n_neg = self.n_sample - np.sum(label == 1)
        neg_index = np.where(label == 0)[0]
        if len(neg_index) > n_neg:
            disable_index = np.random.choice(
                neg_index, size=(len(neg_index) - n_neg), replace=False)
            label[disable_index] = -1

        return argmax_ious, label

    def _calc_ious(self, anchor, bbox):
        # 计算所有
        ious = bbox_iou(anchor, bbox)
        # 行是先验框,列是真实框
        argmax_ious = ious.argmax(axis=1)
        # 找出每一个先验框对应真实框最大的iou
        max_ious = ious[np.arange(len(anchor)), argmax_ious]
        # 行是先验框,列是真实框
        gt_argmax_ious = ious.argmax(axis=0)
        # 找到每一个真实框对应的先验框最大的iou
        gt_max_ious = ious[gt_argmax_ious, np.arange(ious.shape[1])]
        # 每一个真实框对应的最大的先验框的序号
        gt_argmax_ious = np.where(ious == gt_max_ious)[0]

        return argmax_ious, max_ious, gt_argmax_ious

def bbox2loc(src_bbox, dst_bbox):
    width = src_bbox[:, 2] - src_bbox[:, 0]
    height = src_bbox[:, 3] - src_bbox[:, 1]
    ctr_x = src_bbox[:, 0] + 0.5 * width
    ctr_y = src_bbox[:, 1] + 0.5 * height

    base_width = dst_bbox[:, 2] - dst_bbox[:, 0]
    base_height = dst_bbox[:, 3] - dst_bbox[:, 1]
    base_ctr_x = dst_bbox[:, 0] + 0.5 * base_width
    base_ctr_y = dst_bbox[:, 1] + 0.5 * base_height

    eps = np.finfo(height.dtype).eps
    width = np.maximum(width, eps)
    height = np.maximum(height, eps)

    dx = (base_ctr_x - ctr_x) / width
    dy = (base_ctr_y - ctr_y) / height
    dw = np.log(base_width / width)
    dh = np.log(base_height / height)

    loc = np.vstack((dx, dy, dw, dh)).transpose()
    return loc
focal会忽略一些重合度相对较高但是不是非常高的先验框,一般将重合度在0.3-0.7之间的先验框进行忽略。
2、Roi网络的训练
通过上一步已经可以对建议框网络进行训练了,建议框网络会提供一些位置的建议,在ROI网络部分,其会将建议框根据进行一定的截取,并获得对应的预测结果,事实上就是将上一步建议框当作了ROI网络的先验框。
因此,我们需要计算所有建议框和真实框的重合程度,并进行筛选,如果某个真实框和建议框的重合程度大于0.5则认为该建议框为正样本,如果重合程度小于0.5则认为该建议框为负样本
因此我们可以对真实框进行编码,这个编码是相对于建议框的,也就是,当我们存在这些建议框的时候,我们的ROI预测网络需要有什么样的预测结果才能将这些建议框调整成真实框。
每次训练我们都放入128个建议框进行训练,同时要注意正负样本的平衡。
实现代码如下:
# 编码
class ProposalTargetCreator(object):
    def __init__(self,n_sample=128,
                 pos_ratio=0.5, pos_iou_thresh=0.5,
                 neg_iou_thresh_hi=0.5, neg_iou_thresh_lo=0.0
                 ):
        self.n_sample = n_sample
        self.pos_ratio = pos_ratio
        self.pos_iou_thresh = pos_iou_thresh
        self.neg_iou_thresh_hi = neg_iou_thresh_hi
        self.neg_iou_thresh_lo = neg_iou_thresh_lo  # NOTE:default 0.1 in py-faster-rcnn

    def __call__(self, roi, bbox, label,
                 loc_normalize_mean=(0., 0., 0., 0.),
                 loc_normalize_std=(0.1, 0.1, 0.2, 0.2)):
        n_bbox, _ = bbox.shape

        # 计算正样本
        roi = np.concatenate((roi, bbox), axis=0)
        pos_roi_per_image = np.round(self.n_sample * self.pos_ratio)
        iou = bbox_iou(roi, bbox)
        gt_assignment = iou.argmax(axis=1)
        max_iou = iou.max(axis=1)
        # 真实框的标签要+1因为有背景的存在
        gt_roi_label = label[gt_assignment] + 1

        # 找到大于门限的真实框的索引
        pos_index = np.where(max_iou >= self.pos_iou_thresh)[0]
        pos_roi_per_this_image = int(min(pos_roi_per_image, pos_index.size))
        if pos_index.size > 0:
            pos_index = np.random.choice(
                pos_index, size=pos_roi_per_this_image, replace=False)

        # 正负样本的平衡,满足建议框和真实框重合程度小于neg_iou_thresh_hi大于neg_iou_thresh_lo作为负样本
        neg_index = np.where((max_iou < self.neg_iou_thresh_hi) &
                             (max_iou >= self.neg_iou_thresh_lo))[0]
        if neg_index.size > 0:
            try:
                neg_index = np.random.choice(
                    neg_index, size=self.n_sample - pos_roi_per_this_image, replace=False)
            except:
                neg_index = np.random.choice(
                    neg_index, size=self.n_sample - pos_roi_per_this_image, replace=True)

        # 取出这些框对应的标签
        keep_index = np.append(pos_index, neg_index)
        gt_roi_label = gt_roi_label[keep_index]
        gt_roi_label[pos_roi_per_this_image:] = 0
        sample_roi = roi[keep_index]

        # 找到
        gt_roi_loc = bbox2loc(sample_roi, bbox[gt_assignment[keep_index]])
        gt_roi_loc = ((gt_roi_loc - np.array(loc_normalize_mean, np.float32)
                       ) / np.array(loc_normalize_std, np.float32))

        return sample_roi, gt_roi_loc, gt_roi_label

def bbox2loc(src_bbox, dst_bbox):
    width = src_bbox[:, 2] - src_bbox[:, 0]
    height = src_bbox[:, 3] - src_bbox[:, 1]
    ctr_x = src_bbox[:, 0] + 0.5 * width
    ctr_y = src_bbox[:, 1] + 0.5 * height

    base_width = dst_bbox[:, 2] - dst_bbox[:, 0]
    base_height = dst_bbox[:, 3] - dst_bbox[:, 1]
    base_ctr_x = dst_bbox[:, 0] + 0.5 * base_width
    base_ctr_y = dst_bbox[:, 1] + 0.5 * base_height

    eps = np.finfo(height.dtype).eps
    width = np.maximum(width, eps)
    height = np.maximum(height, eps)

    dx = (base_ctr_x - ctr_x) / width
    dy = (base_ctr_y - ctr_y) / height
    dw = np.log(base_width / width)
    dh = np.log(base_height / height)

    loc = np.vstack((dx, dy, dw, dh)).transpose()
    return loc
训练自己的Faster-RCNN模型
Faster-RCNN整体的文件夹构架如下:

本文使用VOC格式进行训练。
训练前将标签文件放在VOCdevkit文件夹下的VOC2007文件夹下的Annotation中。
训练前将图片文件放在VOCdevkit文件夹下的VOC2007文件夹下的JPEGImages中。

在训练前利用voc2faster-rcnn.py文件生成对应的txt。

再运行根目录下的voc_annotation.py,运行前需要将classes改成你自己的classes。
classes = ["aeroplane", "bicycle", "bird", "boat", "bottle", "bus", "car", "cat", "chair", "cow", "diningtable", "dog", "horse", "motorbike", "person", "pottedplant", "sheep", "sofa", "train", "tvmonitor"]

就会生成对应的2007_train.txt,每一行对应其图片位置及其真实框的位置。

在训练前需要修改model_data里面的voc_classes.txt文件,需要将classes改成你自己的classes。

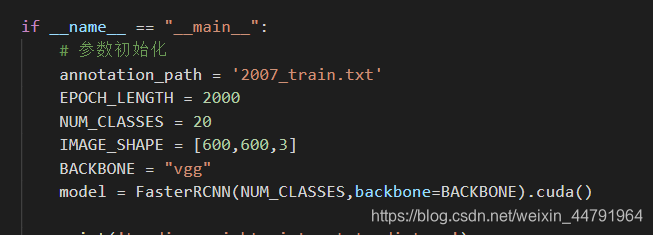
也需要将train.py文件下的NUM_CLASSES修改成需要分的类的个数。
运行train.py即可开始训练。

