步骤:
1.打开windows商店,搜索ubuntu,安装18.04版本。
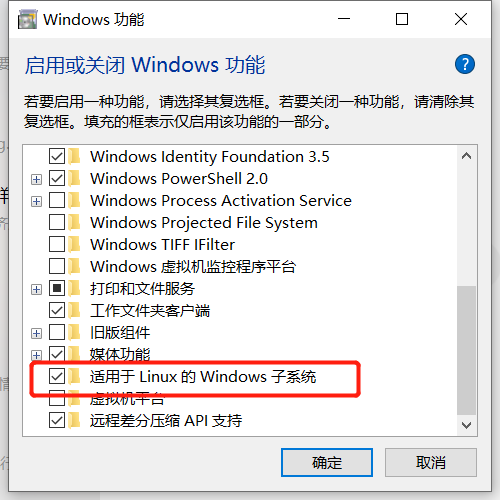
2.控制面板 /程序和功能 /打开或关闭windows功能
3.关机重启
4.打开刚安装得ubuntu,设置用户名和密码。
5.更换为清华源,以提高安装软件得数据。https://mirror.tuna.tsinghua.edu.cn/help/ubuntu/
Ubuntu 的软件源配置文件是 /etc/apt/sources.list。将系统自带的该文件做个备份,将该文件替换为下面内容,即可使用 TUNA 的软件源镜像。
# 默认注释了源码镜像以提高 apt update 速度,如有需要可自行取消注释
deb https://mirrors.tuna.tsinghua.edu.cn/ubuntu/ bionic main restricted universe multiverse
# deb-src https://mirrors.tuna.tsinghua.edu.cn/ubuntu/ bionic main restricted universe multiverse
deb https://mirrors.tuna.tsinghua.edu.cn/ubuntu/ bionic-updates main restricted universe multiverse
# deb-src https://mirrors.tuna.tsinghua.edu.cn/ubuntu/ bionic-updates main restricted universe multiverse
deb https://mirrors.tuna.tsinghua.edu.cn/ubuntu/ bionic-backports main restricted universe multiverse
# deb-src https://mirrors.tuna.tsinghua.edu.cn/ubuntu/ bionic-backports main restricted universe multiverse
deb https://mirrors.tuna.tsinghua.edu.cn/ubuntu/ bionic-security main restricted universe multiverse
# deb-src https://mirrors.tuna.tsinghua.edu.cn/ubuntu/ bionic-security main restricted universe multiverse

# 预发布软件源,不建议启用
# deb https://mirrors.tuna.tsinghua.edu.cn/ubuntu/ bionic-proposed main restricted universe multiverse
# deb-src https://mirrors.tuna.tsinghua.edu.cn/ubuntu/ bionic-proposed main restricted universe multiverse
-
sudo apt-get update 更新源 -
sudo apt-get upgrade 更新软件
6.新建esp目录
cd ~
mkdir esp
7.将下载好的esp-idf复制到linux,windows得盘符在目录 /mnt/c d ...等
blue@%#*¥&#%¥&6$:~/esp/esp-idf$ cp /mnt/d/esp32/esp-idf-v4.0.zip .
8.安装unzip解压软件并解压,更名
sudo apt install unzip
unzip esp-idf-v4.0.zip
mv esp-idf-v4.0 esp-idf
9.安装所需得软件包
sudo apt-get install git wget flex bison gperf python python-pip python-setuptools python-serial python-click python-cryptography python-future python-pyparsing python-pyelftools cmake ninja-build ccache libffi-dev libssl-dev
10.继续安装
sudo apt-get install gawk gperf grep gettext libncurses-dev python python-dev automake bison flex texinfo help2man libtool make
11.安装解压好的esp-idf
cd ~/esp/esp-idf
sh install.sh
12.设置环境变量
刚才安装的xtensa-esp32-elf在目录 ~/.espressif/tools/xtensa-esp32-elf/esp-2019r2-8.2.0/xtensa-esp32-elf
在 ~/.barchrc中,将工具和esp-idf添加到PATH中
cd ~
vi .barhrc
在最后添加:
export PATH="$HOME/.espressif/tools/xtensa-esp32-elf/esp-2019r2-8.2.0/xtensa-esp32-elf/bin:$PATH"
export IDF_PATH="$HOME/esp/esp-idf"
:wq 保存退出
exit 推出终端,并重新打开,让PATH生效。
13.拷贝hello_world测试
cd ~/esp
cp -r esp-idf/examples/get-started/hello_world/ .
make
14.推荐一个比较好用的 终端Windows Terminal,可在商店获取,输入bash即可启动 linux,如下:
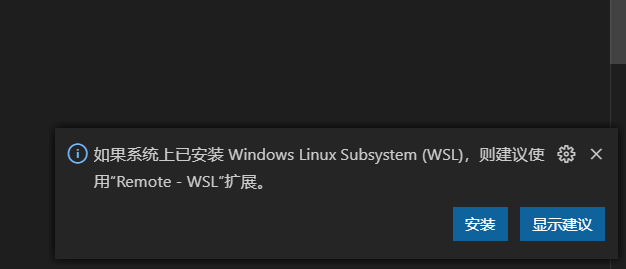
15.配合 vscode使用,可安装WSL插件,可通过该插件通过linux编译本地项目,vscode的默认终端改为wsl.exe。
"terminal.integrated.shell.windows": "C:\\Windows\\System32\\wsl.exe",