笔者的树莓派2B+买来放在家里吃灰很多年了,突然想到用来开发ESP32也许不错。经过摸索,主要有如下步骤:
1.工具链生成;
2.SDK环境搭建;
3.树莓派串口设置。
一、工具链生成
乐鑫官方没有提供针对树莓派的工具链,因此需要自己编译生成。树莓派的官方系统raspbian为debian系统的深度定制版,为linux系统的一个版本,乐鑫官网的帮助文档https://esp-idf.readthedocs.io/en/latest/get-started/linux-setup.html有完整详细的介绍。步骤如下:
sudo apt-get update
sudo apt-get upgrade
sudo apt-get install gawk gperf grep gettext automake bison flex texinfo help2man libtool libtool-bin git wget make libncurses-dev python python-serial python-dev python-pip
sudo pip install pyserial
cd ~/esp
git clone -b xtensa-1.22.x https://github.com/espressif/crosstool-NG.git
cd crosstool-NG
./bootstrap && ./configure --enable-local && make install
./ct-ng xtensa-esp32-elf
./ct-ng build
chmod -R u+w builds/xtensa-esp32-elf
这里需要注意的是:树莓派需要运行在桌面系统下,不然可能会编译出错。且编译时间较长,笔者将树莓派超频到1GHz,显存减小到16MB,编译的时间将近5小时。编译完成后会在bulids文件下生成xtensa-esp32-elf文件夹,这就是我们需要的工具链。接下来是将工具链添加到系统路径中:
cp -r ./buils/xtensa-esp32-elf ~/esp/
nano ~/.profile
在.profile中添加:export PATH="$PATH:$HOME/esp/xtensa-esp32-elf/bin"
二、SDK环境搭建
乐鑫官网也有详细的帮助文档,主要是下载SDK并设置路径,步骤如下:
cd ~/esp
git clone --recursive https://github.com/espressif/esp-idf.git
cd ~/esp/esp-idf
git submodule update --init
nano ~/.profile
在.profile中添加:export IDF_PATH=~/esp/esp-idf
三、树莓派串口设置
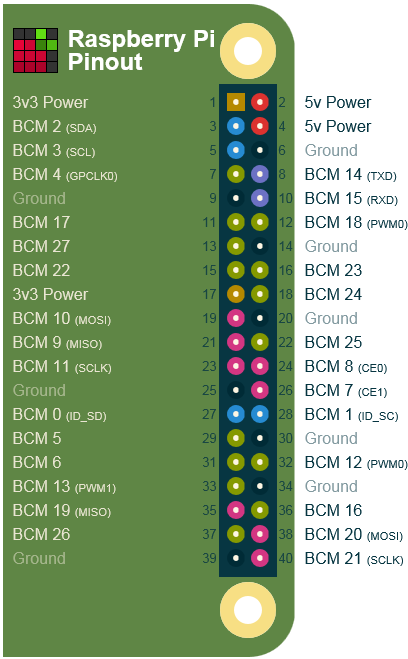
树莓派的40PIN接口中有一个串口,如下图,详细信息参见https://pinout.xyz/#。可利用该串口进行ESP32的程序下载和调试。raspbian默认使用该串口来打印系统信息,要使用该串口需要禁止打印系统信息,该串口在raspbian中为/dev/ttyAMA0,可以使用raspi-config进行设置,设置选项在Interfacing Options中。
可使用minicom串口工具来调试ESP32。安装minicom命令如下:
sudo apt-get install minicom
通过sudo minicom -s命令来设置串口,并可将设置保存到df1中。保存后,以后就可以直接运行minicom来打开串口了。