Docker—私有仓库的搭建,数据卷(容器),端口映射
一.搭建私有仓库
私有仓库设置步骤:
1:下载registry镜像
2:生成registry容器,开放5000端口
3:客户端设置daemon.json文件 指定私有仓库位置
4: 镜像打标签 docker tag 原镜像名 仓库IP:端口/镜像名
5:上传镜像 docker push 仓库IP:端口/镜像名
6:下载镜像 docker pull—》 docker images 查看
1.下载registry镜像
[root@localhost ~]# docker pull registry
Using default tag: latest
latest: Pulling from library/registry
486039affc0a: Pull complete
ba51a3b098e6: Pull complete
8bb4c43d6c8e: Pull complete
6f5f453e5f2d: Pull complete
42bc10b72f42: Pull complete
Digest: sha256:7d081088e4bfd632a88e3f3bcd9e007ef44a796fddfe3261407a3f9f04abe1e7
Status: Downloaded newer image for registry:latest
docker.io/library/registry:latest
2.提供上传路径,允许http协议
[root@localhost ~]# vim /etc/docker/daemon.json

{
"insecure-registries": ["192.168.88.131:5000"],
"registry-mirrors": ["https://gklcnot2.mirror.aliyuncs.com"]
}
3.重启docker服务
[root@localhost ~]# systemctl stop docker
[root@localhost ~]# systemctl start docker
4.加载镜像为容器
[root@localhost ~]# docker create -it registry /bin/bash
4084c5eb5e417f42680460ee7633692abc166bfd2ae3768bebb7a8756c9134d3
[root@localhost ~]# docker ps -a
CONTAINER ID        IMAGE               COMMAND                  CREATED             STATUS              PORTS               NAMES
4084c5eb5e41        registry            "/entrypoint.sh /bin…"   7 seconds ago       Created                                 xenodochial_bohr
5.开启容器
[root@localhost ~]# docker start 4084c5eb5e41
4084c5eb5e41
6.把宿主机registry的路径挂载到容器中
[root@localhost ~]# docker run -d -p 5000:5000 -v /data/registry:/tmp/registry registry
bf5037638c7241f15b33955224ed5147a81cdc9785b2831902260564f4a4fb42
7.修改标签
[root@localhost ~]# docker tag nginx:latest 192.168.88.131:5000/nginx
[root@localhost ~]# docker images
REPOSITORY                  TAG                 IMAGE ID            CREATED             SIZE
192.168.88.131:5000/nginx   latest              e791337790a6        4 days ago          127MB
nginx                       latest              e791337790a6        4 days ago          127MB
registry                    latest              708bc6af7e5e        2 months ago        25.8MB
8.上传
[root@localhost ~]# docker push 192.168.88.131:5000/nginx
The push refers to repository [192.168.88.131:5000/nginx]
be91fceb796e: Pushed
919b6770519b: Pushed
b60e5c3bcef2: Pushed
latest: digest: sha256:6b3b6c113f98e901a8b1473dee4c268cf37e93d72bc0a01e57c65b4ab99e58ee size: 948
9.验证镜像是否上传成功
[root@localhost ~]# curl -XGET http://192.168.88.131:5000/v2/_catalog
{"repositories":["nginx"]}
10.测试私有仓库下载
先删除镜像:
[root@localhost ~]# docker rmi 192.168.88.131:5000/nginx:latest
Untagged: 192.168.88.131:5000/nginx:latest
Untagged: 192.168.88.131:5000/nginx@sha256:6b3b6c113f98e901a8b1473dee4c268cf37e93d72bc0a01e57c65b4ab99e58ee
[root@localhost ~]# docker rmi nginx:latest
Untagged: nginx:latest
Untagged: nginx@sha256:d81f010955749350ef31a119fb94b180fde8b2f157da351ff5667ae037968b28
Deleted: sha256:e791337790a6181d5ce870b3bb16de1a4d5aa3a916e8fba6907f57eb409934cf
Deleted: sha256:615a169a3412634ebf75d5f0f5162290fb6042ba36285bd0ddc9ee123165b95e
Deleted: sha256:bd32d67adcec3dba661c5afebc8a2a5413e68a3283b5ad7df134ed86f00b380a
Deleted: sha256:b60e5c3bcef2f42ec42648b3acf7baf6de1fa780ca16d9180f3b4a3f266fe7bc
[root@localhost ~]# docker images
REPOSITORY          TAG                 IMAGE ID            CREATED             SIZE
registry            latest              708bc6af7e5e        2 months ago        25.8MB
再去私有仓库下载:
[root@localhost ~]# docker pull 192.168.88.131:5000/nginx
Using default tag: latest
latest: Pulling from nginx
123275d6e508: Pull complete
6cd6a943ce27: Pull complete
a50b5ac4a7fb: Pull complete
Digest: sha256:6b3b6c113f98e901a8b1473dee4c268cf37e93d72bc0a01e57c65b4ab99e58ee
Status: Downloaded newer image for 192.168.88.131:5000/nginx:latest
192.168.88.131:5000/nginx:latest
[root@localhost ~]# docker images
REPOSITORY                  TAG                 IMAGE ID            CREATED             SIZE
192.168.88.131:5000/nginx   latest              e791337790a6        4 days ago          127MB
registry                    latest              708bc6af7e5e        2 months ago        25.8MB
二.数据卷
1.下载centos镜像
[root@localhost ~]# docker pull centos
Using default tag: latest
latest: Pulling from library/centos
8a29a15cefae: Pull complete
Digest: sha256:fe8d824220415eed5477b63addf40fb06c3b049404242b31982106ac204f6700
Status: Downloaded newer image for centos:latest
docker.io/library/centos:latest
2.宿主机目录/var/www挂载容器中的/data1
[root@localhost ~]# docker run -v /var/www:/data1 --name web1 -it centos /bin/bash
[root@73e4895d557c /]#
3.在data1中写一个文件
[root@73e4895d557c /]# ls
bin    dev  home  lib64       media  opt   root  sbin  sys  usr
data1  etc  lib   lost+found  mnt    proc  run	 srv   tmp  var
[root@73e4895d557c /]# cd data1
[root@73e4895d557c data1]# ls
[root@73e4895d557c data1]# touch test01.txt
[root@73e4895d557c data1]# echo "123" > test01.txt
[root@73e4895d557c data1]# cat test01.txt
123
4.退出容器,查看宿主机是否有这个文件
[root@73e4895d557c data1]# exit
exit
[root@localhost ~]# ls /var/www
test01.txt
[root@localhost ~]# cat /var/www/test01.txt
123
三.数据卷容器
1.创建数据卷容器
[root@localhost ~]# docker run --name web100 -v /data1 -v /data2 -it centos /bin/bash
[root@601f0837ed8d /]# ls
bin    data2  etc   lib    lost+found  mnt  proc  run	srv  tmp  var
data1  dev    home  lib64  media       opt  root  sbin	sys  usr
2.在data1和data2中创建文件
[root@601f0837ed8d /]# cd data1/
[root@601f0837ed8d data1]# echo "111" > 111.txt
[root@601f0837ed8d data1]# cd ..
[root@601f0837ed8d /]# cd data2/
[root@601f0837ed8d data2]# echo "222" > 222.txt
[root@601f0837ed8d data2]# cd ..
[root@601f0837ed8d /]# exit
exit
[root@localhost ~]#
3.创建新容器挂载数据卷容器web100
[root@localhost ~]# docker run -it --volumes-from web100 -it centos /bin/bash
[root@238f1e68823e /]#
4.查看关联的文件
[root@238f1e68823e /]# cd data1/
[root@238f1e68823e data1]# ls
111.txt
[root@238f1e68823e data1]# cat 111.txt
111
[root@238f1e68823e data1]# cd ..
[root@238f1e68823e /]# cd data2/
[root@238f1e68823e data2]# ls
222.txt
[root@238f1e68823e data2]# cat 222.txt
222
四.端口映射
-p 指定端口,-P随机端口
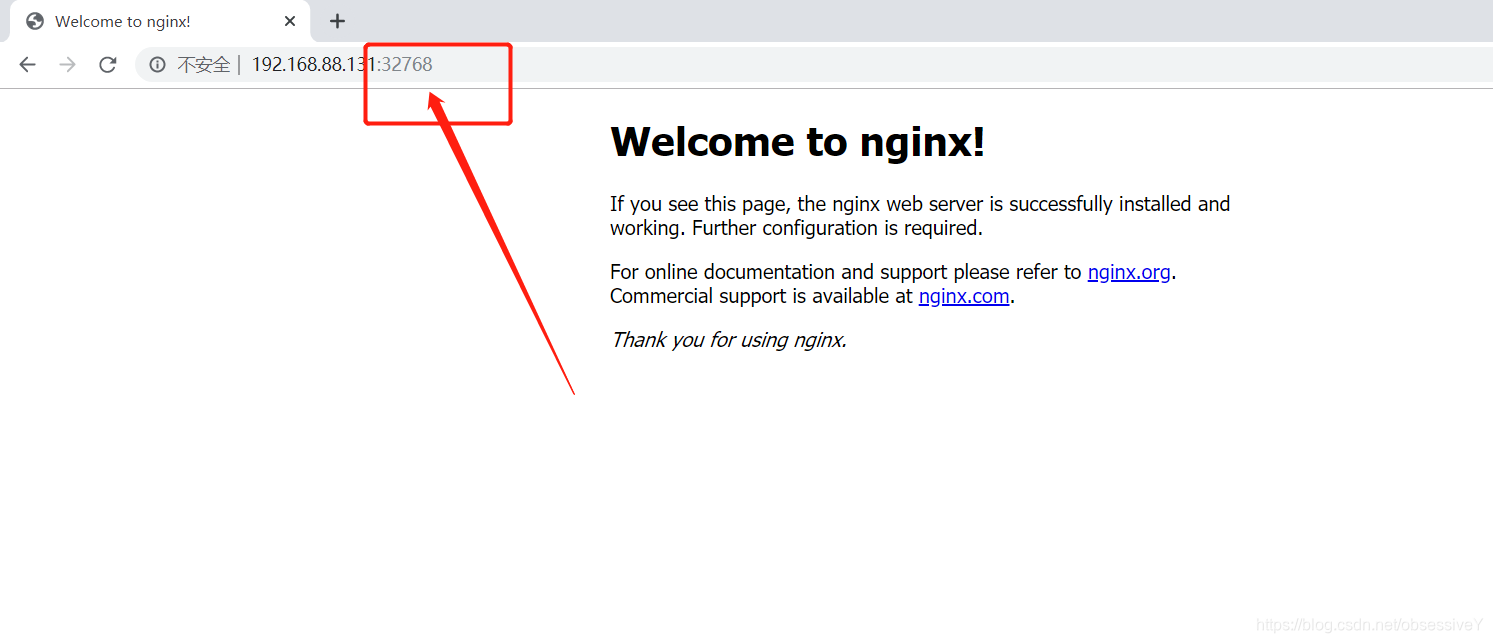
[root@localhost ~]# docker run -d -P nginx

[root@localhost ~]# docker ps -a
CONTAINER ID        IMAGE               COMMAND                  CREATED             STATUS                        PORTS                    NAMES
8e844faf0807        nginx               "nginx -g 'daemon of…"   30 seconds ago      Up 28 seconds                 0.0.0.0:32768->80/tcp    funny_swartz
用32768端口去访问nginx:
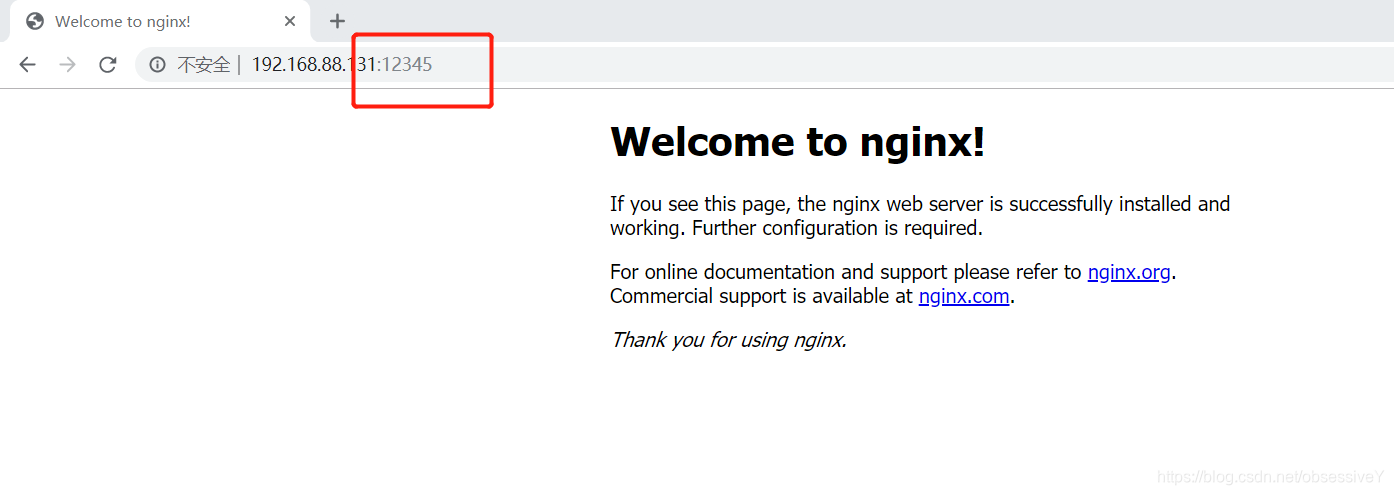
[root@localhost ~]# docker run -d -p 12345:80 nginx
f1776c11d6d63c88331db02c009faaf64e44d536c1ef8046087d56357330497f
[root@localhost ~]#
五.容器互联
1.创建并运行容器名为web10,端口随机映射
[root@localhost ~]# docker run -itd -P --name web10 centos /bin/bash
73f4258153a8235a4b3f8d7ab9d677c897d5f1c5df04cfd803267375f6bd4502
2.创建web20容器与web10容器互联:
[root@localhost ~]# docker run -itd -P --name web20 --link web10:web10 centos /bin/bash
8ef316d7de5bb3e24bc6380bd35d3101257e5335a19bd7c6f510f2048aaa4e38
3.验证,进入容器web20,去pingweb10
[root@localhost ~]# docker exec -it 8ef316d7de5b /bin/bash
[root@8ef316d7de5b /]# ping web10
PING web10 (172.17.0.7) 56(84) bytes of data.
64 bytes from web10 (172.17.0.7): icmp_seq=1 ttl=64 time=0.157 ms
64 bytes from web10 (172.17.0.7): icmp_seq=2 ttl=64 time=0.143 ms
64 bytes from web10 (172.17.0.7): icmp_seq=3 ttl=64 time=0.069 ms
^C
web10 ping statistics ---
3 packets transmitted, 3 received, 0% packet loss, time 3ms
rtt min/avg/max/mdev = 0.069/0.123/0.157/0.038 ms
[root@8ef316d7de5b /]#
