文章目录
前言
使用容器时会产生一些日志或其他文件,或是我们需要把容器内的数据进行备份,甚至多个容器之间进行数据共享,这样就会涉及容器的数据管理操作。
容器中管理数据主要有两种方式:1. 数据卷 2. 数据卷容器
数据卷:挂载宿主系统的存储空间
数据卷容器:挂载容器的存储空间
如果用户需要在容器之间共享一些持续更新的数据,最简单的方式是使用数据卷容器,数据卷容器其实是一个普通的容器,专门用来提供数据卷供其它容器挂载
一:Docker的数据管理
1.1:数据管理操作
方便查看容器内产生的数据
多容器间实现数据共享
1.2:两种管理方式
数据卷 【容器与宿主机之间数据共享】
数据卷容器 【容器与容器之间数据共享】
二:数据卷
- 数据卷是一个提供容器使用的特殊目录
创建数据卷
-v 指定的宿主机目录是会自动创建的
docker run -d -v /data1 -v /data2 --name web
httpd:centos
- 挂载主机目录作为数据卷
docker run -d -v /var/www:/data1--name web-1
httpd:centos
/var/www:宿主机目录
data1:容器路径
- Docker数据卷操作
#宿主机目录/var/www 挂载容器的/data1
[root@localhost apache]# docker run -v /var/www:/data1 --name web1 -it centos:7 /bin/bash

#没有var/www目录 默认给你创建好
-
测试
-
容器data1目录文件创建shuai.txt
#进入data1目录
[root@3f4a01924c8a /]# cd data1/
[root@3f4a01924c8a data1]# ls
cgi-bin  html  index.html

#创建shuai.txt
[root@3f4a01924c8a data1]# touch shuai.txt
[root@3f4a01924c8a data1]# ls
cgi-bin  html  index.html  shuai.txt
- 宿主机查看是否同步文件
#已经同步了
[root@localhost ~]# ls /var/www/
cgi-bin  html  index.html  shuai.txt
2.1:数据卷与数据卷流程说明

- 创建数据卷容器web100
[root@localhost apache]# docker run --name web100 -v /data1 -v /data2 -it centos:7 /bin/bash
[root@3f8728f28bb8 /]# exit
exit
- 创建新容器web99并挂载数据卷容器目录
[root@localhost ~]# docker run -it --volumes-from web100 --name web99 centos:7 /bin/
[root@35460a15c575 /]#
-
测试
-
创建测试文件
[root@35460a15c575 /]# cd data1
[root@35460a15c575 data1]# touch 123
[root@35460a15c575 data1]# cd ..
[root@35460a15c575 /]# cd data2
[root@35460a15c575 data2]# touch 456
- 进入数据卷web100测试是否共享数据文件
#登录到容器
[root@localhost apache]# docker exec -it 3f8728f28bb8 /bin/bash
#可以看到已经同步共享
[root@3f8728f28bb8 /]# ls data1
123
[root@3f8728f28bb8 /]# ls data2
456
二:Docker私有仓库建立
搭建企业私有的镜像仓库,满足从开发环境推送和拉取镜像。当我们使用k8s来编排和调度容器时,操作的基本单位是镜像,所以需要从仓库去拉取镜像到当前的工作节点。本来使用公共的docker hub完全可以满足我们的需求,也非常方便,但是上传的镜像任何人都可以访问,其次docker hub的私有仓库又是收费的,所以从安全和商业两方面考虑,企业必须搭建自己的私有镜像仓库。
2.1:私有仓库设置步骤
1、下载registry镜像
2、客户端设置daemon.json文件,指定私有仓库位置
3、生成registry容器,开放5000端口
4、镜像打标签
5、上传镜像,docker push
6、下载镜像,docker pull
2.2:registry的搭建
Docker 官方提供了一个搭建私有仓库的镜像 registry ,只需把镜像下载下来,运行容器并暴露5000端口,就可以使用了。
[root@localhost apache]# docker pull registry      #私有仓库都要建立registry

#查看镜像
[root@localhost apache]# docker images

registry            latest              2d4f4b5309b1        3 months ago        26.2M
- 指定镜像仓库的地址
[root@localhost apache]# vim /etc/docker/daemon.json

{


 "insecure-registries":["20.0.0.42:5000"],           '//添加'
 "registry-mirrors": ["https://rsezwjwx.mirror.aliyuncs.com"]
}

#重启docker
[root@localhost apache]# systemctl restart docker.service

#查看容器列表
[root@localhost apache]# docker ps -a
CONTAINER ID        IMAGE               COMMAND             CREATED             STATUS                        PORTS               NAMES
35460a15c575        centos:7            "/bin/bash"         17 minutes ago      Exited (137) 13 seconds ago                       web99
3f8728f28bb8        centos:7            "/bin/bash"         23 minutes ago      Exited (137) 13 seconds ago                       web100
3f4a01924c8a        centos:7            "/bin/bash"         46 minutes ago      Exited (0) 31 minutes ago                         web1
cd1bc0acea9f        httpd:cetnos        "/run.sh"           About an hour ago   Exited (137) 13 seconds ago                       beautiful_northcutt
- 生成registry容器,开发5000端口
[root@localhost apache]# docker create -it registry /bin/bash

#查看容器列表
[root@localhost apache]# docker ps -a
CONTAINER ID        IMAGE               COMMAND                  CREATED             STATUS                       PORTS               NAMES
2ec308b2eb7a        registry            "/entrypoint.sh /bin…"   28 seconds ago      Created                                          festive_benz
...省略

#启动容器
[root@localhost apache]# docker start 2ec308b2eb7a
2ec308b2eb7a

#宿主机的/data/registry自动挂载容器中的/tmp/registry
[root@localhost apache]# docker run -d -p 5000:5000 -v /data/registry:/tmp/registry registry9a2d9b395c3c985de8cdc6da789cae3c46aaffa59507bca44aa7b76cfa416e56
- 镜像打标签
[root@localhost apache]# docker ps -a
CONTAINER ID        IMAGE               COMMAND                  CREATED             STATUS                        PORTS                    NAMES
9a2d9b395c3c        registry            "/entrypoint.sh /etc…"   3 minutes ago       Up 3 minutes                  0.0.0.0:5000->5000/tcp   optimistic_austin
...省略其他信息.....

#获取nginx镜像
[root@localhost apache]# docker pull nginx

#更改标记为20.0.0.42:5000/nginx
[root@localhost apache]# docker tag nginx:latest 20.0.0.42:5000/nginx

#查看镜像列表
[root@localhost apache]# docker images
REPOSITORY             TAG                 IMAGE ID            CREATED             SIZE
httpd                  cetnos              157276e697ad        2 hours ago         283MB
20.0.0.42:5000/nginx   latest              7e4d58f0e5f3        10 days ago         133MB
nginx                  latest              7e4d58f0e5f3        10 days ago         133MB
centos                 7                   7e6257c9f8d8        5 weeks ago         203MB
centos                 latest              0d120b6ccaa8        5 weeks ago         215MB
registry               latest              2d4f4b5309b1        3 months ago        26.2MB
- 上传镜像测试
#获取仓库列表    里面是空的
[root@localhost apache]# curl -XGET http://20.0.0.42:5000/v2/_catalog
{

    "repositories":[]}

#上传镜像到服务端
[root@localhost apache]# docker push 20.0.0.42:5000/nginx

#再次获取仓库列表    已经有了
[root@localhost apache]# curl -XGET http://20.0.0.42:5000/v2/_catalog
{

    "repositories":["nginx"]}
- 下载镜像测试
#先把服务端nginx镜像删除
[root@localhost apache]# docker rmi nginx:latest
Untagged: nginx:latest
Untagged: nginx@sha256:c628b67d21744fce822d22fdcc0389f6bd763daac23a6b77147d0712ea7102d0
[root@localhost apache]# docker rmi 20.0.0.42:5000/nginx:latest
Untagged: 20.0.0.42:5000/nginx:latest

#从私有仓库进行下载
[root@localhost apache]# docker pull 20.0.0.42:5000/nginx
Using default tag: latest
latest: Pulling from nginx
d121f8d1c412: Pull complete
ebd81fc8c071: Pull complete
655316c160af: Pull complete
d15953c0e0f8: Pull complete
2ee525c5c3cc: Pull complete
Digest: sha256:794275d96b4ab96eeb954728a7bf11156570e8372ecd5ed0cbc7280313a27d19
Status: Downloaded newer image for 20.0.0.42:5000/nginx:latest
20.0.0.42:5000/nginx:latest

#查看江镜像列表
[root@localhost apache]# docker images
REPOSITORY             TAG                 IMAGE ID            CREATED             SIZE
httpd                  cetnos              157276e697ad        2 hours ago         283MB
20.0.0.42:5000/nginx   latest              7e4d58f0e5f3        10 days ago         133MB
centos                 7                   7e6257c9f8d8        5 weeks ago         203MB
centos                 latest              0d120b6ccaa8        5 weeks ago         215MB
registry               latest              2d4f4b5309b1        3 months ago

下载成功
三:端口映射实现访问容器
在启动容器的时候,如果不指定对应的参数,在容器外部是无法通过网络来访问容器内部的网络应用和服务的。
当容器中运行一些网络应用,要让外部访问这些应用时,可以通过-p或-P参数来指定端口映射。当使用-P(大写P)标记时,Docker会随机映射一个端口到内部容器开放的网络端口(端口范围在Linux系统使用的端口之外,一般都过万):
- 在启动容器时,如果不配置宿主机器与虚拟机的端口映射,外部程序是无法访问虚拟机的,因此我们需要手动进行设置端口映射
- -P【大写P】:随机指定端口号
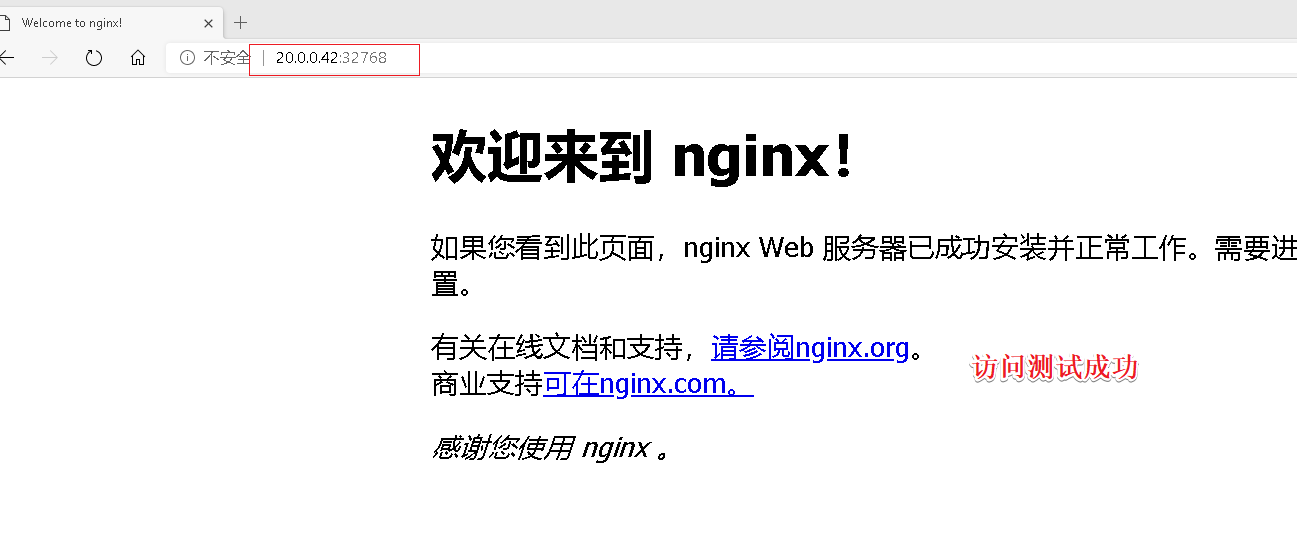
[root@localhost ~]# docker run -d -P 20.0.0.42:5000/nginx
3708f041f57cd055fa4465e72f96b4b904868d5580f37e500df29bbf31d4ea36

#查看容器列表
[root@localhost ~]# docker ps -a
CONTAINER ID        IMAGE                  COMMAND                  CREATED              STATUS                     PORTS                    NAMES
3708f041f57c        20.0.0.42:5000/nginx   "/docker-entrypoint.…"   About a minute ago   Up About a minute          0.0.0.0:32768->80/tcp    musing_bohr
- 通过docker ps可以看到nginx容器的80端口被映射打本机的32768端口上,访问宿主机的32768端口就可以访问容器内的应用程序提供的Web界面
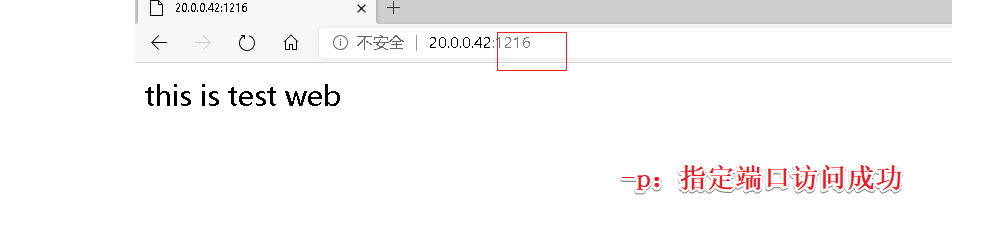
-p:【小p】可以指定映射的端口,并且在一个指定的端口上只可以绑定一个容器
[root@localhost ~]# docker run -d -p 1216:80 httpd:cetnos

#查看容器列表
[root@localhost ~]# docker ps -a
CONTAINER ID        IMAGE                  COMMAND                  CREATED             STATUS                     PORTS                    NAMES
63f83ab77dbd        httpd:cetnos           "/run.sh"                2 minutes ago       Up 2 minutes               0.0.0.0:1216->80/tcp     reverent_hypatia
3708f041f57c        20.0.0.42:5000/nginx   "/docker-entrypoint.…"   13 minutes ago      Up 13 minutes              0.0.0.0:32768->80/tcp    musing_bohr
9a2d9b395c3c        registry               "/entrypoint.sh /etc…"   8 hours ago         Up 8 hours                 0.0.0.0:5000->5000/tcp   optimistic_austin
四:容器互联
-
使用–link参数可以让容器之间安全地进行交互。
-
创建并运行容器取名web12,端口号自动映射
-
使用–name参数可以为容器自定义命名:
[root@localhost ~]# docker run -itd -P --name web12 centos:7
da6488b996a53c88f1681ae876e0a018a012b88fad9e5d5c076a6157b16be63f

#查看容器列表
[root@localhost ~]# docker ps -a
CONTAINER ID        IMAGE                  COMMAND                  CREATED             STATUS                     PORTS                    NAMES
da6488b996a5        centos:7               "/bin/bash"              3 minutes ago       Up 3 minutes                                        web12
...省略

#进入容器
[root@localhost ~]# docker exec -it da6488b996a5 /bin/bash
[root@da6488b996a5 /]#
- 创建并运行web15容器,连接到web12和其通信,端口自动映射
[root@localhost ~]# docker run -itd -P --name web15 --link web12:web12 centos:7 /bin/bash
2a42e78f735bcdf10f279179182de63317cf899355faf3b8b71e4836b427ab12

[root@localhost ~]# docker ps -a
CONTAINER ID        IMAGE                  COMMAND                  CREATED             STATUS                     PORTS                    NAMES
2a42e78f735b        centos:7               "/bin/bash"              37 seconds ago      Up 36 seconds                                       web15

#进入容器
[root@localhost ~]# docker exec -it 2a42e78f735b /bin/bash
[root@2a42e78f735b /]#
- 测试,进入web12 ping web15
[root@localhost ~]# docker exec -it 2a42e78f735b /bin/bash
[root@2a42e78f735b /]# ping web12
PING web12 (172.17.0.5) 56(84) bytes of data.
64 bytes from web12 (172.17.0.5): icmp_seq=1 ttl=64 time=0.137 ms
64 bytes from web12 (172.17.0.5): icmp_seq=2 ttl=64 time=0.048 ms
^C
--- web12 ping statistics ---
2 packets transmitted, 2 received, 0% packet loss, time 999ms
rtt min/avg/max/mdev = 0.048/0.092/0.137/0.045 ms

两个容器都安装net-tools才能在容器中使用ifconfig
[root@2a42e78f735b /]# yum install net-tools -y

#查看两个容器的IP

#web12容器
[root@da6488b996a5 /]# ifconfig
eth0: flags=4163<UP,BROADCAST,RUNNING,MULTICAST>  mtu 1500
        inet 172.17.0.5  netmask 255.255.0.0  broadcast 172.17.255.255
        ether 02:42:ac:11:00:05  txqueuelen 0  (Ethernet)
        RX packets 1896  bytes 11864032 (11.3 MiB)
        RX errors 0  dropped 0  overruns 0  frame 0
        TX packets 1900  bytes 106137 (103.6 KiB)
        TX errors 0  dropped 0 overruns 0  carrier 0  collisions 0

#web15容器
[root@2a42e78f735b /]# ifconfig
eth0: flags=4163<UP,BROADCAST,RUNNING,MULTICAST>  mtu 1500
        inet 172.17.0.6  netmask 255.255.0.0  broadcast 172.17.255.255
        ether 02:42:ac:11:00:06  txqueuelen 0  (Ethernet)
        RX packets 1796  bytes 11860251 (11.3 MiB)
        RX errors 0  dropped 0  overruns 0  frame 0
        TX packets 1798  bytes 100511 (98.1 KiB)
        TX errors 0  dropped 0 overruns 0  carrier 0  collisions 0
互联的容器之间是可以ping通的。