【版权申明】未经博主同意,谢绝转载!(请尊重原创,博主保留追究权)
在Android开发板跑一个LED驱动的历程(个人笔记)
1. 板子端, 放置驱动程序
1.1 编写一个驱动程序
驱动程序的编写上, 与Linux是一致的, 无需关心任何Android相关的事物. 代码如下:#include <linux/init.h>
#include <linux/module.h>
#include <linux/fs.h>
#include <linux/cdev.h>
#include <linux/device.h>
#include <mach/gpio.h>
#include <plat/gpio-cfg.h>
static dev_t dev_num = 0;
static struct cdev *cdevice = NULL;
static struct class *sys_class = NULL;
static struct device *class_device = NULL;
static int led_gpios[] = {
EXYNOS4212_GPM4(0),
EXYNOS4212_GPM4(1),
EXYNOS4212_GPM4(2),
EXYNOS4212_GPM4(3),
};
#define LED_NUM ARRAY_SIZE(led_gpios)
static int leds_open(struct inode *pinode, struct file *pfile)
{
int i = 0;
for (i = 0; i < LED_NUM; i++) {
s3c_gpio_cfgpin(led_gpios[i], S3C_GPIO_OUTPUT);
}
return 0;
}
ssize_t leds_write(struct file *pfile, const char __user *userbuf, size_t size, loff_t *loff)
{
//long copy_from_user(void *to, const void __user * from, unsigned long n)
return 0;
}
ssize_t leds_read(struct file *pfile, char __user *userbuf, size_t size, loff_t *loff)
{
// long copy_to_user(void __user *to, const void *from, unsigned long n)
return 0;
}
/**
* app: ioctl(fd, cmd, arg)
*
* cmd: 0-off, 1-on
* arg: 0-3, which led
*/
static long leds_ioctl(struct file *filp, unsigned int cmd,
unsigned long arg)
{
switch(cmd) {
case 0:
case 1:
if (arg >= LED_NUM) {
return -EINVAL;
}
gpio_set_value(led_gpios[arg], !cmd);
break;
default:
return -EINVAL;
}
return 0;
}
static struct file_operations tiny4412_leds_fops = {
.owner = THIS_MODULE,
.open = leds_open,
.read = leds_read,
.write = leds_write,
.unlocked_ioctl = leds_ioctl,
};
static int __init tiny4412_leds_init(void)
{
cdevice = cdev_alloc(); // 构建cdev设备对象
cdev_init(cdevice, &tiny4412_leds_fops); // 初始化cdev设备对象, 将它与操作函数集绑定起来
alloc_chrdev_region(&dev_num, 0, 1, "yangbkLed");
cdev_add(cdevice, dev_num, 1);
sys_class = class_create(THIS_MODULE, "yangbkClass"); // 在/sys中新建设备类
class_device = device_create(sys_class, NULL, dev_num, NULL, "yangbkDevice"); // 在sys_class指向的类中创建一组(个)设备文件
return 0;
}
static void __exit tiny4412_leds_exit(void)
{
device_destroy(sys_class, dev_num);
class_destroy(sys_class);
cdev_del(cdevice);
unregister_chrdev_region(dev_num, 1); // 回收设备号.
}
module_init(tiny4412_leds_init);
module_exit(tiny4412_leds_exit);
MODULE_AUTHOR("yangbkGit");
MODULE_LICENSE("GPL v2");
MODULE_DESCRIPTION("Tiny4412 android driver.");
MODULE_ALIAS("model");
1.2 把1.1步骤的驱动程序编入Linux内核
Android使用的也是Linux内核, 所以将驱动程序编入内核也是和Linux一致的. 我的驱动文件放置在/drivers/char目录下的led_4412.c, 故打开/drivers/char目录下的Makefile, 添加如下一行:
obj-y += led_4412.o
然后退出到内核的根目录, make即可得到将驱动编入内核的zImage文件. 烧写进开发板
2. JNI安卓程序 C程序端
JNI是Java Native Interface的缩写, 它提供了若干的API实现了Java和其他语言的通信(主要是C&C++), 它允许Java代码和其他语言写的代码进行交互.
2.1 Makefile (编译.c文件的命令)
# to build *.so
CFLAG := -fPIC -shared
CFLAG += -I /usr/lib/jvm/java-1.7.0-openjdk-amd64/include/
# for can't find libc.so
CFLAG += -nostdlib /home/whistle/Tiny4412/Android-5.0.2/android-5.0.2/prebuilts/ndk/9/platforms/android-19/arch-arm/usr/lib/libc.so
# for liblog: fatal error: android/log.h: No such file or directory
CFLAG += -I /home/whistle/Tiny4412/Android-5.0.2/android-5.0.2/prebuilts/ndk/9/platforms/android-19/arch-arm/usr/include/
# for liblog: dlopen failed: cannot locate symbol "__android_log_print" referenced by "libhardcontrol.so"...
CFLAG += /home/whistle/Tiny4412/Android-5.0.2/android-5.0.2/prebuilts/ndk/9/platforms/android-19/arch-arm/usr/lib/liblog.so

all:
	arm-linux-gcc hardcontrol.c -o libhardcontrol.so $(CFLAG)
2.2 C源码
#include <jni.h>  /* /usr/lib/jvm/java-1.7.0-openjdk-amd64/include/ */

/**
 * liblog
 * android-5.0.2/prebuilts/ndk/9/platforms/android-19/arch-arm/usr/include/android/log.h
 *
 * __android_log_print(ANDROID_LOG_DEBUG, "LEDDemo", "ledOpen");
 */
#include <android/log.h>	/* ,  */

#include <stdio.h>
#include <stdlib.h>
#include <sys/types.h>
#include <sys/stat.h>
#include <fcntl.h>
#include <unistd.h>

#if 0
typedef struct {
    char *name;          /* Java里调用的函数名 */
    char *signature;    /* JNI字段描述符, 用来表示Java里调用的函数的参数和返回值类型 */
    void *fnPtr;          /* C语言实现的本地函数 */
} JNINativeMethod;
#endif

static jint fd;

jint ledOpen(JNIEnv *env, jobject cls)
{
	fd = open("/dev/yangbkDevice", O_RDWR);
	if(fd < 0){
		return -1;
	}

	__android_log_print(ANDROID_LOG_DEBUG, "LEDDemo", "ledOpen() fd = %d", fd);


	return 0;
}

void ledClose(JNIEnv *env, jobject cls)
{
	close(fd);
	__android_log_print(ANDROID_LOG_DEBUG, "LEDDemo", "ledClose");
}

jint ledCtrl(JNIEnv *env, jobject cls, jint which, jint status)
{
	int ret = ioctl(fd, status, which);
	__android_log_print(ANDROID_LOG_DEBUG, "LEDDemo", "ledCtrl() ret = %d, %d, %d", ret, which, status);

	return ret;
}

static const JNINativeMethod methods[] = {
	{"ledOpen", "()I", (void *)ledOpen},
	{"ledClose", "()V", (void *)ledClose},
	{"ledCtrl", "(II)I", (void *)ledCtrl},
};

/* System.loadLibrary */
JNIEXPORT jint JNICALL
JNI_OnLoad(JavaVM *jvm, void *reserved)
{
	JNIEnv *env;
	jclass cls;

	if ((*jvm)->GetEnv(jvm, (void **)&env, JNI_VERSION_1_4)) {
		return JNI_ERR; /* JNI version not supported */
	}
	cls = (*env)->FindClass(env, "com/yangbkgit/hardlibrary/HardControl");
	if (cls == NULL) {
		return JNI_ERR;
	}

	/* 2. map java hello <-->c c_hello */
	if ((*env)->RegisterNatives(env, cls, methods, sizeof(methods)/sizeof(methods[0])) < 0)
		return JNI_ERR;

	return JNI_VERSION_1_4;
}
3. JNI安卓程序 安卓端
我的安卓工程目录结构:
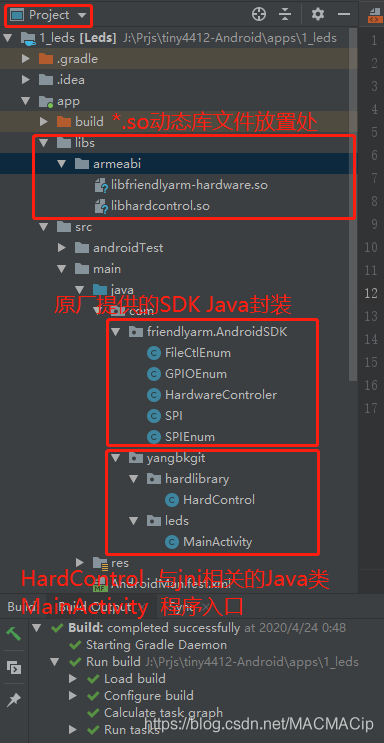
3.1 和jni相关的Java类
package com.yangbkgit.hardlibrary;

public class HardControl {
    public static native int ledCtrl(int which, int status);
    public static native int ledOpen();
    public static native void ledClose();

    static {
        try {
            System.loadLibrary("hardcontrol");
        } catch (Exception e) {
            e.printStackTrace();
        }

    }
}
3.2 ANdroid主程序
请自由发挥.
4. 期间遇到的一些小bug
4.1 open()函数返回-1
在板子端ls /dev/yangbkDevice -l发现除了root用户外其他用户没有读写权限, 所以会导致open()失败, 修改文件权限可以解决问题(Android开发板权限看来还是比较严格的)
10|shell@tiny4412:/ $ ls /dev/yangbkDevice -l
crw------- root     root     253,   0 2020-04-23 17:27 yangbkDevice

解决办法:
su root
chmod 666 /dev/yangbkDevice
