说明:本文也是参考互联网上的文章写的,感谢相关作者的贡献。
操作系统
64位CentOS Linux release 7.2.1511 (Core)
配置好IP:192.168.1.160
修改yum源
目的是提升对docker的下载速度。
1.备份你的原镜像文件,以免出错后可以恢复。
[root@localhost ~]#
mv /etc/yum.repos.d/CentOS-Base.repo /etc/yum.repos.d/CentOS-Base.repo.backup
2.下载新的CentOS-Base.repo 到/etc/yum.repos.d/
[root@localhost ~]# wget -O /etc/yum.repos.d/CentOS-Base.repo http://mirrors.aliyun.com/repo/Centos-7.repo
3.运行yum makecache生成缓存
[root@localhost ~]# yum clean all
[root@localhost ~]# yum makecache
安装Docker
[root@localhost ~]# yum -y install docker-io
要稍等几分钟才能安装好。网速快的话几十秒吧。
启动Docker
[root@localhost ~]# systemctl start docker
发现会报错:
Job for docker.service failed because the control process exited with error code. See "systemctl status docker.service" and "journalctl -xe" for details.
按照提示执行:
[root@localhost ~]# systemctl status docker.service
会有提示信息如下:
● docker.service - Docker Application Container Engine
Loaded: loaded (/usr/lib/systemd/system/docker.service; disabled; vendor preset: disabled)
Active: failed (Result: exit-code) since 三 2018-05-02 23:34:46 CST; 52s ago
Docs: http://docs.docker.com
Process: 14416 ExecStart=/usr/bin/dockerd-current --add-runtime docker-runc=/usr/libexec/docker/docker-runc-current --default-runtime=docker-runc --exec-opt native.cgroupdriver=systemd --userland-proxy-path=/usr/libexec/docker/docker-proxy-current --seccomp-profile=/etc/docker/seccomp.json $OPTIONS $DOCKER_STORAGE_OPTIONS $DOCKER_NETWORK_OPTIONS $ADD_REGISTRY $BLOCK_REGISTRY $INSECURE_REGISTRY $REGISTRIES (code=exited, status=1/FAILURE)
Main PID: 14416 (code=exited, status=1/FAILURE)
5月 02 23:34:45 localhost.localdomain systemd[1]: Starting Docker Application Container Engine...
5月 02 23:34:45 localhost.localdomain dockerd-current[14416]: time="2018-05-02T23:34:45.527821208+08:00" level=warning msg="could not change group /var/run/...t found"
5月 02 23:34:45 localhost.localdomain dockerd-current[14416]: time="2018-05-02T23:34:45.532650572+08:00" level=info msg="libcontainerd: new containerd proce...: 14421"
5月 02 23:34:46 localhost.localdomain dockerd-current[14416]: time="2018-05-02T23:34:46.539484373+08:00" level=warning msg="overlay2: the backing xfs filesystem is ...
5月 02 23:34:46 localhost.localdomain dockerd-current[14416]: Error starting daemon: SELinux is not supported with the overlay2 graph driver on this kernel....d=false)
5月 02 23:34:46 localhost.localdomain systemd[1]: docker.service: main process exited, code=exited, status=1/FAILURE
5月 02 23:34:46 localhost.localdomain systemd[1]: Failed to start Docker Application Container Engine.
5月 02 23:34:46 localhost.localdomain systemd[1]: Unit docker.service entered failed state.
5月 02 23:34:46 localhost.localdomain systemd[1]: docker.service failed.
Hint: Some lines were ellipsized, use -l to show in full.
红色部分告诉我们此linux的内核中的SELinux不支持 overlay2 graph driver,解决方法有两个,要么启动一个新内核,要么就在docker里禁用selinux,设置--selinux-enabled=false。我们采用第二种方式。
[root@localhost ~]# vi /etc/sysconfig/docker
然后将--selinux-enabled设置成false,保存并退出。
如下图:

重新启动
[root@localhost ~]# systemctl start docker
查看版本号
[root@localhost ~]# docker -v
Docker version 1.13.1, build 774336d/1.13.1
至此docker启动成功
修改Docker镜像
因为国外的docker镜像访问太慢,所以我们需要修改成阿里云的docker镜像。这样从国内镜像拉取速度会快点。
1.打开阿里云docker仓库地址https://dev.aliyun.com/search.html
2.淘宝账号即可登录,登录后点击自己的管理中心。
3.点击管理中心左侧菜单栏的“镜像加速器”,右边面板会有你的加速地址,面板下面有详细设置步骤。
如下图:
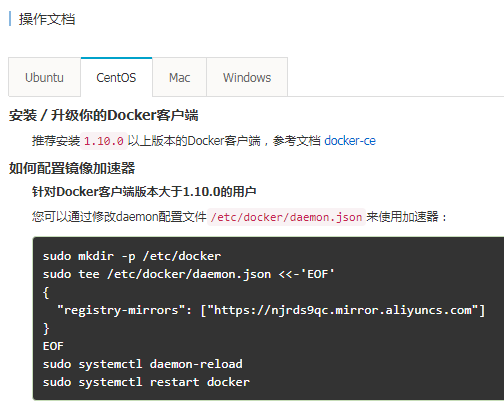
[root@localhost ~]# vi /etc/docker/daemon.json
将下面字符拷贝进去
"registry-mirrors": ["https://njrds9qc.mirror.aliyuncs.com"]
保存并退出。
刷新daemon
[root@localhost ~]# systemctl daemon-reload
重启docker
[root@localhost ~]# systemctl restart docker
拉取镜像
以hello-world为例
[root@localhost ~]# docker pull hello-world

表示成功拉取
运行镜像
[root@localhost ~]# docker run hello-world

成功运行。