1 换脸难点
(1)人类面部几何形状差异明显,并且存在一些异常值;
(2)光照使得面部肤色色调发生偏移;
(3)头部姿态影响;
(4)皮肤纹理差异。
2 换脸方案
%matplotlib inline
from utils.plot_imgs import *
#from utils.delaunay_triangulation import *
from utils.dlib_face_api import *

import cv2
import glob
import os
2.1 面部对齐
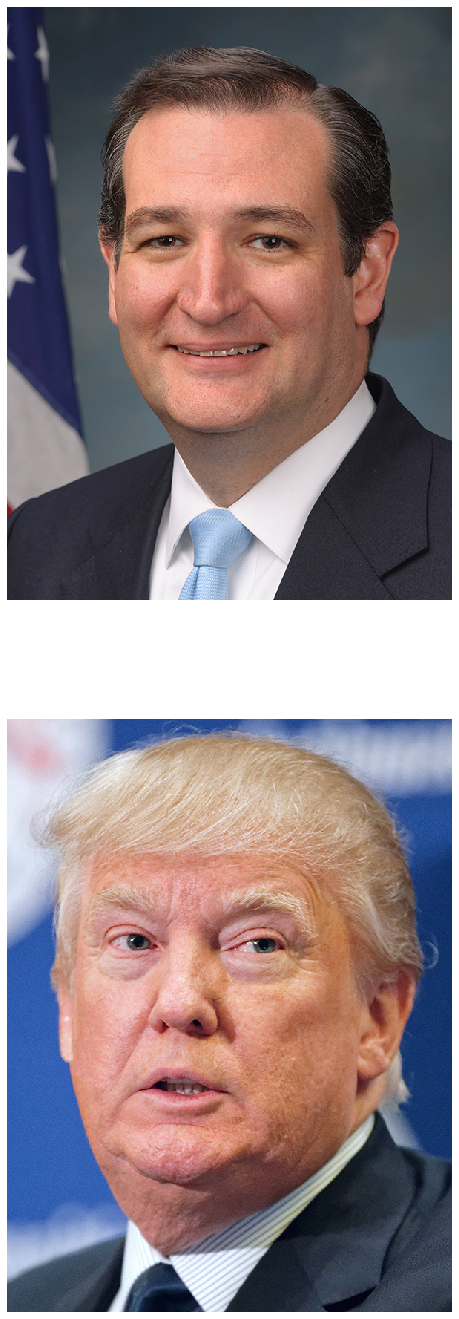
用源图像 面部区域覆盖目标图像 面部区域。
# 读取示例图像
filename_src = "./img/ted_cruz.jpg"
filename_dst = "./img/donald_trump.jpg"

img_src = cv2.imread(filename_src)
img_dst = cv2.imread(filename_dst)
img_dst_warped = np.copy(img_dst)

idx_fig = 1
plot_imgs(idx_fig, [img_src, img_dst])
2.1.1 面部关键点定位
(1)面部关键点定位(68,dlib)
dlib.get_frontal_face_detector()
dlib.shape_predictor()
(2)狄洛尼三角剖分
面部外轮廓关键点(jaw[1 - 17]、right_brow[18 - 22]、left_brow[23 - 27])
# 读取关键点
def read_points(str_file_path):

    lst_points = []
    with open(str_file_path) as fr:

        for str_line in fr.readlines():
            lst_points.append(
                [int(item) for item in str_line.strip().split(" ")])

    return lst_points
# 面部关键点
points_src = read_points(filename_src + ".txt")
points_dst = read_points(filename_dst + ".txt")
2.1.2 凸包
凸包(convex hull):没有凹陷的边界
cv2.convexHull()
# 凸包
hull_pt_src = []
hull_pt_dst = []

hull_pt_indices = cv2.convexHull(np.array(points_dst),
                                 returnPoints = False)
hull_pt_indices = hull_pt_indices.flatten()

for idx_pt in hull_pt_indices:
    hull_pt_src.append(points_src[idx_pt])
    hull_pt_dst.append(points_dst[idx_pt])
print(hull_pt_indices)
print(hull_pt_src)
print(hull_pt_dst)
[16 15 14 13 12 11 10  9  8  7  6  5  4  3  2  1  0 17 18 19 24 25]
[[464, 329], [463, 371], [459, 411], [451, 454], [433, 493], [401, 526], [361, 552], [317, 572], [272, 576], [232, 566], [203, 540], [178, 510], [159, 476], [150, 439], [147, 401], [146, 365], [148, 328], [160, 301], [170, 280], [193, 269], [365, 268], [396, 279]]
[[494, 321], [487, 377], [479, 433], [464, 486], [434, 531], [391, 568], [335, 591], [278, 611], [226, 616], [180, 607], [144, 580], [114, 546], [96, 502], [88, 454], [83, 405], [80, 357], [80, 311], [109, 259], [126, 238], [154, 235], [359, 240], [397, 247]]
2.1.3 狄洛尼三角剖分
cv2.Subdiv2D()
# 检查点pt是否在矩形rect内
def rect_contains(rect, point):
    if point[0] < rect[0]:
        return False
    elif point[1] < rect[1]:
        return False
    elif point[0] > rect[2]:
        return False
    elif point[1] > rect[3]:
        return False
    return True


#----------------------------------------------------------------------
def cal_delaunay_tri(rect, points):
    """计算狄洛尼三角剖分"""

    subdiv = cv2.Subdiv2D(rect);

    # 逐点插入
    for pt in points:
        # subdiv.insert 输入类型:tuple
        subdiv.insert(tuple(pt))

    lst_tri = subdiv.getTriangleList();

    # 狄洛尼三角网格顶点索引
    lst_delaunay_tri_pt_indices = []

    for tri in lst_tri:
        lst_tri_pts = [(tri[0], tri[1])]
        lst_tri_pts.append((tri[2], tri[3]))
        lst_tri_pts.append((tri[4], tri[5]))

        # 查询三角网格顶点索引
        lst_pt_indices = []
        for tri_pt in lst_tri_pts:

            for idx_pt in range(len(points)):

                if (abs(tri_pt[0] - points[idx_pt][0]) < 1) and \
                    (abs(tri_pt[1] - points[idx_pt][1]) < 1):
                    lst_pt_indices.append(idx_pt)

        lst_delaunay_tri_pt_indices.append(lst_pt_indices)

    return lst_delaunay_tri_pt_indices
# 狄洛尼三角剖分
size_img_dst = img_dst.shape
rect = (0, 0, size_img_dst[1], size_img_dst[0])

# 狄洛尼三角索引对应凸包顶点索引,与面部关键点索引不同
lst_delaunay_tri_pt_indices = cal_delaunay_tri(rect, hull_pt_dst)
print(lst_delaunay_tri_pt_indices)
print(len(lst_delaunay_tri_pt_indices))
[[4, 6, 20], [6, 4, 5], [1, 20, 21], [20, 1, 2], [2, 4, 20], [4, 2, 3], [0, 1, 21], [7, 13, 6], [13, 7, 12], [8, 10, 7], [10, 8, 9], [7, 10, 12], [12, 10, 11], [6, 13, 20], [20, 13, 14], [20, 14, 19], [19, 14, 15], [16, 19, 15], [19, 16, 17], [19, 17, 18]]
20
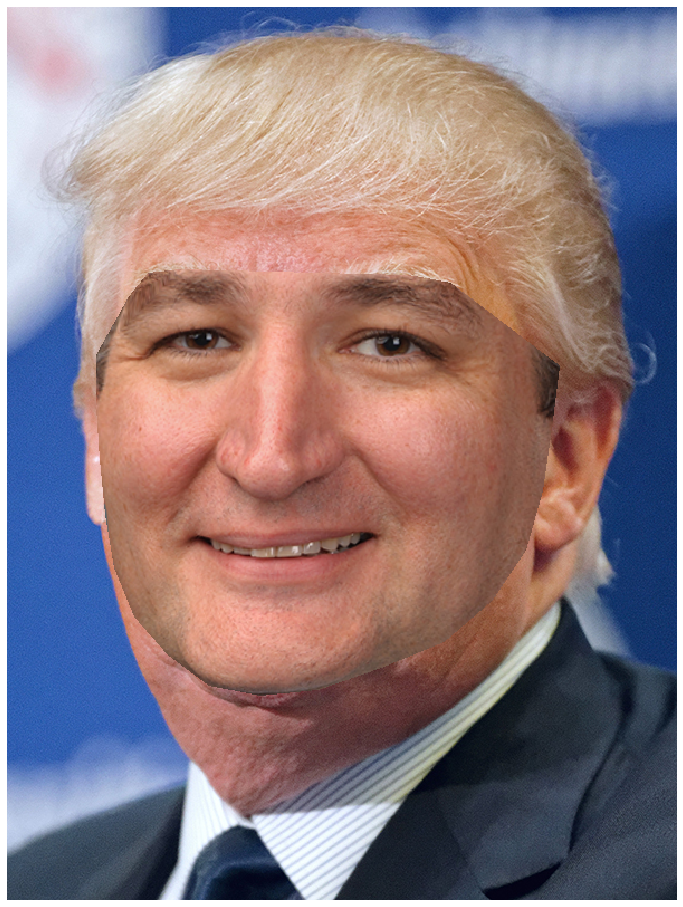
2.1.4 三角仿射变形
将源图像 面部区域三角形仿射到目标图像 面部区域。
#----------------------------------------------------------------------
def warp_affine(img_src, tri_src, tri_dst, size):
    """仿射"""

    # 仿射矩阵
    mat_warp = cv2.getAffineTransform(np.float32(tri_src), np.float32(tri_dst))

    # 仿射变换
    img_dst = cv2.warpAffine(img_src, mat_warp, (size[0], size[1]), None,
                             flags=cv2.INTER_LINEAR,
                             borderMode=cv2.BORDER_REFLECT_101)

    return img_dst


#----------------------------------------------------------------------
def warp_tri(img_src, img_dst, tri_src, tri_dst, alpha=1) :
    """仿射三角剖分,源图像到目标图像"""

    # 三角区域框
    rect_src = cv2.boundingRect(np.array(tri_src))
    rect_dst = cv2.boundingRect(np.array(tri_dst))

    # 三角形顶点相对于三角区域框的偏移
    tri_src_to_rect = [(item[0] - rect_src[0], item[1] - rect_src[1])
                       for item in tri_src]
    tri_dst_to_rect = [(item[0] - rect_dst[0], item[1] - rect_dst[1])
                       for item in tri_dst]

    # 蒙板
    mask = np.zeros((rect_dst[3], rect_dst[2], 3), dtype = np.float32)
    cv2.fillConvexPoly(mask, np.array(tri_dst_to_rect), (1, 1, 1), 16, 0)

    # 截取三角区域框中的源图像
    img_src_rect = img_src[rect_src[1] : rect_src[1] + rect_src[3],
                           rect_src[0] : rect_src[0] + rect_src[2]]

    size = (rect_dst[2], rect_dst[3])

    # 三角区域框仿射
    img_src_rect_warpped = warp_affine(img_src_rect, tri_src_to_rect, tri_dst_to_rect, size)

    # 蒙板 * 透明度
    mask *= alpha
    # 目标图像 = 目标图像 * (1 - 蒙板) + 源图像 * 蒙板
    img_dst[rect_dst[1] : rect_dst[1] + rect_dst[3],
            rect_dst[0] : rect_dst[0] + rect_dst[2]] = \
        img_dst[rect_dst[1] : rect_dst[1] + rect_dst[3],
                rect_dst[0] : rect_dst[0] + rect_dst[2]] * (1 - mask) + \
        img_src_rect_warpped * mask
# 狄洛尼三角剖分仿射
for tri_pt_indices in lst_delaunay_tri_pt_indices:

    # 源图像、目标图像三角顶点坐标
    tri_src = [hull_pt_src[tri_pt_indices[idx]] for idx in range(3)]
    tri_dst = [hull_pt_dst[tri_pt_indices[idx]] for idx in range(3)]

    warp_tri(img_src, img_dst_warped, tri_src, tri_dst, 1)

idx_fig += 1
plot_imgs(idx_fig, [img_dst_warped])
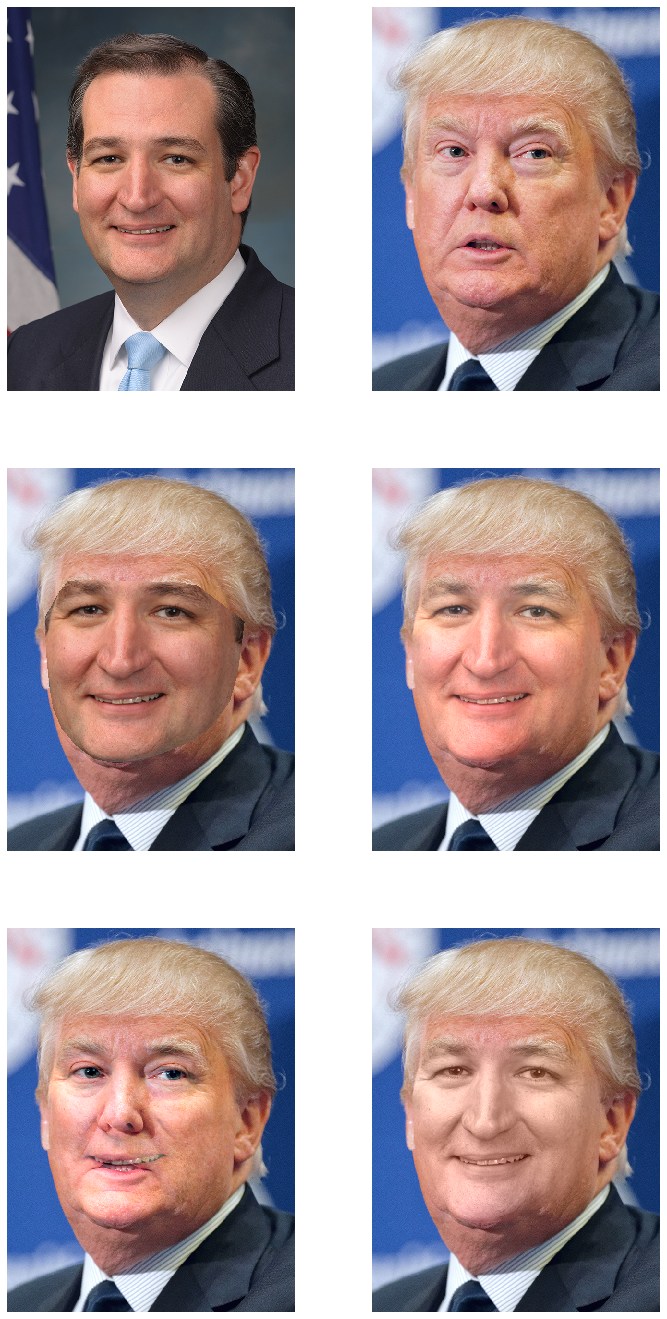
2.2 无缝融合
消除肤色差异
-
无缝融合:cv2.seamlessClone()
-
蒙板:cv2.fillConvexPoly()
mask = np.zeros(img_dst.shape, dtype=img_dst.dtype)
cv2.fillConvexPoly(mask, np.array(hull_pt_dst), (255, 255, 255))

rect = cv2.boundingRect(np.float32([hull_pt_dst]))

center = (rect[0] + rect[2] // 2, rect[1] + rect[3] // 2)

img_dst_src_grad = cv2.seamlessClone(img_dst_warped, img_dst,
                                     mask, center, cv2.NORMAL_CLONE)
img_dst_mix_grad = cv2.seamlessClone(img_dst_warped, img_dst,
                                     mask, center, cv2.MIXED_CLONE)
img_dst_mono_grad = cv2.seamlessClone(img_dst_warped, img_dst,
                                     mask, center, cv2.MONOCHROME_TRANSFER)

idx_fig += 1
plot_imgs(idx_fig, [img_src, img_dst, img_dst_warped, img_dst_src_grad, img_dst_mix_grad, img_dst_mono_grad])