MVC程序中实体框架的Code First迁移和部署
这是微软官方教程Getting Started with Entity Framework 6 Code First using MVC 5 系列的翻译,里是第五篇:MVC程序中实体框架的Code First迁移和部署
原文: Code First Migrations and Deployment with the Entity Framework in an ASP.NET MVC Application
到目前为止,应用程序已经可以在您本地机器上正常地运行。但如果您想将它发布在互联网上以便更多的人来使用,您需要将程序部署到WEB服务器。在本教程中你会将Contoso大学应用程序部署到Windows Azure网站的云中。
本教程包含以下章节:
- 启用Code First迁移。迁移功能能够使您不必删除并重新创建数据库的数据架构而进行更改数据模型并部署你的更改到生产环境下。
- 将应用程序部署到Windows Azure。该步骤是可选的,你可以跳过本步骤继续剩余的教程。
我们建议使用源代码管理的持续集成过程部署,但本教程并不包含那些主题。更多的信息请参见 source control 和 Building Real-World Cloud Apps with Windows Azure 。
启用Code First迁移
当你进行新应用程序的开发时,你的数据模型会频繁地变动。并且随着每一次变动都会使数据模型与数据库脱节。你已经成功配置了实体框架让其在每一次你变更数据模型时自动删除并重新创建数据库。当您添加、删除或更改实体类或者更改你的DbContext类时,重新运行应用程序会使它自动删除已经存在的数据库并创建一个和当前数据模型相匹配的数据库。并且填充测试数据。
这种方法在保持数据模型和数据库架构同步方面做得非常好,直到你准备将应用程序部署到生产环境。当应用程序开始生产并存储生产数据,你当然不想因为数据模型的变更而丢失成产数据(比如添加一个新列)。 Code First Migrations 功能解决了这个问题。通过启用Code First迁移来更新数据库架构,而不是删除和重建数据库。在本教程中,您会部署该应用程序,并准备启用迁移。
禁用之前教程中你在Web.Config中设定的初始设定项。
<entityFramework>
  <!--<contexts>
    <context type="ContosoUniversity.DAL.SchoolContext, ContosoUniversity">
      <databaseInitializer type="ContosoUniversity.DAL.SchoolInitializer, ContosoUniversity" />
    </context>
  </contexts>-->
  <defaultConnectionFactory type="System.Data.Entity.Infrastructure.LocalDbConnectionFactory, EntityFramework">
    <parameters>
      <parameter value="v11.0" />
    </parameters>
  </defaultConnectionFactory>
  <providers>
    <provider invariantName="System.Data.SqlClient" type="System.Data.Entity.SqlServer.SqlProviderServices, EntityFramework.SqlServer" />
  </providers>
</entityFramework>
同样在Web.config中,更改数据库连接字符串的名为成ContosoUniversity2。
<connectionStrings>
  <add name="SchoolContext" connectionString="Data Source=(LocalDb)\v11.0;Initial Catalog=ContosoUniversity2;Integrated Security=SSPI;" providerName="System.Data.SqlClient" />
</connectionStrings>
此更改设置该项目的第一次迁移将创建一个新的数据库,这不是必须的,但您稍后将看到为这么这样做是一个不错的主意。
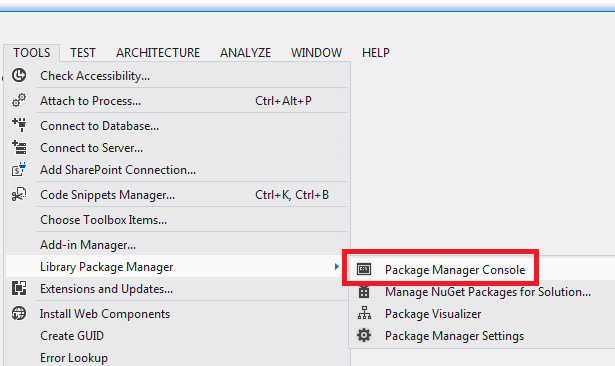
从工具菜单上,单击NuGet程序包管理器,单击程序包管理器控制台。
在控制台中输入以下命令:
enable-migrations
add-migration InitialCreate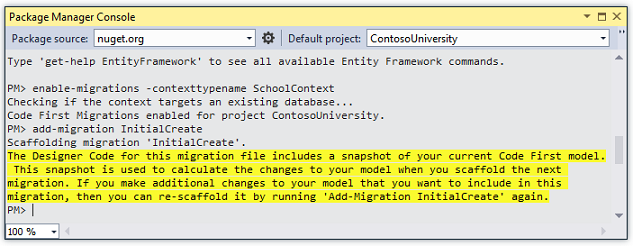
enable-migrations命令将在项目中创建一个迁移文件夹。同时文件夹中包含一个Configuration.cs文件,你可以编辑该文件来配置迁移。 如果你在上一步中没有更改数据库名称,迁移将找到现有的数据库并自动执行add-migration命令,这没有关系。它只是意味着你不会在部署数据库之前运行迁移代码的测试。之后当您运行update-database将不会做任何改变因为数据库已经存在。

如同之前教程中,Configuration类中同样包含Seed方法。
internal sealed class Configuration : DbMigrationsConfiguration<ContosoUniversity.DAL.SchoolContext>
{
    public Configuration()
    {
        AutomaticMigrationsEnabled = false;
    }

    protected override void Seed(ContosoUniversity.DAL.SchoolContext context)
    {
        //  This method will be called after migrating to the latest version.

        //  You can use the DbSet<T>.AddOrUpdate() helper extension method
        //  to avoid creating duplicate seed data. E.g.
        //
        //    context.People.AddOrUpdate(
        //      p => p.FullName,
        //      new Person { FullName = "Andrew Peters" },
        //      new Person { FullName = "Brice Lambson" },
        //      new Person { FullName = "Rowan Miller" }
        //    );
        //
    }
}
Seed方法的目的是使您在Code First创建或更新数据库后插入或更新测试数据。当数据库每次创建和更新数据库架构时将调用该方法。
设置Seed方法
当您每次更改数据模型后,删除和重新创建数据库时你可以使用初始类的Seed方法来插入测试数据。因为每次模型更改数据库后,数据库将被删除,所有的测试数据都将丢失。在Code First前一种,测试数据在数据库更改后是保留的。所以在Seed方法中包含测试数据通常不是必要的。事实上,你并不想要在使用迁移部署数据库到生产环境时让Seed方法来插入测试数据,因为Seed方法会在生产环境中调用。在这种情况下,只有真正需要时,才使用Seed方法来在生产环境中插入数据。例如你可能想要在部署到生产环境时在Deparment表中包含实际部门的名称。
对于本教程,您将使用迁移来部署。但为了让你能够跟容易地看到程序功能是如何无需人工操作而插入数据的,我们将使用Seed方法来插入测试数据。
使用下面的代码替换Configuration.cs文件的内容:
namespace ContosoUniversity.Migrations
{
    using ContosoUniversity.Models;
    using System;
    using System.Collections.Generic;
    using System.Data.Entity;
    using System.Data.Entity.Migrations;
    using System.Linq;

    internal sealed class Configuration : DbMigrationsConfiguration<ContosoUniversity.DAL.SchoolContext>
    {
        public Configuration()
        {
            AutomaticMigrationsEnabled = false;
        }

        protected override void Seed(ContosoUniversity.DAL.SchoolContext context)
        {
            var students = new List<Student>
            {
                new Student { FirstMidName = "Carson",   LastName = "Alexander",
                    EnrollmentDate = DateTime.Parse("2010-09-01") },
                new Student { FirstMidName = "Meredith", LastName = "Alonso",
                    EnrollmentDate = DateTime.Parse("2012-09-01") },
                new Student { FirstMidName = "Arturo",   LastName = "Anand",
                    EnrollmentDate = DateTime.Parse("2013-09-01") },
                new Student { FirstMidName = "Gytis",    LastName = "Barzdukas",
                    EnrollmentDate = DateTime.Parse("2012-09-01") },
                new Student { FirstMidName = "Yan",      LastName = "Li",
                    EnrollmentDate = DateTime.Parse("2012-09-01") },
                new Student { FirstMidName = "Peggy",    LastName = "Justice",
                    EnrollmentDate = DateTime.Parse("2011-09-01") },
                new Student { FirstMidName = "Laura",    LastName = "Norman",
                    EnrollmentDate = DateTime.Parse("2013-09-01") },
                new Student { FirstMidName = "Nino",     LastName = "Olivetto",
                    EnrollmentDate = DateTime.Parse("2005-08-11") }
            };
            students.ForEach(s => context.Students.AddOrUpdate(p => p.LastName, s));
            context.SaveChanges();

            var courses = new List<Course>
            {
                new Course {CourseID = 1050, Title = "Chemistry",      Credits = 3, },
                new Course {CourseID = 4022, Title = "Microeconomics", Credits = 3, },
                new Course {CourseID = 4041, Title = "Macroeconomics", Credits = 3, },
                new Course {CourseID = 1045, Title = "Calculus",       Credits = 4, },
                new Course {CourseID = 3141, Title = "Trigonometry",   Credits = 4, },
                new Course {CourseID = 2021, Title = "Composition",    Credits = 3, },
                new Course {CourseID = 2042, Title = "Literature",     Credits = 4, }
            };
            courses.ForEach(s => context.Courses.AddOrUpdate(p => p.Title, s));
            context.SaveChanges();

            var enrollments = new List<Enrollment>
            {
                new Enrollment {
                    StudentID = students.Single(s => s.LastName == "Alexander").ID,
                    CourseID = courses.Single(c => c.Title == "Chemistry" ).CourseID,
                    Grade = Grade.A
                },
                 new Enrollment {
                    StudentID = students.Single(s => s.LastName == "Alexander").ID,
                    CourseID = courses.Single(c => c.Title == "Microeconomics" ).CourseID,
                    Grade = Grade.C
                 },
                 new Enrollment {
                    StudentID = students.Single(s => s.LastName == "Alexander").ID,
                    CourseID = courses.Single(c => c.Title == "Macroeconomics" ).CourseID,
                    Grade = Grade.B
                 },
                 new Enrollment {
                     StudentID = students.Single(s => s.LastName == "Alonso").ID,
                    CourseID = courses.Single(c => c.Title == "Calculus" ).CourseID,
                    Grade = Grade.B
                 },
                 new Enrollment {
                     StudentID = students.Single(s => s.LastName == "Alonso").ID,
                    CourseID = courses.Single(c => c.Title == "Trigonometry" ).CourseID,
                    Grade = Grade.B
                 },
                 new Enrollment {
                    StudentID = students.Single(s => s.LastName == "Alonso").ID,
                    CourseID = courses.Single(c => c.Title == "Composition" ).CourseID,
                    Grade = Grade.B
                 },
                 new Enrollment {
                    StudentID = students.Single(s => s.LastName == "Anand").ID,
                    CourseID = courses.Single(c => c.Title == "Chemistry" ).CourseID
                 },
                 new Enrollment {
                    StudentID = students.Single(s => s.LastName == "Anand").ID,
                    CourseID = courses.Single(c => c.Title == "Microeconomics").CourseID,
                    Grade = Grade.B
                 },
                new Enrollment {
                    StudentID = students.Single(s => s.LastName == "Barzdukas").ID,
                    CourseID = courses.Single(c => c.Title == "Chemistry").CourseID,
                    Grade = Grade.B
                 },
                 new Enrollment {
                    StudentID = students.Single(s => s.LastName == "Li").ID,
                    CourseID = courses.Single(c => c.Title == "Composition").CourseID,
                    Grade = Grade.B
                 },
                 new Enrollment {
                    StudentID = students.Single(s => s.LastName == "Justice").ID,
                    CourseID = courses.Single(c => c.Title == "Literature").CourseID,
                    Grade = Grade.B
                 }
            };

            foreach (Enrollment e in enrollments)
            {
                var enrollmentInDataBase = context.Enrollments.Where(
                    s =>
                         s.Student.ID == e.StudentID &&
                         s.Course.CourseID == e.CourseID).SingleOrDefault();
                if (enrollmentInDataBase == null)
                {
                    context.Enrollments.Add(e);
                }
            }
            context.SaveChanges();
        }
    }
}
Seed方法使用数据库上下文对象作为输入参数,并在代码中使用该对象来添加新实体到数据库。对于每个实体类型,代码创建一个新实体的集合并将它们添加到适当的DbSet属性,然后将更改保存到数据库。在每组实体后立刻调用SaveChanges方法并不是必须的,但这样做可以在出现问题时让你更容易地定位问题的根源。
大多数插入对象的语句是使用AddOrUpdate方法来执行”upsert”操作。因为你每次执行更新数据库命令时Seed方法都会运行,通常在每个迁移后你不能只是插入数据。因为您试图添加的行有可能在创建数据库后的第一次迁移中已经存在。”upsert”操作可以防止你试图添加一个已经存在的行,但是它会重写你在测试阶段对数据进行的修改。你或许不希望这种情况在某些数据表中发生:在某些情况下你可能希望保留你在测试阶段对测试数据所进行的更改。在这种情况下,你需要做一个条件插入操作:仅当它不存在时插入行。Seed方法同时使用以上两种方法。
第一个传递给AddOrUpdate方法的参数,一个指定的属性是用来检查否行已经存在。对于您提供的测试学生数据,LastName属性可以被用作检查在每个列表中实体是否是唯一的。
context.Students.AddOrUpdate(p => p.LastName, s)此代码假定LastName是唯一的。如果您手动添加具有重复LastName的学生,你就会得到一个“序列包含多个元素”的异常。 有关如何处理容易数据,请参阅 Seeding and Debugging Entity Framework (EF) DBs 。有关AddOrUpdate方法的更多信息,请参阅 Take care with EF 4.3 AddOrUpdate Method 。 创建Enrollment实体的代码假定你在学生集合中的实体已经拥有ID值,虽然你没有在创建集合的代码中设置该值。
new Enrollment {
    StudentID = students.Single(s => s.LastName == "Alexander").ID,
    CourseID = courses.Single(c => c.Title == "Chemistry" ).CourseID,
    Grade = Grade.A
},
你在这里可以使用ID值,因为当你为学生集合调用SaveChanges方法时,ID值被设置。当实体被插入到数据库时,实体框架会自动获取该实体的主键值并且更新内存中实体上的ID属性。 添加每个Enrollment实体到Enrollments实体集合的代码不会使用AddOrUpdate方法,它会检查每一个实体是否存在,如果不存在,则插入该实体。这种方法将保留通过使用应用程序UI对成绩所做的修改。代码遍历Enrollment列表中的每个成员。如果在数据库中没有该成员,就向数据库中添加它。当你第一次更新数据库时,该数据库是空的,所以集合中的每个enrollment实体都将被添加。
foreach (Enrollment e in enrollments)
{
    var enrollmentInDataBase = context.Enrollments.Where(
        s => s.Student.ID == e.Student.ID &&
             s.Course.CourseID == e.Course.CourseID).SingleOrDefault();
    if (enrollmentInDataBase == null)
    {
        context.Enrollments.Add(e);
    }
}
生成项目。
执行第一次迁移
当您执行add-migration命令时,迁移将生成代码用来创建数据库。该代码同样在Migrations文件夹中,在文件名为<时间戳>_InitalCreate.cs的文件中。该类中的Up方法将按照数据模型实体集来创建数据库表格,Down方法用来删除它们。
public partial class InitialCreate : DbMigration
{
    public override void Up()
    {
        CreateTable(
            "dbo.Course",
            c => new
                {
                    CourseID = c.Int(nullable: false),
                    Title = c.String(),
                    Credits = c.Int(nullable: false),
                })
            .PrimaryKey(t => t.CourseID);

        CreateTable(
            "dbo.Enrollment",
            c => new
                {
                    EnrollmentID = c.Int(nullable: false, identity: true),
                    CourseID = c.Int(nullable: false),
                    StudentID = c.Int(nullable: false),
                    Grade = c.Int(),
                })
            .PrimaryKey(t => t.EnrollmentID)
            .ForeignKey("dbo.Course", t => t.CourseID, cascadeDelete: true)
            .ForeignKey("dbo.Student", t => t.StudentID, cascadeDelete: true)
            .Index(t => t.CourseID)
            .Index(t => t.StudentID);

        CreateTable(
            "dbo.Student",
            c => new
                {
                    ID = c.Int(nullable: false, identity: true),
                    LastName = c.String(),
                    FirstMidName = c.String(),
                    EnrollmentDate = c.DateTime(nullable: false),
                })
            .PrimaryKey(t => t.ID);

    }

    public override void Down()
    {
        DropForeignKey("dbo.Enrollment", "StudentID", "dbo.Student");
        DropForeignKey("dbo.Enrollment", "CourseID", "dbo.Course");
        DropIndex("dbo.Enrollment", new[] { "StudentID" });
        DropIndex("dbo.Enrollment", new[] { "CourseID" });
        DropTable("dbo.Student");
        DropTable("dbo.Enrollment");
        DropTable("dbo.Course");
    }
}
迁移调用Up方法来实现数据模型所做的更改。当你输入一个命令回滚更新,迁移将调用Down方法。
这是您输入add-migration InitialCreate命令时创建的初始迁移。参数(在该示例中是InitialCreate)用于文件的名称,当然也可以是任意你想要的其他名称。通常你会选择一个单词或短语来总结迁移中所做的改变。例如您可以能会命名之后的迁移为”AddDeparmentTable”。
如果你创建了一个在数据库已经存在的情况下的迁移,则生成的的数据库创建代码不会运行。因为数据库已经和数据模型匹配。将应用程序部署到另一个尚未创建数据库的环境时,代码才会运行以创建数据库。所以最好是提前测试一下。这就是为什么之前你更改了连接字符串中数据库的名称,以便迁移可以从零开始创建一个新的数据库。
在程序包管理器控制台中,输入以下命令:
update-database
update-database命令运行Up方法来创建数据库,然后运行Seed方法来填充数据库。同样的过程会在将程序部署到生产环境下发生,您将会在下一节看到。使用服务器资管管理器来检查数据库,验证里面的数据和程序同之前一样运行正常。
部署到Windows Azure
因为咱没有Windows Azure的试用账号,所以这部分翻译就跳过了……反正也不影响学习的。
总结
在本节中你看到了如何使用Code First迁移,在下一节中你会开始进入高级主题,扩展数据模型。
作者信息
Tom Dykstra- Tom Dykstra 是微软Web平台及工具团队的高级程序员,作家。
