整体流程
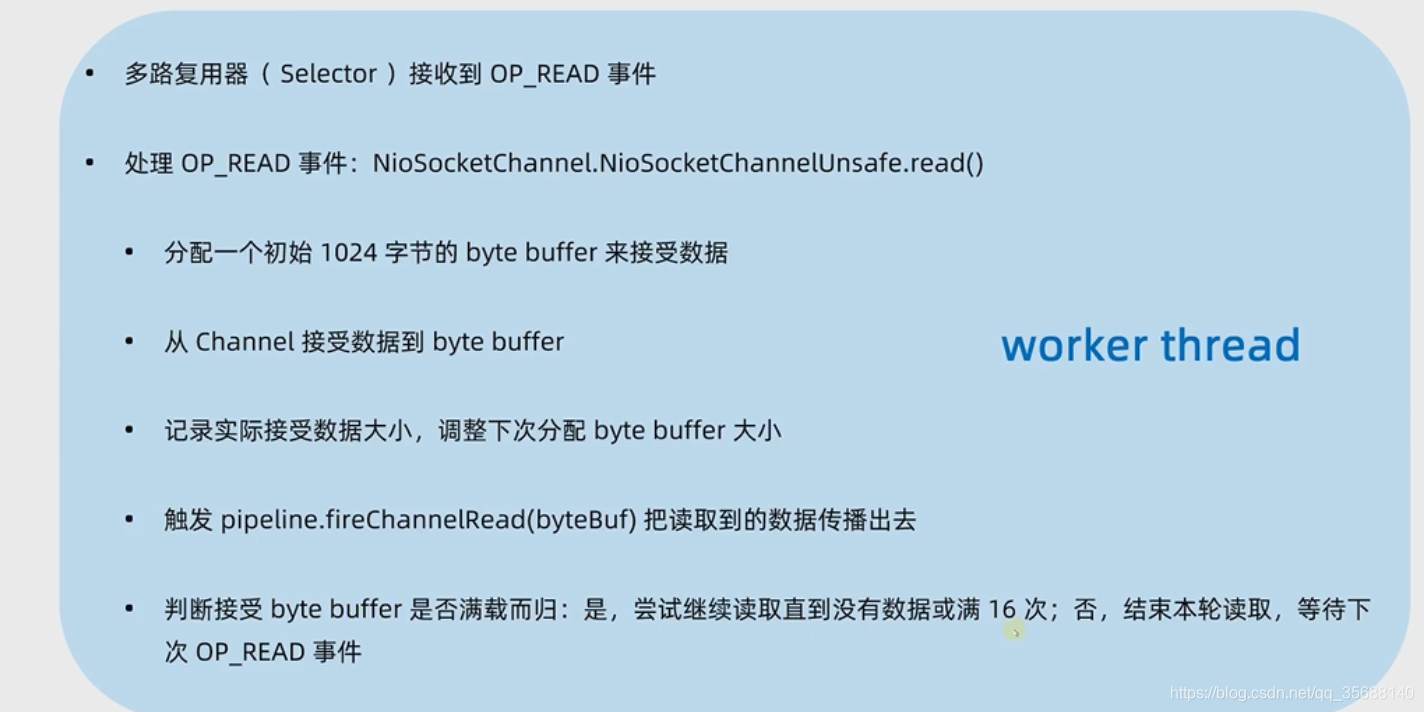
也是在EvenetLoop的run方法中select到了read事件,开始处理read事件。
进入AbstractNioByteChannel类,调用其中的read方法
		@Override
        public final void read() {
            final ChannelConfig config = config();
            if (shouldBreakReadReady(config)) {
                clearReadPending();
                return;
            }
            final ChannelPipeline pipeline = pipeline();
            // 内存分配器
            final ByteBufAllocator allocator = config.getAllocator();
            // 接收数据测handler
            final RecvByteBufAllocator.Handle allocHandle = recvBufAllocHandle();
            allocHandle.reset(config);

            ByteBuf byteBuf = null;
            boolean close = false;
            try {
                do {
                    // 分配内存
                    byteBuf = allocHandle.allocate(allocator);
                    // 开始读取数据
                    allocHandle.lastBytesRead(doReadBytes(byteBuf));
                    if (allocHandle.lastBytesRead() <= 0) {// 读取失败
                        // nothing was read. release the buffer.
                        byteBuf.release();
                        byteBuf = null;
                        close = allocHandle.lastBytesRead() < 0;
                        if (close) {
                            // There is nothing left to read as we received an EOF.
                            readPending = false;
                        }
                        break;
                    }

                    allocHandle.incMessagesRead(1);//读取一次数据
                    readPending = false;
                    pipeline.fireChannelRead(byteBuf);// 将读到的数据传递出去
                    byteBuf = null;
                } while (allocHandle.continueReading());//继续读取

                // 通过当前
                allocHandle.readComplete();//计算下一次的需要分配的空间
                pipeline.fireChannelReadComplete();// 将完成读取的事件传递出去

                if (close) {
                    closeOnRead(pipeline);
                }
            } catch (Throwable t) {
                handleReadException(pipeline, byteBuf, t, close, allocHandle);
            } finally {
                // Check if there is a readPending which was not processed yet.
                // This could be for two reasons:
                // * The user called Channel.read() or ChannelHandlerContext.read() in channelRead(...) method
                // * The user called Channel.read() or ChannelHandlerContext.read() in channelReadComplete(...) method
                //
                // See https://github.com/netty/netty/issues/2254
                if (!readPending && !config.isAutoRead()) {
                    removeReadOp();
                }
            }
        }
1. 跟进allocHandle.allocate(allocator)
分配内存时用的是下面两个方法,第一次read会guess方法猜测需要分配的容量的大小,默认是64*1024
		@Override
        public ByteBuf allocate(ByteBufAllocator alloc) {
            // guess猜测我们需要分配的内存大小
            return alloc.ioBuffer(guess());
        }

        @Override
        public int guess() {
            return Math.min(individualReadMax, bytesToRead);// 这两个值默认都是64*1024
        }
2. 跟进doReadBytes(byteBuf)
NioSocketChannel的doReadBytes方法,调用AbstractByteBuf的writeBytes方法。
	@Override
    public int writeBytes(ScatteringByteChannel in, int length) throws IOException {
        // 确认可以读取的数据长度
        ensureWritable(length);
        // 读取数据
        int writtenBytes = setBytes(writerIndex, in, length);
        if (writtenBytes > 0) {
            writerIndex += writtenBytes;
        }
        return writtenBytes;
    }
跟进setBytes方法,进入其中一个具体实现类UnpooledDirectByteBuf的setBytes方法
	@Override
    public int setBytes(int index, ScatteringByteChannel in, int length) throws IOException {
        ensureAccessible();
        ByteBuffer tmpBuf = internalNioBuffer();
        // 设置tmpBuf的position和limit
        tmpBuf.clear().position(index).limit(index + length);
        try {
            // 读取channel中的数据到tmpBuf
            return in.read(tmpBuf);//这是jdk的源码
        } catch (ClosedChannelException ignored) {
            return -1;
        }
    }
总结:
1.分配内存是自适应的
2.读取流采用的任然是jdk的channel.red()去读取

